Visual Studio Code releases new updates every month with new features and bug fixes, and the June 2024 release is now available.
Version 1.91 includes:
Python is an interpreted high-level programming language for general-purpose programming. Created by Guido van Rossum and first released in 1991, Python has a design philosophy that emphasizes code readability, notably using significant whitespace
Visual Studio Code releases new updates every month with new features and bug fixes, and the June 2024 release is now available.
Version 1.91 includes:
.png)
Hi Developers!
This is the second post on the resources for Developers. This part is about Open Exchange
Using Open Exchange to Learn InterSystems
InterSystems Open Exchange is a applications gallery of tools, connectors, and libraries which InterSystems Developers submit to share the experience, approaches and do business. All the applications are either built with InterSystems data platforms or are intended to use for development with InterSystems data platforms.
If you are a beginner developer you can take a look at applications in Technology Example category. All the applications in this category come with open source code repositories, so you are able to run the samples and examples in a docker container with IRIS on your laptop or in the cloud IRIS sandbox. Examples:


Hello everyone,
Recently, I've been working on a Business Process that processes a large JSON FHIR message containing up to 50k requests in an array within the JSON.
Currently, the code imports the JSON as a dynamic object from the original message stream, obtains an iterator from it, and processes each request one at a time in a loop.
In InterSystems IRIS versions >=2021.2 we can use the accompanying irispython binary to directly write python code on top of our IRIS instances. This lets us use python packages, call methods, make SQL queries, and do nearly anything in Objectscript but pythonic.
For example, below I check if a namespace is present:
#!/usr/irissys/bin/irispython
import iris
# call arbitrary class methods
result = iris.cls('%SYS.Namespace').Exists('USER')
if result == 1:
    print(f"Namespace USER is present")
But, what if my method in IRIS has special parameters such as
OutputandByRefparameters? How can we useOutputparameters in irispython?
For example, Ens.Director has a lot of Output parameters on it's methods, how can I use these parameters in python?
Ens.Director:GetProductionStatus
// An example method stub from Ens.Director
ClassMethod GetProductionStatus(Output pProductionName As %String, Output pState As %Integer...
At first glance, you may try the following:
import os
# Set namespace the manual way
os.environ['IRISNAMESPACE'] = 'DEMONSTRATION'

import iris

# TEST 1 with output variables
productionName, productionState = None, None
status = iris.cls('Ens.Director').GetProductionStatus(productionName, productionState)

print("Success? -- {}".format(productionState != None))
But both tests won't return the Output Variables! You can try this yourself on any Ensemble namespace
The irispython utility iris.ref can be used to capture the Output and ByRef variables.
iris.ref() object.value variable to get the result from that parameterimport os
# Set namespace the hard way
os.environ['IRISNAMESPACE'] = 'DEMONSTRATION'
import iris
# TEST 2 with output variables
productionName, productionState = iris.ref('productionName'), iris.ref('productionState')
status = iris.cls('Ens.Director').GetProductionStatus(productionName, productionState)
print("Status: {}".format(status))
# see .value
print("Production: {}".format(productionName.value))
# see .value
print("Production State: {}".format(productionState.value))

Pandas is not just a popular software library. It is a cornerstone in the Python data analysis landscape. Renowned for its simplicity and power, it offers a variety of data structures and functions that are instrumental in transforming the complexity of data preparation and analysis into a more manageable form. It is particularly relevant in such specialized environments as ObjectScript for Key Performance Indicators (KPIs) and reporting, especially within the framework of the InterSystems IRIS platform, a leading data management and analysis solution. In the realm of data handling and
Hi,
I am using Windows 10 and I cannot find an installation source for the irisnative python library. I tried to install the wheel file provided by intersystems on github (https://github.com/intersystems/quickstarts-python/).
c:\wc\quickstarts-python\Solutions\nativeAPI_wheel>pip install irisnative-1.0.0-cp34.cp35.cp36.cp37.cp38.cp39-none-win_amd64.whl
ERROR: irisnative-1.0.0-cp34.cp35.cp36.cp37.cp38.cp39-none-win_amd64.whl is not a supported wheel on this platform.
Is irisnative supported on Windows 10 ? The purpose is to execute ObjectScript command from external python code.
Kind regards,
Hi,
In my Iris Installation I cannot use python. When I try to install external libraries I get no OPENSSL_Applink:
$ pwd
/cygdrive/c/InterSystems/IRIS2/bin
$ ./irispip install --target ../Mgr/python/ pandas
OPENSSL_Uplink(00007FFBEC2F7068,08): no OPENSSL_Applink
I get the same error when I try to install a wheel file:
$ ../../bin/irispip install ./intersystems_irispython-3.2.0-py3-none-any.whl
Processing c:\intersystems\iris2\dev\python\intersystems_irispython-3.2.0-py3-none-any.whl
Installing collected packages: intersystems-irispython
Successfully installed intersystems-irispython-3.2.0
OPENSSL_Uplink(00007FFBCBE37068,08): no OPENSSL_Applink
I am using IRIS for Windows (x86-64) 2024.1 (Build 262) Thu Mar 7 2024 15:57:00 EST and I tried to install 2024.2 and it happens the same in both cases.
Any ideas, please ?
Kind regards,
Alin C Soare.
Hi,
I have over 36 years of experience developing solutions with MUMPS and Cache. Additionally, I also develop in Python and HTML.
I have no experience in Vista or PSL, but I would be very happy to have the opportunity to learn it. I'm looking for a job opportunity.
Best,
Carlos
We have a yummy dataset with recipes written by multiple Reddit users, however most of the information is free text as the title or description of a post. Let's find out how we can very easily load the dataset, extract some features and analyze it using features from OpenAI large language model within Embedded Python and the Langchain framework.
First things first, we need to load the dataset or can we just connect to it?
There are different ways you can achieve this: for instance CSV Record Mapper you can use in an interoperability production or even nice OpenExchange applications like csvgen.
We will use Foreign Tables. A very useful capability to project data physically stored elsewhere to IRIS SQL. We can use that to have a very first view of the dataset files.
We create a Foreign Server:
CREATE FOREIGN SERVER dataset FOREIGN DATA WRAPPER CSV HOST '/app/data/'
And then a Foreign Table that connects to the CSV file:
CREATE FOREIGN TABLE dataset.Recipes (
  CREATEDDATE DATE,
  NUMCOMMENTS INTEGER,
  TITLE VARCHAR,
  USERNAME VARCHAR,
  COMMENT VARCHAR,
  NUMCHAR INTEGER
) SERVER dataset FILE 'Recipes.csv' USING
{
  "from": {
    "file": {
       "skip": 1
    }
  }
}
And that's it, immediately we can run SQL queries on dataset.Recipes:

## What data do we need? The dataset is interesting and we are hungry. However if we want to decide a recipe to cook we will need some more information that we can use to analyze.
We are going to work with two persistent classes (tables):
We can now load our yummy.data* tables with the contents from the dataset:
do ##class(yummy.Utils).LoadDataset()
It looks good but still we need to find out how are going to generate data for the Score, Difficulty, Ingredients, PreparationTime and CuisineType fields.
## Analyze the recipes We want to process each recipe title and description and:
We are going to use the following:
LLM (large language models) are really a great tool to process natural language.
LangChain is ready to work in Python, so we can use it directly in InterSystems IRIS using Embedded Python.
The full SimpleOpenAI class looks like this:
/// Simple OpenAI analysis for recipes
Class yummy.analysis.SimpleOpenAI Extends Analysis
{

Property CuisineType As %String;

Property PreparationTime As %Integer;

Property Difficulty As %String;

Property Ingredients As %String;

/// Run
/// You can try this from a terminal:
/// set a = ##class(yummy.analysis.SimpleOpenAI).%New(##class(yummy.data.Recipe).%OpenId(8))
/// do a.Run()
/// zwrite a
Method Run()
{
    try {
        do ..RunPythonAnalysis()

        set reasons = ""

        // my favourite cuisine types
        if "spanish,french,portuguese,italian,korean,japanese"[..CuisineType {
            set ..Score = ..Score + 2
            set reasons = reasons_$lb("It seems to be a "_..CuisineType_" recipe!")
        }

        // don't want to spend whole day cooking :)
        if (+..PreparationTime < 120) {
            set ..Score = ..Score + 1
            set reasons = reasons_$lb("You don't need too much time to prepare it")
        }

        // bonus for fav ingredients!
        set favIngredients = $listbuild("kimchi", "truffle", "squid")
        for i=1:1:$listlength(favIngredients) {
            set favIngred = $listget(favIngredients, i)
            if ..Ingredients[favIngred {
                set ..Score = ..Score + 1
                set reasons = reasons_$lb("Favourite ingredient found: "_favIngred)
            }
        }

        set ..Reason = $listtostring(reasons, ". ")

    } catch ex {
        throw ex
    }
}

/// Update recipe with analysis results
Method UpdateRecipe()
{
    try {
        // call parent class implementation first
        do ##super()

        // add specific OpenAI analysis results
        set ..Recipe.Ingredients = ..Ingredients
        set ..Recipe.PreparationTime = ..PreparationTime
        set ..Recipe.Difficulty = ..Difficulty
        set ..Recipe.CuisineType = ..CuisineType

    } catch ex {
        throw ex
    }
}

/// Run analysis using embedded Python + Langchain
/// do ##class(yummy.analysis.SimpleOpenAI).%New(##class(yummy.data.Recipe).%OpenId(8)).RunPythonAnalysis(1)
Method RunPythonAnalysis(debug As %Boolean = 0) [ Language = python ]
{
    # load OpenAI APIKEY from env
    import os
    from dotenv import load_dotenv, find_dotenv
    _ = load_dotenv('/app/.env')

    # account for deprecation of LLM model
    import datetime
    current_date = datetime.datetime.now().date()
    # date after which the model should be set to "gpt-3.5-turbo"
    target_date = datetime.date(2024, 6, 12)
    # set the model depending on the current date
    if current_date > target_date:
        llm_model = "gpt-3.5-turbo"
    else:
        llm_model = "gpt-3.5-turbo-0301"

    from langchain.chat_models import ChatOpenAI
    from langchain.prompts import ChatPromptTemplate
    from langchain.chains import LLMChain

    from langchain.output_parsers import ResponseSchema
    from langchain.output_parsers import StructuredOutputParser

    # init llm model
    llm = ChatOpenAI(temperature=0.0, model=llm_model)

    # prepare the responses we need
    cuisine_type_schema = ResponseSchema(
        name="cuisine_type",
        description="What is the cuisine type for the recipe? \
                     Answer in 1 word max in lowercase"
    )
    preparation_time_schema = ResponseSchema(
        name="preparation_time",
        description="How much time in minutes do I need to prepare the recipe?\
                     Anwer with an integer number, or null if unknown",
        type="integer",
    )
    difficulty_schema = ResponseSchema(
        name="difficulty",
        description="How difficult is this recipe?\
                     Answer with one of these values: easy, normal, hard, very-hard"
    )
    ingredients_schema = ResponseSchema(
        name="ingredients",
        description="Give me a comma separated list of ingredients in lowercase or empty if unknown"
    )
    response_schemas = [cuisine_type_schema, preparation_time_schema, difficulty_schema, ingredients_schema]

    # get format instructions from responses
    output_parser = StructuredOutputParser.from_response_schemas(response_schemas)
    format_instructions = output_parser.get_format_instructions()

    analysis_template = """\
    Interprete and evaluate a recipe which title is: {title}
    and the description is: {description}

    {format_instructions}
    """
    prompt = ChatPromptTemplate.from_template(template=analysis_template)

    messages = prompt.format_messages(title=self.Recipe.Title, description=self.Recipe.Description, format_instructions=format_instructions)
    response = llm(messages)

    if debug:
        print("======ACTUAL PROMPT")
        print(messages[0].content)
        print("======RESPONSE")
        print(response.content)

    # populate analysis with results
    output_dict = output_parser.parse(response.content)
    self.CuisineType = output_dict['cuisine_type']
    self.Difficulty = output_dict['difficulty']
    self.Ingredients = output_dict['ingredients']
    if type(output_dict['preparation_time']) == int:
        self.PreparationTime = output_dict['preparation_time']

    return 1
}

}
The RunPythonAnalysis method is where the OpenAI stuff happens :). You can run it directly from your terminal for a given recipe:
do ##class(yummy.analysis.SimpleOpenAI).%New(##class(yummy.data.Recipe).%OpenId(12)).RunPythonAnalysis(1)
We will get an output like this:
USER>do ##class(yummy.analysis.SimpleOpenAI).%New(##class(yummy.data.Recipe).%OpenId(12)).RunPythonAnalysis(1)
======ACTUAL PROMPT
                    Interprete and evaluate a recipe which title is: Folded Sushi - Alaska Roll
                    and the description is: Craving for some sushi but don't have a sushi roller? Try this easy version instead. It's super easy yet equally delicious!
[Video Recipe](https://www.youtube.com/watch?v=1LJPS1lOHSM)
# Ingredients
Serving Size:  \~5 sandwiches
* 1 cup of sushi rice
* 3/4 cups + 2 1/2 tbsp of water
* A small piece of konbu (kelp)
* 2 tbsp of rice vinegar
* 1 tbsp of sugar
* 1 tsp of salt
* 2 avocado
* 6 imitation crab sticks
* 2 tbsp of Japanese mayo
* 1/2 lb of salmon
# Recipe
* Place 1 cup of sushi rice into a mixing bowl and wash the rice at least 2 times or until the water becomes clear. Then transfer the rice into the rice cooker and add a small piece of kelp along with 3/4 cups plus 2 1/2 tbsp of water. Cook according to your rice cookers instruction.
* Combine 2 tbsp rice vinegar, 1 tbsp sugar, and 1 tsp salt in a medium bowl. Mix until everything is well combined.
* After the rice is cooked, remove the kelp and immediately scoop all the rice into the medium bowl with the vinegar and mix it well using the rice spatula. Make sure to use the cut motion to mix the rice to avoid mashing them. After thats done, cover it with a kitchen towel and let it cool down to room temperature.
* Cut the top of 1 avocado, then slice into the center of the avocado and rotate it along your knife. Then take each half of the avocado and twist. Afterward, take the side with the pit and carefully chop into the pit and twist to remove it. Then, using your hand, remove the peel. Repeat these steps with the other avocado. Dont forget to clean up your work station to give yourself more space. Then, place each half of the avocado facing down and thinly slice them. Once theyre sliced, slowly spread them out. Once thats done, set it aside.
* Remove the wrapper from each crab stick. Then, using your hand, peel the crab sticks vertically to get strings of crab sticks. Once all the crab sticks are peeled, rotate them sideways and chop them into small pieces, then place them in a bowl along with 2 tbsp of Japanese mayo and mix until everything is well mixed.
* Place a sharp knife at an angle and thinly slice against the grain. The thickness of the cut depends on your preference. Just make sure that all the pieces are similar in thickness.
* Grab a piece of seaweed wrap. Using a kitchen scissor, start cutting at the halfway point of seaweed wrap and cut until youre a little bit past the center of the piece. Rotate the piece vertically and start building. Dip your hand in some water to help with the sushi rice. Take a handful of sushi rice and spread it around the upper left hand quadrant of the seaweed wrap. Then carefully place a couple slices of salmon on the top right quadrant. Then place a couple slices of avocado on the bottom right quadrant. And finish it off with a couple of tsp of crab salad on the bottom left quadrant. Then, fold the top right quadrant into the bottom right quadrant, then continue by folding it into the bottom left quadrant. Well finish off the folding by folding the top left quadrant onto the rest of the sandwich. Afterward, place a piece of plastic wrap on top, cut it half, add a couple pieces of ginger and wasabi, and there you have it.

                    The output should be a markdown code snippet formatted in the following schema, including the leading and trailing "```json" and "```":
json
{
        "cuisine_type": string  // What is the cuisine type for the recipe?                                  Answer in 1 word max in lowercase
        "preparation_time": integer  // How much time in minutes do I need to prepare the recipe?                                    Anwer with an integer number, or null if unknown
        "difficulty": string  // How difficult is this recipe?                               Answer with one of these values: easy, normal, hard, very-hard
        "ingredients": string  // Give me a comma separated list of ingredients in lowercase or empty if unknown
}


======RESPONSE
json
{
        "cuisine_type": "japanese",
        "preparation_time": 30,
        "difficulty": "easy",
        "ingredients": "sushi rice, water, konbu, rice vinegar, sugar, salt, avocado, imitation crab sticks, japanese mayo, salmon"
}
That looks good. It seems that our OpenAI prompt is capable of returning some useful information. Let's run the whole analysis class from the terminal:
set a = ##class(yummy.analysis.SimpleOpenAI).%New(##class(yummy.data.Recipe).%OpenId(12))
do a.Run()
zwrite a
USER>zwrite a
a=37@yummy.analysis.SimpleOpenAI  ; <OREF>
+----------------- general information ---------------
|      oref value: 37
|      class name: yummy.analysis.SimpleOpenAI
| reference count: 2
+----------------- attribute values ------------------
|        CuisineType = "japanese"
|         Difficulty = "easy"
|        Ingredients = "sushi rice, water, konbu, rice vinegar, sugar, salt, avocado, imitation crab sticks, japanese mayo, salmon"
|    PreparationTime = 30
|             Reason = "It seems to be a japanese recipe!. You don't need too much time to prepare it"
|              Score = 3
+----------------- swizzled references ---------------
|           i%Recipe = ""
|           r%Recipe = "30@yummy.data.Recipe"
+-----------------------------------------------------
## Analyzing all the recipes! Naturally, you would like to run the analysis on all the recipes we have loaded.
You can analyze a range of recipes IDs this way:
USER>do ##class(yummy.Utils).AnalyzeRange(1,10)
> Recipe 1 (1.755185s)
> Recipe 2 (2.559526s)
> Recipe 3 (1.556895s)
> Recipe 4 (1.720246s)
> Recipe 5 (1.689123s)
> Recipe 6 (2.404745s)
> Recipe 7 (1.538208s)
> Recipe 8 (1.33001s)
> Recipe 9 (1.49972s)
> Recipe 10 (1.425612s)
After that, have a look again at your recipe table and check the results
select * from yummy_data.Recipe

I think I could give a try to Acorn Squash Pizza or Korean Tofu Kimchi with Pork :). I will have to double check at home anyway :)
You can find the full example in https://github.com/isc-afuentes/recipe-inspector
With this simple example we've learned how to use LLM techniques to add features or to analyze some parts of your data in InterSystems IRIS.
With this starting point, you could think about:
What other things could you try? Let me know what you think!
DNA Similarity and Classification was developed as a REST API utilizing InterSystems Vector Search technology to investigate genetic similarities and efficiently classify DNA sequences. This is an application that utilizes artificial intelligence techniques, such as machine learning, enhanced by vector search capabilities, to classify genetic families and identify known similar DNAs from an unknown input DNA.
K-mer Analysis: Fundamentals in DNA Sequence Analysis
This article introduces using the langchain framework supported by IRIS for implementing a Q&A chatbot, focusing on Retrieval Augmented Generation (RAG). It explores how IRIS Vector Search within langchain-iris facilitates storage, retrieval, and semantic search of data, enabling precise and up-to-date responses to user queries. Through seamless integration and processes like indexing and retrieval/generation, RAG applications powered by IRIS enable the capabilities of GenAI systems for InterSystems developers.
A notebook and a complete Q&A chatbot application using the topics discussed here are provided to help readers to fix the concepts.
This article explores the langchain's Q&A chatbot example, focusing on its indexing and retrieval/generation components for building RAG applications. It details data loading, segmentation, and indexing, alongside retrieval and answer generation processes. You can find the original example here and an adaptation to use IRIS as its vector store by using Vector Search and langchain-iris here.
Note that in this article we are going to focus on explaining the concepts used by implementing the Q&A chatbot. So, you should to refer to those sources in order to get the full source code.
RAG, or Retrieval Augmented Generation, stands as a technique for enriching the knowledge base of Language Model (LLM) systems by integrating supplementary data beyond their initial training set. While LLMs possess the ability to reason across diverse topics, they are confined to the public data they were trained on up to a particular cutoff date. To empower AI applications to process private or more recent data effectively, RAG supplements the model's knowledge with specific information as required. This is an alternative way to fine tuning LLMs, which could be expensive.
Within the realm of Q&A chatbots, RAG plays a pivotal role in handling unstructured data queries, comprising two key components: indexing and retrieval/generation.
Indexing commences with the ingestion of data from a source, followed by its segmentation into smaller, more manageable chunks for efficient processing. These segmented chunks are then stored and indexed, often utilizing embeddings models and vector databases, ensuring swift and accurate retrieval during runtime.
During retrieval and generation, upon receiving a user query, the system generates an embedding vector using the same embedding model used in the indexing phase, and then retrieves pertinent data chunks from the index utilizing a retriever component. These retrieved segments are then passed to the LLM for answer generation.
Thus, RAG empowers Q&A chatbots to access and leverage both structured and unstructured data sources, thereby enhancing their capability to furnish precise and up-to-date responses to user queries through the utilization of embeddings models and vector databases as an alternative to LLM fine tuning.
InterSystems IRIS Vector Search is a new feature which enables semantic search and generative AI capabilities within databases. It allows users to query data based on its meaning rather than its raw content, leveraging retrieval-augmented generation (RAG) architecture. This technology transforms unstructured data, like text, into structured vectors, facilitating efficient processing and response generation.
The platform supports the storage of vectors in a compressed and performant VECTOR type within relational schemas, allowing for seamless integration with existing data structures. Vectors represent the semantic meaning of language through embeddings, with similar meanings reflected by proximity in a high-dimensional geometric space.
By comparing input vectors with stored vectors using operations like dot product, users can algorithmically determine semantic similarity, making it ideal for tasks like information retrieval. IRIS also offers efficient storage and manipulation of vectors through dedicated VECTOR types, enhancing performance for operations on large datasets.
To utilize this capability, text must be transformed into embeddings through a series of steps involving text preprocessing and model instantiation. InterSystems IRIS supports seamless integration of Python code for embedding generation alongside ObjectScript for database interaction, enabling smooth implementation of vector-based applications.
You can check out the Vector Search documentation and usage examples here.
In short, langchain-iris is the way to use IRIS Vector Search with the langchain framework.
InterSystems IRIS Vector Search aligns closely with langchain's vector store requirements. IRIS stores and retrieves embedded data, crucial for similarity searches. With its VECTOR type, IRIS supports storing embeddings, enabling semantic search over unstructured data and facilitating seamless document processing into the vector store.
By leveraging operations like dot product comparisons, IRIS facilitates algorithmic determination of semantic similarity, ideal for langchain's similarity search.
Thus, langchain-iris allows the development of RAG applications with langchain framework supported by InterSystems IRIS data platform. For more information on langchain-iris, check out here.
In order to use IRIS as the vector storage to RAG application using langchain, you must first import langchain-iris, like this:
pip install langchain-iris
After that, you can use the method from_documents() from IRISVector class, like this:
db = IRISVector.from_documents(
    embedding=embeddings,
    documents=docs,
    collection_name=COLLECTION_NAME,
    connection_string=CONNECTION_STRING,
)
Where:
embeddings is a langchain.embeddings instance of some embedding model - like OpenAI or Hugging Faces, for instance.documents is an array of strings that will be applied to the embedding model and the resulting vectors stored in IRIS. Generally, the document should be splitted due size limitations of embedding models and better managing of it; the langchain framework provides several splitters.collection_name is the table name where the documents (or its fragments) and its embedding vectors will be stored.connections_string is a DBAPI connection string to IRIS, in this format: iris://<username>:<password>@<hostname>:<iris_port>/<namespace>Check out the complete code of the hello world example in langchain-iris repo.
Here, we are going to focus on how to use IRIS as langchain’s vector store through langchain-iris and how it works. To get a better understanding, please first refer to the langchain Q&A chatbot example, which provides a great explanation on each section of its code.
As you can see in the original example, the Chroma vector database is used, by its langchain’s vector store implementation:
from langchain_chroma import Chroma
…
vectorstore = Chroma.from_documents(documents=splits, embedding=OpenAIEmbeddings())
So, in order to use IRIS instead, just change the Chroma vector store by langchain-iris:
vectorstore = IRISVector.from_documents(
    embedding=OpenAIEmbeddings(),
    documents=splits,
    collection_name="chatbot_docs",
    connection_string=iris://_SYSTEM:SYS@localhost:1972/USER',
)
Now, you are all set to use IRIS in the langchain’s Q&A chatbot example. You can check out the whole example source code in this notebook.
After running the example, a table is created in the SQLUser schema (IRIS default schema) by langchain-iris. Note that its name came from the collection name set in langchain-iris:
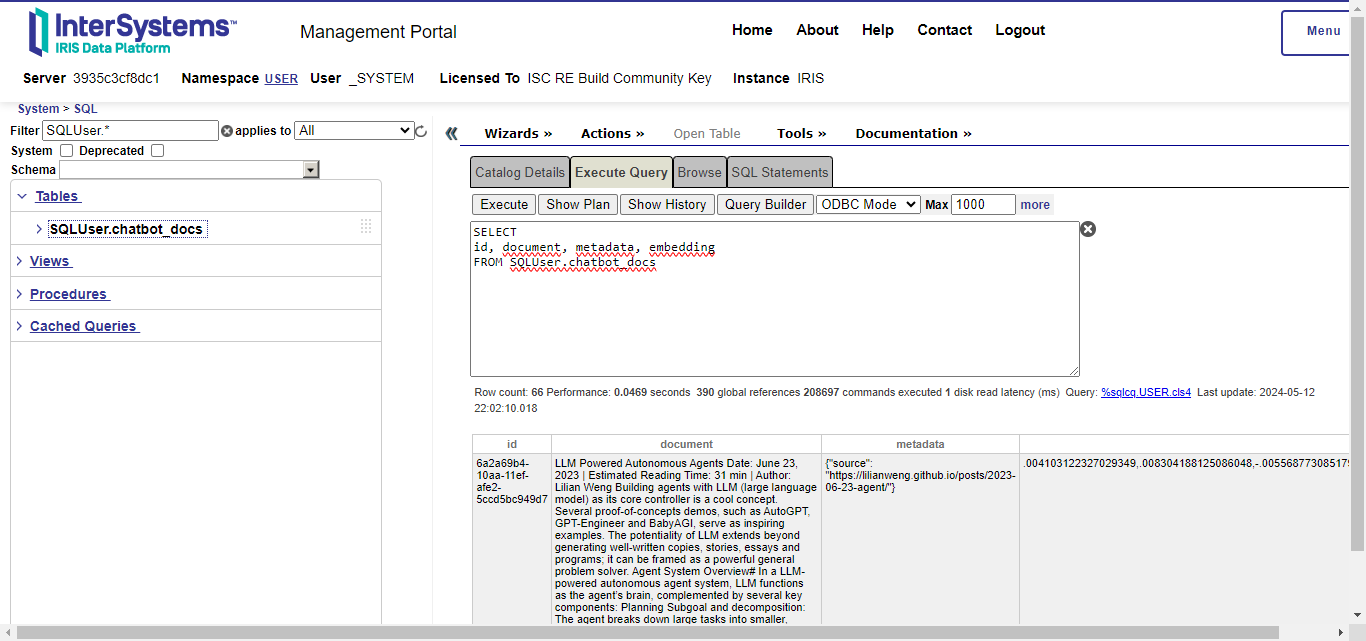
You can also note four columns:
id: the document ID.document: the document or a fragment of it, if a text splitter was used.metadata: a JSON object containing information about the document.embedding: the embedding vector which represents the document in a high vectorial space; this is the VECTOR type of IRIS Vector Search.This is the indexing step, i.e, when langchain applies the embedding model to each document splitted fragment and stores its vector in IRIS with the fragment itself and a metadata.
As said before, langchaing provides splitters to break documents into fragments that fit the limits of embedding models and for enhance the retrieval process. Also we saw that those fragments and its corresponding embedding vectors are stored into a table in IRIS by langchain-iris. Now, in order to implement a RAG application, it’s necessary to query for most relevant documents stored into IRIS, given a query string. This is done by implementation of langchain retrievers.
You can create a retriever for documents stored in IRIS like this:
retriever = vectorstore.as_retriever()
With this retriever, you can query for most similar documents given a natural language query. The langchain framework will use the same embedding model used in the indexing step to extract a vector from the query. This way, document fragments with similar semantic content to the query could be retrieved.
For illustration, let’s use the langchain example, which indexes a web page with information about LLM agents. This page explaing several concepts, like task decomposition. Let's check out what the retriever returns given a query like “What are the approaches to Task Decomposition?":
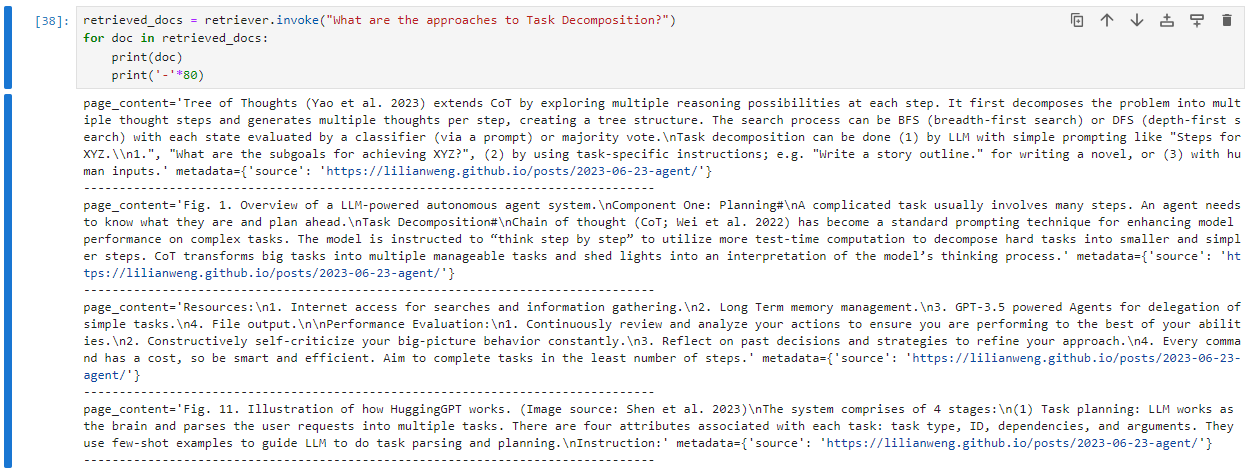
Now, let's do the same query - semantically speaking but syntactically different, i.e., using different words with similar meaning and see what the Vector Search engine returns:

You can note that the results are practically the same, even with passing different query strings. This means that the embedding vectors are somehow abstracting the semantics in documents and query strings.
To get more evidences of such a semantic query capability, let's now keeping ask about task decomposition, but this time, asking for its downsides:
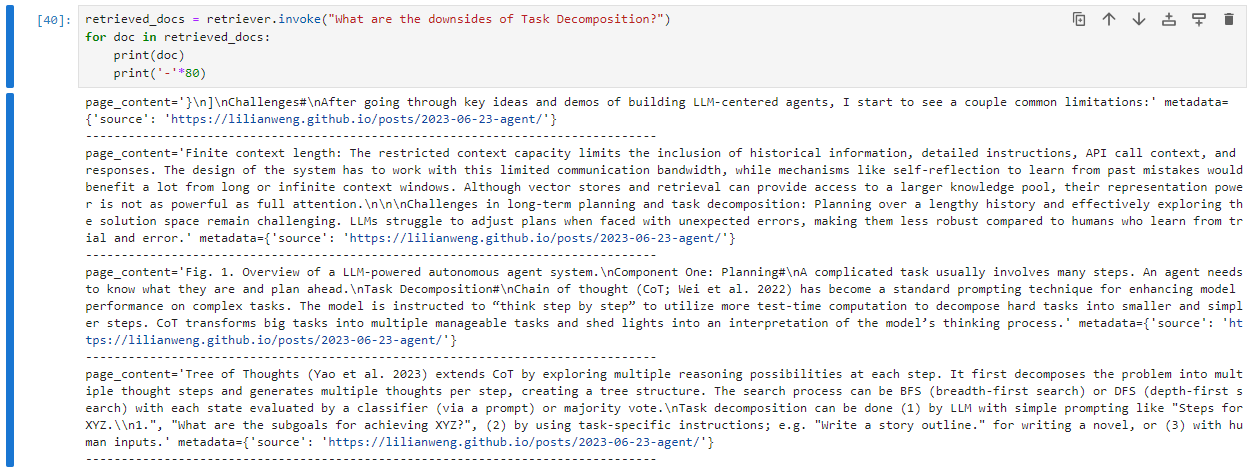
Note that this time the most relevant results are different from the previous one. Furthermore, the first results haven't the word ‘downside’, but related words like ‘challenges’, ‘limitation’ and ‘restricted’.
This reinforces the capability of semantic search of embedding vectors in vector databases.
After the retrieval step, the most relevant documents are appended as context information to the user query that will be sent to the LLM process. For instance (adapted from this page):
from langchain import hub

prompt = hub.pull("rlm/rag-prompt")

user_query = "What are the approaches to Task Decomposition?"
retrieved_docs = [doc.page_content for doc in retriever.invoke(user_query)]

example_messages = prompt.invoke(
    {"context": "filler context", "question": user_query}
).to_messages()
print(example_messages[0].content)
This code will generate a prompt like this, which you can see the retrieved documents being used as context to the LLM align its response:
"""
You are an assistant for question-answering tasks. Use the following pieces of retrieved context to answer the question. If you don't know the answer, just say that you don't know. Use three sentences maximum and keep the answer concise.
Question: What are the approaches to Task Decomposition?
Context: Tree of Thoughts (Yao et al. 2023) extends CoT by exploring multiple ... (truncated in the sake of brevity)
Answer:
"""
So, the RAG application can enhance its accuracy while respecting the size limits of LLM prompt.
In conclusion, the integration of IRIS Vector Search with the langchain framework opens new horizons for the development of Q&A chatbots and other applications reliant on semantic search and generative AI for InterSystems developers community.
The seamless integration of IRIS as the vector store through langchain-iris simplifies the implementation process, offering developers a robust and efficient solution for managing and querying large datasets of structured and unstructured information.
Through indexing, retrieval, and generation processes, RAG applications powered by IRIS Vector Search can effectively leverage both public and private data sources, enriching the capabilities of AI systems based on LLMs and providing users with more comprehensive and up-to-date responses.
To finalize, if you want to get more deep and see a complete application implementing these concepts along side other features like interoperability and business hosts to communicate with external APIs like OpenAI and Telegram, check out our application iris-medicopilot. We are planning to cover such an application in more detail in a next article.
See you!
Hi, I need to use some pythonic library from cos.
To use them I need a python dict with some python object in it
Ex in python:
obj = pythonObject("value1")
dict = {object : obj  ,key : "value2"}
result = pythonFunc(dict)Hello,
I would like you to propose this challenge.
It has been created by the CodeWars community here: https://www.codewars.com/kata/6523a71df7666800170a1954/python
I will copy and paste the description:
A number is Esthetic if, in any base from base2 up to base10, the absolute difference between every pair of its adjacent digits is constantly equal to 1.
Principle: After dividing the article uploaded by the user into sentences using Python, the embedded value is obtained and stored in the Iris database. Then, the similarity between sentences is compared through Iris vector search, and finally displayed on the front-end page.
Hi Developers,
Join us at the upcoming Developer Roundtable on April 25th at 9 am ET | 3 pm CET. 📍
We will have 2 topics covered by the invited experts and open discussion as always.
Tech Talks:
➡ Practical Usage of Embedded Python - by Stefan Wittmann Product Manager, InterSystems
▶ Recording:
BPL stands for Business Process Language.
This is an XML format for describing complex information orchestration interactions between systems.
InterSystems Integration engine has for two decades, provided a visual designer to build, configure, and maintain, BPL using a graphical interface.
Think of it like drawing a process flow diagram that can be compiled and deployed.
BPL components are added to Integration productions like any other built-in or custom business component.
Test example input and output
With the advent of Embedded Python, a myriad of use cases are now possible from within IRIS directly using Python libraries for more complex operations. One such operation is the use of natural language processing tools such as textual similarity comparison.
Hi Developers!
Here're the technology bonuses for the InterSystems Vector Search, GenAI, and ML contest 2024 that will give you extra points in the voting:
See the details below.
Hello everybody,
I've been experimenting with Embedded Python and have been following the steps outlined in this documentation: https://docs.intersystems.com/irislatest/csp/docbook/DocBook.UI.Page.cl…
I'm trying to convert a python dictionary into an objectscript array but there is an issue with the 'arrayref' function, that is not working as in the linked example.
This is a snapshoot of my IRIS terminal:
Hi,
I am using embeded python to utilize some pythonic library but i got a problem on my hand.
One of the python function i am using return multiple values
in python you would do something like that :
val1, val2, val3, = function(params)
In COS I got something like that :
lib = ##class(%SYS.Python).Import("lib")
val1 = lib.function(params)
And I don't know how to get the second and third values.
Is there a way to get them?
Visual Studio Code releases new updates every month with new features and bug fixes, and the March 2024 release is now available.
After running many tests to kick the tires calling Python from COS (which worked fine) in any directory, I encountered problems when trying to access Python libraries like Numpy from any OTHER namespace. I saw some other posts about this but the resolution seems unclear. When I run the test program method numpytest below in %SYS it works just fine. If i run the Python method in any other namespace I get:
PITT>do ##class(test.python).numpytest()
DO ##CLASS(test.python).numpytest()
^
<OBJECT DISPATCH> *python object not found
Using VECTOR_COSINE() in SQL query to perform a text similarity search on existing embeddings in a %VECTOR column.
Code is below.
Commented out sql query returns this error: SQLCODE: -29 Field 'NEW_EMBEDDING_STR' not found in the applicable tables^ SELECT TOP ? maxID , activity , outcome FROMMain .AITest ORDER BY VECTOR_COSINE ( new_embedding_str ,
Sql query as written returns ERROR #5002: ObjectScript error: <PYTHON EXCEPTION> *<class 'OSError'>: isc_stdout_write: PyArg_ParseTuple failed!
Hi, I am trying to use embedded python in a cache class, but I can only get it to work in the source code namespace.
We map our client namespaces to our source code namespaces using Default Database for Routines under System > Configuration > Namespaces > Edit Namespace in the management portal.
In the source code namespace:
SOURCENEW>w ##class(EF.helloWorld).helloWorldPython()
Hello World!
SOURCENEW>ZN "EVEXAMPLE"
In the client namespace:
EVEXAMPLE>w ##class(EF.helloWorld).helloWorldPython()
W ##CLASS(EF.helloWorld).helloWorldPython()
^
<OBJECT DISPATCH> *python object not found
The objective of the article is to provide the reader with the following informations:
Schema of the article:
Workflow of the article:
This training aims to provide the participants with the following skills:
To install the training environment, you need to have Docker and Docker Compose installed on your machine.
You can install Docker and Docker Compose by following the instructions on the Docker website.
Once you have Docker and Docker Compose installed, you can clone this repository and run the following command:
docker-compose up -d
This command will start the IRIS for Health container and the Web Gateway container to expose the FHIR server over HTTPS.
Once the containers are started, you can access the FHIR server at the following URL:
https://localhost:4443/fhir/r5/
You can access the InterSystems IRIS Management Portal at the following URL:
http://localhost:8089/csp/sys/UtilHome.csp
The default username and password are SuperUser and SYS.
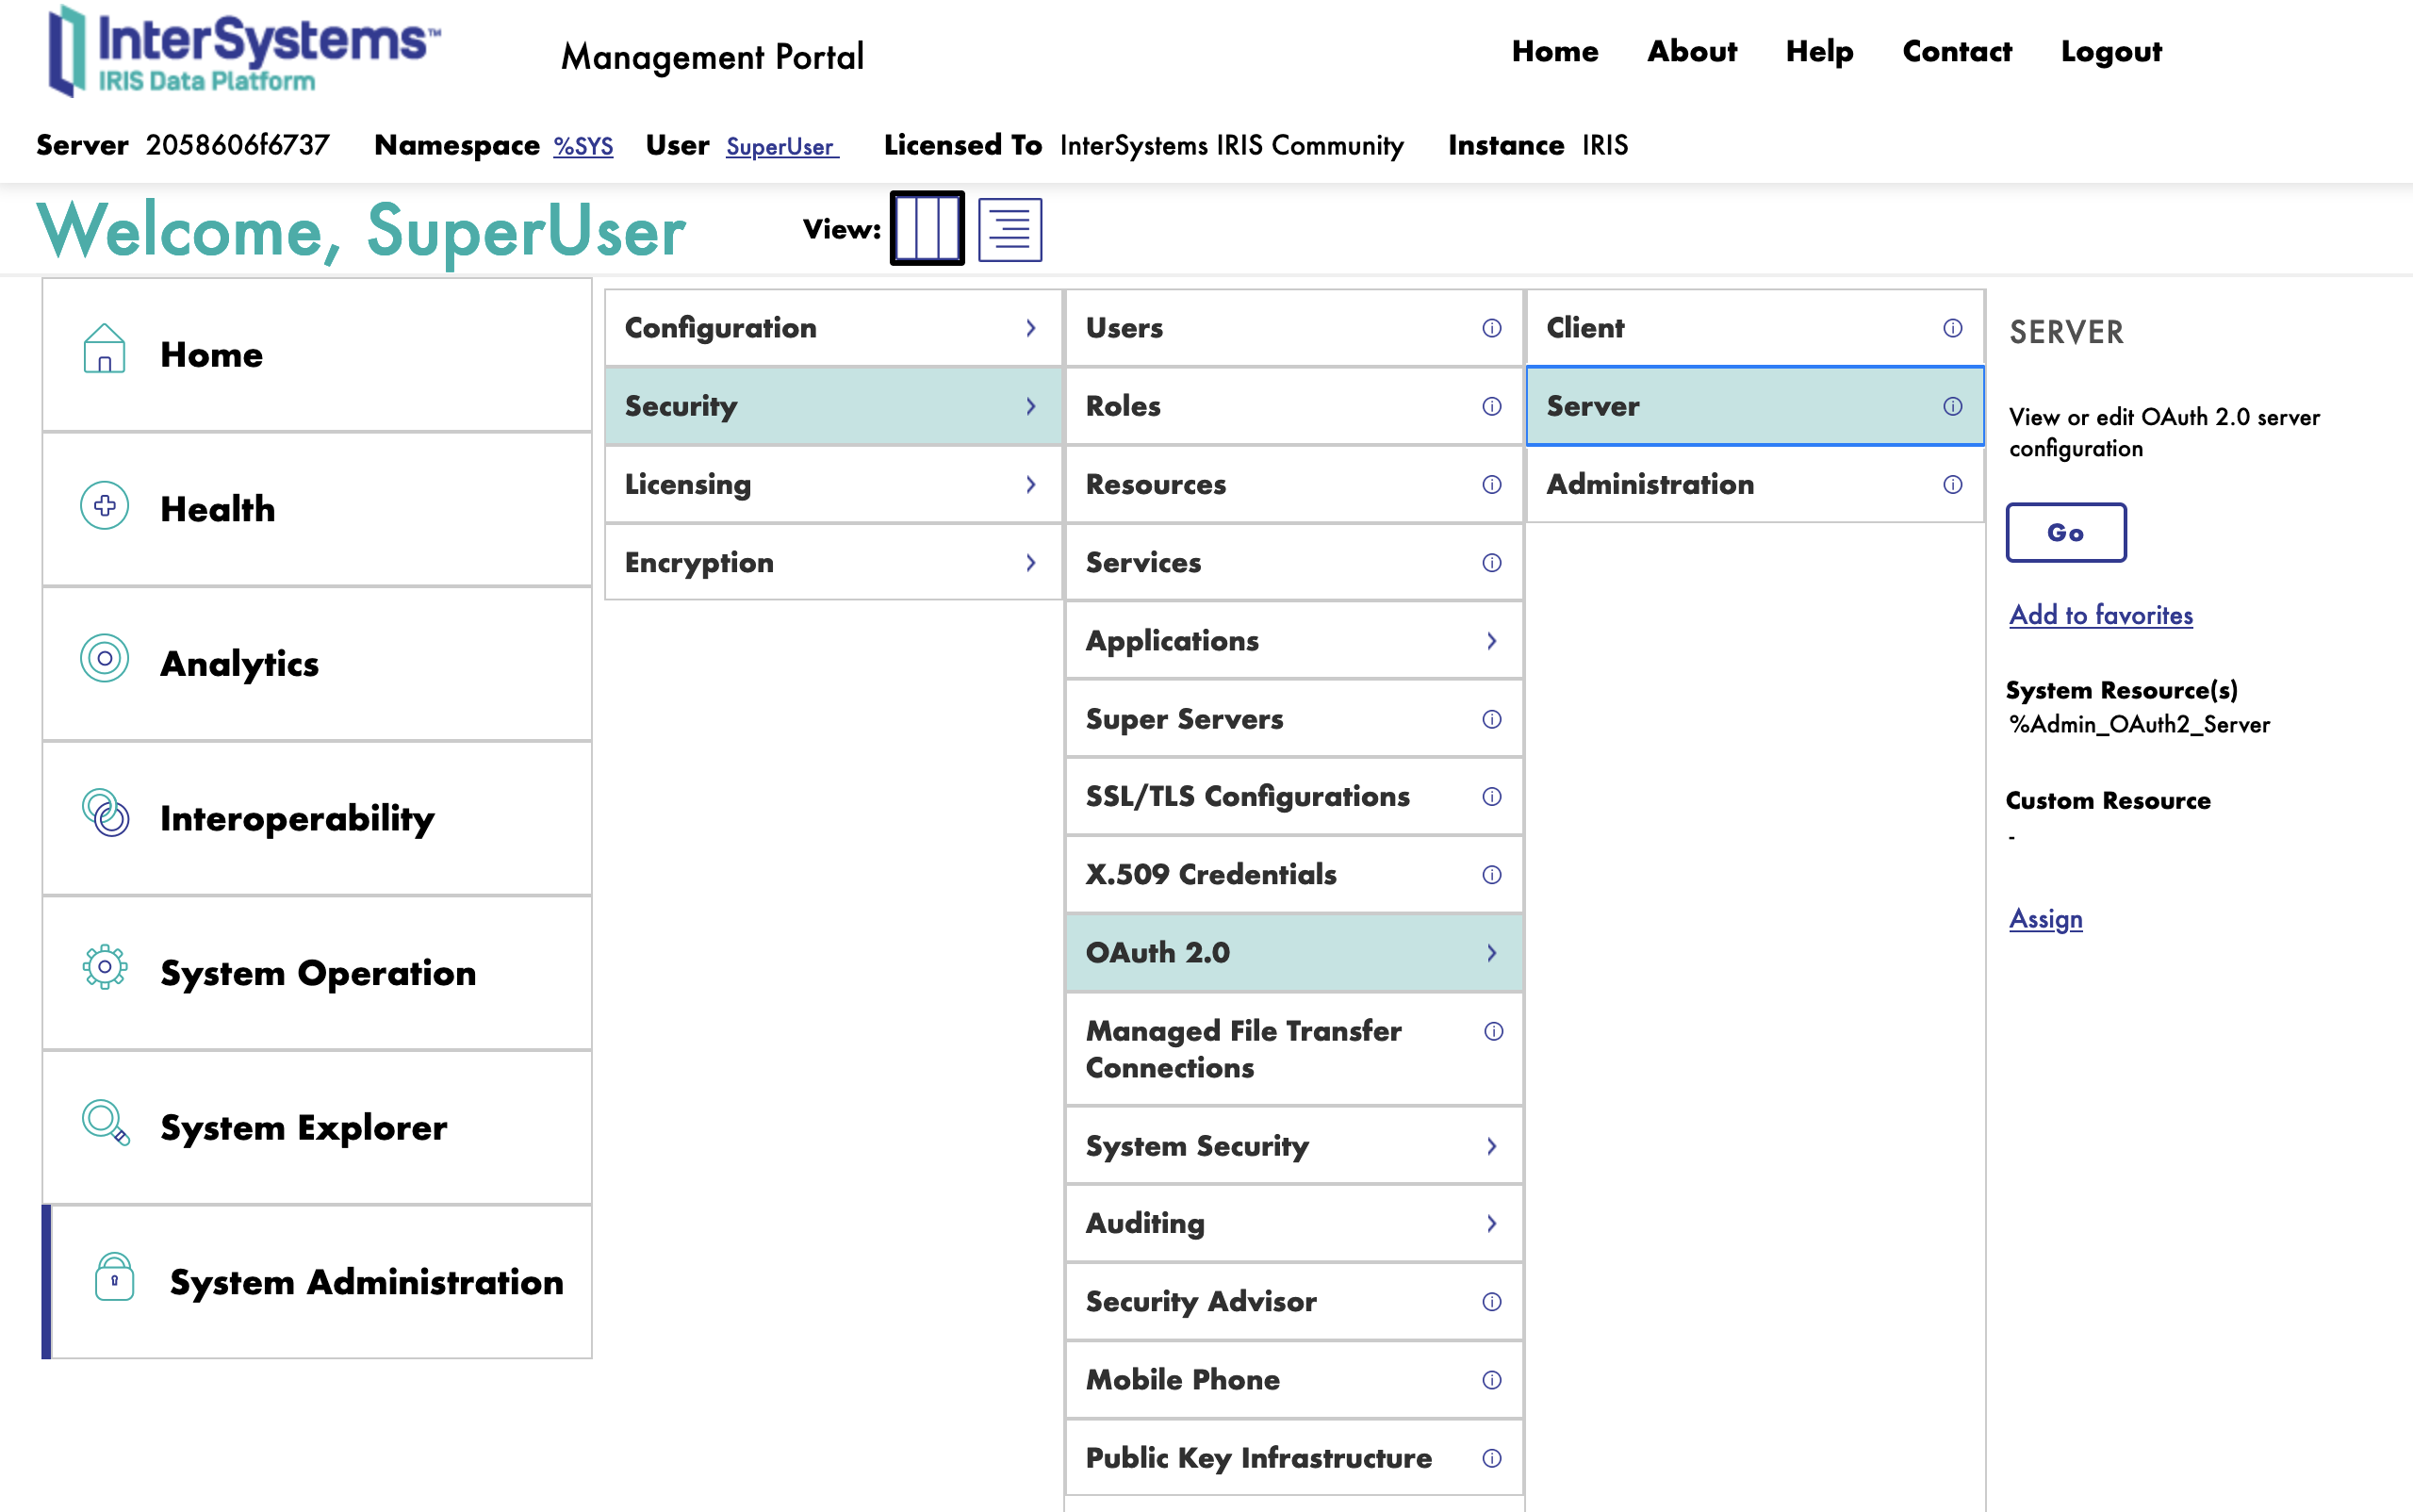
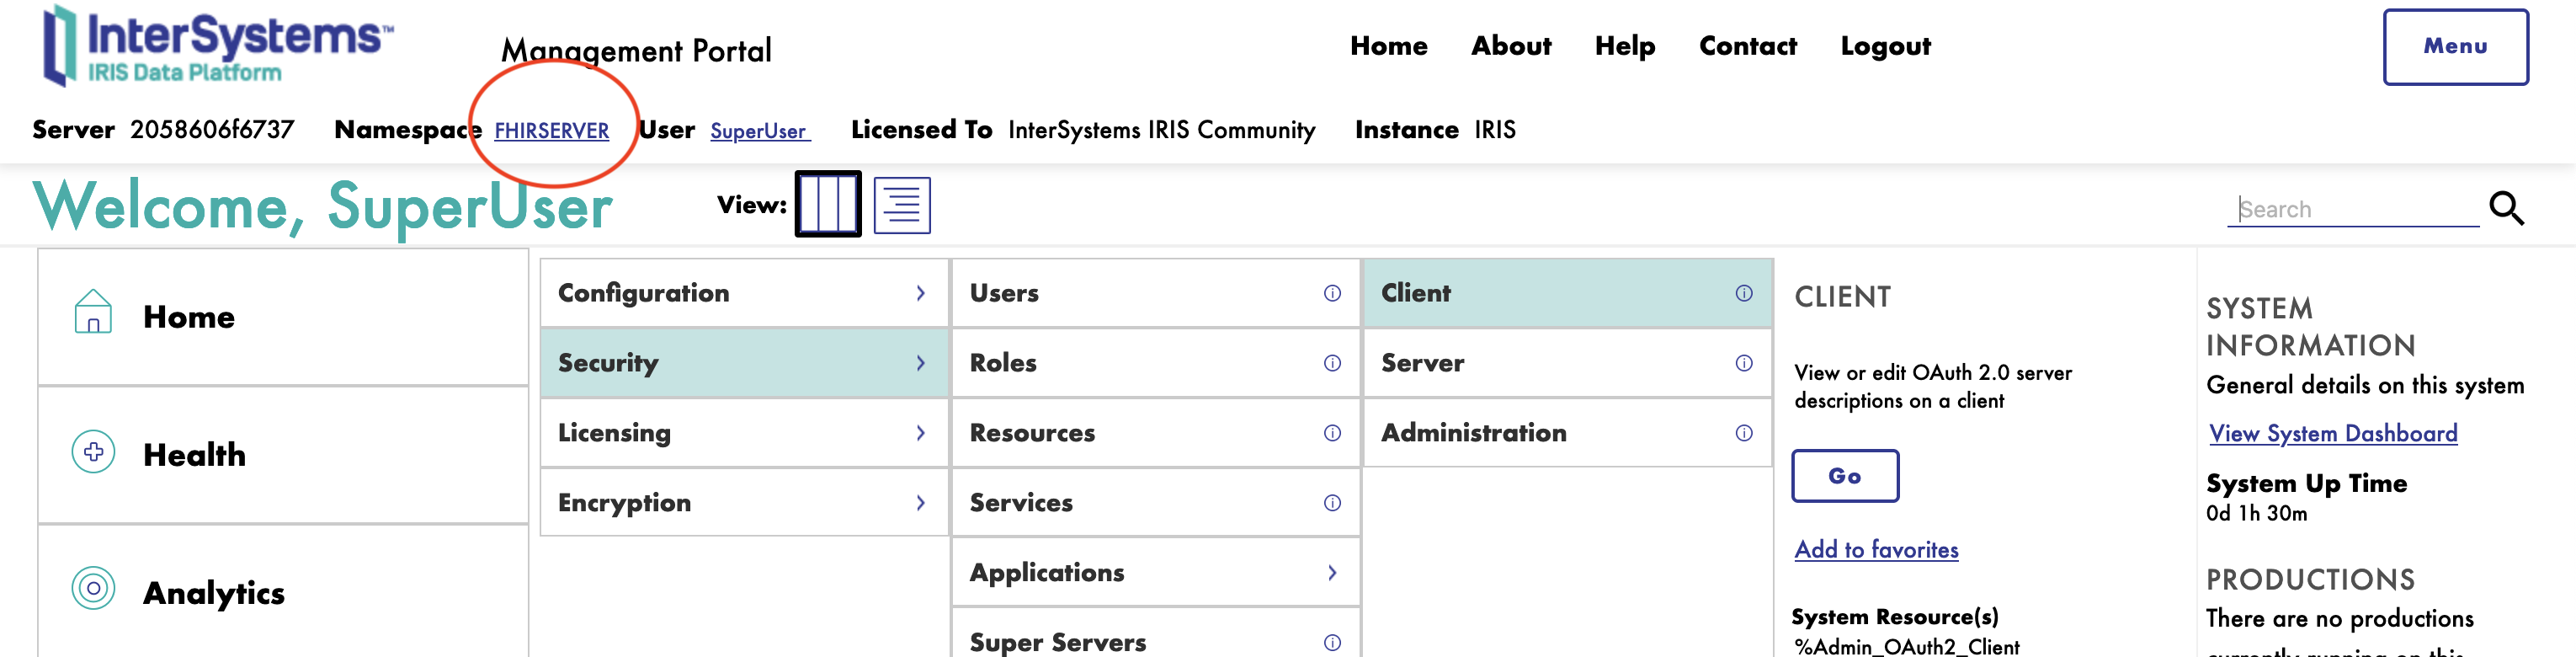
To configure the OAuth2 Authorization Server, you need to connect to the InterSystems IRIS Management Portal and navigate to the System Administration > Security > OAuth 2.0 > Servers.
Next, we will fulfill the form to create a new OAuth2 Authorization Server.
First we start with the General tab.
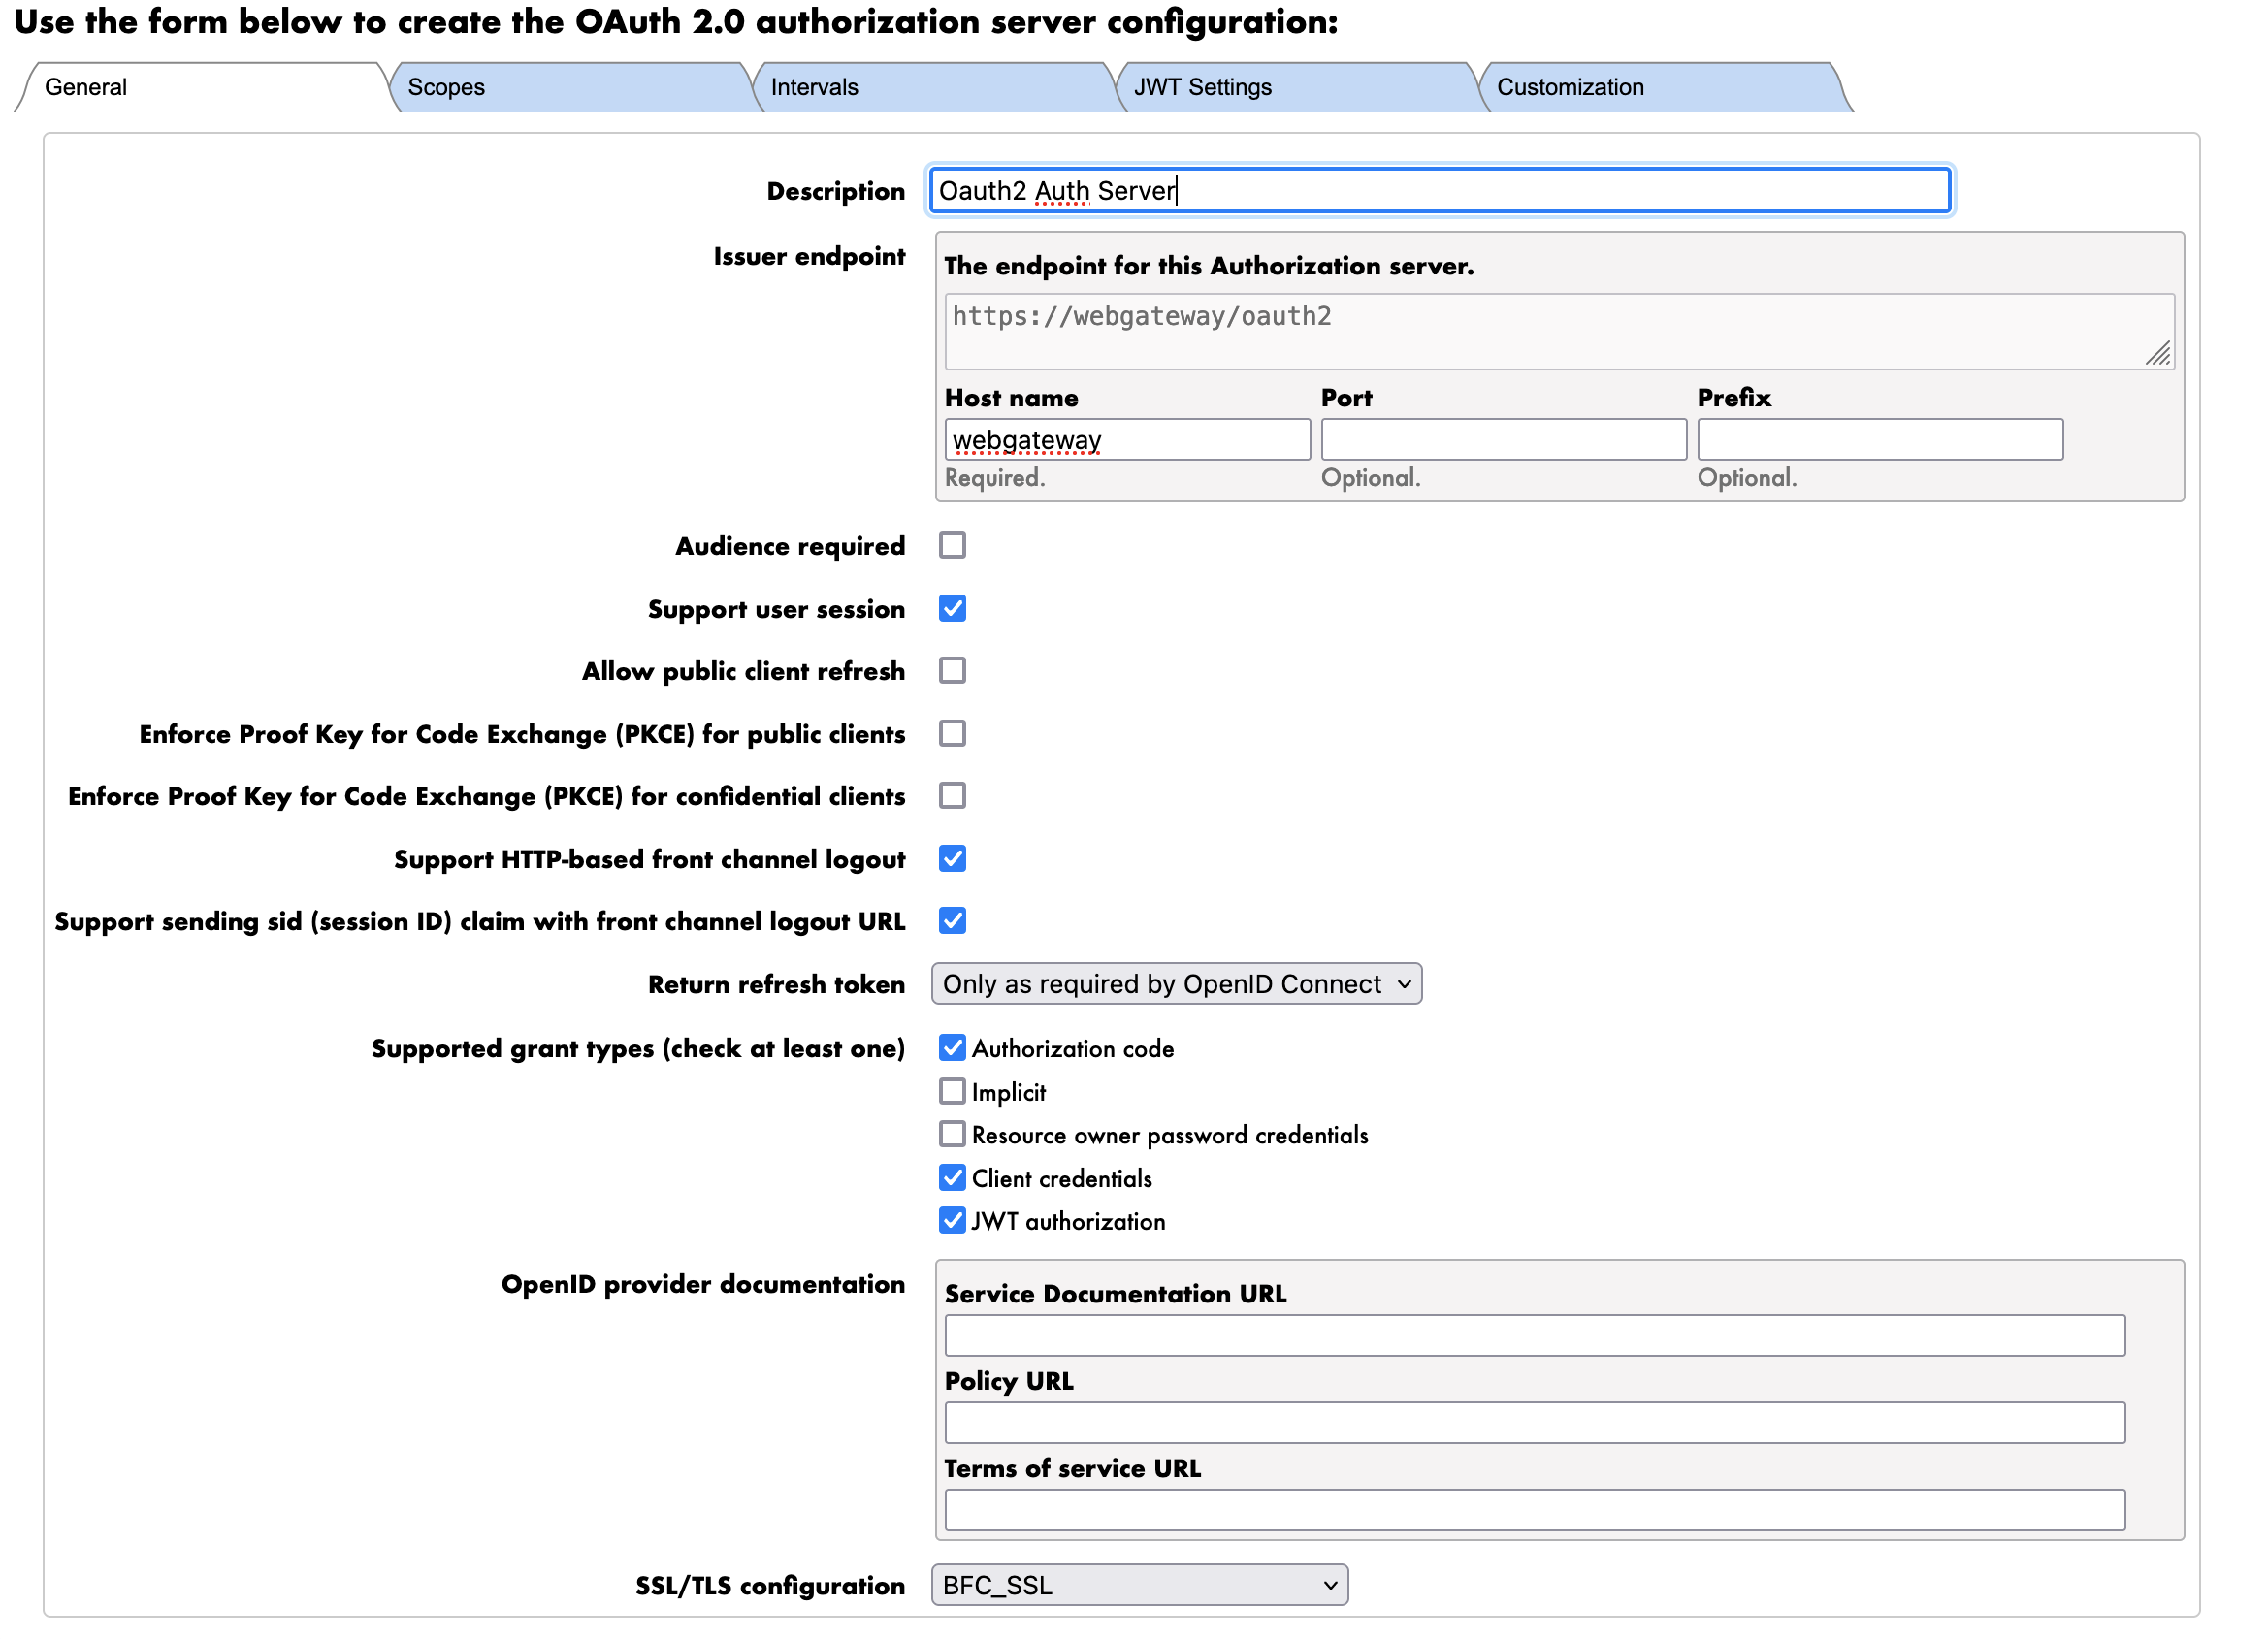
The parameters are as follows:
Next we move to the Scope tab.
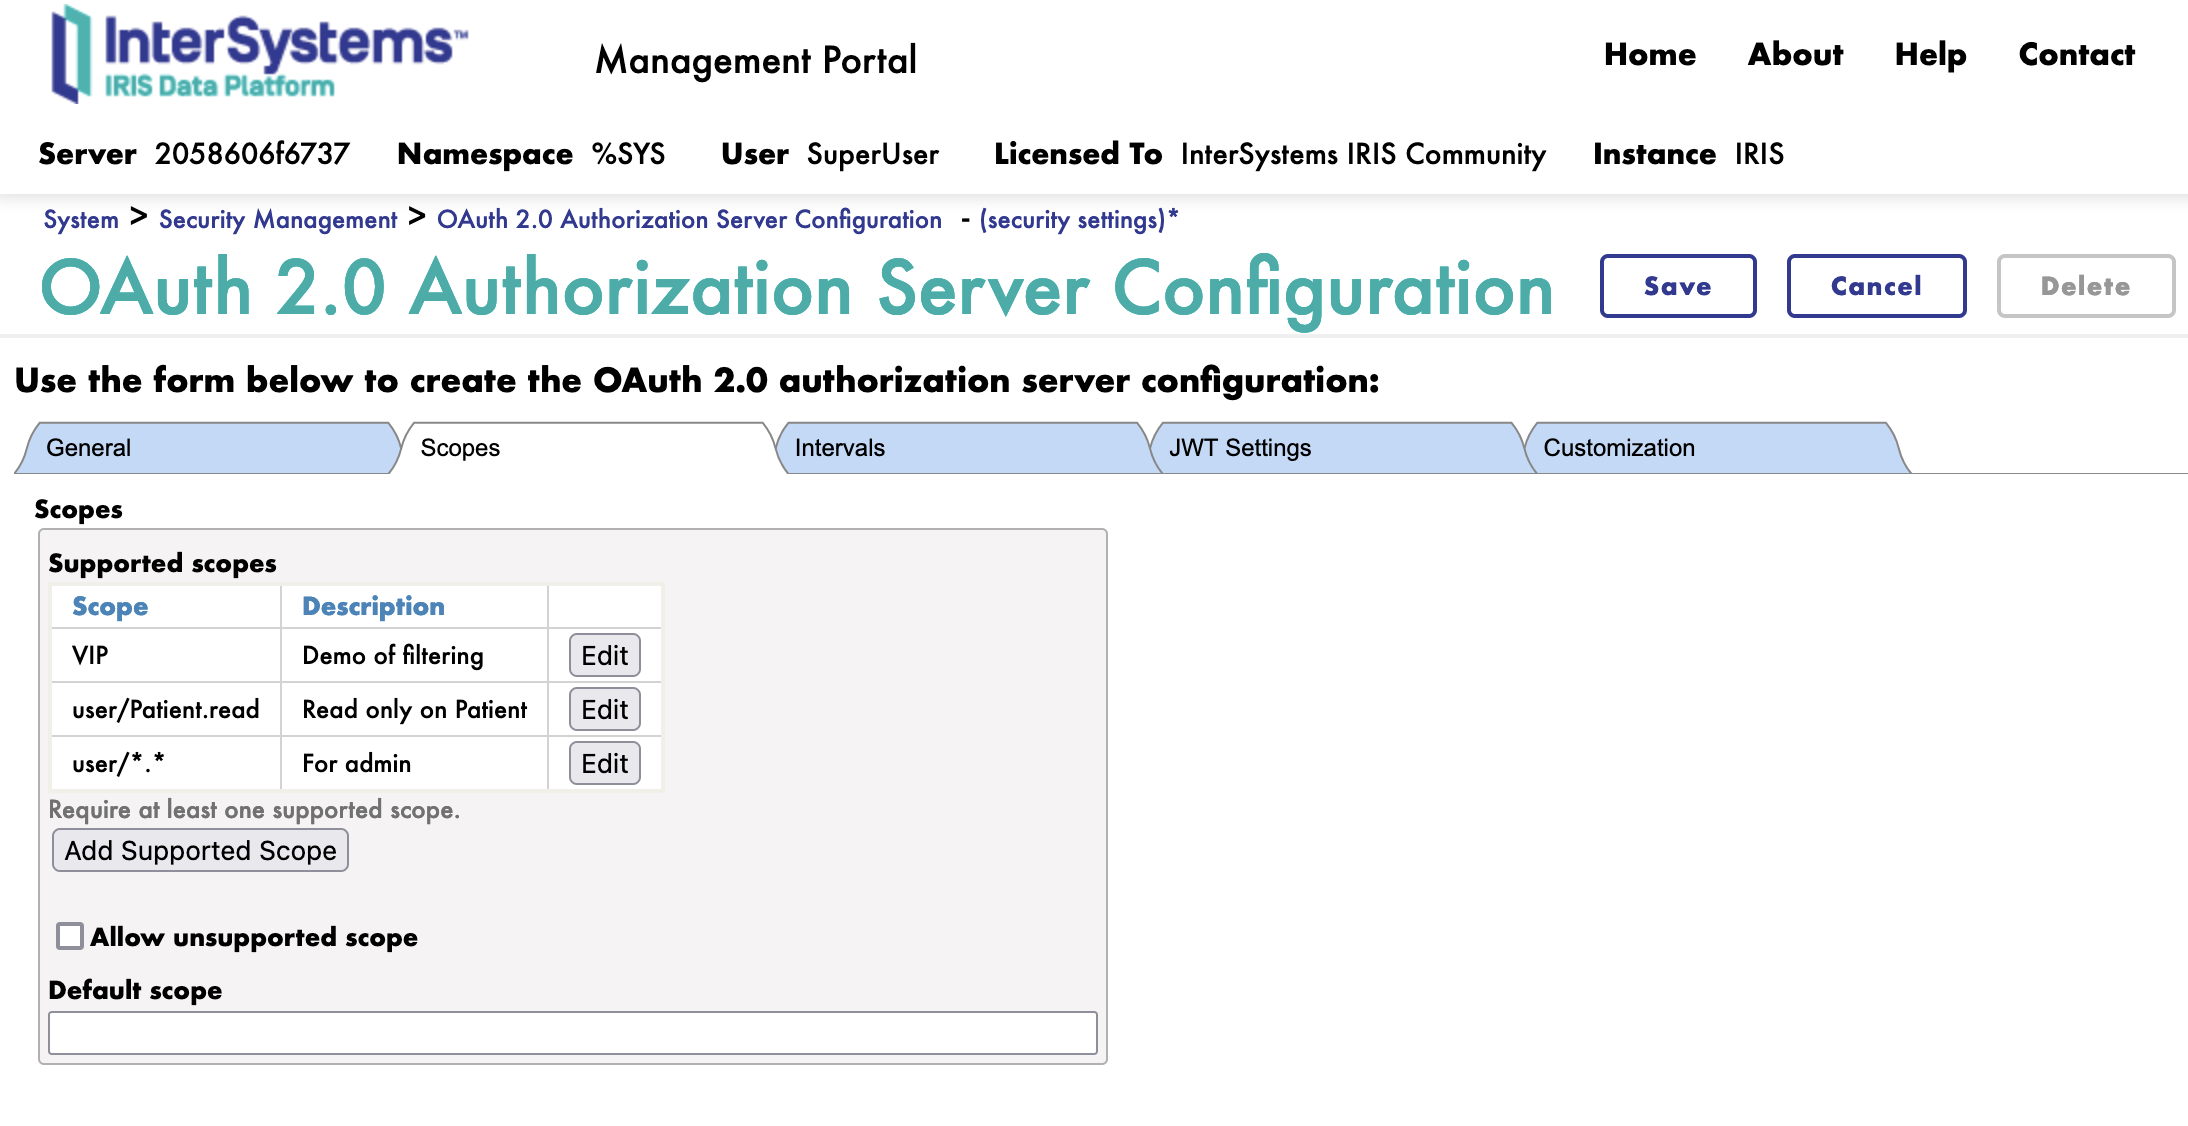
We will create 3 scopes:
Next we move to the JWT tab.
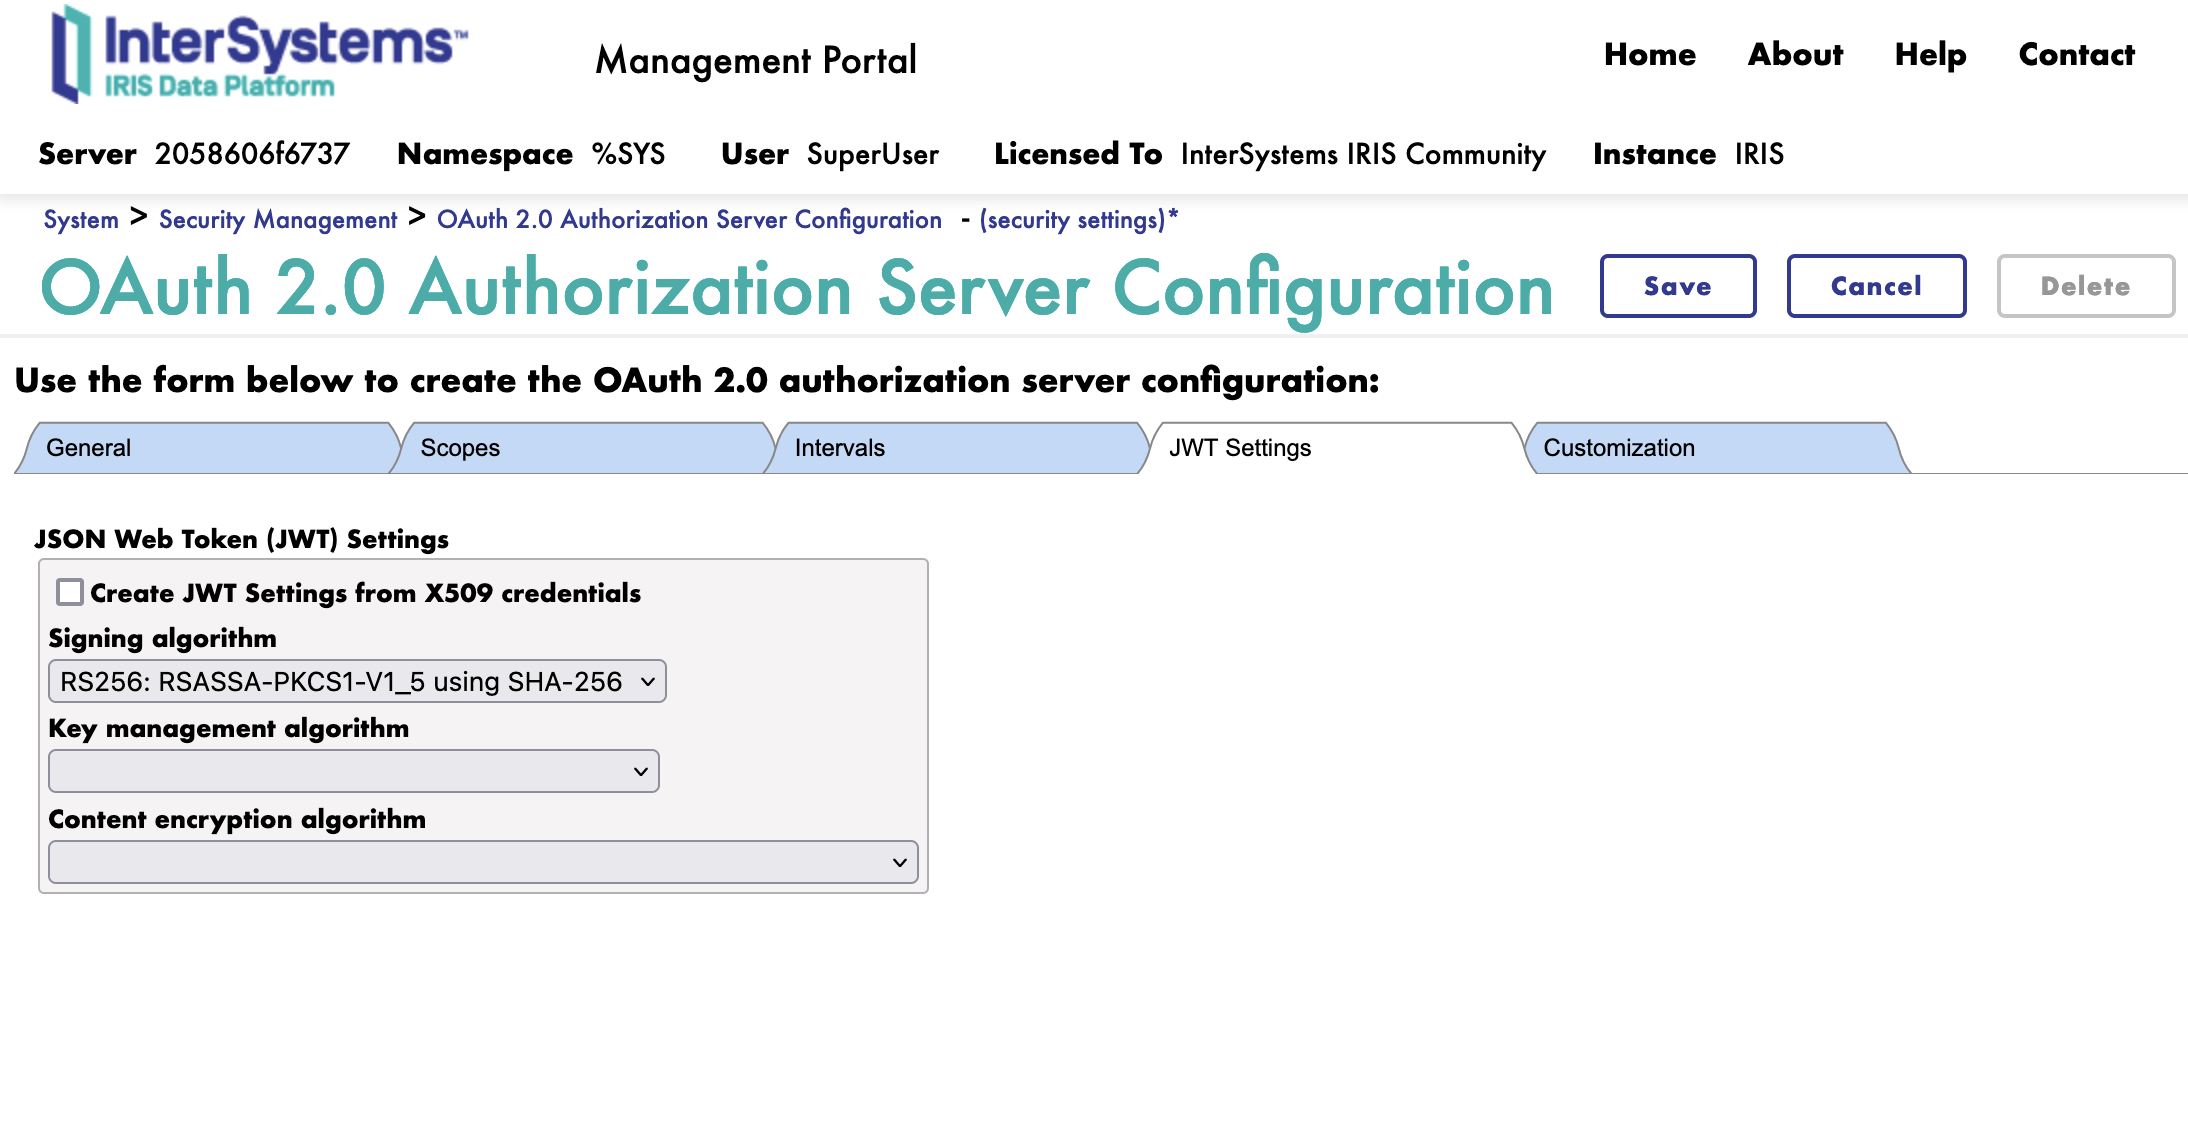
Here we simply select the algorithm to use for the JWT.
We will use the RS256 algorithm.
If needed, we can select encryption for the JWT. We will not use encryption for this training.
Next we move to the Customization tab.
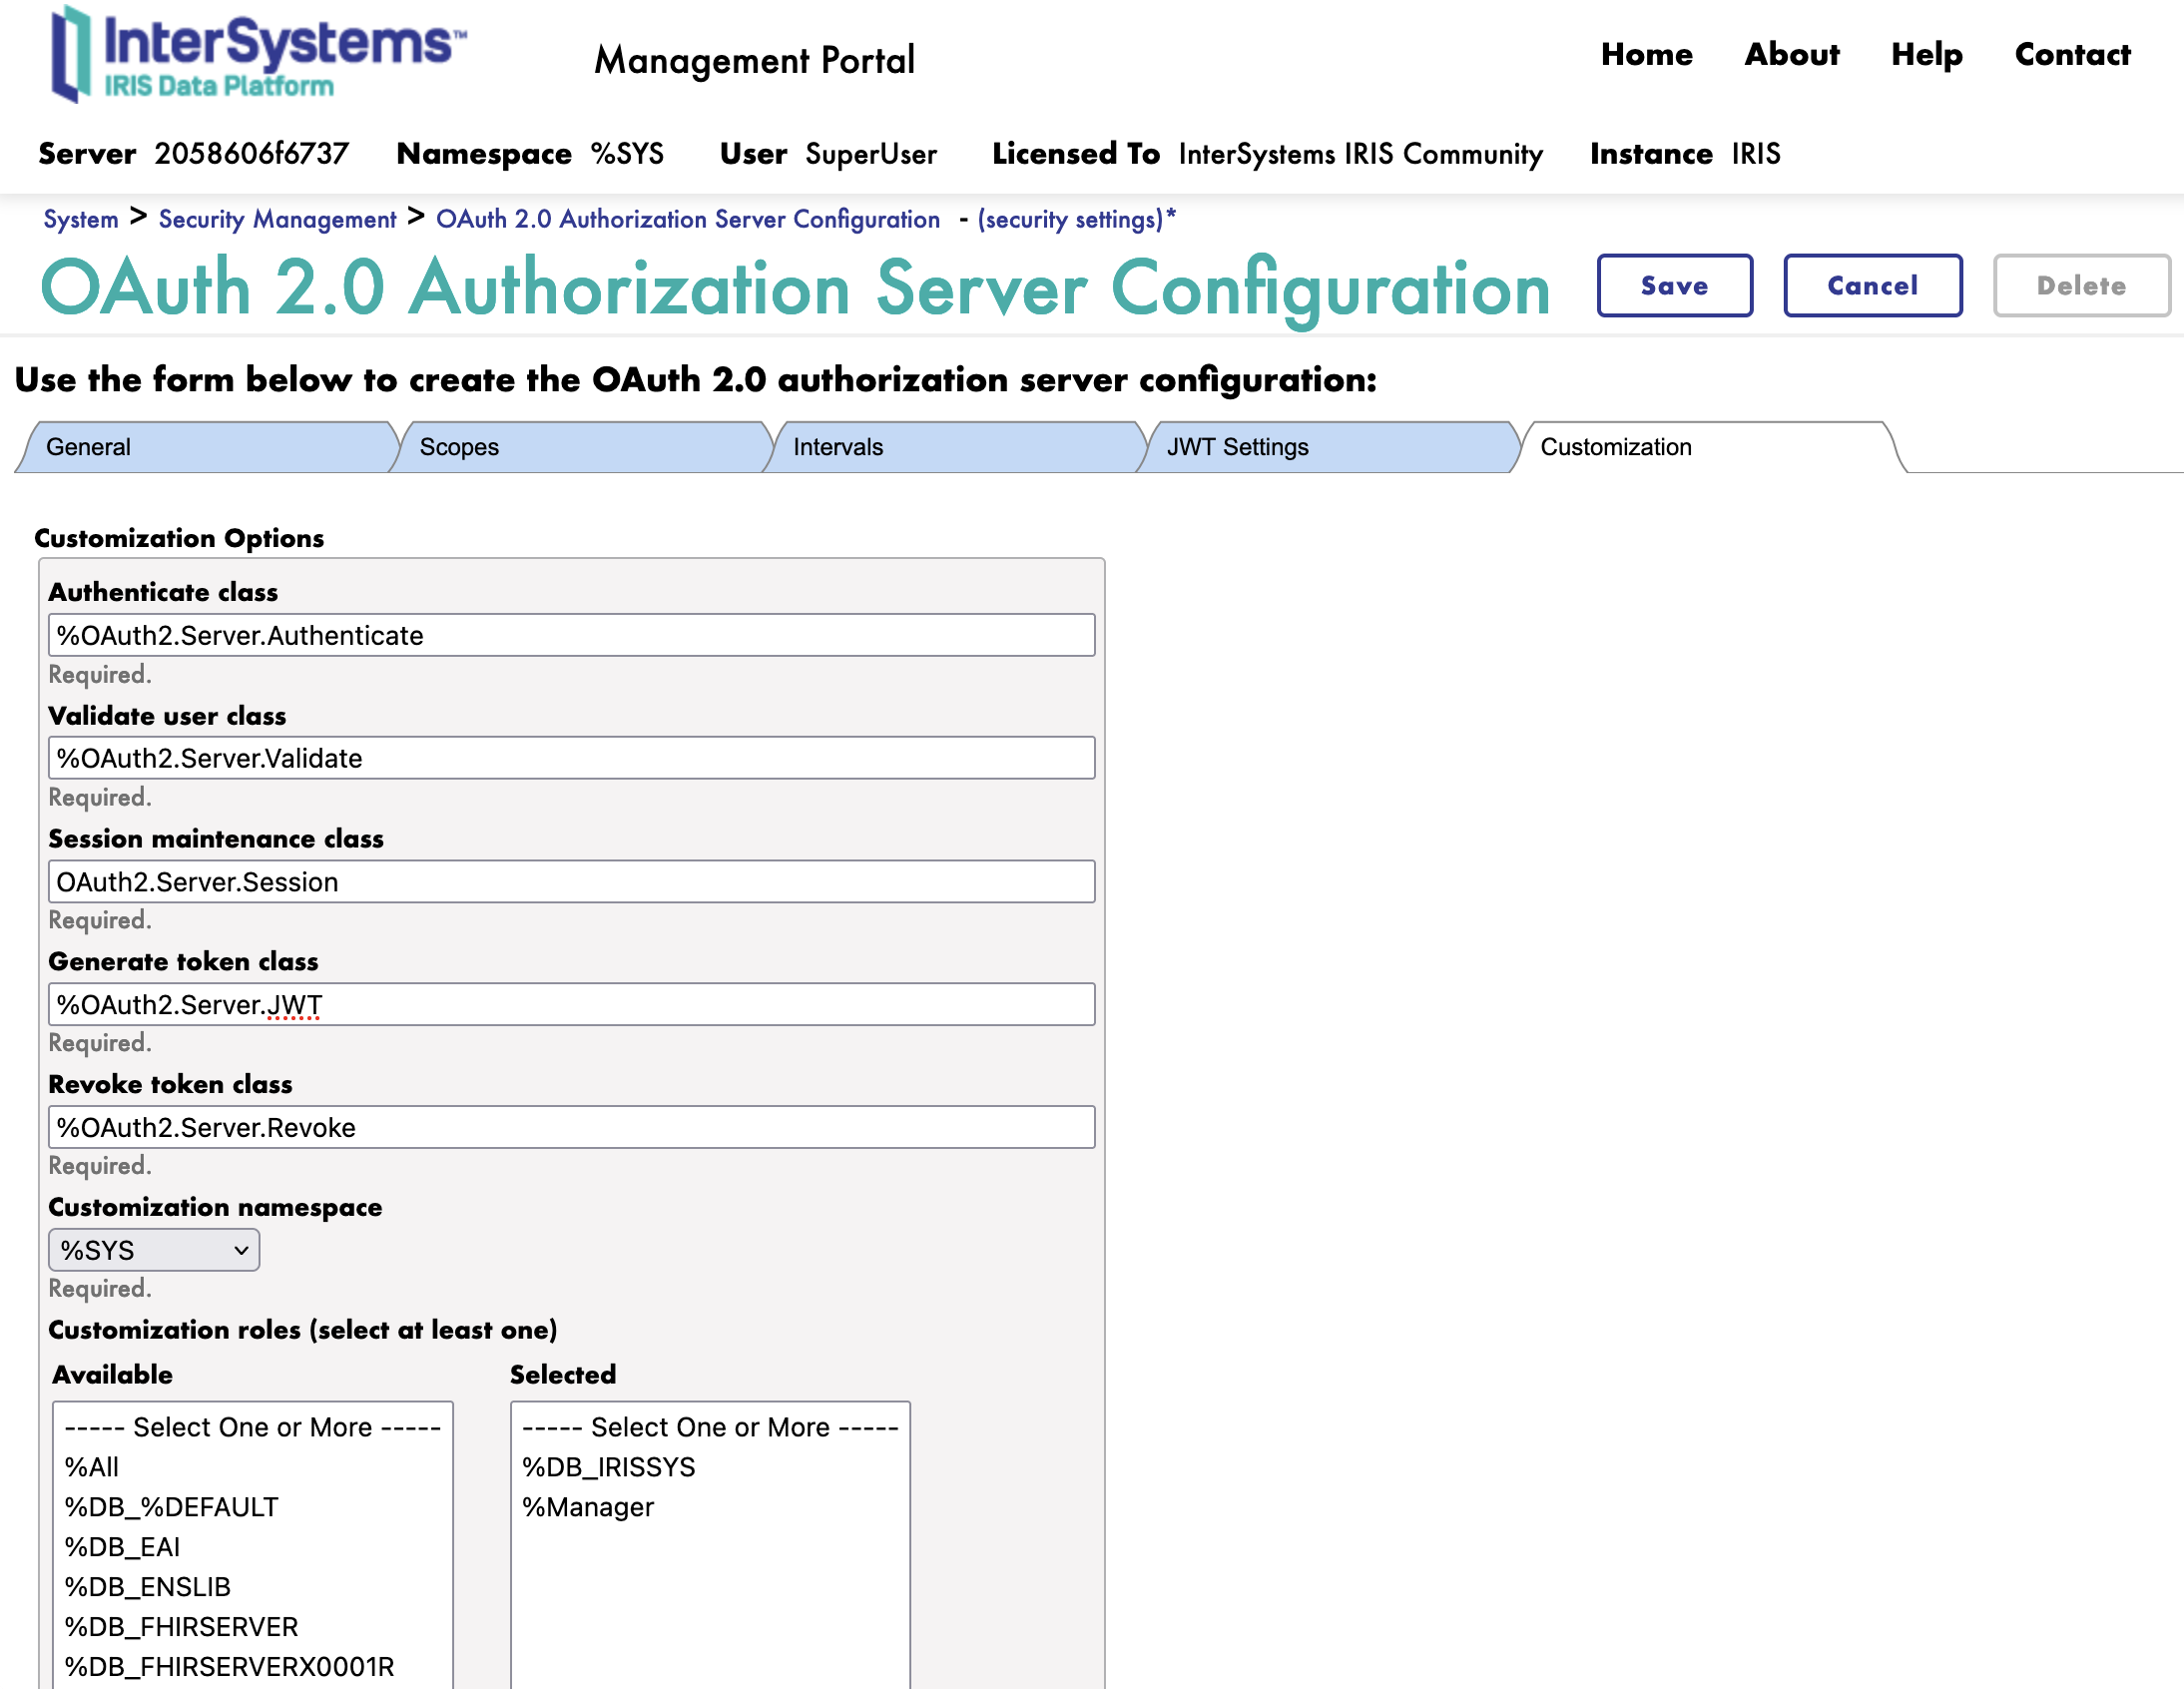
Here is all the customization classes for the OAuth2 Authorization Server.
We change the following classes:
We can now save the OAuth2 Authorization Server.
Great, we have now configured the OAuth2 Authorization Server. 🥳
To configure the client, you need to connect to the InterSystems IRIS Management Portal and navigate to the System Administration > Security > OAuth 2.0 > Client.
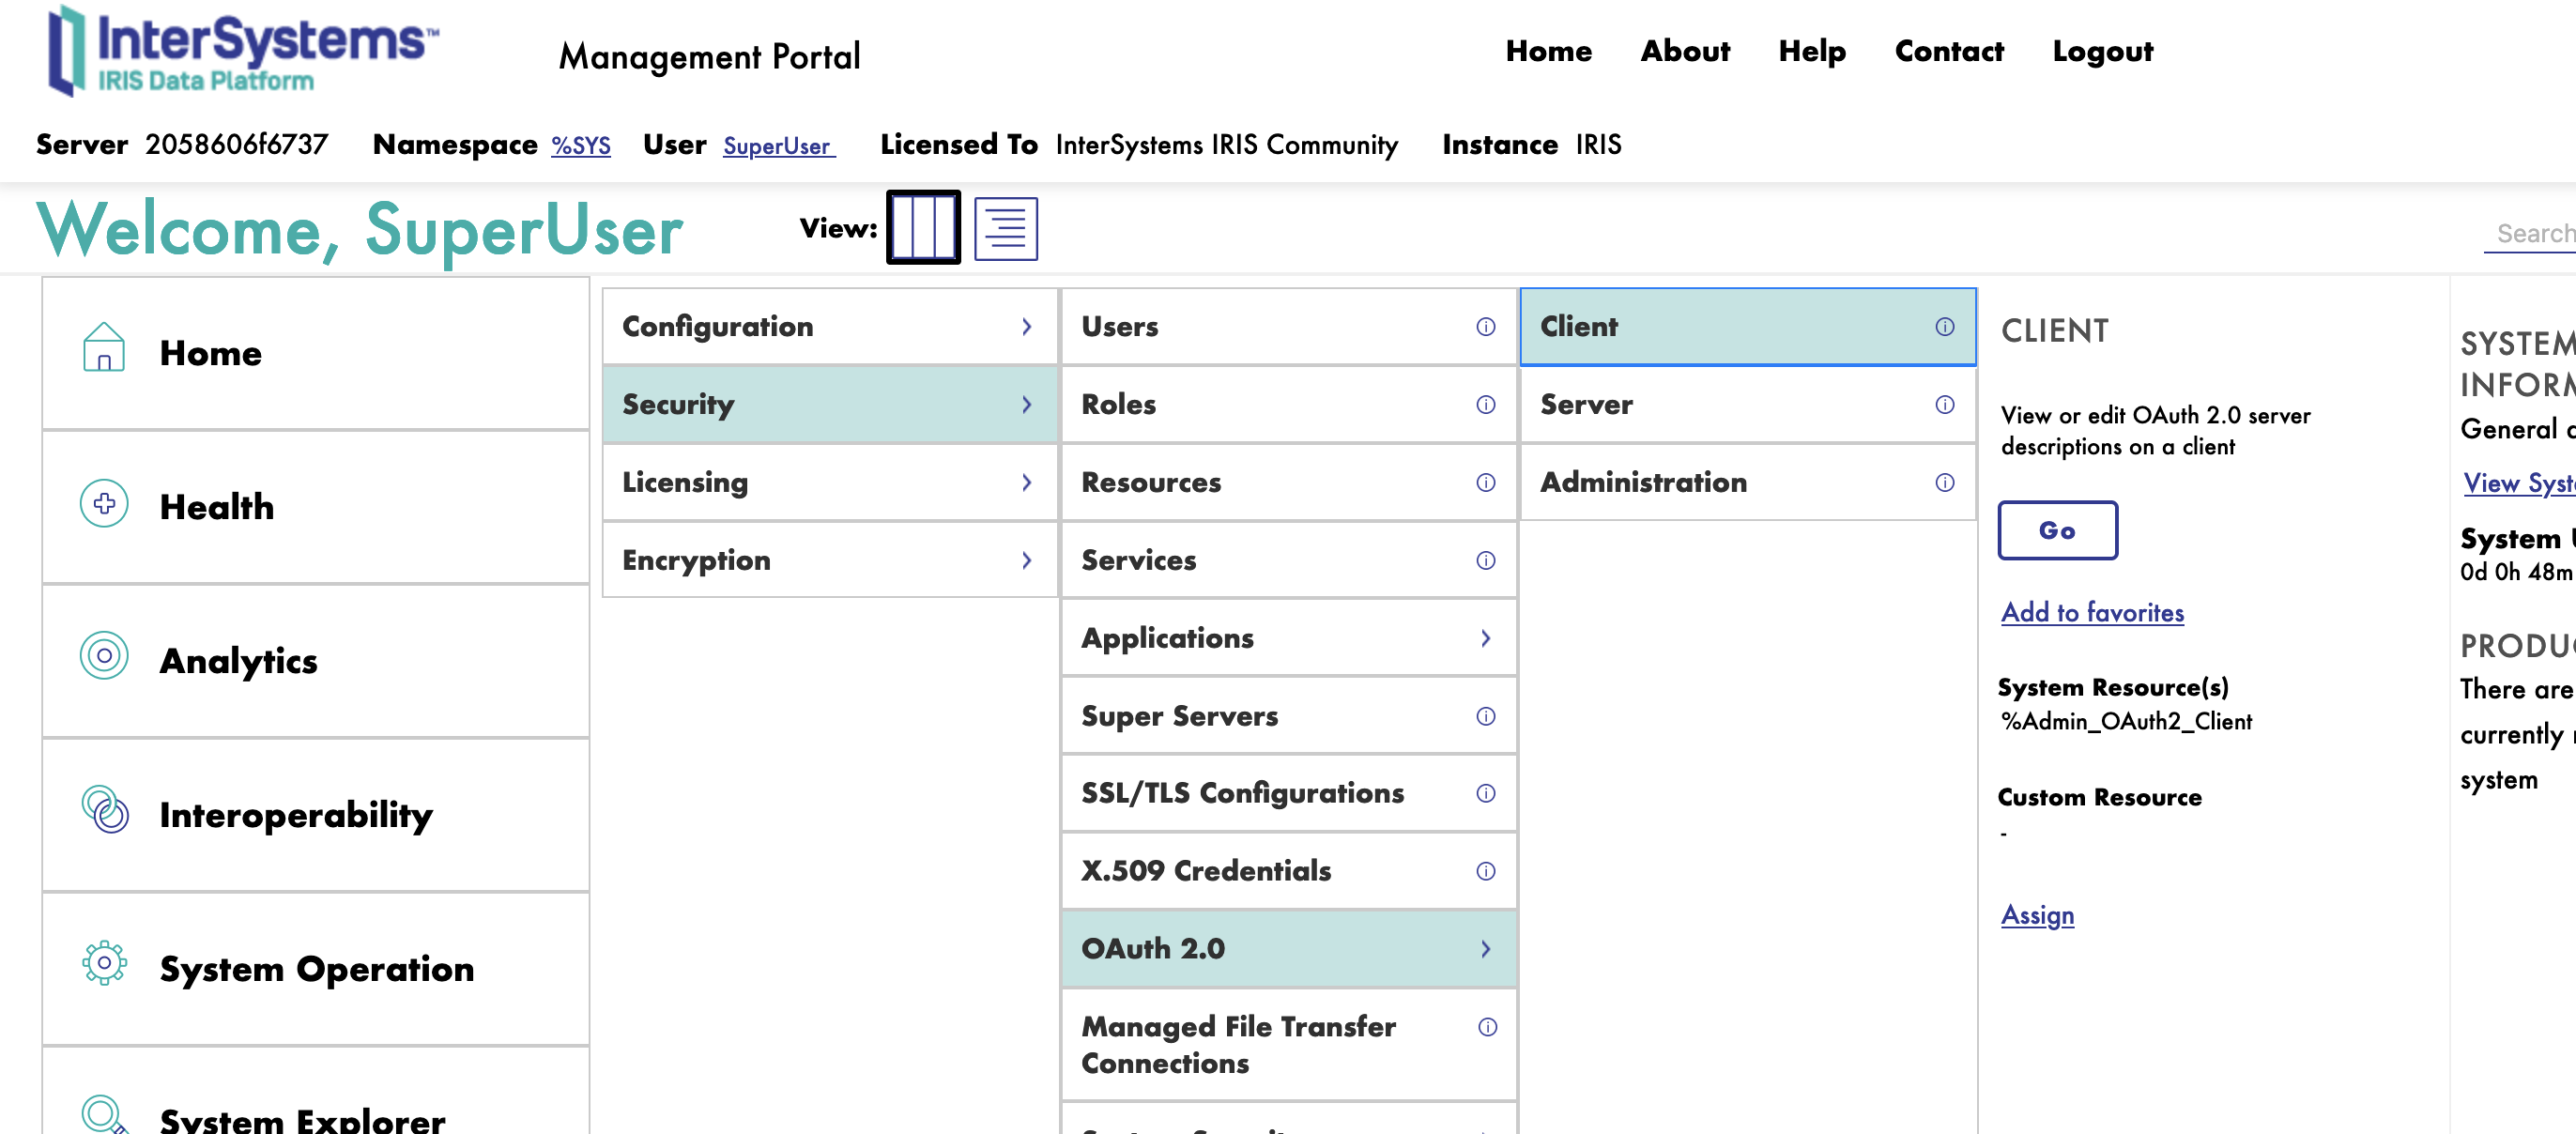
To create a new client, we need first to register the OAuth2 Authorization Server.
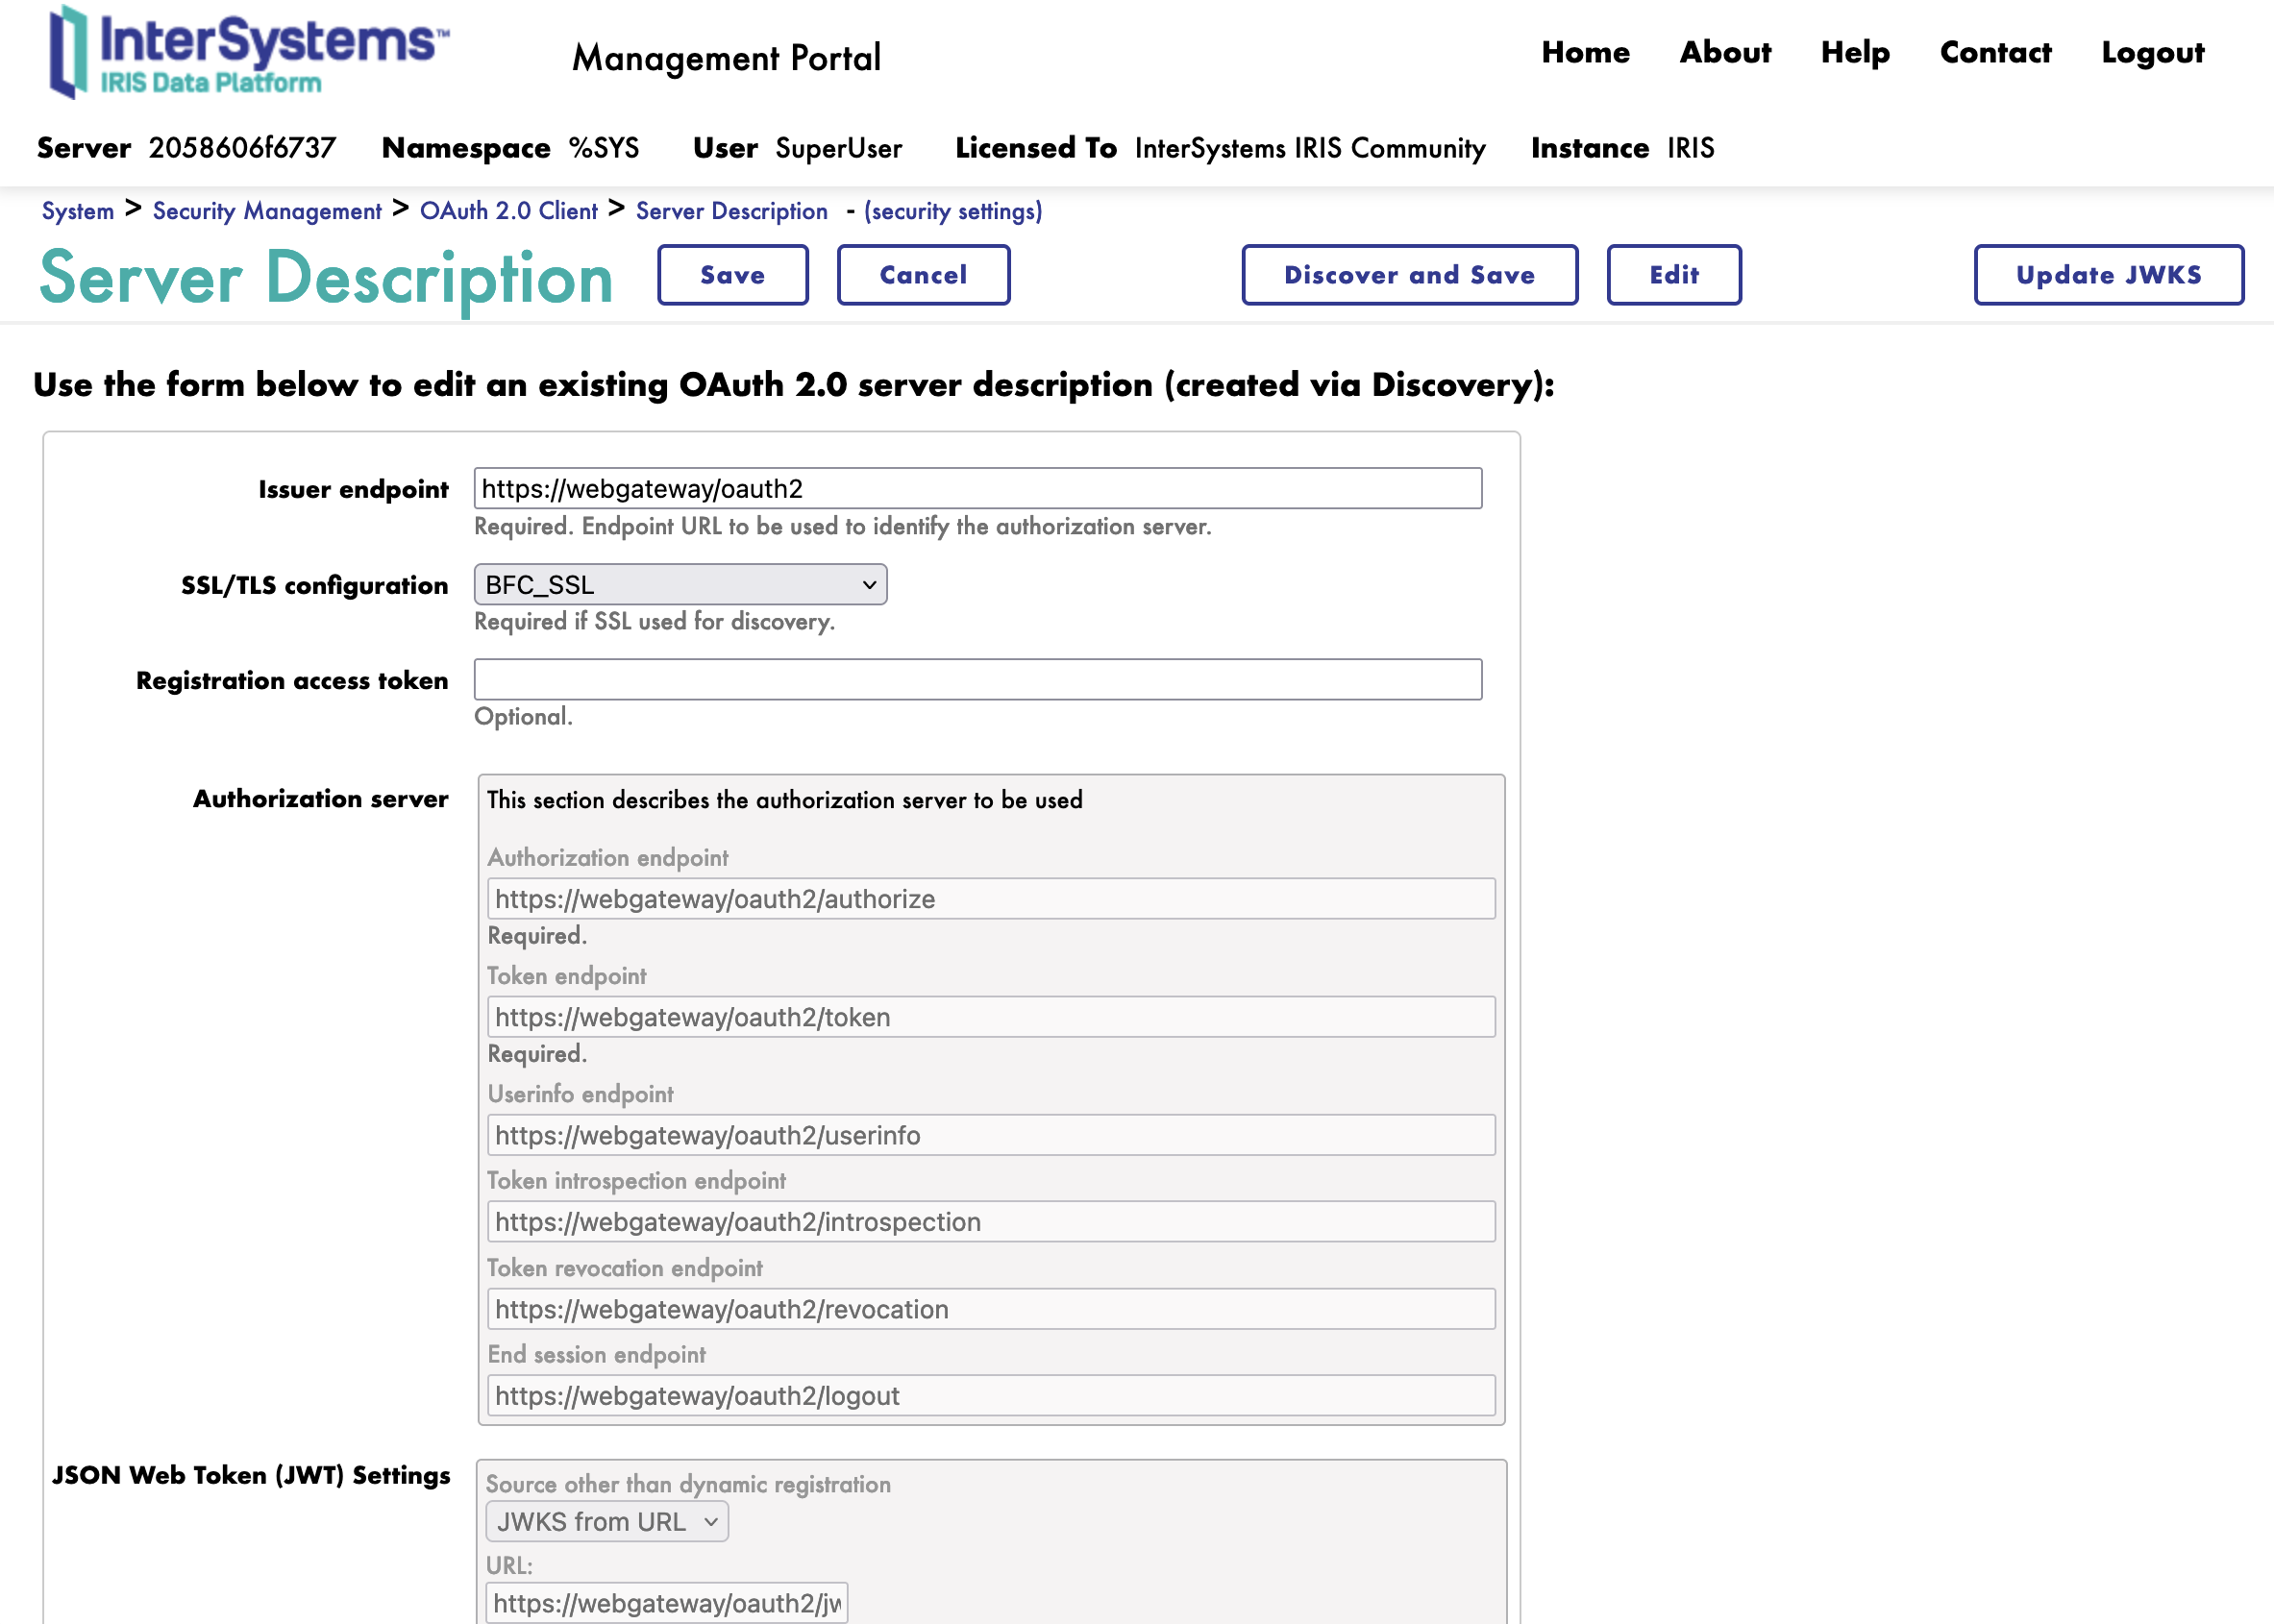
On the client page, click on the Create Server Description button.
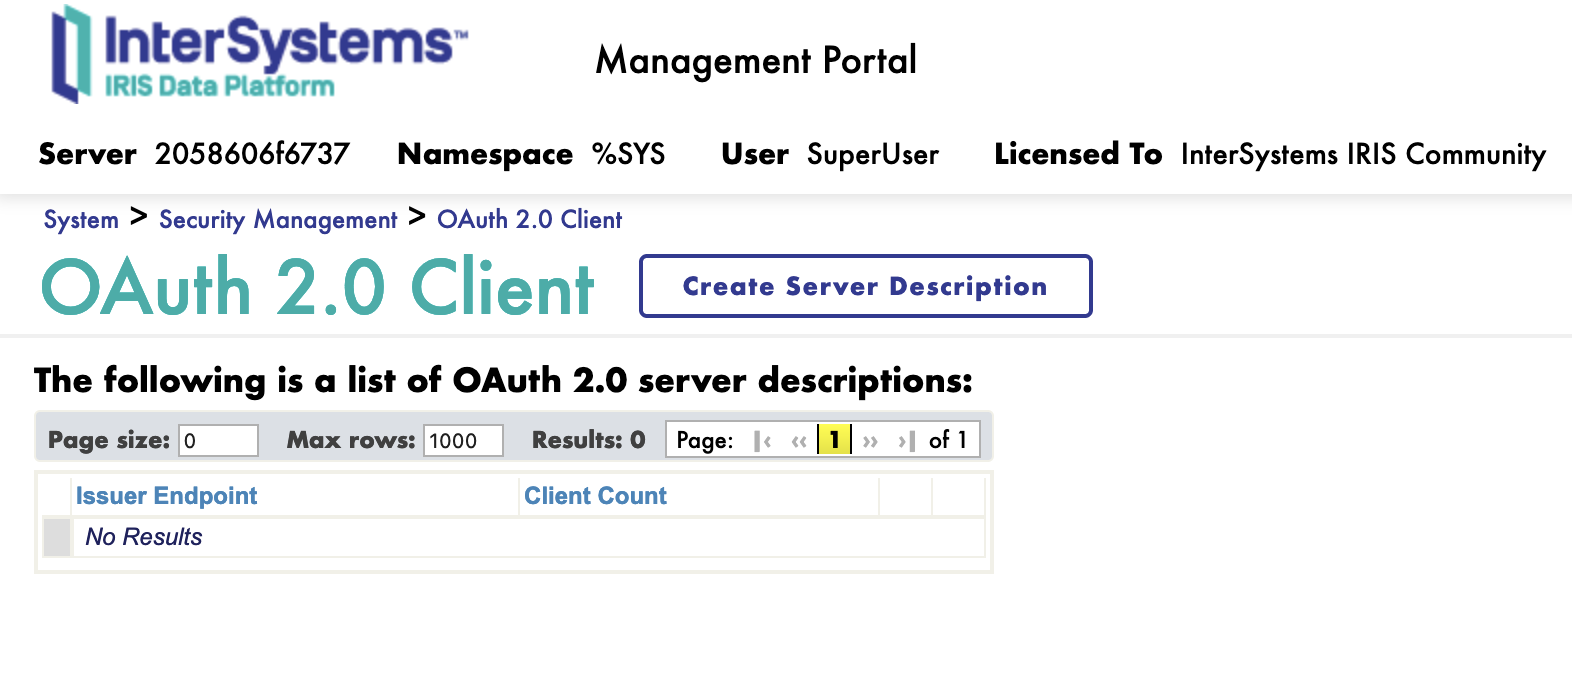
In the Server Description form, we need to fulfill the following parameters:
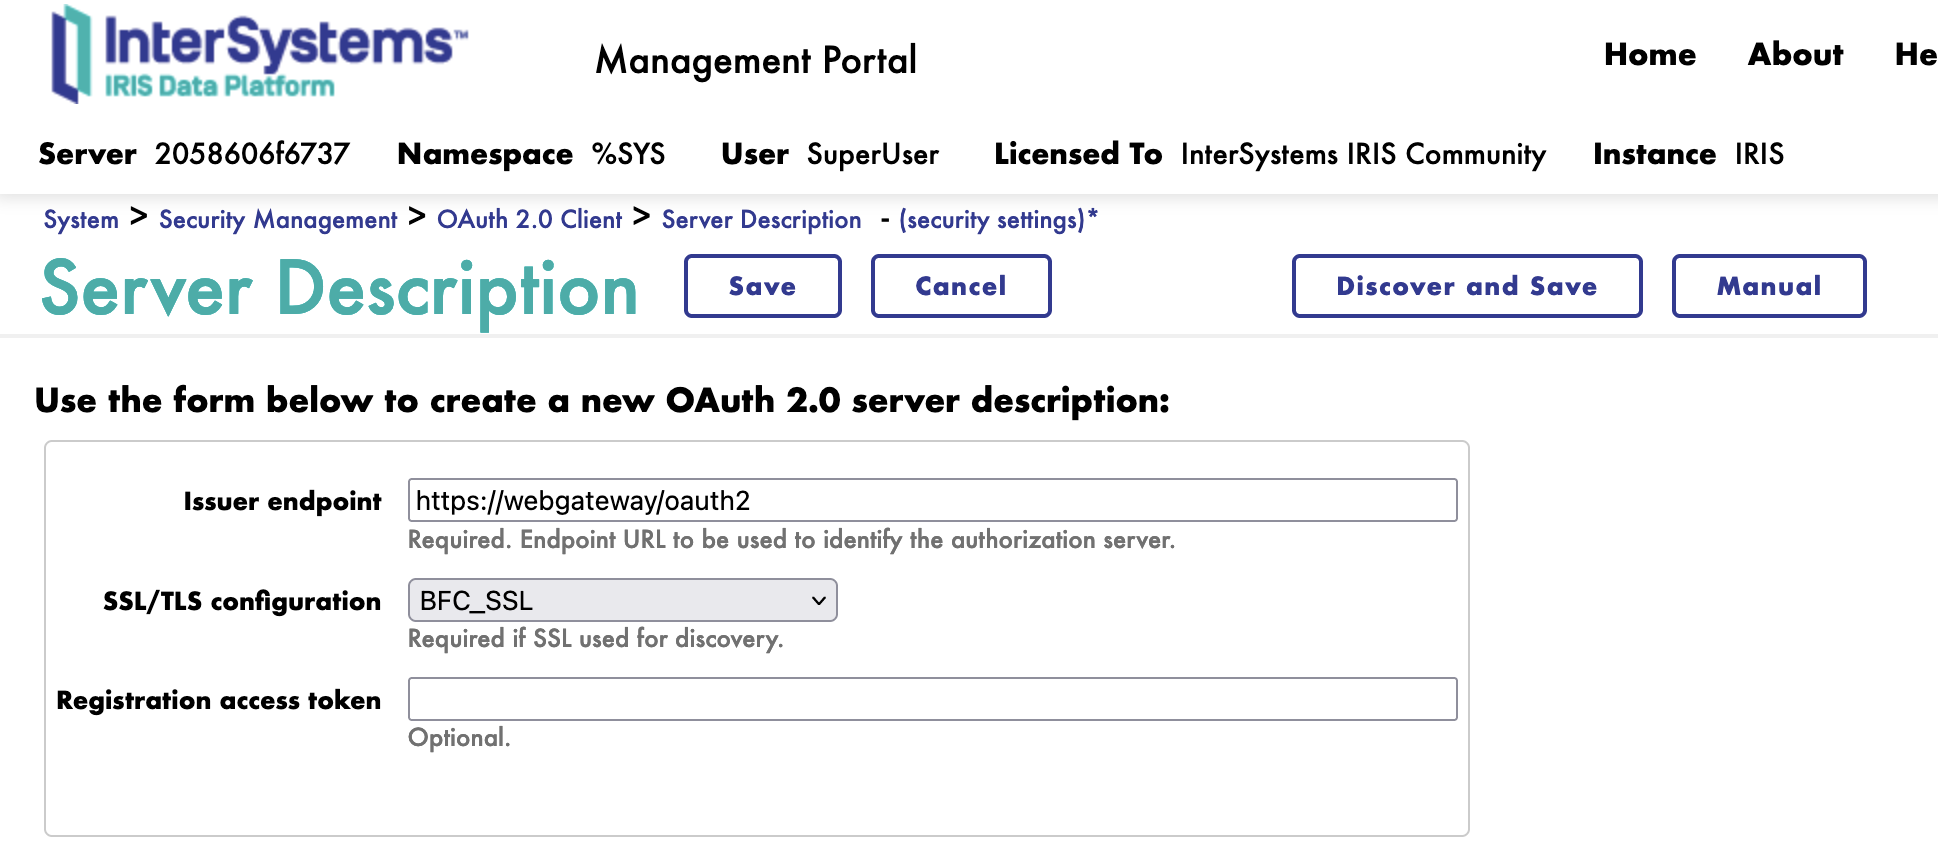
Click on the Discover and Save button.
Neat, we have now registered the OAuth2 Authorization Server.
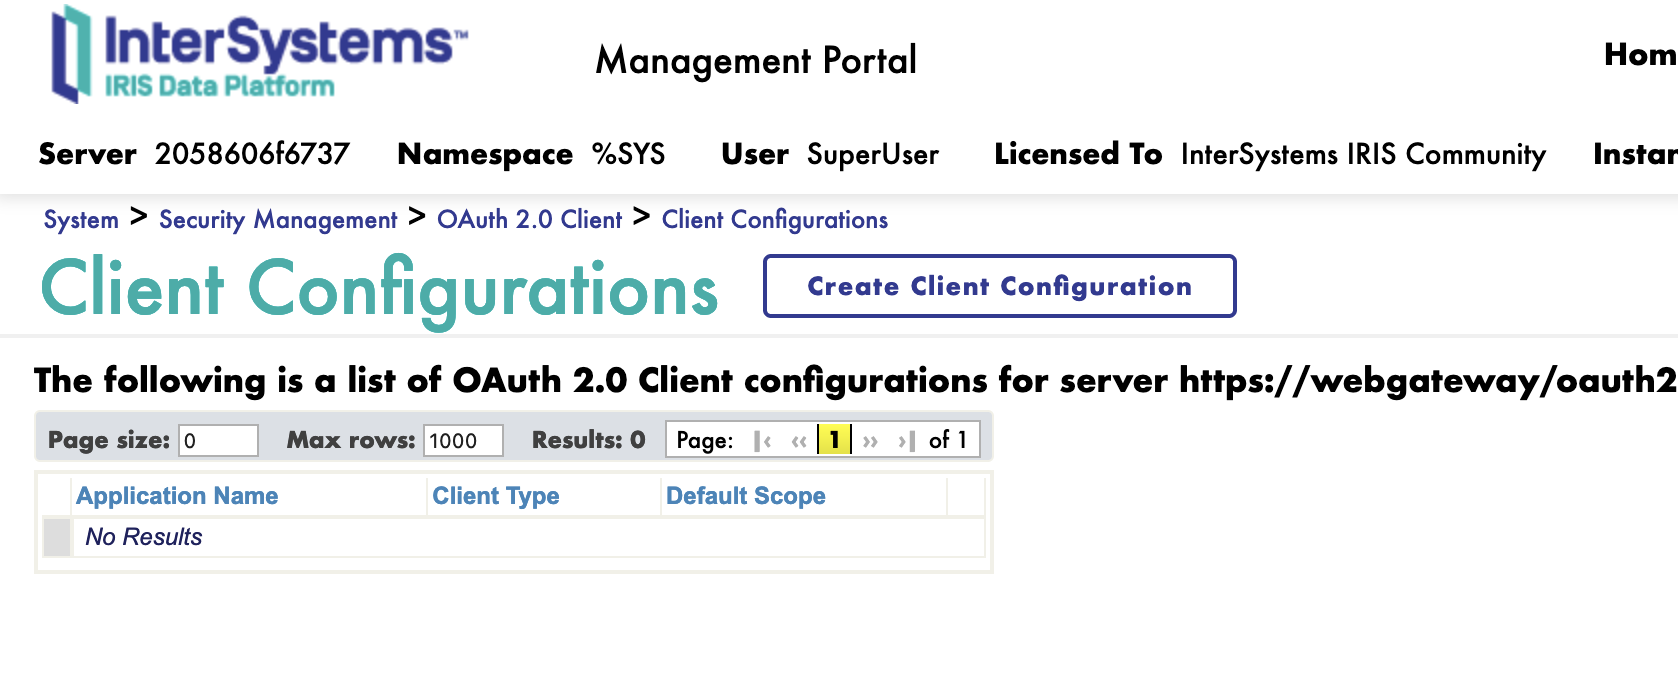
Next, we can create a new client.
On the client page, we have a new button Client Configuration.

Click on the Client Configuration button link to the Server Description.
We can now Create a new client.
First we start with the General tab.
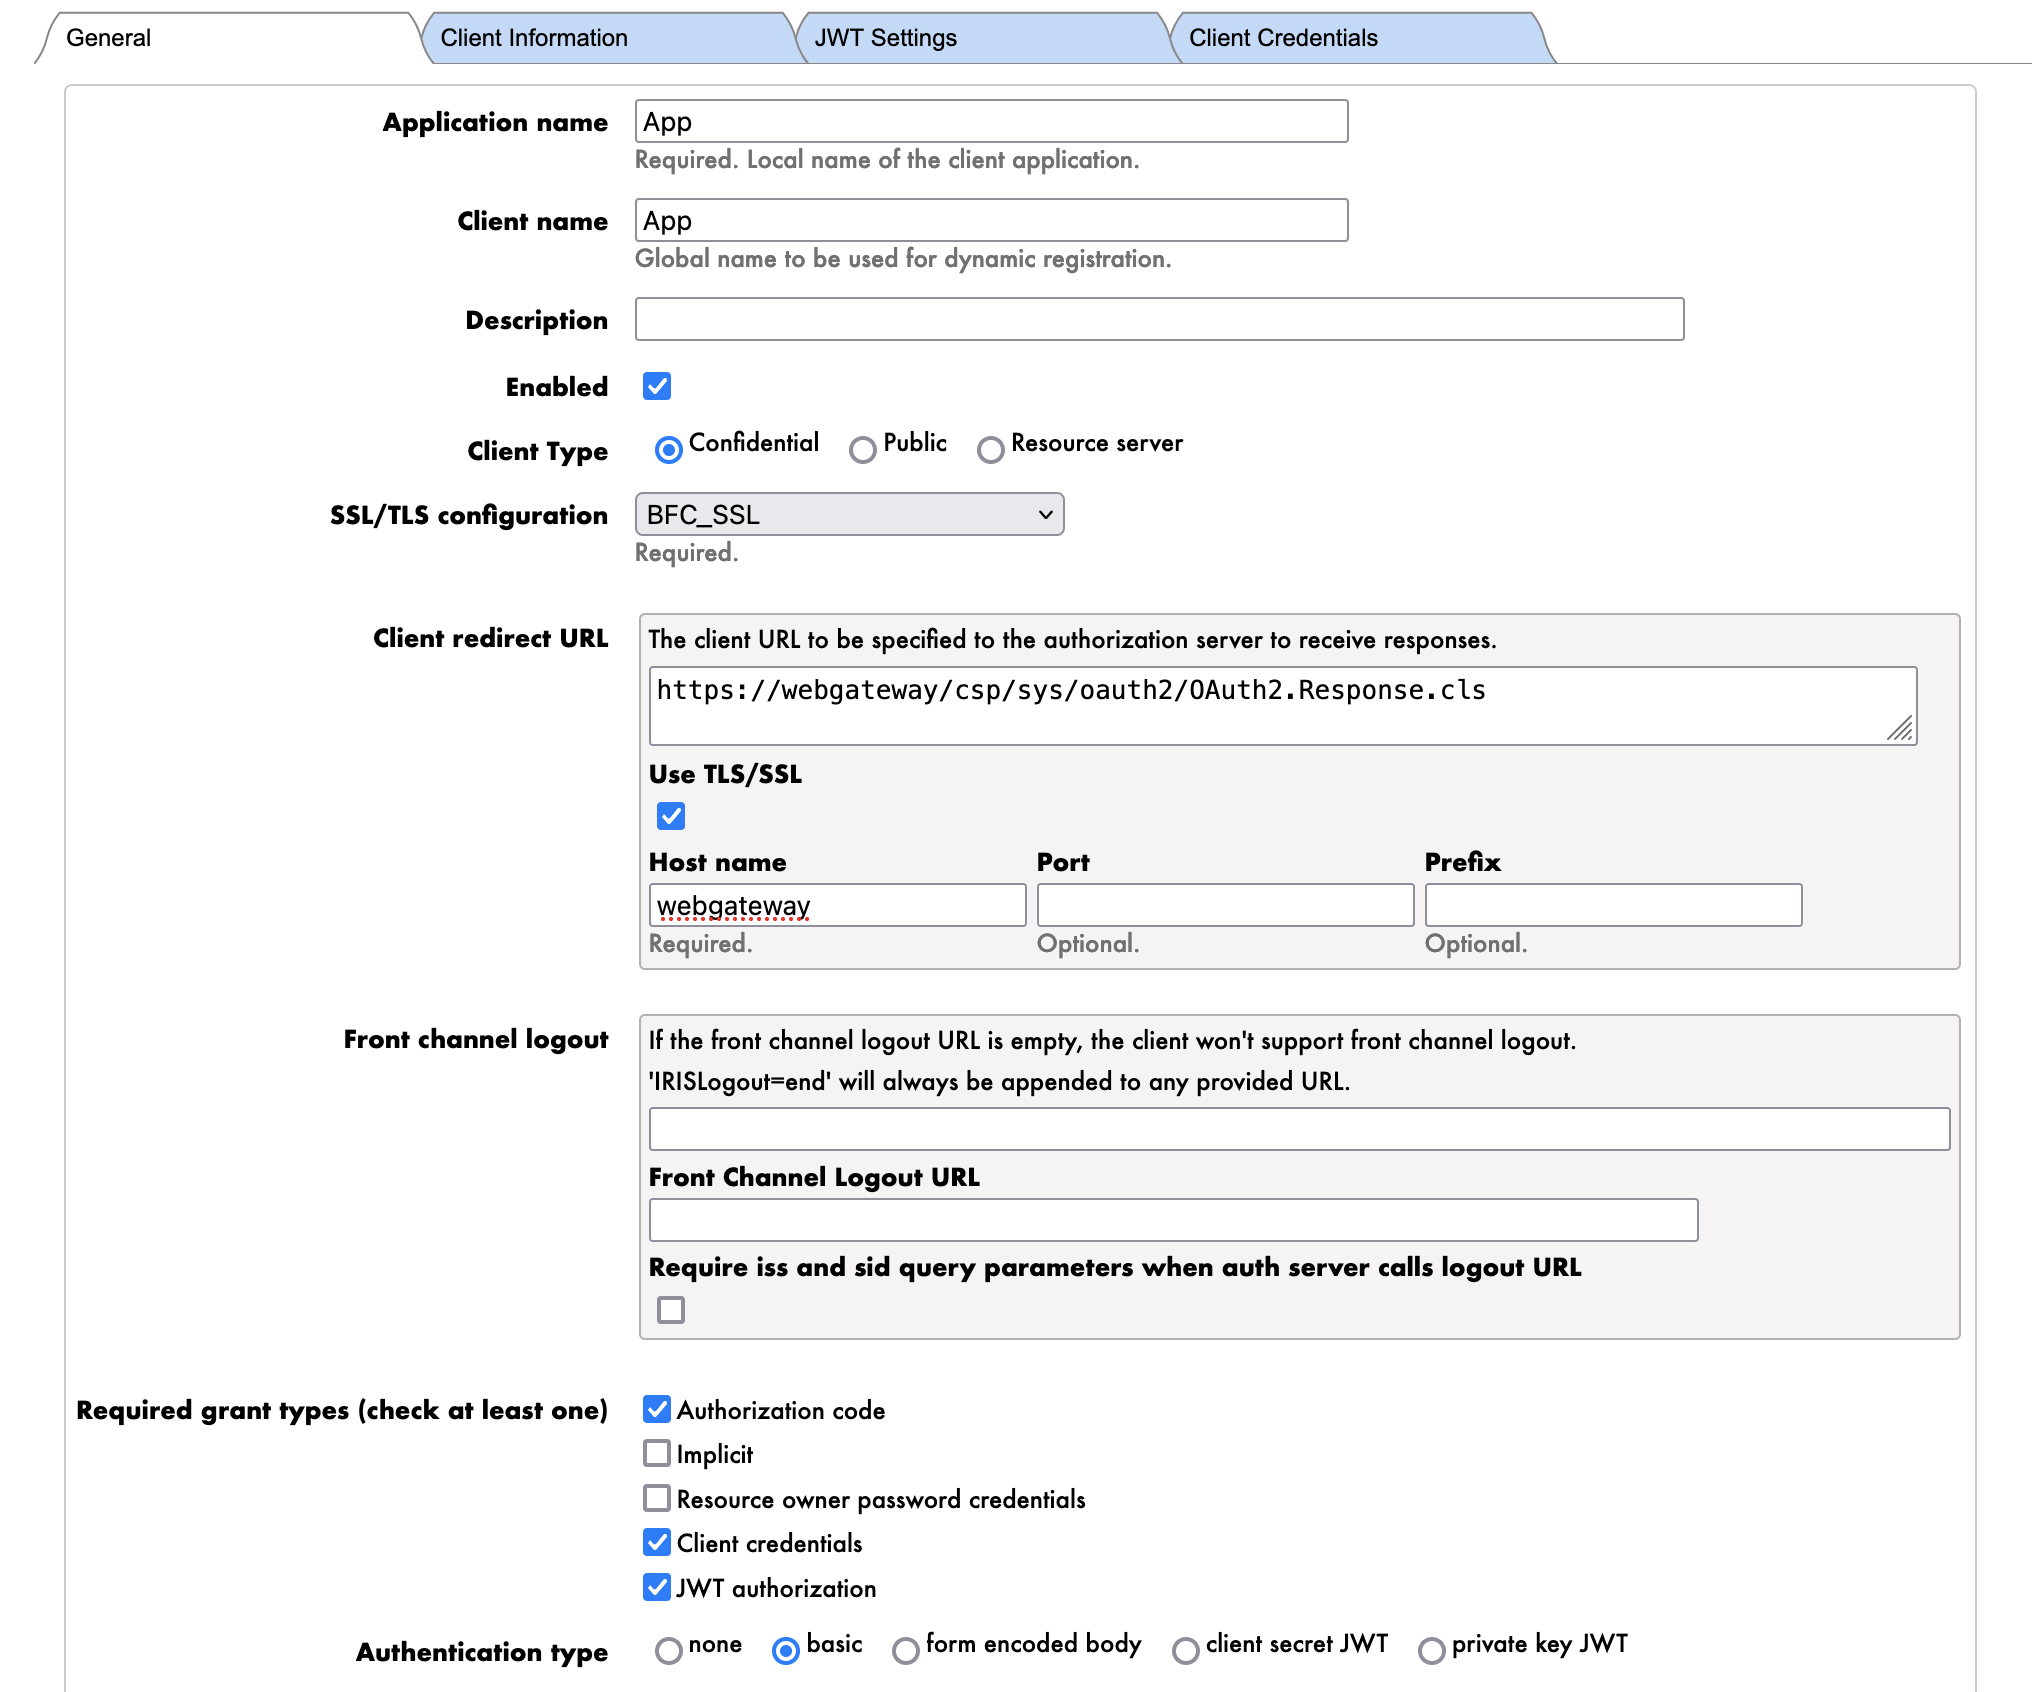
The parameters are as follows:
Now we can click the Dynamic Registration button.
Congratulations, we have now created the client. 🥳
If we go to the Client Credentials tab, we can see the client credentials.
Notice that the client credentials are the Client ID and the Client Secret.
⚠️ WARNING ⚠️ : Make sure to be on the FHIRSERVER namespace.
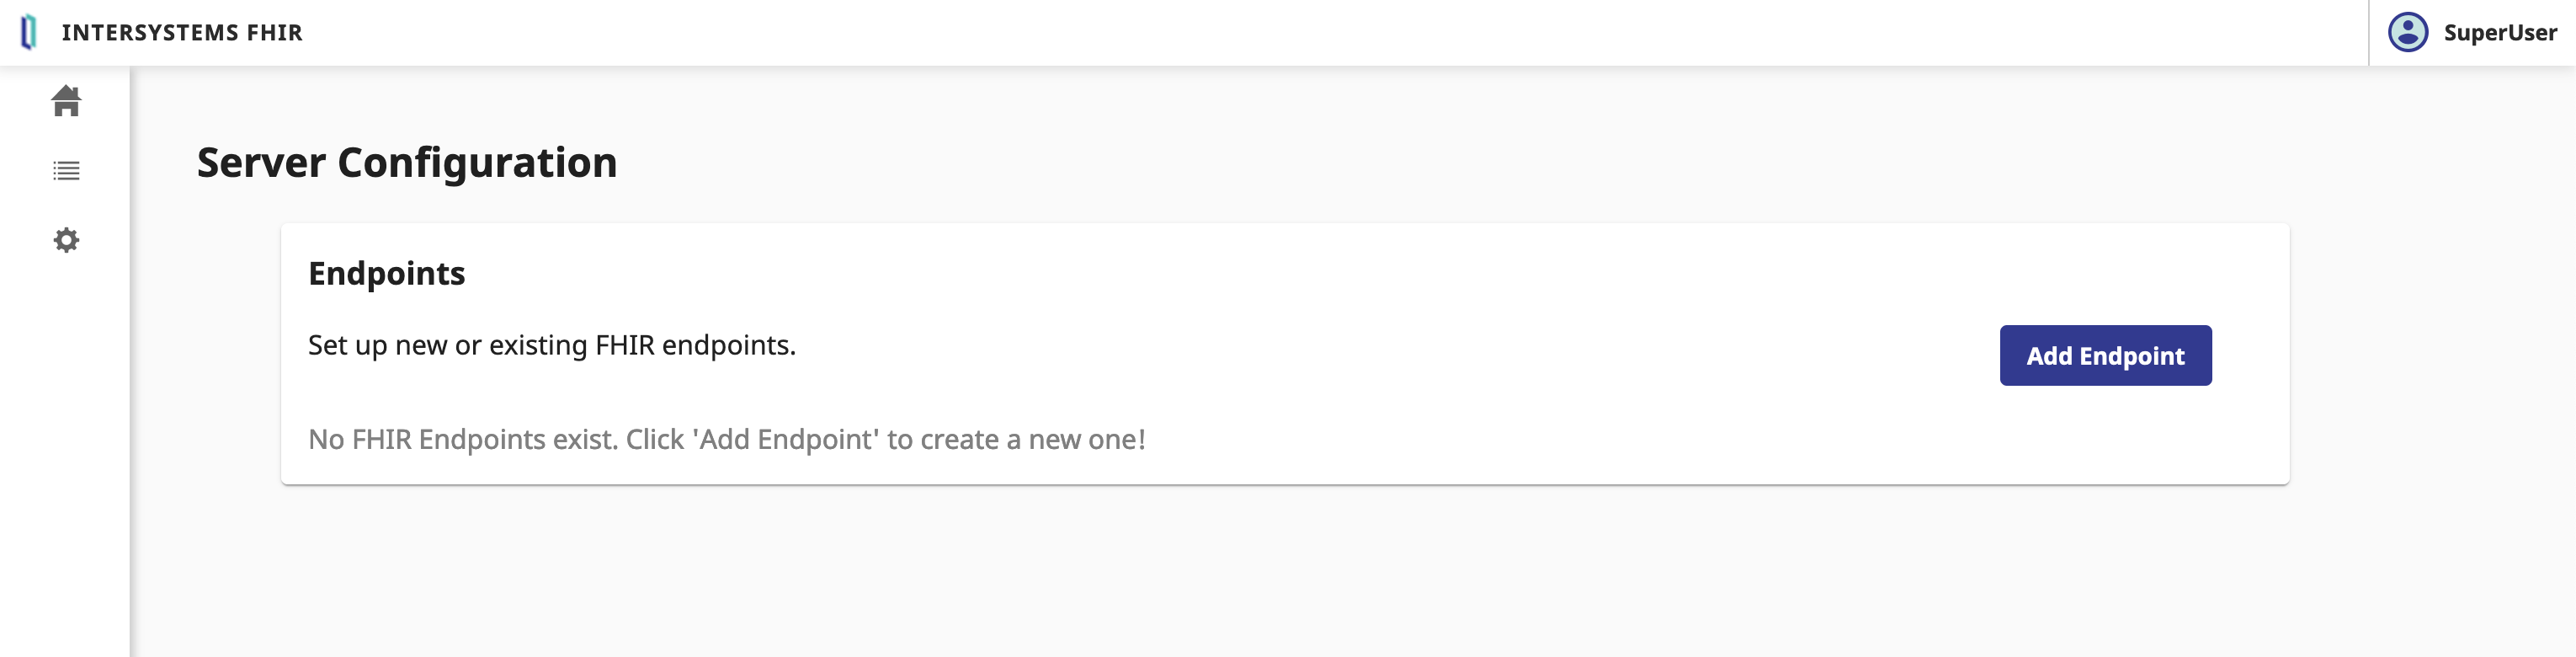
To configure the FHIR server, you need to connect to the InterSystems IRIS Management Portal and navigate to the Health > FHIR Configuration > Servers.
Next, we will create a new FHIR server.
Click on the Server Configuration button.
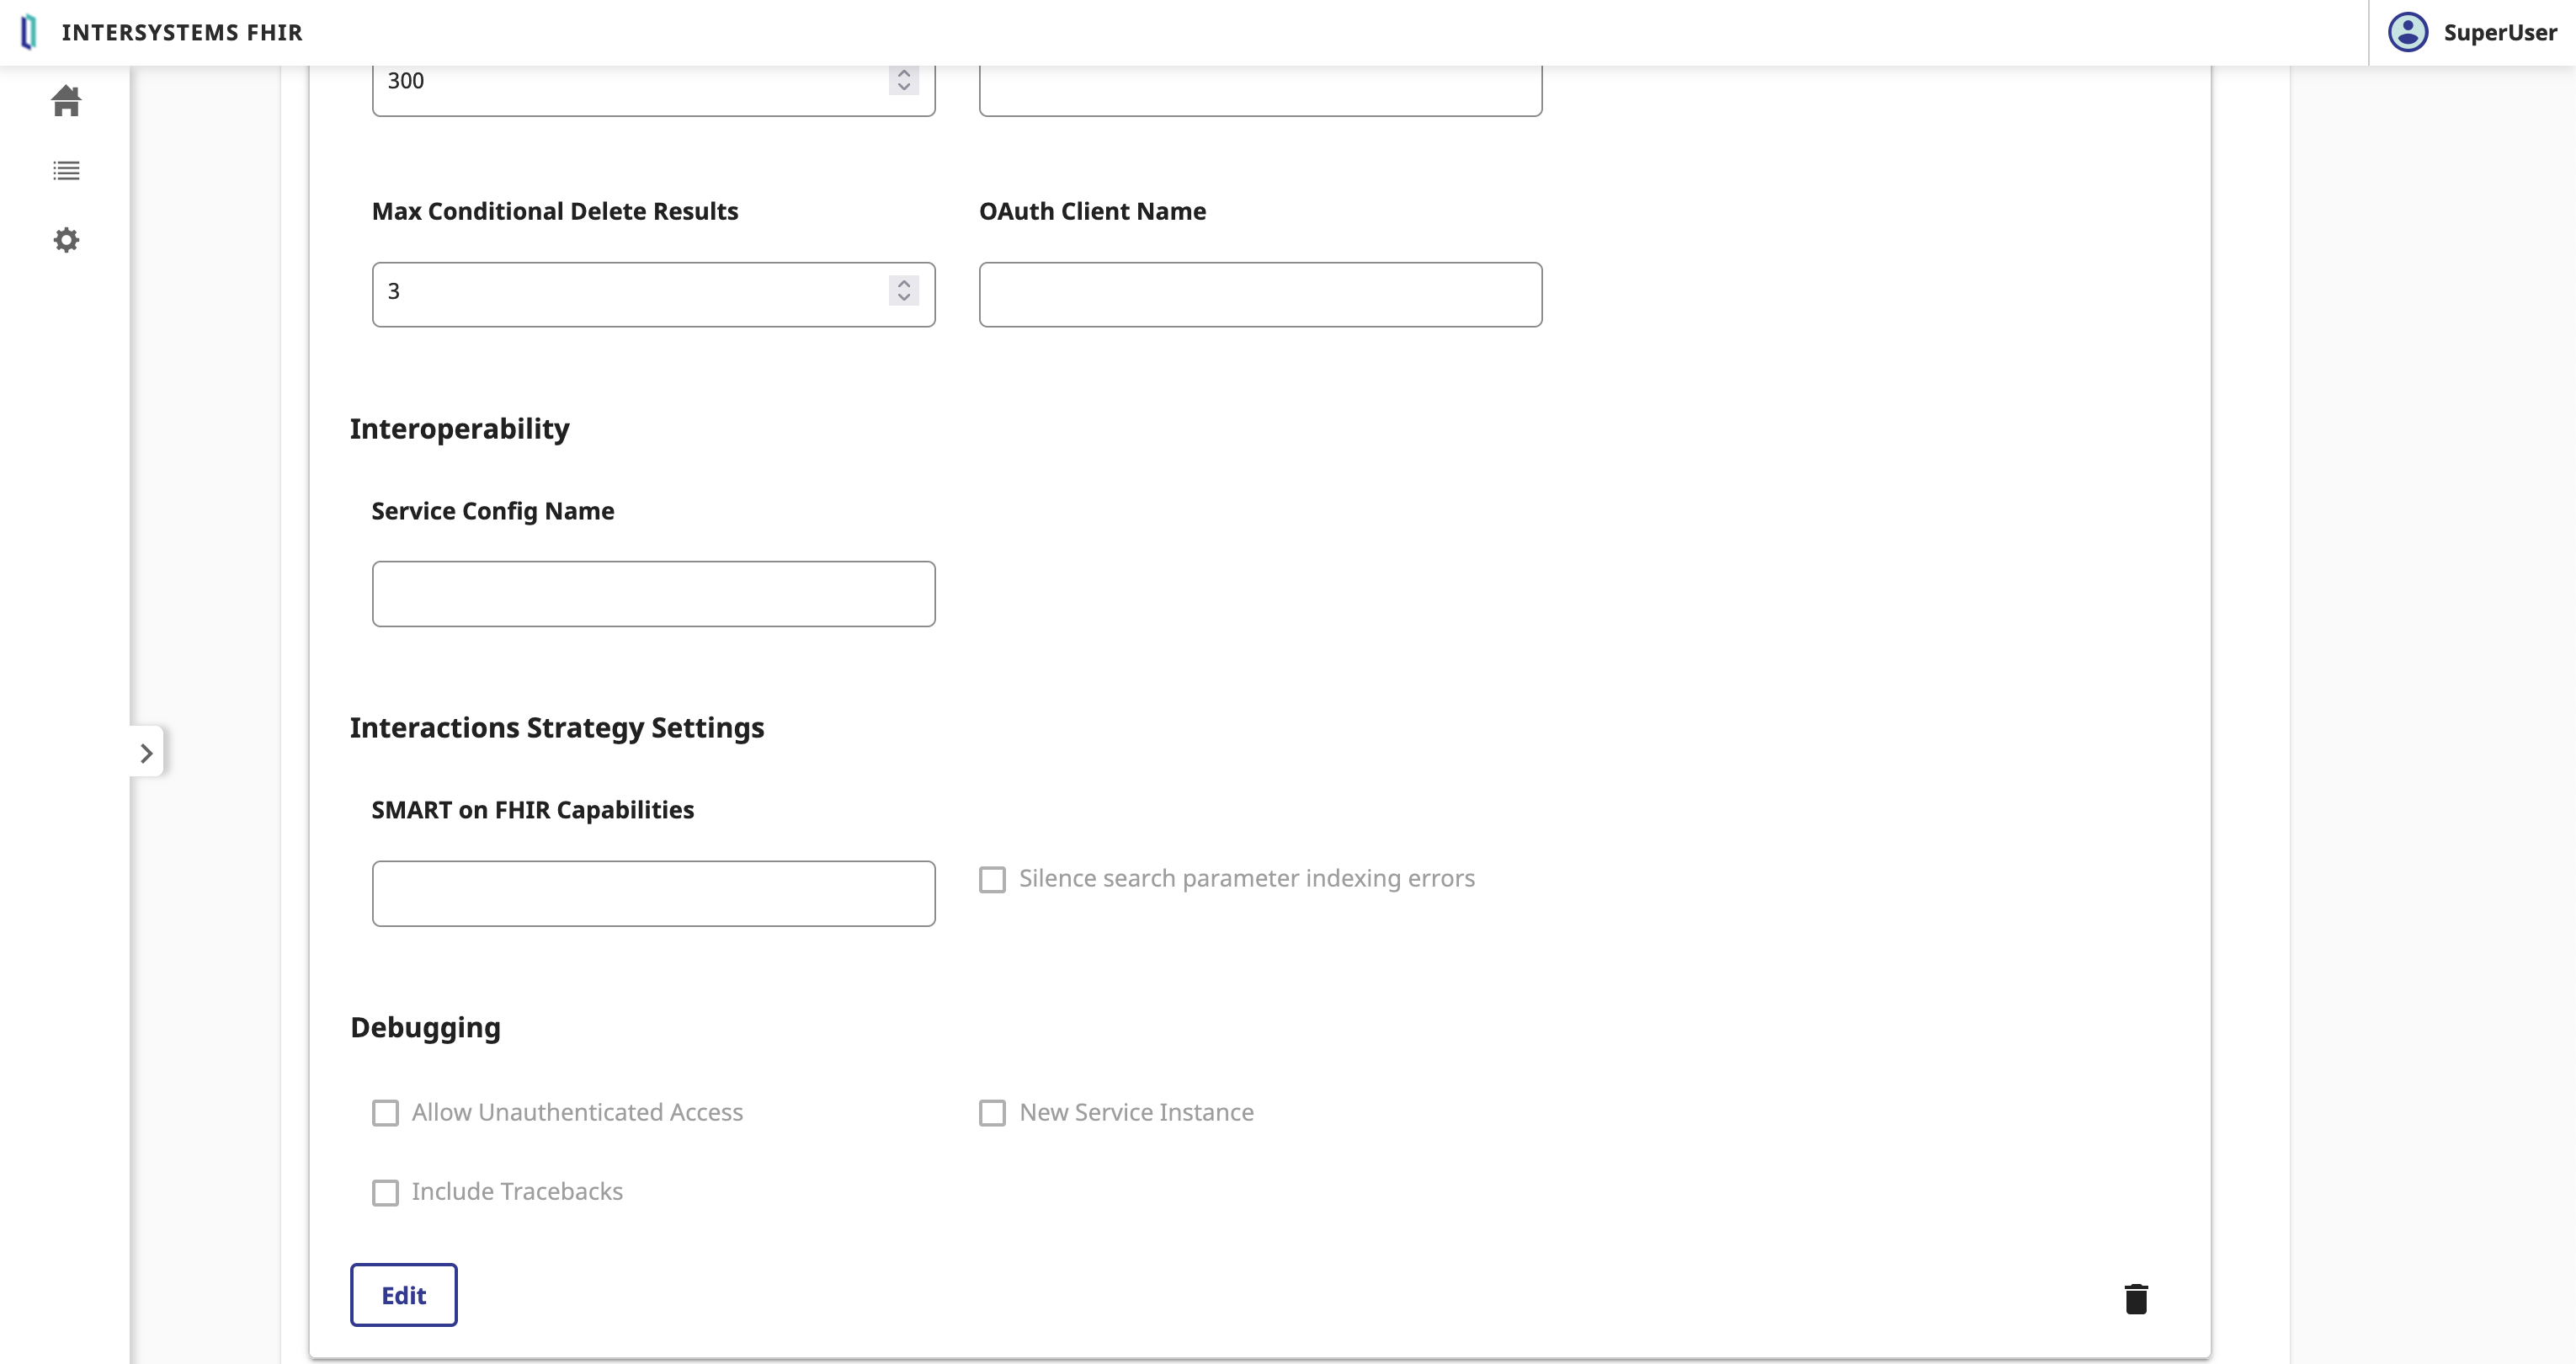
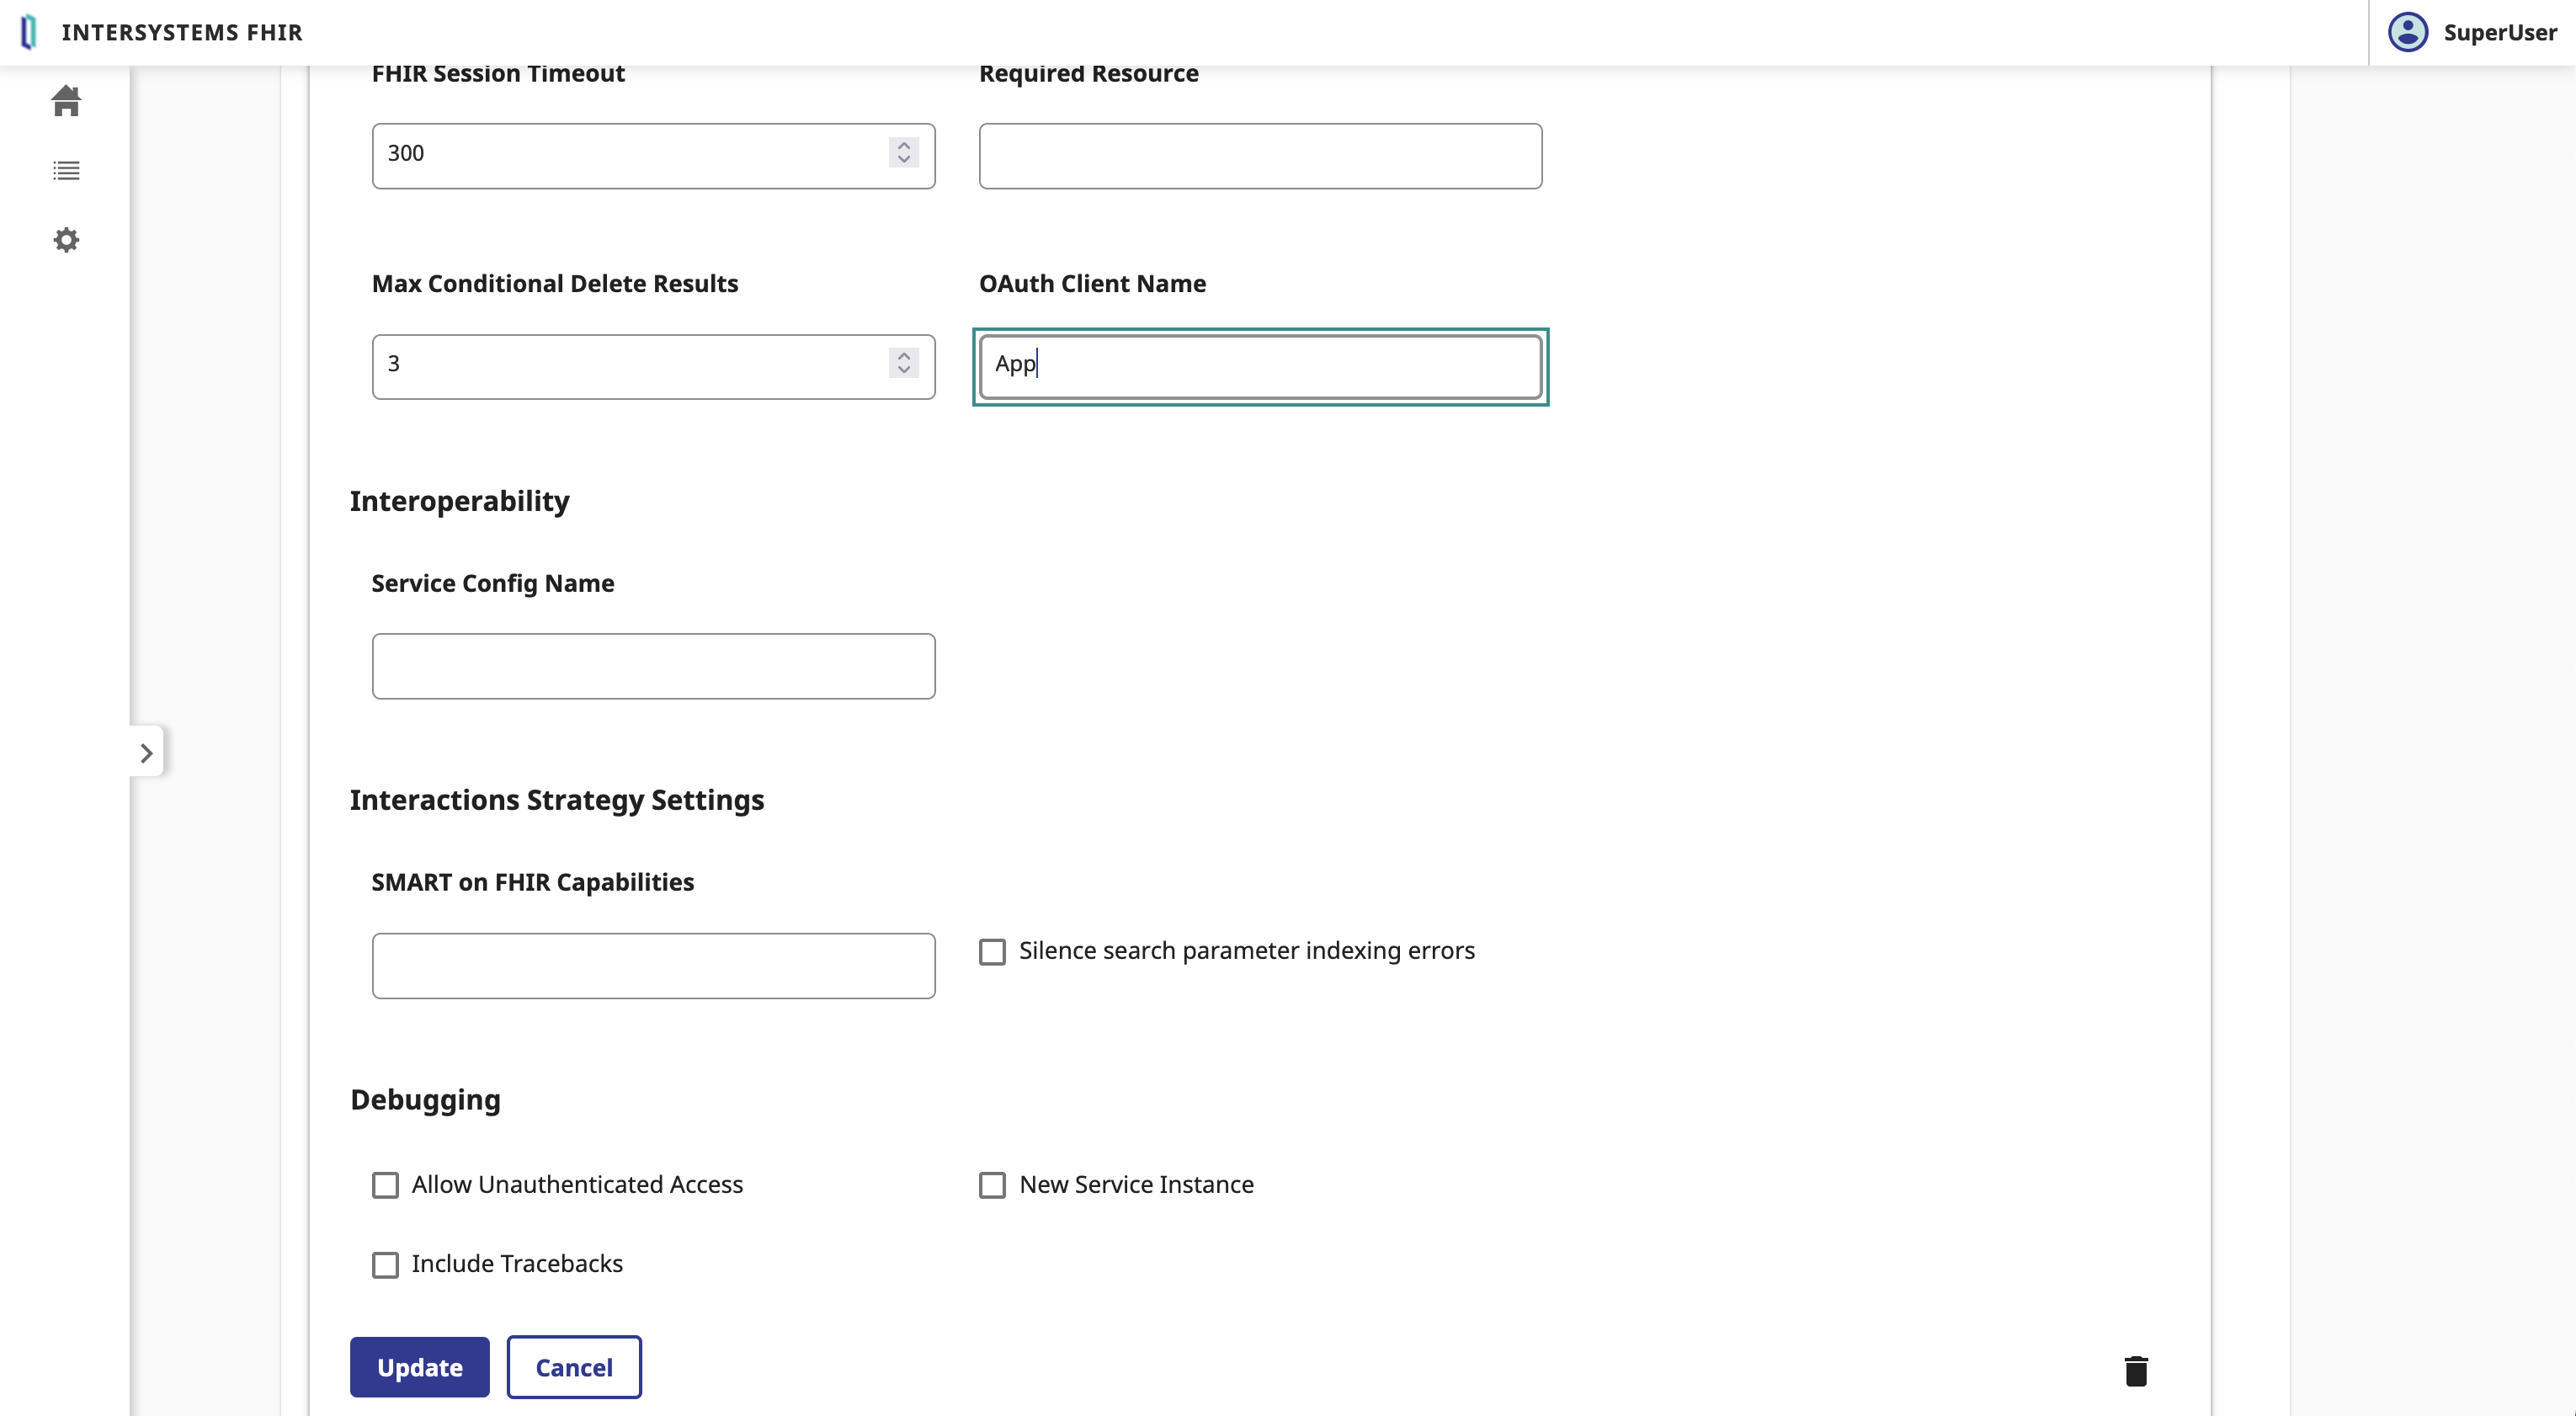
In the Server Configuration form, we need to fulfill the following parameters:
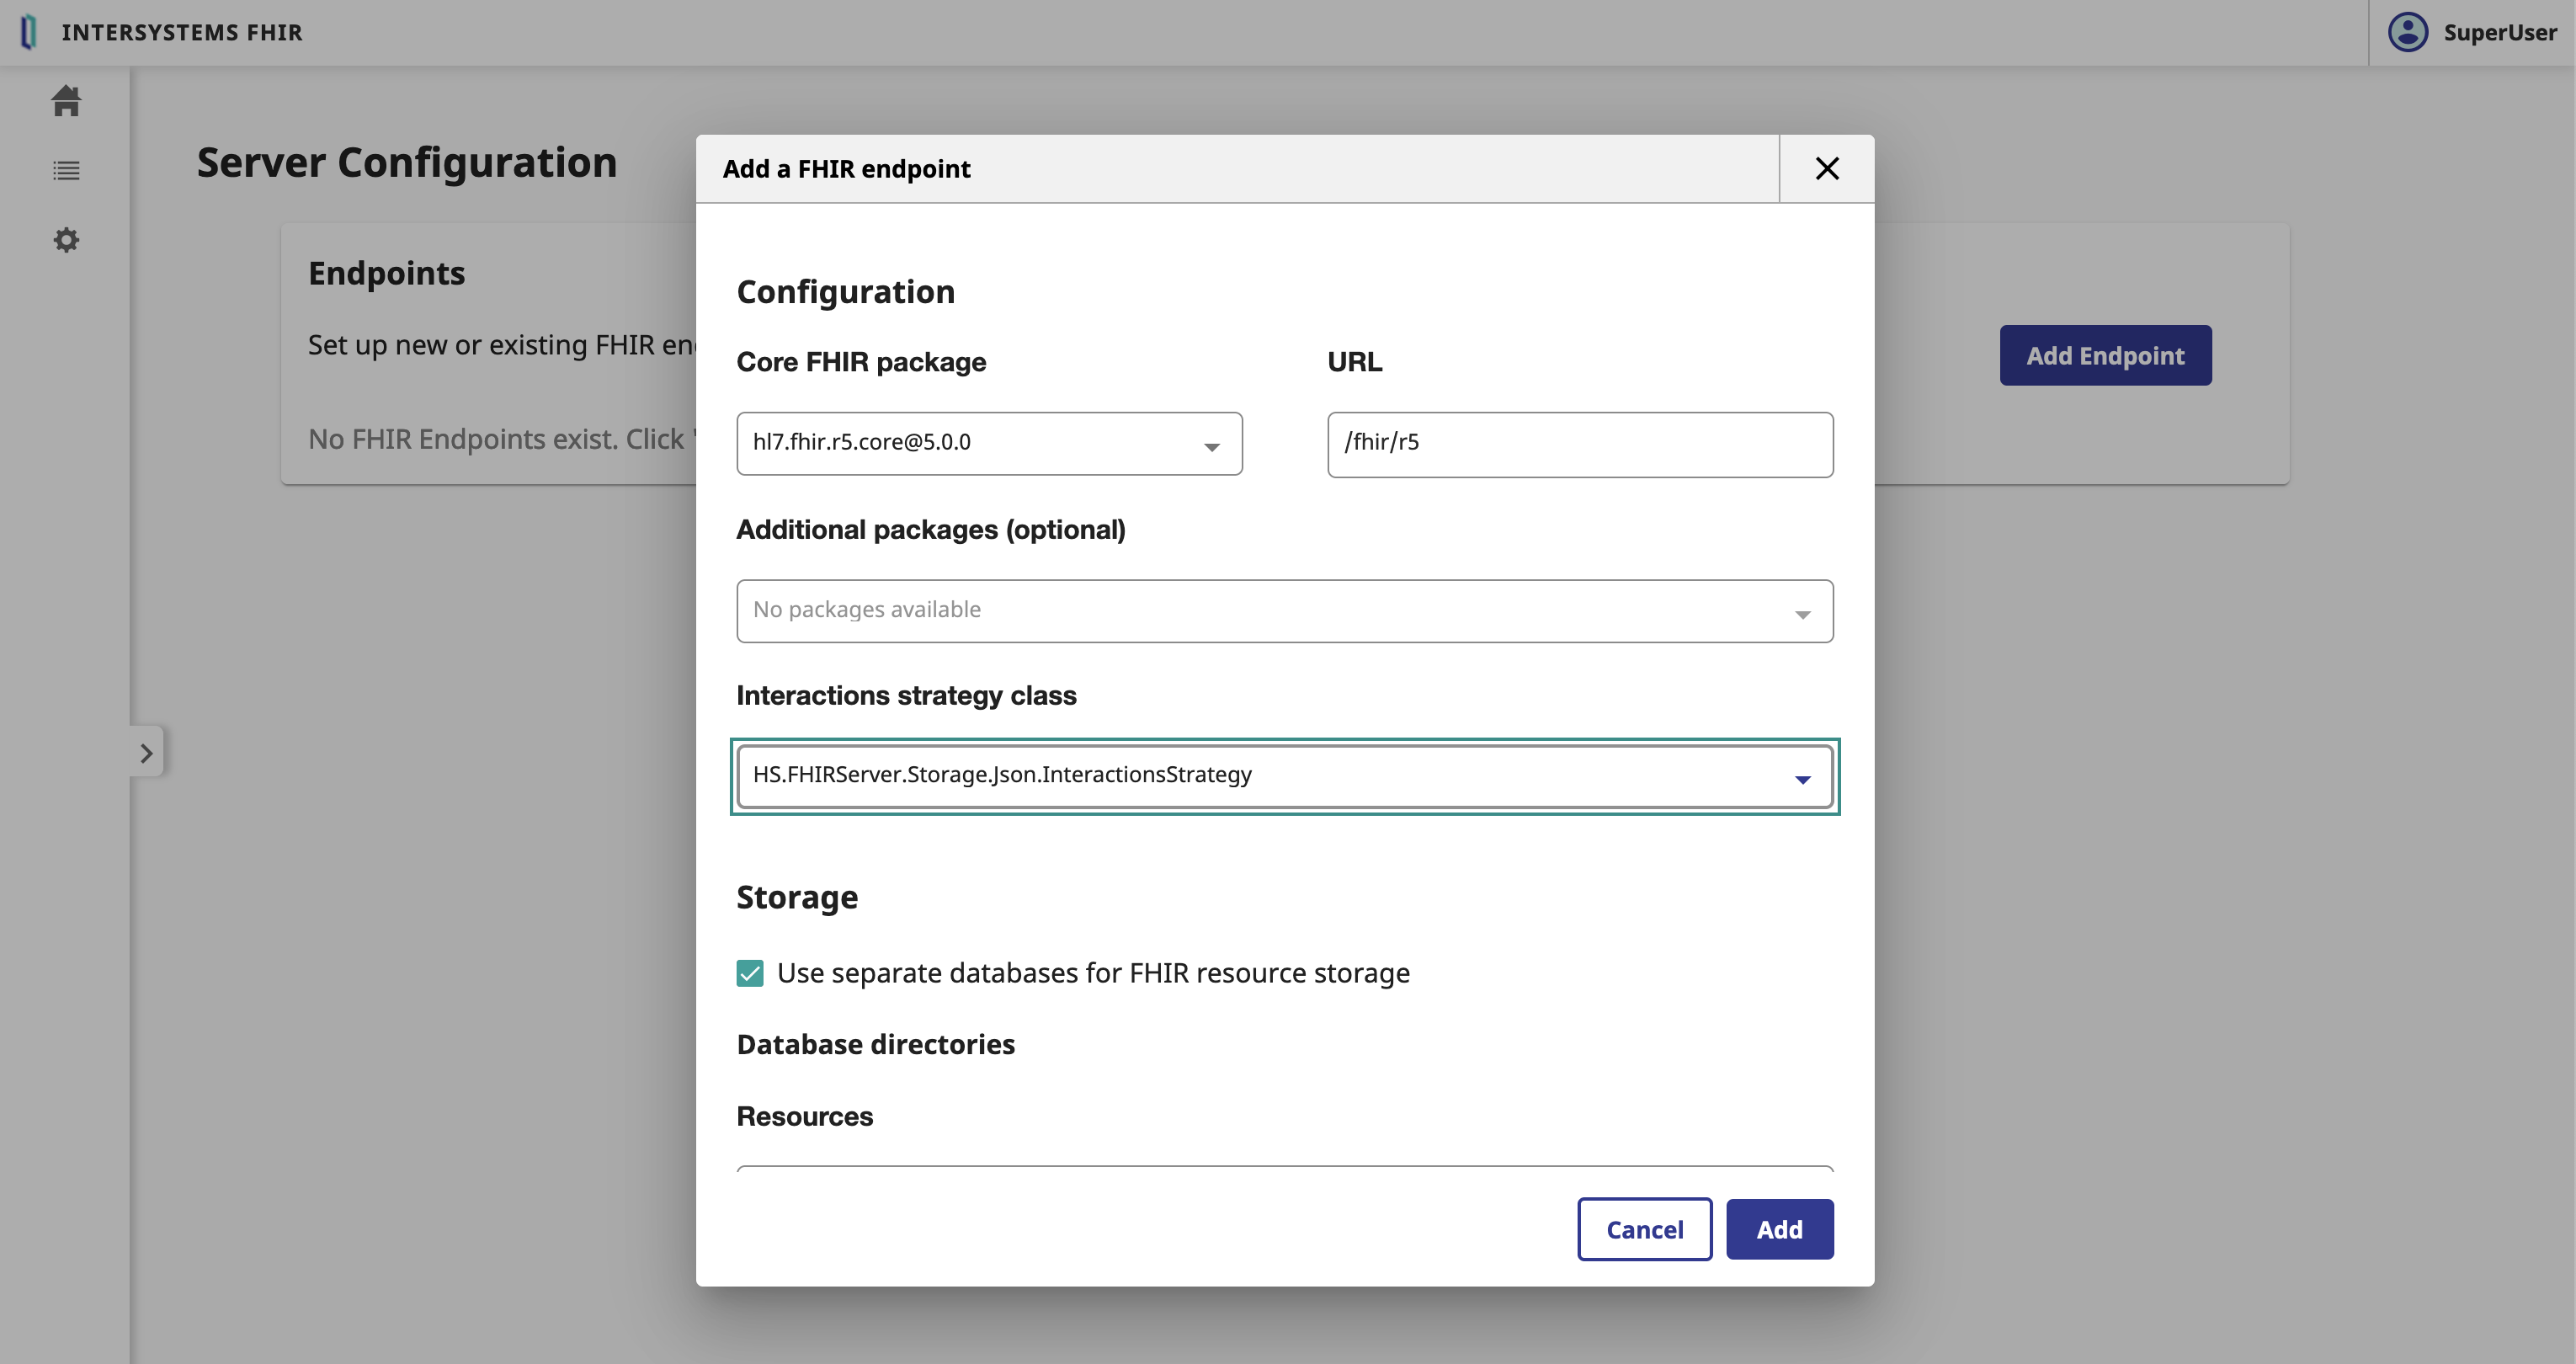
FHIR.Python.InteractionsStrategy interactions strategy.Click on the Add button.
This can take a few minutes. 🕒 Let's go grabe a coffee. ☕️
Great, we have now created the FHIR server. 🥳
Select the FHIR server and scroll down to the Edit button.
In the FHIR Server form, we need to fulfill the following parameters:
Click on the Save button.
Great, we have now bind the FHIR server to the OAuth2 Authorization Server. 🥳
To test the FHIR server, you can use the following command:
GET https://localhost:4443/fhir/r5/Patient
Without the Authorization header, you will get a 401 Unauthorized response.
To authenticate the request, you need to add the Authorization header with the Bearer token.
For that let's claim a token from the OAuth2 Authorization Server.
POST https://localhost:4443/oauth2/token
Content-Type: application/x-www-form-urlencoded
Authorization: Basic <client_id>:<client_secret>

grant_type=client_credentials&scope=user/Patient.read&aud=https://localhost:4443/fhir/r5
You will get a 200 OK response with the access_token and the token_type.
Now you can use the access_token to authenticate the request to the FHIR server.
GET https://localhost:4443/fhir/r5/Patient
Authorization: Bearer <access_token>
Accept: application/fhir+json
Great, you have now authenticated the request to the FHIR server. 🥳
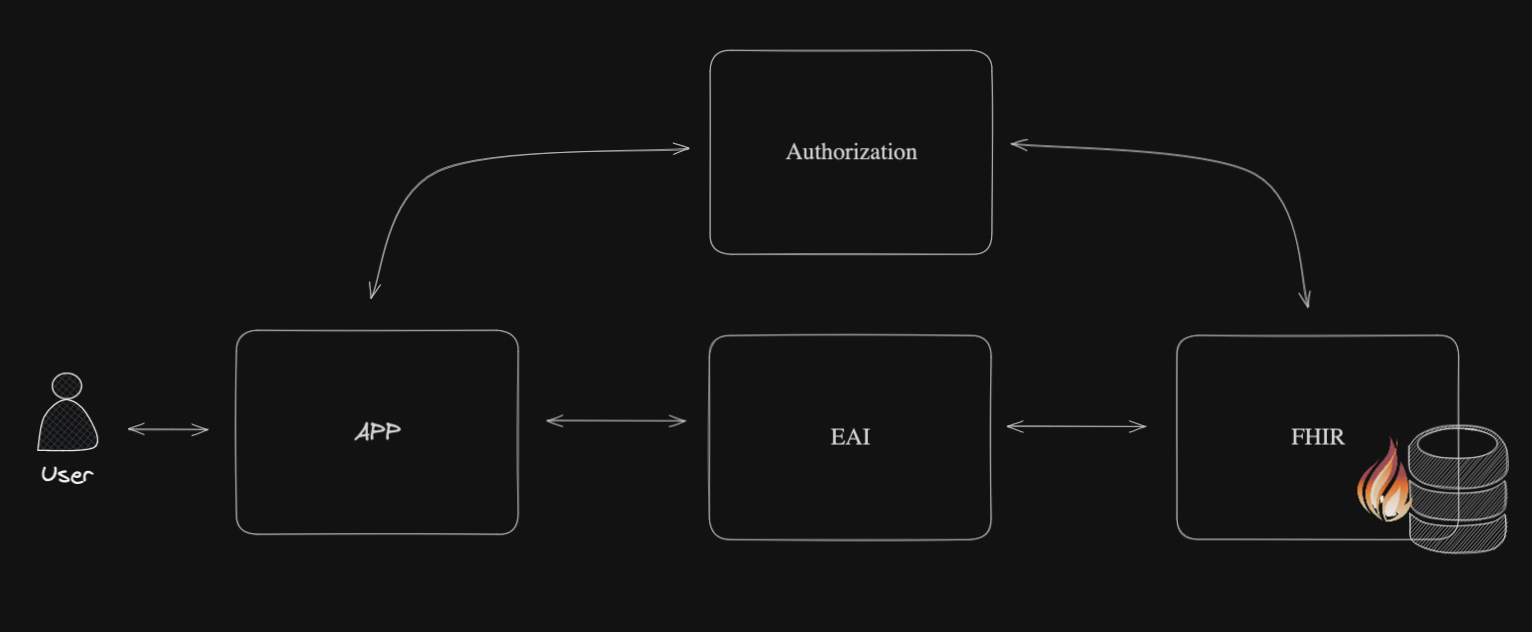
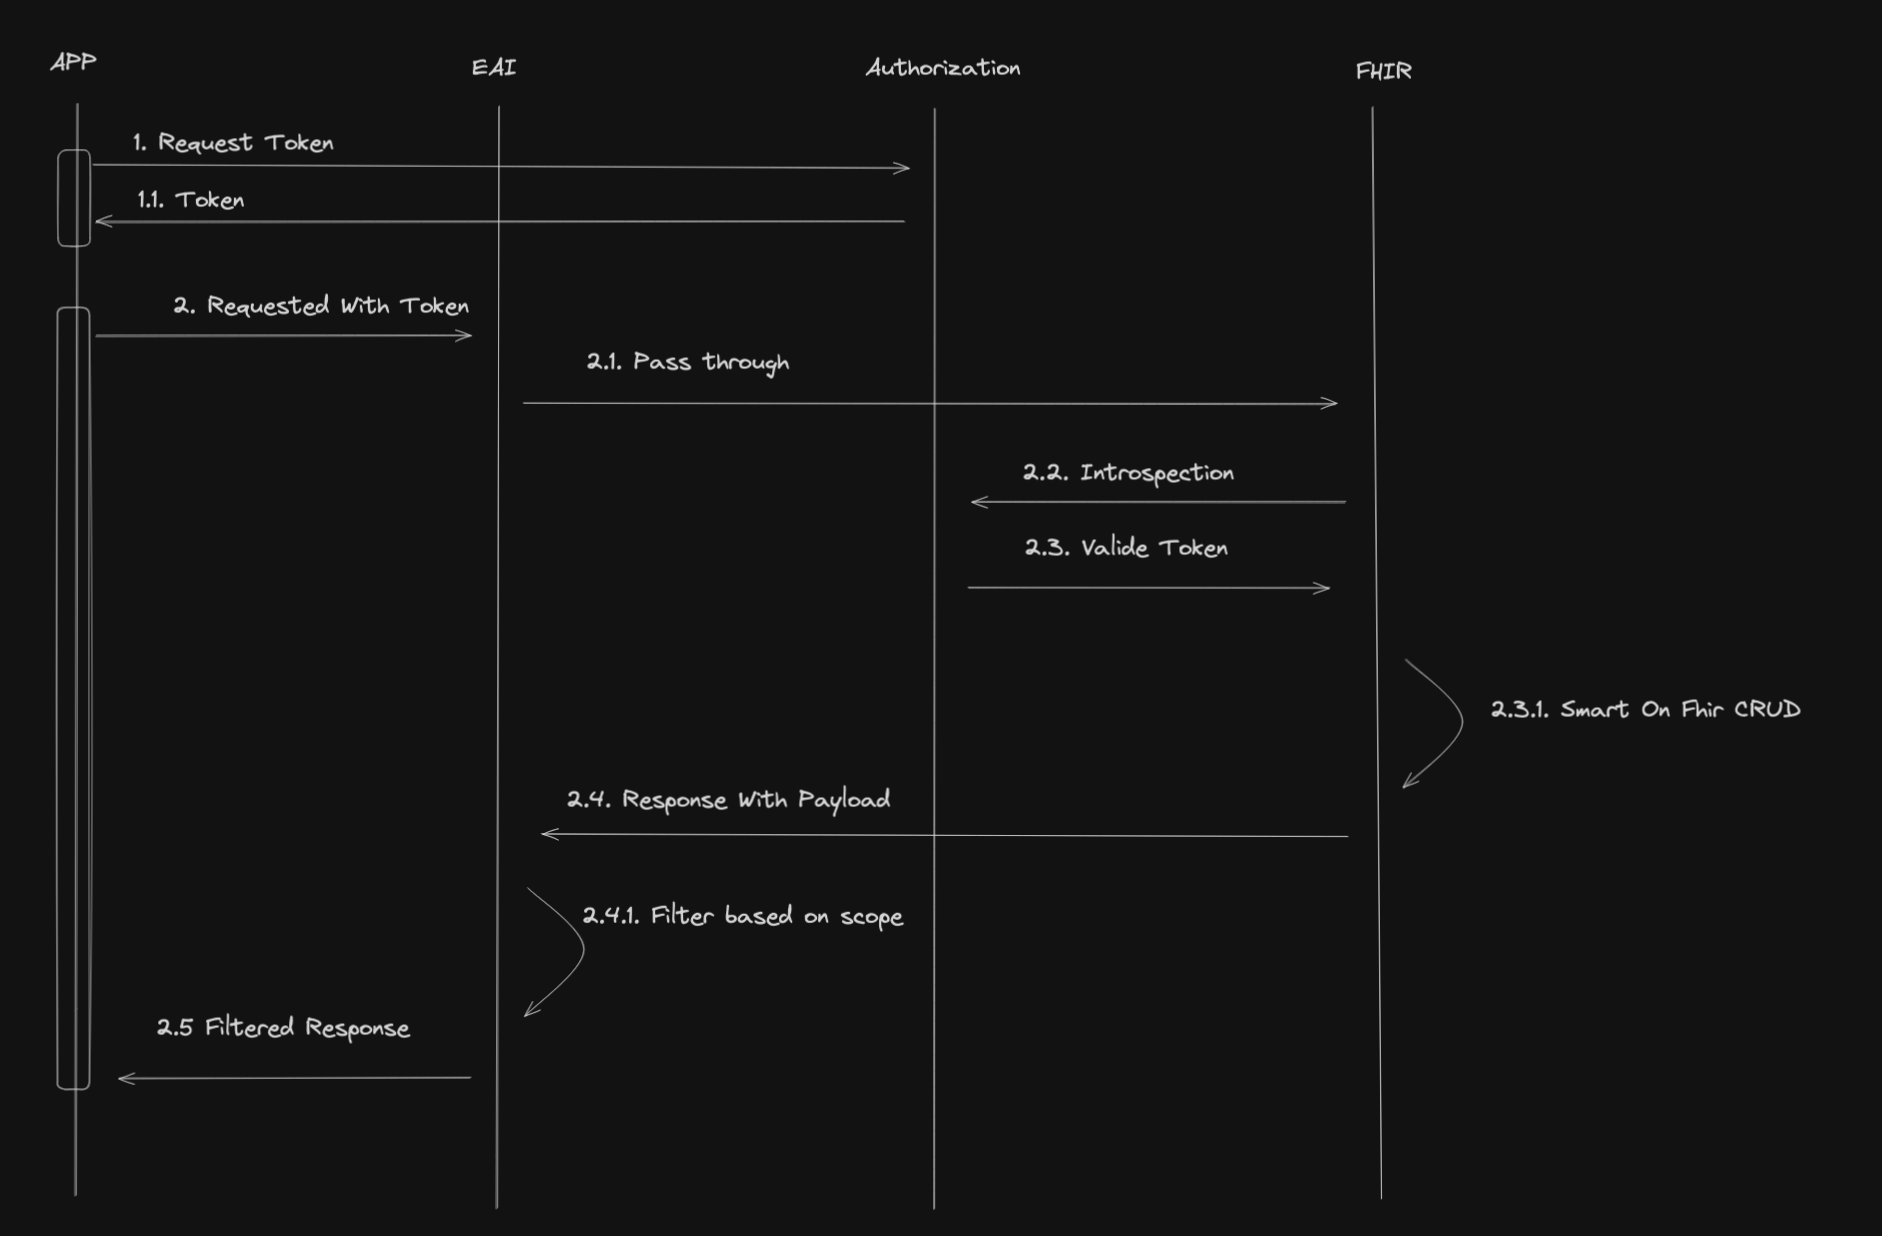
Ok, we now start a big topic.
The whole point of this topic will be to put in between the FHIR server and the client application the interoperability capabilities of IRIS for Health.
Here is a macro view of the architecture:
And here is the workflow:
What we notice here is that the EAI (Interoperability capabilities of IRIS for Health) will act as a path through for incoming requests to the FHIR server.
Will filter the response from the FHIR server based on scopes and send the filtered response to the client application.
Before going further, let me make a quick introduction to the Interoperability capabilities of IRIS for Health.
This is the IRIS Framework.

The whole point of this framework is to provide a way to connect different systems together.
We have 4 main components:
For this training, we will use the following components:
Business Service to receive the incoming request from the client application.Business Process to filter the response from the FHIR server based on scopes.Business Operation to send messages to the FHIR server.For this training, we will be using a pre-built interoperability production.
And we will only focus on the Business Process to filter the response from the FHIR server based on scopes.
For this part, we will use the IoP tool. IoP stands for Interoperability on Python.
You can install the IoP tool by following the instructions on the IoP repository
IoP is pre-installed in the training environment.
Connect to the running container:
docker exec -it formation-fhir-python-iris-1 bash
And run the following command:
iop --init
This will install iop on the IRIS for Health container.
Still in the container, run the following command:
iop --migrate /irisdev/app/src/python/EAI/settings.py
This will create the interoperability production.
Now you can access the interoperability production at the following URL:
http://localhost:8089/csp/healthshare/eai/EnsPortal.ProductionConfig.zen?$NAMESPACE=EAI&$NAMESPACE=EAI&
You can now start the production.
Great, you have now created the interoperability production. 🥳
Get a token from the OAuth2 Authorization Server.
POST https://localhost:4443/oauth2/token
Content-Type: application/x-www-form-urlencoded
Authorization : Basic <client_id>:<client_secret>

grant_type=client_credentials&scope=user/Patient.read&aud=https://webgateway/fhir/r5
⚠️ WARNING ⚠️ : we change the aud parameter to the URL of the Web Gateway to expose the FHIR server over HTTPS.
Get a patient through the interoperability production.
GET https://localhost:4443/fhir/Patient
Authorization : Bearer <Token>
Accept: application/fhir+json
You can see the trace of the request in the interoperability production.
http://localhost:8089/csp/healthshare/eai/EnsPortal.MessageViewer.zen?SOURCEORTARGET=Python.EAI.bp.MyBusinessProcess
All the code for the Business Process is in this file : https://github.com/grongierisc/formation-fhir-python/blob/main/src/python/EAI/bp.py
For this training, we will be as a TTD (Test Driven Development) approach.
All the tests for the Business Process are in this file : https://github.com/grongierisc/formation-fhir-python/blob/main/src/python/tests/EAI/test_bp.py
To prepare your development environment, we need to create a virtual environment.
python3 -m venv .venv
source .venv/bin/activate
pip install -r requirements.txt
To run the tests, you can use the following command:
pytest
Tests are failing.
We have 4 functions to implement:
check_tokenon_fhir_requestfilter_patient_resourcefilter_resourcesYou can implement the code in the https://github.com/grongierisc/formation-fhir-python/blob/main/src/python/EAI/bp.py file.
This function will check if the token is valid and if the scope contains the VIP scope.
If the token is valid and the scope contains the VIP scope, the function will return True, otherwise it will return False.
We will use the jwt library to decode the token.
def check_token(self, token:str) -> bool:

    # decode the token
    try:
        decoded_token= jwt.decode(token, options={"verify_signature": False})
    except jwt.exceptions.DecodeError:
        return False

    # check if the token is valid
    if 'VIP' in decoded_token['scope']:
        return True
    else:
        return False
This function will filter the patient resource.
It will remove the name, address, telecom and birthdate fields from the patient resource.
The function will return the filtered patient resource as a string.
We will use the fhir.resources library to parse the patient resource.
Notice the signature of the function.
The function takes a string as input and returns a string as output.
So we need to parse the input string to a fhir.resources.patient.Patient object and then parse the fhir.resources.patient.Patient object to a string.
def filter_patient_resource(self, patient_str:str) -> str:
    # filter the patient
    p = patient.Patient(**json.loads(patient_str))
    # remove the name
    p.name = []
    # remove the address
    p.address = []
    # remove the telecom
    p.telecom = []
    # remove the birthdate
    p.birthDate = None

    return p.json()
This function will filter the resources.
We need to check the resource type and filter the resource based on the resource type.
If the resource type is Bundle, we need to filter all the entries of the bundle that are of type Patient.
If the resource type is Patient, we need to filter the patient resource.
The function will return the filtered resource as a string.
We will use the fhir.resources library to parse the resource.
    def filter_resources(self, resource_str:str) -> str:
        # parse the payload
        payload_dict = json.loads(resource_str)

        # what is the resource type?
        resource_type = payload_dict['resourceType'] if 'resourceType' in payload_dict else 'None'
        self.log_info('Resource type: ' + resource_type)

        # is it a bundle?
        if resource_type == 'Bundle':
            obj = bundle.Bundle(**payload_dict)
            # filter the bundle
            for entry in obj.entry:
                if entry.resource.resource_type == 'Patient':
                    self.log_info('Filtering a patient')
                    entry.resource = patient.Patient(**json.loads(self.filter_patient_resource(entry.resource.json())))

        elif resource_type == 'Patient':
            # filter the patient
            obj = patient.Patient(**json.loads(self.filter_patient_resource(resource_str)))
        else:
            return resource_str

        return obj.json()
This function will be the entry point of the Business Process.
It will receive the request from the Business Service, check the token, filter the response from the FHIR server based on scopes and send the filtered response to the Business Service.
The function will return the response from the FHIR server.
We will use the iris library to send the request to the FHIR server.
The message will be a iris.HS.FHIRServer.Interop.Request object.
This object contains the request to the FHIR server.
This includes the Method, the URL, the Headers and the Payload.
To check the token, we will use the check_token function and use the header USER:OAuthToken to get the token.
To filter the response, we will use the filter_resources function and use the QuickStream to read the response from the FHIR server.
def on_fhir_request(self, request:'iris.HS.FHIRServer.Interop.Request'):
    # Do something with the request
    self.log_info('Received a FHIR request')

    # pass it to the target
    rsp = self.send_request_sync(self.target, request)

    # Try to get the token from the request
    token = request.Request.AdditionalInfo.GetAt("USER:OAuthToken") or ""

    # Do something with the response
    if self.check_token(token):
        self.log_info('Filtering the response')
        # Filter the response
        payload_str = self.quick_stream_to_string(rsp.QuickStreamId)

        # if the payload is empty, return the response
        if payload_str == '':
            return rsp

        filtered_payload_string = self.filter_resources(payload_str)
        if filtered_payload_string == '':
            return rsp

        # write the json string to a quick stream
        quick_stream = self.string_to_quick_stream(filtered_payload_string)

        # return the response
        rsp.QuickStreamId = quick_stream._Id()

    return rsp
To run the tests, you can use the following command:
pytest
Tests are passing. 🥳
You can now test the Business Process with the interoperability production.
Last part of the training. 🏁
We will create a custom operation on the FHIR server.
The custom operation will be a Patient merge operation, the result will be the diff of the 2 patients.
example:
POST https://localhost:4443/fhir/r5/Patient/1/$merge
Authorization : Bearer <Token>
Accept: application/fhir+json
Content-Type: application/fhir+json

{
  "resourceType": "Patient",
  "id": "2",
  "meta": {
    "versionId": "2"
  }
}
The response will be the diff of the 2 patients.
{
    "values_changed": {
        "root['address'][0]['city']": {
            "new_value": "fdsfd",
            "old_value": "Lynnfield"
        },
        "root['meta']['lastUpdated']": {
            "new_value": "2024-02-24T09:11:00Z",
            "old_value": "2024-02-28T13:50:27Z"
        },
        "root['meta']['versionId']": {
            "new_value": "1",
            "old_value": "2"
        }
    }
}
Before going further, let me make a quick introduction to the custom operation on the FHIR server.
There is 3 types of custom operation:
For this training, we will use the Instance Operation to create the custom operation.
A custom operation must inherit from the OperationHandler class from the FhirInteraction module.
Here is the signature of the OperationHandler class:
class OperationHandler(object):

    @abc.abstractmethod
    def add_supported_operations(self,map:dict) -> dict:
        """
        @API Enumerate the name and url of each Operation supported by this class
        @Output map : A map of operation names to their corresponding URL.
        Example:
        return map.put("restart","http://hl7.org/fhir/OperationDefinition/System-restart")
        """

    @abc.abstractmethod
    def process_operation(
        self,
        operation_name:str,
        operation_scope:str,
        body:dict,
        fhir_service:'iris.HS.FHIRServer.API.Service',
        fhir_request:'iris.HS.FHIRServer.API.Data.Request',
        fhir_response:'iris.HS.FHIRServer.API.Data.Response'
    ) -> 'iris.HS.FHIRServer.API.Data.Response':
        """
        @API Process an Operation request.
        @Input operation_name : The name of the Operation to process.
        @Input operation_scope : The scope of the Operation to process.
        @Input fhir_service : The FHIR Service object.
        @Input fhir_request : The FHIR Request object.
        @Input fhir_response : The FHIR Response object.
        @Output : The FHIR Response object.
        """
As we did in the previous part, we will use a TTD (Test Driven Development) approach.
All the tests for the custom operation are in this file : https://github.com/grongierisc/formation-fhir-python/blob/main/src/python/tests/FhirInteraction/test_custom.py
This function will add the Patient merge operation to the supported operations.
The function will return a dictionary with the name of the operation and the URL of the operation.
Be aware that the input dict can be empty.
The expected output is:
{
  "resource":
    {
      "Patient":
        [
          {
            "name": "merge",
            "definition": "http://hl7.org/fhir/OperationDefinition/Patient-merge"
          }
        ]
    }
}
This json document will be added to the CapabilityStatement of the FHIR server.
def add_supported_operations(self,map:dict) -> dict:
    """
    @API Enumerate the name and url of each Operation supported by this class
    @Output map : A map of operation names to their corresponding URL.
    Example:
    return map.put("restart","http://hl7.org/fhir/OperationDefinition/System-restart")
    """

    # verify the map has attribute resource
    if not 'resource' in map:
        map['resource'] = {}
    # verify the map has attribute patient in the resource
    if not 'Patient' in map['resource']:
        map['resource']['Patient'] = []
    # add the operation to the map
    map['resource']['Patient'].append({"name": "merge" , "definition": "http://hl7.org/fhir/OperationDefinition/Patient-merge"})

    return map
This function will process the Patient merge operation.
The function will return the diff of the 2 patients.
We will make use of deepdiff library to get the diff of the 2 patients.
The input parameters are:
operation_name: The name of the operation to process.operation_scope: The scope of the operation to process.body: The body of the operation.fhir_service: The FHIR Service object.
resource_type: The type of the resource to read.resource_id: The id of the resource to read.%DynamicObject object.fhir_request: The FHIR Request object.
%DynamicObject object.fhir_response: The FHIR Response object.
%DynamicObject object.%DynamicObject is a class to manipulate JSON objects.
It's the same as a Python dictionary but for ObjectScript.
Load a JSON object:
json_str = fhir_request.Json._ToJSON()
json_obj = json.loads(json_str)
Set a JSON object:
json_str = json.dumps(json_obj)
fhir_response.Json._FromJSON(json_str)
Make sure went process_operation is called to check if the operation_name is merge, the operation_scope is Instance and the RequestMethod is POST.
def process_operation(
    self,
    operation_name:str,
    operation_scope:str,
    body:dict,
    fhir_service:'iris.HS.FHIRServer.API.Service',
    fhir_request:'iris.HS.FHIRServer.API.Data.Request',
    fhir_response:'iris.HS.FHIRServer.API.Data.Response'
) -> 'iris.HS.FHIRServer.API.Data.Response':
    """
    @API Process an Operation request.
    @Input operation_name : The name of the Operation to process.
    @Input operation_scope : The scope of the Operation to process.
    @Input fhir_service : The FHIR Service object.
    @Input fhir_request : The FHIR Request object.
    @Input fhir_response : The FHIR Response object.
    @Output : The FHIR Response object.
    """
    if operation_name == "merge" and operation_scope == "Instance" and fhir_request.RequestMethod == "POST":
        # get the primary resource
        primary_resource = json.loads(fhir_service.interactions.Read(fhir_request.Type, fhir_request.Id)._ToJSON())
        # get the secondary resource
        secondary_resource = json.loads(fhir_request.Json._ToJSON())
        # retun the diff of the two resources
        # make use of deepdiff to get the difference between the two resources
        diff = DeepDiff(primary_resource, secondary_resource, ignore_order=True).to_json()

        # create a new %DynamicObject to store the result
        result = iris.cls('%DynamicObject')._FromJSON(diff)

        # set the result to the response
        fhir_response.Json = result

    return fhir_response
Test it :
POST https://localhost:4443/fhir/r5/Patient/1/$merge
Authorization : Bearer <Token>
Accept: application/fhir+json

{
  "resourceType": "Patient",
  "id": "2",
  "meta": {
    "versionId": "2"
  }
}
You will get the diff of the 2 patients.
{
    "values_changed": {
        "root['address'][0]['city']": {
            "new_value": "fdsfd",
            "old_value": "Lynnfield"
        },
        "root['meta']['lastUpdated']": {
            "new_value": "2024-02-24T09:11:00Z",
            "old_value": "2024-02-28T13:50:27Z"
        },
        "root['meta']['versionId']": {
            "new_value": "1",
            "old_value": "2"
        }
    }
}
Great, you have now created the custom operation. 🥳
In %SYS
set ^%ISCLOG = 5
zw ^ISCLOG
from grongier.pex import BusinessProcess
import iris
import jwt
import json
from fhir.resources import patient, bundle

class MyBusinessProcess(BusinessProcess):

    def on_init(self):
        if not hasattr(self, 'target'):
            self.target = 'HS.FHIRServer.Interop.HTTPOperation'
            return

    def on_fhir_request(self, request:'iris.HS.FHIRServer.Interop.Request'):
        # Do something with the request
        self.log_info('Received a FHIR request')

        # pass it to the target
        rsp = self.send_request_sync(self.target, request)

        # Try to get the token from the request
        token = request.Request.AdditionalInfo.GetAt("USER:OAuthToken") or ""

        # Do something with the response
        if self.check_token(token):
            self.log_info('Filtering the response')
            # Filter the response
            payload_str = self.quick_stream_to_string(rsp.QuickStreamId)

            # if the payload is empty, return the response
            if payload_str == '':
                return rsp

            filtered_payload_string = self.filter_resources(payload_str)
            if filtered_payload_string == '':
                return rsp

            # write the json string to a quick stream
            quick_stream = self.string_to_quick_stream(filtered_payload_string)

            # return the response
            rsp.QuickStreamId = quick_stream._Id()

        return rsp

    def check_token(self, token:str) -> bool:

        # decode the token
        decoded_token= jwt.decode(token, options={"verify_signature": False})

        # check if the token is valid
        if 'VIP' in decoded_token['scope']:
            return True
        else:
            return False

    def quick_stream_to_string(self, quick_stream_id) -> str:
        quick_stream = iris.cls('HS.SDA3.QuickStream')._OpenId(quick_stream_id)
        json_payload = ''
        while quick_stream.AtEnd == 0:
            json_payload += quick_stream.Read()

        return json_payload

    def string_to_quick_stream(self, json_string:str):
        quick_stream = iris.cls('HS.SDA3.QuickStream')._New()

        # write the json string to the payload
        n = 3000
        chunks = [json_string[i:i+n] for i in range(0, len(json_string), n)]
        for chunk in chunks:
            quick_stream.Write(chunk)

        return quick_stream

    def filter_patient_resource(self, patient_str:str) -> str:
        # filter the patient
        p = patient.Patient(**json.loads(patient_str))
        # remove the name
        p.name = []
        # remove the address
        p.address = []
        # remove the telecom
        p.telecom = []
        # remove the birthdate
        p.birthDate = None

        return p.json()

    def filter_resources(self, resource_str:str) -> str:
        # parse the payload
        payload_dict = json.loads(resource_str)

        # what is the resource type?
        resource_type = payload_dict['resourceType'] if 'resourceType' in payload_dict else 'None'
        self.log_info('Resource type: ' + resource_type)

        # is it a bundle?
        if resource_type == 'Bundle':
            obj = bundle.Bundle(**payload_dict)
            # filter the bundle
            for entry in obj.entry:
                if entry.resource.resource_type == 'Patient':
                    self.log_info('Filtering a patient')
                    entry.resource = patient.Patient(**json.loads(self.filter_patient_resource(entry.resource.json())))

        elif resource_type == 'Patient':
            # filter the patient
            obj = patient.Patient(**json.loads(self.filter_patient_resource(resource_str)))
        else:
            return resource_str

        return obj.json()
Hi all,
Does anybody have the same issue?
$ZF(-100) to run python script not work when directly execute in studio or in storedproc called by TrakCare, but can work when do in iris session.
The python script imports a "barcode" package. It seems that when directly execute in studio or in storedproc called by TrakCare, the package can not be imported.
sr = $ZF(-100,"/SHELL", "/usr/bin/python3.9","/trak/cnpubase/tc/webfiles/web/custom/CNPU/script/py/barcode/genslbarcodetest.py",keyStr,path)Visual Studio Code releases new updates every month with new features and bug fixes, and the February 2024 release is now available.
Version 1.87 includes:
I am sending an httpRequest from ObjectScript to a python server. I am not receiving a response in OS
OS config On the client side
// Create an HTTP request object
Set httpRequest = ##class(%Net.HttpRequest).%New()
// Set the server URL
Set httpRequest.Server = "http://127.0.0.1:8080"
// Set content type to JSON
Set httpRequest.ContentType = "application/json"
Not so long ago, I came across the idea of using Python Class Definition Syntax to create IRIS classes on the InterSystems Ideas Portal. It caught my attention since integrating as many syntaxes as possible gives visibility to InterSystems’s products for programmers with experience in many languages.
The author of that idea pointed out the possibility of creating classes using Python’s syntax, in addition to the currently available ones on IRIS. This concept inspired me to write this article, exploring the possibilities of accessing the full InterSystems power employing only Python.