XML(eXtensible Markup Language) is a flexible, text-based, andplatform-independentformat used to store and transport data in a well-structured way that is both human- and machine-readable. XML permits users to define custom tags to describe the meaning and organization of their data. For example: <book><title>The Hitchhiker's Guide</title></book>.
JWT (JSON Web Token) is an open standard (RFC 7519) that offers a lightweight, compact, and self-contained method for securely transmitting information between two parties. It is commonly used in web applications for authentication, authorization, and information exchange.
A JWT is typically composed of three parts:
1. JOSE (JSON Object Signing and Encryption) Header 2. Payload 3. Signature
These parts are encoded in Base64Url format and concatenated with dots (.) separating them.
ObjectScript doesn't include any built-in method for appending one JSON dynamic array to another. Here's a code snippet I use that's equivalent to the JavaScript concat() method.
Call it with any number of arguments to concatenate them into a new array. If an argument is a dynamic array, its elements will be added. Otherwise the argument itself will be added.
ClassMethod ConcatArrays(pArgs...) As %DynamicArray
{
	set outArray = ##class(%DynamicArray).%New()
	for i=1:1:pArgs {
		set arg = pArgs(i)
		if ($IsObject(arg) && arg.%IsA("%DynamicArray")) {
			set iter = arg.%GetIterator()
			while iter.%GetNext(.key, .value) {
				do outArray.%Push(value)
			}
		} else {
			do outArray.%Push(arg)
		}
	}
	return outArray
}
Feel free to let me know if there's a better way to do this!
For one of our customers I had to integrate with the AFAS imageconnector endpoint /imageconnector/{imageId}?format={format}.
This endpoint returns in a json message with the image as a base64-encoded string property, in addition to the mimetype for the image:
/// Image Object
Class Mycustomer.Model.AfasGet.Image Extends (%SerialObject, %XML.Adaptor, %JSON.Adaptor)
{
/// file data (base64 encoded)
Property Filedata As %String(%JSONFIELDNAME = "filedata");

/// MimeType e.g. "image/jpeg"
Property MimeType As %String(%JSONFIELDNAME = "mimetype");
}
In the Message class, we tried handling this like:
Property Image As Mycustomer.Model.AfasGet.Image;

/// AFAS GetImage response
/// get /imageconnector/{imageId}?format={format}
Method LoadFromResponse(httpResponse As %Net.HttpResponse, caller As %String = "") As %Status
{
	Set sc = $$$OK

	If $$$LOWER($Piece(httpResponse.ContentType,";",1))="application/json",httpResponse.StatusCode = "200" {
		set ..Image = ##class(Mycustomer.Model.AfasGet.Image).%New()
		set ..status = ..Image.%JSONImport(httpResponse.Data)
	}

	Return sc
}
This all worked fine until at some point the size of the filedata became larger than the $$$MaxStringLength (3641144), in which case a MAXSTRING exception was raised.
The logical next step was to change the type of the filedata property to %Stream.GlobalCharacter:
/// Image Object
Class Mycustomer.Model.AfasGet.Image Extends (%SerialObject, %XML.Adaptor, %JSON.Adaptor)
{
/// file data (base64 encoded)
Property Filedata As %Stream.GlobalCharacter(%JSONFIELDNAME = "filedata");

/// MimeType e.g. "image/jpeg"
Property MimeType As %String(%JSONFIELDNAME = "mimetype");
}
But that didn't work, %JSONImport() would still raise a MAXSTRING error.
I then tried Python, but as I am not a python wizard, I gave up on that route eventually.
Method LoadFromResponse(httpResponse As %Net.HttpResponse, caller As %String = "") As %Status
{
	Set sc = $$$OK

	If $$$LOWER($Piece(httpResponse.ContentType,";",1))="application/json",httpResponse.StatusCode = "200" {
		set ..Image = ##class(Mycustomer.Model.AfasGet.Image).%New()
		set image = {}.%FromJSON(httpResponse.Data)
		set ..Image.MimeType = image.mimetype
		set ..Image.Filedata = ##class(%Stream.GlobalCharacter).%New()
		do ..Image.Filedata.CopyFrom(image.%Get("filedata", , "stream"))
	}

	Return sc
}
I am still puzzled as how I would be able to instruct the %JSON.Adaptor class and use the built-in logic to map to a stream.
If there is anyone out there that knows how to do this, please let me know!
When I was younger (a question about exactly how much younger is outside the scope of this article), the word “token” meant fun. You see, just a couple of times a year, I would get to go to an arcade and play some amusing video games with my friends.
I wanted to share my experience about working on Large Data projects. Over the years, I have had the opportunity to handle massive patient data, payor data and transactional logs while working in an hospital industry. I have had the chance to build huge reports which had to be written using advanced logics fetching data across multiple tables whose indexing was not helping me write efficient code.
Here is what I have learned about managing large data efficiently.
Choosing the right data access method.
As we all here in the community are aware of, IRIS provides multiple ways to access data. Choosing the right method, depends on the requirement.
Direct Global Access: Fastest for bulk read/write operations. For example, if i have to traverse through indexes and fetch patient data, I can loop through the globals to process millions of records. This will save a lot of time.
Set ToDate=+HSet FromDate=+$H-1ForSet FromDate=$O(^PatientD("Date",FromDate)) Quit:FromDate>ToDate  Do
. Set PatId=""ForSet PatId=$Order(^PatientD("Date",FromDate,PatID)) Quit:PatId=""Do
. . Write$Get(^PatientD("Date",FromDate,PatID)),!
Using SQL: Useful for reporting or analytical requirements, though slower for huge data sets.
The ObjectScript language has incredible JSON support through classes like %DynamicObject and %JSON.Adaptor. This support is due to the JSON format's immense popularity over the previous dominance of XML. JSON brought less verbosity to data representation and increased readability for humans who needed to interpret JSON content. To further reduce verbosity and increase readability, the YAML format was created. The very easy-to-read YAML format quickly became the most popular format for representing configurations and parameterizations, due to its readability and minimal verbosity. While XML is
I was really surprised that such a flexible integration platform with a rich toolset specifically for app connections has no out-of-the-box Enterprise Service Bus solution. Like Apache ServiceMix, Mule ESB, SAP PI/PO, etc, what’s the reason? What do you think? Has this pattern lost its relevance completely nowadays? And everybody moved to message brokers, maybe?
Managing IAM can be tedious when done manually — especially when your APIs are already well-documented using OpenAPI (Swagger) specs. Wouldn't it be great if you could automatically generate Kong services and routes directly from your OpenAPI spec?
That's exactly what this ObjectScript method does: it reads an OpenAPI 2.0 spec stored in the XData block of your spec class and generates a decK-compatible YAML file that can be used to sync your IAM configuration.
This will create or update services and routes in IAM based on your spec.
Final Thoughts
This method bridges the gap between spec driven development and gateway configuration. It’s ideal for teams using InterSystems IRIS or HealthShare and IAM in their architecture.
Want to extend it?
Include authentication plugins
Generate multiple services based on tags
Let me know in the comments or reach out if you'd like help customizing it!
One of the most common kinds of integration we are asked to do is emailing. One of the most typical email services our customers use is Microsoft’s Office 365. After setting up the right configuration on the Microsoft side, we can email from IRIS with two HTTP requests. By the end of this article, we will be able to send an email with an attachment through our Microsoft 365 service!
I am struggling in understanding how FDN works within Health Share, in particular those that are related to Provider Directory within Health Share. Does anyone have examples of using FDN that they would be able share?
A FHIR Server is a software application that implements the FHIR (Fast Healthcare Interoperability Resources) standard, enabling healthcare systems to store, access, exchange, and manage healthcare data in a standardized manner.
Intersystems IRIS can store and retrieve the following FHIR resources:
Resource Repository – IRIS Native FHIR server can effortlessly store the FHIR bundles/resources directly in the FHIR repository.
FHIR Facade - the FHIR facade layer is a software architecture pattern used to expose a FHIR-compliant API on top of an existing one (often non-FHIR). It also streamlines the healthcare data system, including an electronic health record (EHR), legacy database, or HL7 v2 message store, without requiring the migration of all data into a FHIR-native system.
What is FHIR?
Fast Healthcare Interoperability Resources (FHIR) is a standardized framework created by HL7 International to facilitate the exchange of healthcare data in a flexible, developer-friendly, and modern way. It leverages contemporary web technologies to ensure seamless integration and communication across various healthcare systems.
I am trying to help another group within our organization access a SQL Table that I have created to populate Epic Department Data within our environment and came across the ability to use SQL Seach REST Interface using iKnow.
However, I am having issues trying to get it to work via POSTMAN before I hand off the solution...
the POST URL... https://<servername>/api/iKnow/latest/TESTCLIN/table/osuwmc_Epic_Clarity.DepartmentMaster/search
where osuwmc_Epic_Clarity.DepartmentMaster is the table
Sometimes, when designing a class method and feeding it with more and more useful features, very soon the number of parameters can reach 10 and even more.
It becomes pretty difficult for users of useful methods to remember the position of the important parameter, and it is very easy to misuse the position and transfer the wrong value to the wrong parameter.
Here is an example of such a method (I asked GPT to create a method with 20 params):
I have defined a class with a dynamic object property:
My class
Class test.Dyn Extends %Persistent
{

Property json As %DynamicObject;

/// do ##class(test.Dyn).test()
ClassMethod test()
{
  do ..%KillExtent()
  for len = 100, $$$MaxStringLength - 1, $$$MaxStringLength, $$$MaxStringLength+1, $$$MaxStringLength *2 {
    set sc = ..save(len)
    write "Len: ",len, " Result: ",$case($$$ISERR(sc), $$$YES: $System.Status.GetErrorText(sc), : "OK"),!
  }
}

ClassMethod save(len)
{
  set json = {}
  set stream = ..getStream(len-8) // -8 because {"a":""}
  do json.%Set("a", stream, "stream")

  set obj = ..%New()
  set obj.json = json
  quit obj.%Save()
}

ClassMethod getStream(len)
{
  set stream = ##class(%Stream.TmpCharacter).%New()

  if len<$$$MaxStringLength {
    do stream.Write($tr($j("",len)," ","A"))
  } else {
    for i=1:$$$MaxStringLength:len {
      do stream.Write($tr($j("",$$$MaxStringLength)," ","A"))
    }
    do stream.Write($tr($j("",len-i)," ","A"))
  }
  quit stream
}
}
The issue I encounter is that if a length of a serialized json property is more than 3641144 symbols, the object fails to save with the following error (either MAXSTRING or STRINGSTACK):
Length: 100 Result: OK
Length: 3641143 Result: OK
Length: 3641144 Result: OK
Length: 3641145 Result: ERROR #5002: ObjectScript error: <MAXSTRING>%GetSerial+1^%Library.DynamicAbstractObject.1
Length: 7282288 Result: ERROR #5002: ObjectScript error: <STRINGSTACK>%GetSerial+1^%Library.DynamicAbstractObject.1
Is there a workaround? I need to store moderately large jsons (10-15 Mb) and dynamic object properties allow for a very convenient access.
What are best practices for JSON transformation in IRIS interoperability? This is for a non-healthcare use case, so any tools we happen to have around FHIR might not be available. The motivating use case is trimming down a verbose and needlessly complex REST API response to feed to an LLM - trying to reduce token usage and maybe get better results from less noisy data.
I would like to know which are the best practices of using Streams in Interoperability messages.
I have always use %Stream.GlobalCharacter properties to hold a JSON, or a base64 document, when creating messages. This is fine and I can see the content in Visual Trace without doing anything, so I can check what is happening and resolve issues if I have, or reprocess messages if something went wrong, because I have the content.
While starting with Intersystems IRIS or Cache, developers often encounter three core concepts: Dynamic Objects, Globals & Relational Table. Each has its role in building scalable and maintainable solutions. In this article, we'll walk through practical code examples, highlight best practices, and show how these concepts tie together.
1. Working with Dynamic Objects:
Dynamic objects (%DynamicObject and %DynamicArray) allow developers to manipulate JSON-like structures directly in Objectscript. They are especially useful for modern applications that need to parse, transform or generate JSON.
Dynamic Entities (objects and arrays) in IRIS are incredibly useful in situations where you are having to transform JSON data into an Object Model for storage to the database, such as in REST API endpoints hosted within IRIS. This is because these dynamic objects and arrays can easily serve as a point of conversion from one data structure to the other.
Dynamic Objects
Dynamic Objects are very similar to the standard ObjectScript object model you get when you create a new instance of a class object, but with some key differences:
In this section, we will explore how to use Python as the primary language in IRIS, allowing you to write your application logic in Python while still leveraging the power of IRIS.
First, let's start by the official way of doing things, which is using the irispython interpreter.
You can use the irispython interpreter to run Python code directly in IRIS. This allows you to write Python code and execute it in the context of your IRIS application.
What is irispython?
irispython is a Python interpreter that is located in the IRIS installation directory (<installation_directory>/bin/irispython), and it is used to run Python code in the context of IRIS.
It will for you:
Set up the sys.path to include the IRIS Python libraries and modules.
This is done by the site.py file, which is located in <installation_directory>/lib/python/iris_site.py.
Allow you to import iris modules which is a special module that provides access to IRIS features and functionality like bridging any ObjectScript class to Python, and vice versa.
Fix permissions issues and dynamic loading of iris kernel libraries.
Example of using irispython
You can run the irispython interpreter from the command line:
<installation_directory>/bin/irispython
Let's run a simple example:
# src/python/article/irispython_example.py
import requests
import iris

def run():
    response = requests.get("https://2eb86668f7ab407989787c97ec6b24ba.api.mockbin.io/")

    my_dict = response.json()

    for key, value in my_dict.items():
        print(f"{key}: {value}")  # print message: Hello World

    return my_dict

if __name__ == "__main__":
    print(f"Iris version: {iris.cls('%SYSTEM.Version').GetVersion()}")
    run()
You can run this script using the irispython interpreter:
Virtual Environment: It's difficult to set up a virtual environment for your Python code in irispython.
Doesn't mean it is not possible, but it's difficult to do it due to virtual environment look by default to an interpreter called python or python3, which is not the case in IRIS.
In conclusion, using irispython allows you to write your application logic in Python while still leveraging the power of IRIS. However, it has its limitations with debugging and virtual environment setup.
Using WSGI
In this section, we will explore how to use WSGI (Web Server Gateway Interface) to run Python web applications in IRIS.
WSGI is a standard interface between web servers and Python web applications or frameworks. It allows you to run Python web applications in a web server environment.
IRIS supports WSGI, which means you can run Python web applications in IRIS using the built-in WSGI server.
How to use it
To use WSGI in IRIS, you need to create a WSGI application and register it with the IRIS web server.
Python Web Frameworks: You can use popular Python web frameworks like Flask or Django to build your web applications.
IRIS Integration: You can easily integrate your Python web applications with IRIS features and functionality.
Cons
Complexity: Setting up a WSGI application can be more complex than just using uvicorn or gunicorn with a Python web framework.
Conclusion
In conclusion, using WSGI in IRIS allows you to build powerful web applications using Python while still leveraging the features and functionality of IRIS.
DB-API
In this section, we will explore how to use the Python DB-API to interact with IRIS databases.
The Python DB-API is a standard interface for connecting to databases in Python. It allows you to execute SQL queries and retrieve results from the database.
How to use it
You can install it using pip:
pip install intersystems-irispython
Then, you can use the DB-API to connect to an IRIS database and execute SQL queries.
Example of using DB-API
You use it like any other Python DB-API, here is an example:
# src/python/article/dbapi_example.py
import iris

def run():
    # Connect to the IRIS database
# Open a connection to the server
    args = {
        'hostname':'127.0.0.1',
        'port': 1972,
        'namespace':'USER',
        'username':'SuperUser',
        'password':'SYS'
    }
    conn = iris.connect(**args)

    # Create a cursor
    cursor = conn.cursor()

    # Execute a query
    cursor.execute("SELECT 1")

    # Fetch all results
    results = cursor.fetchall()

    for row in results:
        print(row)

    # Close the cursor and connection
    cursor.close()
    conn.close()
if __name__ == "__main__":
    run()
You can run this script using any Python interpreter:
Standard Interface: The DB-API provides a standard interface for connecting to databases, making it easy to switch between different databases.
SQL Queries: You can execute SQL queries and retrieve results from the database using Python.
Remote access: You can connect to remote IRIS databases using the DB-API.
Cons
Limited Features: The DB-API only provides SQL access to the database, so you won't be able to use advanced IRIS features like ObjectScript or Python code execution.
Interactive Development: Jupyter Notebooks allow you to write and execute Python code interactively, which is great for data analysis and exploration.
Rich Output: You can display rich output, such as charts and tables, directly in the notebook.
Documentation: You can add documentation and explanations alongside your code, making
Cons
Tricky Setup: Setting up Jupyter Notebooks with IRIS can be tricky, especially with the kernel configuration.
Conclusion
In conclusion, using Jupyter Notebooks with IRIS allows you to write and execute Python code interactively while leveraging the features of IRIS. However, it can be tricky to set up, especially with the kernel configuration.
Bonus Section
Starting from this section, we will explore some advanced topics related to Python in IRIS, such as remote debugging Python code, using virtual environments, and more.
Most of these topics are not officially supported by InterSystems, but they are useful to know if you want to use Python in IRIS.
Using a native interpreter (no irispython)
In this section, we will explore how to use a native Python interpreter instead of the irispython interpreter.
This allows you to use virtual environments out of the box, and to use the Python interpreter you are used to.
How to use it
To use a native Python interpreter, you to have IRIS install locally on your machine, and you need to have the iris-embedded-python-wrapper package installed.
You can install it using pip:
pip install iris-embedded-python-wrapper
Next, you need to setup some environment variables to point to your IRIS installation:
Then, you can use the DB-API to connect to an IRIS database and execute SQL queries or any other Python code that uses the DB-API, like SQLAlchemy, Django, langchain, pandas, etc.
Example of using DB-API
You can use it like any other Python DB-API, here is an example:
# src/python/article/dbapi_community_example.py
import intersystems_iris.dbapi._DBAPI as dbapi

config = {
    "hostname": "localhost",
    "port": 1972,
    "namespace": "USER",
    "username": "_SYSTEM",
    "password": "SYS",
}

with dbapi.connect(**config) as conn:
    with conn.cursor() as cursor:
        cursor.execute("select ? as one, 2 as two", 1)   # second arg is parameter value
        for row in cursor:
            one, two = row
            print(f"one: {one}")
            print(f"two: {two}")
You can run this script using any Python interpreter:
from sqlalchemy import create_engine, text

COMMUNITY_DRIVER_URL = "iris://_SYSTEM:SYS@localhost:1972/USER"
OFFICIAL_DRIVER_URL = "iris+intersystems://_SYSTEM:SYS@localhost:1972/USER"
EMBEDDED_PYTHON_DRIVER_URL = "iris+emb:///USER"

def run(driver):
    # Create an engine using the official driver
    engine = create_engine(driver)

    with engine.connect() as connection:
        # Execute a query
        result = connection.execute(text("SELECT 1 AS one, 2 AS two"))

        for row in result:
            print(f"one: {row.one}, two: {row.two}")

if __name__ == "__main__":
    run(OFFICIAL_DRIVER_URL)
    run(COMMUNITY_DRIVER_URL)
    run(EMBEDDED_PYTHON_DRIVER_URL)
You can run this script using any Python interpreter:
Better Support: It has better support of SQLAlchemy, Django, langchain, and other Python libraries that use the DB-API.
Community Driven: It is maintained by the community, which means it is more likely to be updated and improved over time.
Compatibility: It is compatible with the official InterSystems DB-API, so you can switch between the official and community editions easily.
Cons
Speed: The community edition may not be as optimized as the official version, potentially leading to slower performance in some scenarios.
Debugging Python Code in IRIS
In this section, we will explore how to debug Python code in IRIS.
By default, debugging Python code in IRIS (in objectscript with the language tag or %SYS.Python) is not possible, but a community solution exists to allow you to debug Python code in IRIS.
This will install IoP and new ObjectScript classes that will allow you to debug Python code in IRIS.
Then, you can use the IOP.Wrapper class to wrap your Python code and enable debugging.
Class Article.DebuggingExample Extends %RegisteredObject
{
ClassMethod Run() As %Status
{
    set myScript = ##class(IOP.Wrapper).Import("my_script", "/irisdev/app/src/python/article/", 55550) // Adjust the path to your module
    Do myScript.run()
    Quit $$$OK
}
}
Then configure VsCode to use the IoP debugger by adding the following configuration to your launch.json file:
You can then set breakpoints in your Python code, and the debugger will stop at those breakpoints, allowing you to inspect variables and step through the code.
Video of remote debugging in action (for IoP but the concept is the same):
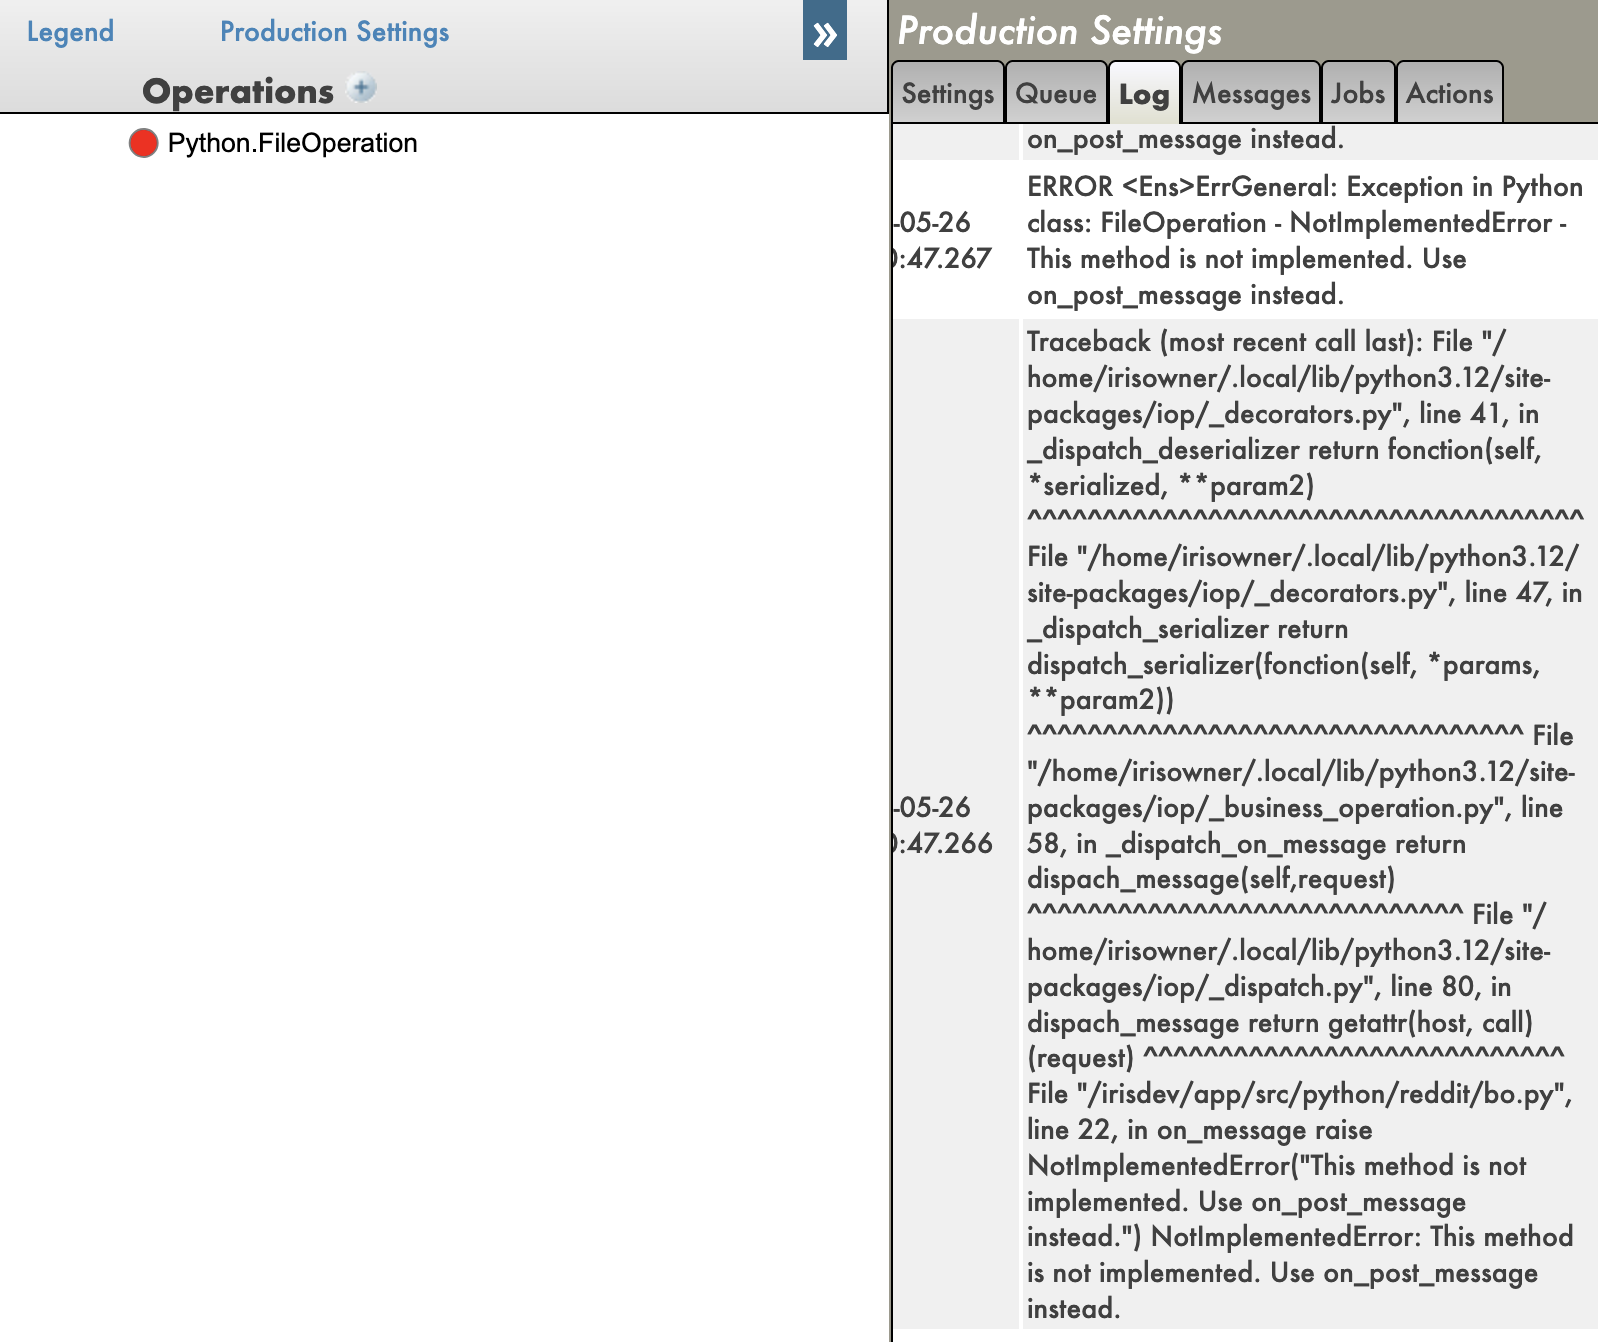
And you have also tracebacks in your Python code, which is very useful for debugging.
With tracebacks enabled:
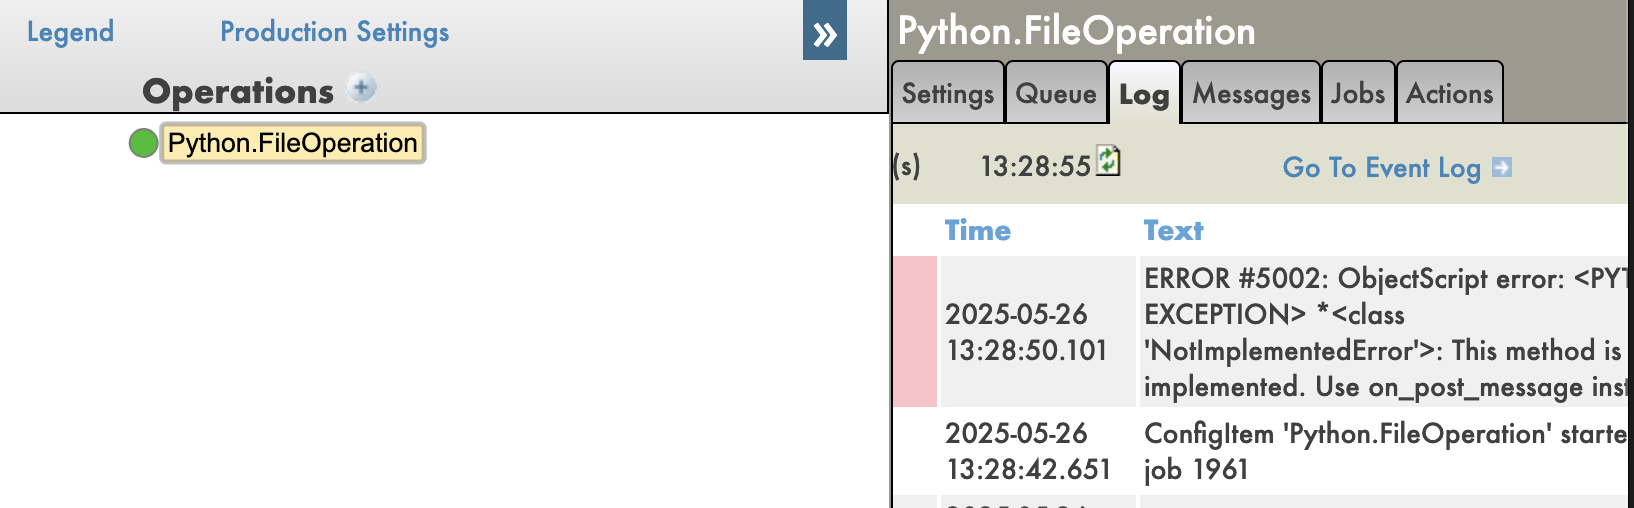
With tracebacks disabled:
Pros
Remote Debugging: You can debug Python code running in IRIS remotely, which is IMO a game changer.
Python Debugging Features: You can use all the Python debugging features, such as breakpoints, variable inspection, and stepping through code.
Tracebacks: You can see the full traceback of errors in your Python code, which is very useful for debugging.
Cons
Setup Complexity: Setting up the IoP and the debugger can be complex, especially for beginners.
Community Solution: This is a community solution, so it may not be as stable or well-documented as official solutions.
Conclusion
In conclusion, debugging Python code in IRIS is possible using the IoP community solution, which allows you to use the Python debugger to debug your Python code running in IRIS. However, it requires some setup and may not be as stable as official solutions.
IoP (Interoperability on Python)
In this section, we will explore the IoP (Interoperability on Python) solution, which allows you to run Python code in IRIS in a python-first approach.
I have been developing this solution for a while now, this is my baby, it tries to solve or enhance all the previous points we have seen in this series of articles.
Key points of IoP:
Python First: You can write your application logic in Python, which allows you to leverage Python's features and libraries.
IRIS Integration: You can easily integrate your Python code with IRIS features and functionality.
Remote Debugging: You can debug your Python code running in IRIS remotely.
Tracebacks: You can see the full traceback of errors in your Python code, which is very useful for debugging.
Virtual Environments: You have a support of virtual environments, allowing you to manage dependencies more easily.
🐍❤️ As you can see, IoP provides a powerful way to integrate Python with IRIS, making it easier to develop and debug your applications.
You don't need to use irispython anymore, you don't have to set your sys.path manually, you can use virtual environments, and you can debug your Python code running in IRIS.
Conclusion
I hope you enjoyed this series of articles about Python in IRIS.
Feel free to reach out to me if you have any questions or feedback about this series of articles.
The language tag is a feature of IRIS that allows you to write Python code directly in your ObjectScript classes.
This is useful for quick prototyping or when you want to use Python's features without creating a separate Python script.
How to use it?
To use the language tag, you need to define a class method with the Language = python attribute. Here's an example:
Class Article.LanguageTagExample Extends %RegisteredObject
{

ClassMethod Run() [ Language = python ]
{
        import requests

        response = requests.get("https://2eb86668f7ab407989787c97ec6b24ba.api.mockbin.io/")

        my_dict = response.json()

        for key, value in my_dict.items():
            print(f"{key}: {value}") # print message: Hello World
}

}
So what are the pros and cons of using the language tag?
Pros
Simplicity: You can write Python code directly in your ObjectScript classes without needing to create separate Python files.
Quick Prototyping: It's great for quick prototyping or testing small pieces of Python code.
Integration: You can easily integrate Python code with your ObjectScript code
Cons
Mixed Code: Mixing Python and ObjectScript code can make your code harder to read and maintain.
Debugging: You can't remotely debug Python code written in the language tag, which can be a limitation for complex applications.
Tracebacks: Python tracebacks are not displayed, you only see an ObjectScript error message, which can make debugging more difficult.
Conclusion
The language tag is a powerful feature that allows you to write Python code directly in your ObjectScript classes. However, it has its limitations, and it's important to use it wisely. For larger projects or when you need to debug your Python code, it's better to create separate Python scripts and import them into your ObjectScript classes.
Importing Python Modules (pypi modules)
Now that we have a good understanding of the language tag, let's explore how to import Python modules and use them in ObjectScript.
First, we will do it only with the built-in and third-party modules that come from PyPI, like requests, numpy, etc.
How to use it
So here, we will do the same thing, but using only the requests module from PyPI.
Class Article.RequestsExample Extends %RegisteredObject
{

ClassMethod Run() As %Status
{
    set builtins = ##class(%SYS.Python).Import("builtins")
    Set requests = ##class(%SYS.Python).Import("requests")

    Set response = requests.get("https://2eb86668f7ab407989787c97ec6b24ba.api.mockbin.io/")
    Set myDict = response.json()

    for i=0:1:builtins.len(myDict)-1 {
        set key = builtins.list(myDict.keys())."__getitem__"(i)
        set value = builtins.list(myDict.values())."__getitem__"(i)
        write key, ": ", value, !
    }
}

}
Not writing Python code: You are not writing Python code, but ObjectScript code that calls Python code, which avoids the sugar syntax of Python.
Conclusion
In conclusion, importing Python modules into ObjectScript can greatly enhance your application's capabilities by leveraging the vast ecosystem of Python libraries. However, it's essential to understand the trade-offs involved, such as the need for a solid grasp of Python.
Importing Python Modules (custom modules)
Let's keep going with the same example, but this time we will create a custom Python module and import it into ObjectScript.
This time, we will be using python as much as possible, and we will only use ObjectScript to call the Python code.
How to use it
Let's create a custom Python module named my_script.py with the following content:
import requests

def run():
    response = requests.get("https://2eb86668f7ab407989787c97ec6b24ba.api.mockbin.io/")

    my_dict = response.json()

    for key, value in my_dict.items():
        print(f"{key}: {value}") # print message: Hello World
Now, we will create an ObjectScript class to import and run this Python module:
Class Article.MyScriptExample Extends %RegisteredObject
{
    ClassMethod Run() As %Status
    {
        set sys = ##class(%SYS.Python).Import("sys")
        do sys.path.append("/irisdev/app/src/python/article")  // Adjust the path to your module

        Set myScript = ##class(%SYS.Python).Import("my_script")

        Do myScript.run()

        Quit $$$OK
    }
}
⚠️ Don't forget to change your iris session to make sure you are on the last version of the code, see the first article for more details.
You will see the output:
message: Hello World
This demonstrates how to import a custom Python module into ObjectScript and execute its code.
Pros
Modularity: You can organize your Python code into modules, making it easier to manage and maintain.
Python Syntax: You can write Python code with its syntax and features
Debugging: Not of the box today, but in the next article, we will see how to debug Python code in IRIS.
Cons
Path Management: You need to manage the path to your Python module, see the article about sys.path for more details.
Python Knowledge: You still need to have a good understanding of Python to write and maintain your modules.
ObjectScript Knowledge: You need to know how to use ObjectScript to import and call your Python modules.
Conclusion
In conclusion, importing Python modules into ObjectScript can greatly enhance your application's capabilities by leveraging the vast ecosystem of Python libraries. However, it's essential to understand the trade-offs involved, such as the need for a solid grasp of Python.
Dear community, I have a confession to make. I have not gotten over Zen yet. Alas, all good things must come to an EOF, so I am currently learning about Angular. I am working on proving to myself that with the right back end and Angular components, I can deliver to myself and my team a very Zen-like experience in this environment. Since this is my first attempt, here is a fair warning: I will be providing some rather large code samples before discussing them. Please warm up your mouse and hand for extensive upcoming scrolling! Also, a note on the code snippets: many of them are labeled
I am making a FHIR request against Epic, in when I get the Response back using "fromDao" I am extracting the stream into HS.FHIRModel.R4.Patient. However, the patient's name comes back as name within a list that references HS.FHIRModel.R4.SeqOfHumanName.
How do I extract the name from HS.FHIRModel.R4.SeqOfHumanName?
Do I have to then do another "fromDao" to pull the list into string format?
How do I navigate around the lists that are in a FHIRModel response, to extract the string values?