Introducing IRIS DocDB Explorer: A Sleek UI for Managing JSON Documents in InterSystems IRIS
IRIS offers a dedicated feature for storing and retrieving JSON documents using DocDB, without requiring a predefined schema.
A programming tool or software development tool is a computer program that software developers use to create, debug, maintain, or otherwise support other programs and applications.
IRIS offers a dedicated feature for storing and retrieving JSON documents using DocDB, without requiring a predefined schema.
Hi everyone,
Does anyone know how to export projects via VSC?
I opened the project through the "InterSystems Tools" plugin (command is "Edit Code in Project") and I can correctly work on it.
However, when I try using the "ObjectScript" plugin to export the project (right click on the project -> "Export Project Contents")
This message appears and it is not possible to export the project:
I've tried also to open a new window, then a folder and finally the project, but nothing changes.
This is an example of my workspace:
.png)
Anyone knows how to do it?
Thank you!
Hello InterSystems Community,
I hope you're all doing well. I'm reaching out to ask if there's any way to enable a dark theme or dark mode for the HealthShare Management Portal.
I have a visual impairment (amblyopia/lazy eye) which means I'm nearly blind in one eye. Like many people with visual difficulties, I find that bright white backgrounds and interfaces cause significant eye strain and fatigue. This makes it challenging to work with the Management Portal for extended periods.
This web interface is designed to facilitate the management of Data Lookup Tables via a user-friendly web page. It is particularly useful when your lookup table values are large, dynamic, and frequently changing. By granting end-users controlled access to this web interface (read, write, and delete permissions limited to this page), they can efficiently manage lookup table data according to their needs.
The data managed through this interface can be seamlessly utilized in HealthConnect rules or data transformations, eliminating the need for constant manual monitoring and management of the lookup tables and thereby saving significant time.
Note:
If the standard Data Lookup Table does not meet your mapping requirements, you can create a custom table and adapt this web interface along with its supporting class with minimal modifications. Sample class code is available upon request.
If you have already built unit tests using the %UnitTest framework, or are thinking about doing so, please take a look at InterSystems Testing Manager.
Without leaving VS Code you can now browse your unit tests, run or debug them, and view previous run results.
Since InterSystems has recently announced the discontinuation of support for InterSystems Studio starting from version 2023.2 in favor of exclusive development of extensions for the Visual Studio Code (VSC) IDE, believing that the latter offers a superior experience compared to Studio, many of us developers have switched or are beginning to use VSC. Many may have wondered how to open the Terminal to perform operations, as VSC does not have an Output panel like Studio did, nor an integrated feature to open the IRIS terminal, except by downloading the plugins developed by InterSystems.
I’m excited to share the project I’ve submitted to the current InterSystems .Net, Java, Python, and JavaScript Contest — it’s called FHIR Data Explorer with Hybrid Search and AI Summaries, and you can find it on the InterSystems Open Exchange and on my GitHub page.
Hi everyone! 👋
I’m excited to share the project I’ve submitted to the current InterSystems .Net, Java, Python, and JavaScript Contest — it’s called IRIStool and Data Manager, and you can find it on the InterSystems Open Exchange and on my GitHub page.
It's about an example for the External Languages Contest 2025
You get almost any information about your databases in IRIS using
the System Management Portal. After passing several levels, you often
get a wide list of items, but the interesting ones are hard to find.
These are the strategic plans of my example for the External Languages Contest 2025
We are excited to announce the general availability of JediSoft IRISsync®, our new synchronization and comparison solution built on InterSystems IRIS technology. IRISsync makes it easy to synchronize and compare IRIS instances.
IRISsync was voted runner-up in the "Most Likely to Use" category at InterSystems READY 2025 Demos and Drinks.
A huge thanks to everyone who supported us — we’re thrilled to see IRISsync resonating with the InterSystems user community!
A benefit of using Doxygenerate is that Doxygen does more than just HTML output. Tweak the Doxyfile that tells Doxygen what to do and you can easily create a PDF. Our example MARINA application yielded a 524-page PDF. Here's what page 94 looks like:
You can browse the whole file here.
In the screenshot above, notice how we only get details of the superclass that is part of the app (AuditHistory). The primary superclass, %Library.SerialObject, is shown faded and with no details of what BankDetails inherits from it.
I have been walking through this with a few team members and as such I thought there might be others out there who could use it, especially if you work with HL7 & Ensemble/HealthConnect/HealthShare and never venture out past the Interoperability section.
First, I would like to establish that this is an extension of the already established documentation on importing and exporting SQL data found here: https://docs.intersystems.com/iris20241/csp/docbook/DocBook.UI.Page.cls?KEY=GSQL_impexp#GSQL_impexp_import
InterSystems IRIS interoperability production development involves using or writing various types of components. They include services (which handle incoming data), processes (which deal with the data flow and logic), and operations (which manage outgoing data or requests). Messages flowing through those components constantly require being adapted to consuming applications. Therefore,Data transformations are by far the most common component in interoperability productions.
Customer support questions span structured data (orders, products 🗃️), unstructured knowledge (docs/FAQs 📚), and live systems (shipping updates 🚚). In this post we’ll ship a compact AI agent that handles all three—using:
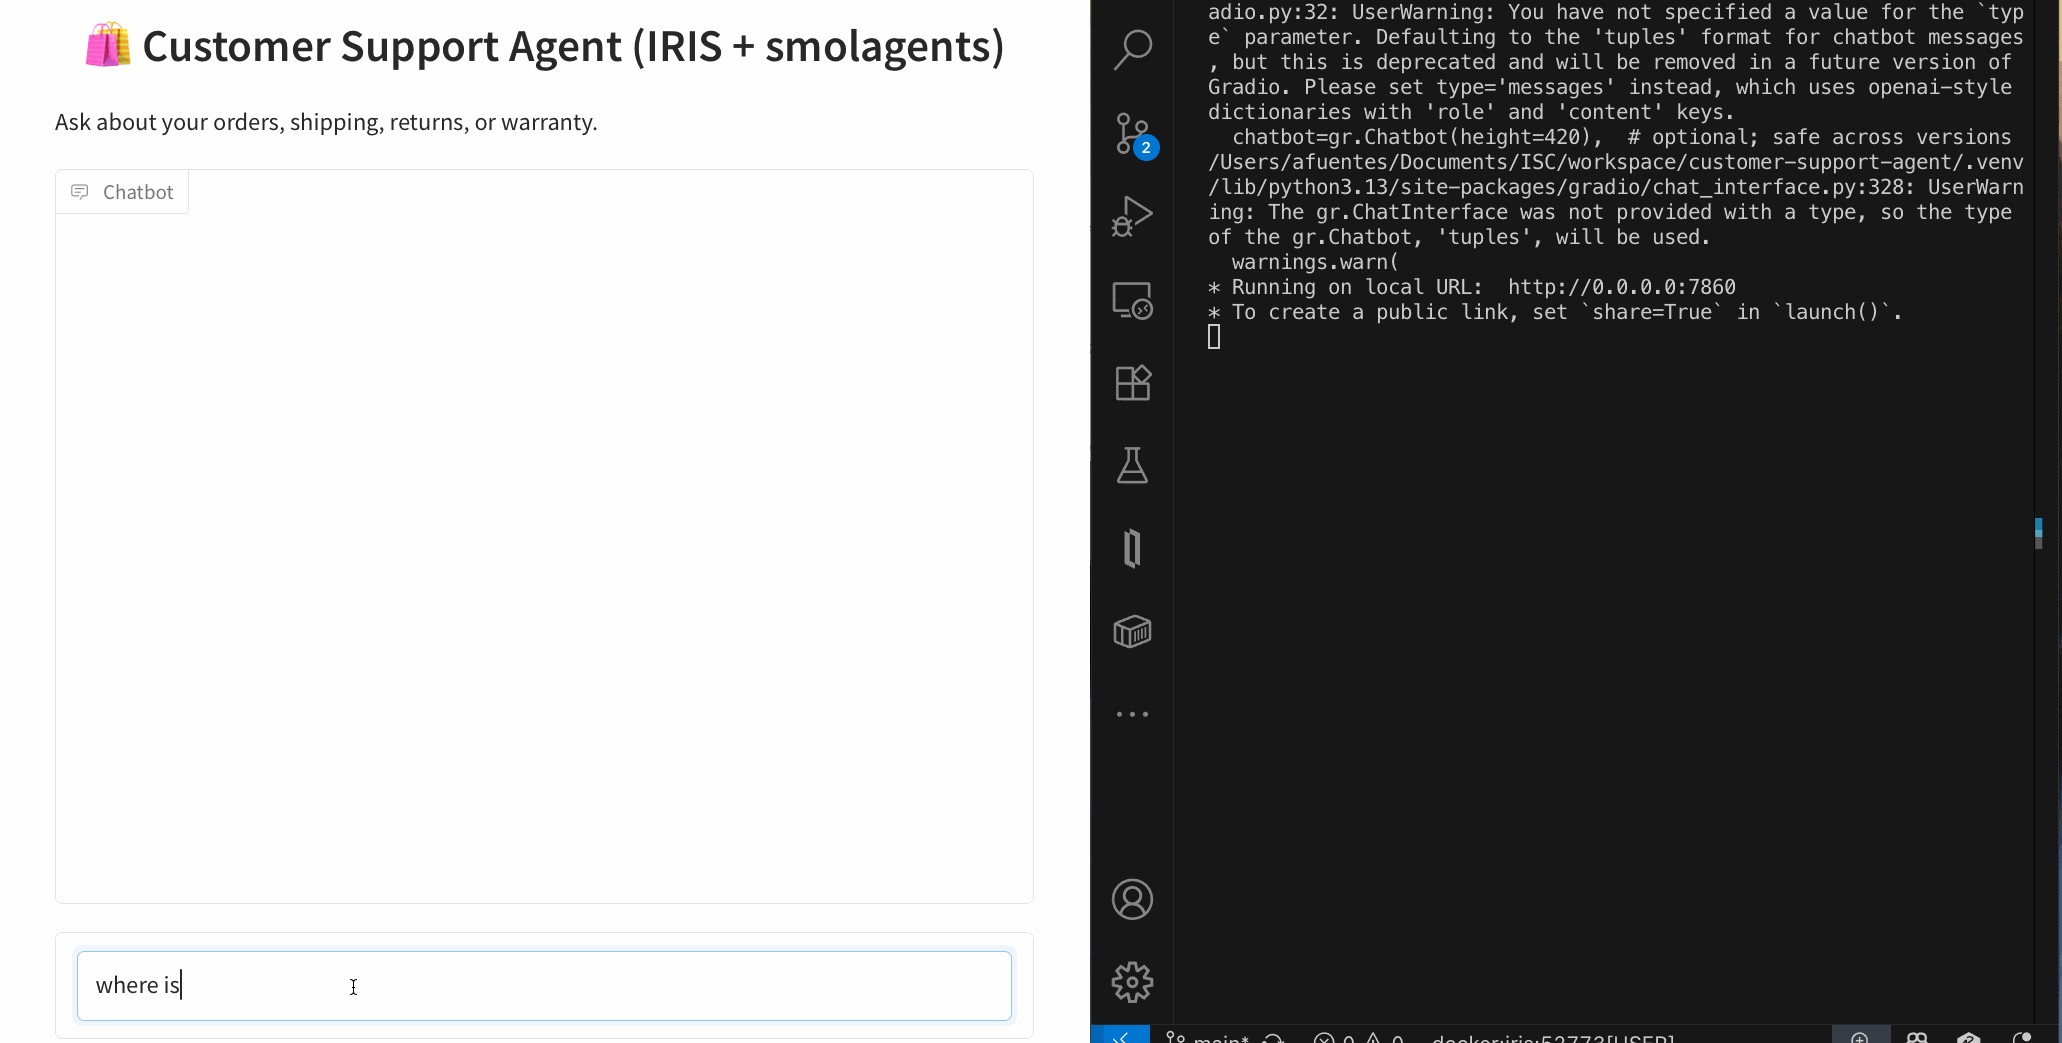
An AI Customer Support Agent that can:
Architecture (at a glance)
User ➜ Agent (smolagents CodeAgent)
               ├─ SQL Tool ➜ IRIS tables
               ├─ RAG Tool ➜ IRIS Vector Search (embeddings + chunks)
               └─ Shipping Tool ➜ IRIS Interoperability (mock shipping) ➜ Visual Trace
New to smolagents? It’s a tiny agent framework from Hugging Face where the model plans and uses your tools—other alternatives are LangGraph and LlamaIndex.
git clone https://github.com/intersystems-ib/customer-support-agent-demo
cd customer-support-agent-demo

python -m venv .venv
# macOS/Linux
source .venv/bin/activate
# Windows (PowerShell)
# .venv\Scripts\Activate.ps1

pip install -r requirements.txt
cp .env.example .env   # add your OpenAI key
docker compose build
docker compose up -d
Open the Management Portal (http://localhost:52773 in this demo).
From SQL Explorer (Portal) or your favorite SQL client:
LOAD SQL FROM FILE '/app/iris/sql/schema.sql' DIALECT 'IRIS' DELIMITER ';';
LOAD SQL FROM FILE '/app/iris/sql/load_data.sql' DIALECT 'IRIS' DELIMITER ';';
This is the schema you have just loaded:

Run some queries and get familiar with the data. The agent will use this data to resolve questions:
-- List customers
SELECT * FROM Agent_Data.Customers;

-- Orders for a given customer
SELECT o.OrderID, o.OrderDate, o.Status, p.Name AS Product
FROM Agent_Data.Orders o
JOIN Agent_Data.Products p ON o.ProductID = p.ProductID
WHERE o.CustomerID = 1;

-- Shipment info for an order
SELECT * FROM Agent_Data.Shipments WHERE OrderID = 1001;
✅ If you see rows, your structured side is ready.
Create an embedding config (example below uses an OpenAI embedding model—tweak to taste):
INSERT INTO %Embedding.Config
  (Name, Configuration, EmbeddingClass, VectorLength, Description)
VALUES
  ('my-openai-config',
   '{"apiKey":"YOUR_OPENAI_KEY","sslConfig":"llm_ssl","modelName":"text-embedding-3-small"}',
   '%Embedding.OpenAI',
   1536,
   'a small embedding model provided by OpenAI');
Need the exact steps and options? Check the documentation
Then embed the sample content:
python scripts/embed_sql.py
Check the embeddings are already in the tables:
SELECT COUNT(*) AS ProductChunks FROM Agent_Data.Products;
SELECT COUNT(*) AS DocChunks     FROM Agent_Data.DocChunks;
EMBEDDING()A major advantage of IRIS is that you can perform semantic (vector) search right inside SQL and mix it with classic filters—no extra microservices needed. The EMBEDDING() SQL function generates a vector on the fly for your query text, which you can compare against stored vectors using operations like VECTOR_DOT_PRODUCT.
Example A — Hybrid product search (price filter + semantic ranking):
SELECT TOP 3
    p.ProductID,
    p.Name,
    p.Category,
    p.Price,
    VECTOR_DOT_PRODUCT(p.Embedding, EMBEDDING('headphones with ANC', 'my-openai-config')) score
FROM Agent_Data.Products p
WHERE p.Price < 200
ORDER BY score DESC
Example B — Semantic doc-chunk lookup (great for feeding RAG answers):
SELECT TOP 3
    c.ChunkID  AS chunk_id,
    c.DocID      AS doc_id,
    c.Title         AS title,
    SUBSTRING(c.ChunkText, 1, 400) AS snippet,
    VECTOR_DOT_PRODUCT(c.Embedding, EMBEDDING('warranty coverage', 'my-openai-config')) AS score
FROM Agent_Data.DocChunks c
ORDER BY score DESC
Why this is powerful: you can pre-filter by price, category, language, tenant, dates, etc., and then rank by semantic similarity—all in one SQL statement.
The project exposes a tiny /api/shipping/status endpoint through IRIS Interoperability—perfect to simulate “real world” calls:
curl -H "Content-Type: application/json" \
  -X POST \
  -d '{"orderStatus":"Processing","trackingNumber":"DHL7788"}' \
  http://localhost:52773/api/shipping/status
Now open Visual Trace in the Portal to watch the message flow hop-by-hop (it’s like airport radar for your integration ✈️).
Peek at these files:
agent/customer_support_agent.py — boots a CodeAgent and registers toolsagent/tools/sql_tool.py — parameterized SQL helpersagent/tools/rag_tool.py — vector search + doc retrievalagent/tools/shipping_tool.py — calls the Interoperability endpointThe CodeAgent plans with short code steps and calls your tools. You bring the tools; it brings the brains using a LLM model
One-shot (quick tests)
python -m cli.run --email alice@example.com --message "Where is my order #1001?"
python -m cli.run --email alice@example.com --message "Show electronics that are good for travel"
python -m cli.run --email alice@example.com --message "Was my headphones order delivered, and what’s the return window?"
Interactive CLI
python -m cli.run --email alice@example.com
Web UI (Gradio)
python -m ui.gradio
# open http://localhost:7860
The agent’s flow (simplified):
🧭 Plan how to resolve the question and what available tools must be used: e.g., “check order status → fetch returns policy ”.
🛤️ Call tools as needed
EMBEDDING() + vector ops as shown above)🧩 Synthesize: stitch results into a friendly, precise answer.
Add or swap tools as your use case grows: promotions, warranties, inventory, you name it.
You now have a compact AI Customer Support Agent that blends:
EMBEDDING() lets you do hybrid + vector search directly from SQLI’m pleased to announce the release of tree-sitter-objectscript, a new open-source tree-sitter grammar that brings first-class ObjectScript support to modern editors. If you caught the preview at READY ’25, you’ll be glad to know it’s now up on Github:
https://github.com/intersystems/tree-sitter-objectscript
.cls files often embed SQL, HTML, Python, JavaScript, JSON, CSS, XML, and Markdown. The grammar is designed to integrate with those seamlessly.We've been working with tree-sitter-objectscript and the following editors:

(this is actually Zed on Windows with a Tokyo Night Storm theme).
We’re excited to see how the community uses this — feedback and ideas are always welcome!
Thanks!
Recently, I replaced my old laptop with a new one and had to migrate all my data. I was looking for a guide but couldn’t find anything that explained in detail how to migrate server connections from InterSystems Studio and Visual Studio Code from one PC to another. Simply reinstalling the tools is not enough, and migrating all the connections manually seemed like a waste of time. In the end, I managed to solve the problem, and this article explains how.
Been testing out the Production Validator toolkit, just to see what we can/not do with it. Seems really interesting and there seem to be some use cases for it that can really streamline some upgrades (or at least parts of upgrades) but I was running into so many hurdles with the documentation. I am curious if anyone else has used it.
Did you experience any issues getting it working? Any clarification that you would have liked in the documentation? any use cases that you worked through that made it particularly valuable? etc?
The hurdles I experienced included:
We are happy to present the bonuses page for the applications submitted to the InterSystems Developer Tools Contest 2025!
See the results below.
Word documents are widely used in the market. Users frequently create contracts, memos, resumes, reports, analyses, and other documents that may require data from or captured by InterSystems IRIS. However, IRIS does not have an API, SDK, library, or adapter for this. This limitation no longer exists.
The new Open Exchange library iris4word (https://openexchange.intersystems.com/package/iris4word) delivers an ObjectScript SDK where the developer passes any %DynamicObject as a parameter, a Word file template and then receives a ready document, with the structure and formatting defined in its template.
.png)
Now that we have a good understanding of Python and its features, let's explore how we can leverage Python within IRIS.
The language tag is a feature of IRIS that allows you to write Python code directly in your ObjectScript classes.
This is useful for quick prototyping or when you want to use Python's features without creating a separate Python script.
To use the language tag, you need to define a class method with the Language = python attribute. Here's an example:
Class Article.LanguageTagExample Extends %RegisteredObject
{

ClassMethod Run() [ Language = python ]
{
        import requests

        response = requests.get("https://2eb86668f7ab407989787c97ec6b24ba.api.mockbin.io/")

        my_dict = response.json()

        for key, value in my_dict.items():
            print(f"{key}: {value}") # print message: Hello World
}

}
So what are the pros and cons of using the language tag?
The language tag is a powerful feature that allows you to write Python code directly in your ObjectScript classes. However, it has its limitations, and it's important to use it wisely. For larger projects or when you need to debug your Python code, it's better to create separate Python scripts and import them into your ObjectScript classes.
Now that we have a good understanding of the language tag, let's explore how to import Python modules and use them in ObjectScript.
First, we will do it only with the built-in and third-party modules that come from PyPI, like requests, numpy, etc.
So here, we will do the same thing, but using only the requests module from PyPI.
Class Article.RequestsExample Extends %RegisteredObject
{

ClassMethod Run() As %Status
{
    set builtins = ##class(%SYS.Python).Import("builtins")
    Set requests = ##class(%SYS.Python).Import("requests")

    Set response = requests.get("https://2eb86668f7ab407989787c97ec6b24ba.api.mockbin.io/")
    Set myDict = response.json()

    for i=0:1:builtins.len(myDict)-1 {
        set key = builtins.list(myDict.keys())."__getitem__"(i)
        set value = builtins.list(myDict.values())."__getitem__"(i)
        write key, ": ", value, !
    }
}

}
Let's run it:
iris session iris -U IRISAPP '##class(Article.RequestsExample).Run()'
You will see the output:
message: Hello World
In conclusion, importing Python modules into ObjectScript can greatly enhance your application's capabilities by leveraging the vast ecosystem of Python libraries. However, it's essential to understand the trade-offs involved, such as the need for a solid grasp of Python.
Let's keep going with the same example, but this time we will create a custom Python module and import it into ObjectScript.
This time, we will be using python as much as possible, and we will only use ObjectScript to call the Python code.
Let's create a custom Python module named my_script.py with the following content:
import requests

def run():
    response = requests.get("https://2eb86668f7ab407989787c97ec6b24ba.api.mockbin.io/")

    my_dict = response.json()

    for key, value in my_dict.items():
        print(f"{key}: {value}") # print message: Hello World
Now, we will create an ObjectScript class to import and run this Python module:
Class Article.MyScriptExample Extends %RegisteredObject
{
    ClassMethod Run() As %Status
    {
        set sys = ##class(%SYS.Python).Import("sys")
        do sys.path.append("/irisdev/app/src/python/article")  // Adjust the path to your module

        Set myScript = ##class(%SYS.Python).Import("my_script")

        Do myScript.run()

        Quit $$$OK
    }
}
Now, let's run it:
iris session iris -U IRISAPP '##class(Article.MyScriptExample).Run()'
⚠️ Don't forget to change your iris session to make sure you are on the last version of the code, see the first article for more details.
You will see the output:
message: Hello World
This demonstrates how to import a custom Python module into ObjectScript and execute its code.
sys.path for more details.In conclusion, importing Python modules into ObjectScript can greatly enhance your application's capabilities by leveraging the vast ecosystem of Python libraries. However, it's essential to understand the trade-offs involved, such as the need for a solid grasp of Python.
Here are the technology bonuses for the InterSystems Developer Tools Contest 2025 that will give you extra points in the voting:
See the details below.
Users of the %UnitTest framework can now get test coverage information inside VS Code by combining the latest release (v2.0.0) of the InterSystems Testing Manager extension with @Timothy Leavitt's impressive Test Coverage Tool.
Above you can see the Test Coverage pane, which I have moved to the secondary sidebar on the right so it can more easily be explored in conjunction with the Test Explorer on the left.
🛠️ Managing InterSystems InterSystems API Manager (IAM = Kong Gateway) configurations in CI/CD
As part of integrating InterSystems IRIS into a secure and controlled environment, InterSystems IAM relies on Kong Gateway to manage exposed APIs.
Kong acts as a modern API Gateway, capable of handling authentication, security, traffic management, plugins, and more.
Learn how to design scalable, autonomous AI agents that combine reasoning, vector search, and tool integration using LangGraph.

Let’s face it — “AI agents” can sound like the robots that will take over your boardroom. In reality, they are your proactive sidekicks that can streamline complex workflows and eliminate repetitive tasks. Think of them as the next evolutionary step beyond chatbots: they do not just simply wait for prompts; they initiate actions, coordinate multiple steps, and adapt as they go.
Back in the day, crafting a “smart” system meant juggling separate models for language understanding, code generation, data lookup, you name it, and then duct-taping them together. Half of your time used to vanish in integration hell, whereas the other half you spent debugging the glue.
Agents flip that script. They bundle context, initiative, and adaptability into a single orchestrated flow. It is not just automation; it is intelligence with a mission. And thanks to such frameworks as LangGraph, assembling an agent squad of your own can actually be… dare I say, fun?

LangGraph is an innovative framework that revolutionizes the way we build complex applications involving Large Language Models (LLMs).
Imagine that you are conducting an orchestra: every instrument (or “node”) needs to know when to play, how loud, and in what sequence. LangGraph, in this case**,** is your baton, giving you the following:
Whether you are building a chatbot with real memory, an interactive story engine, or a team of agents tackling a complex problem, LangGraph turns headache-inducing plumbing into a clean, visual state machine.
To start with LangGraph, you will need a basic setup that typically involves installing such essential libraries as langgraph and langchain-openai. From there, you can define the nodes (tasks) and edges (connections) within the graph, effectively implementing checkpoints for short-term memory and utilizing Zep for more persistent memory needs.
When operating LangGraph, keep in mind the following:
Now that we have covered the basics of LangGraph, let's dive into a practical example. To achieve this, we will develop an AI agent specifically designed for customer support.
This agent will receive email requests, analyze the problem description in the email body, and then determine the request's priority and appropriate topic/category/sector.
So buckle up and let's go!

To begin, we need to define what a 'Tool' is. You can think of it as a specialized "assistant manager" for your agent, allowing it to interact with external functionalities.
The @tool decorator is essential here. LangChain simplifies custom tool creation, meaning that first, you define a Python function, and then apply the @tool decorator.

Let's illustrate this by creating our first tool. This tool will help the agent classify the priority of an IT support ticket based on its email content:
    from langchain_core.tools import tool

    @tool
    def classify_priority(email_body: str) -> str:
        """Classify the priority of an IT support ticket based on email content."""
        prompt = ChatPromptTemplate.from_template(
            """Analyze this IT support email and classify its priority as High, Medium, or Low.

            High: System outages, security breaches, critical business functions down
            Medium: Non-critical issues affecting productivity, software problems
            Low: General questions, requests, minor issues

            Email: {email}

            Respond with only: High, Medium, or Low"""
        )
        chain = prompt | llm
        response = chain.invoke({"email": email_body})
        return response.content.strip()
Excellent! Now we have a prompt that instructs the AI to receive the email body, analyze it, and classify its priority as High, Medium, or Low.
That’s it! You have just composed a tool your agent can call!
Next, let's create a similar tool to identify the main topic (or category) of the support request:
    @tool
    def identify_topic(email_body: str) -> str:
        """Identify the main topic/category of the IT support request."""
        prompt = ChatPromptTemplate.from_template(
            """Analyze this IT support email and identify the main topic category.

            Categories: password_reset, vpn, software_request, hardware, email, network, printer, other

            Email: {email}

            Respond with only the category name (lowercase with underscores)."""
        )
        chain = prompt | llm
        response = chain.invoke({"email": email_body})
        return response.content.strip()
Now we need to create a state, and in LangGraph this little piece is, kind of, a big deal.
Think of it as the central nervous system of your graph. It is how nodes talk to each other, passing notes like overachievers in class.
According to the docs:
“A state is a shared data structure that represents the current snapshot of your application.”
In practice? The state is a structured message that moves between nodes. It carries the output of one step as the input for the next one. Basically, it is the glue that holds your entire workflow together.
Therefore, before constructing the graph, we must first define the structure of our state. In this example, our state will include the following:
It is simple and clean, so you can move through the graph like a pro.
    from typing import TypedDict

    # Define the state structure
    class TicketState(TypedDict):
        email_body: str
        priority: str
        topic: str


    # Initialize state
    initial_state = TicketState(
        email_body=email_body,
        priority="",
        topic=""
    )
The fundamental building blocks of LangGraph include nodes and edges.
To grasp the functionality of edges, let’s consider a simple analogy of a messaging application:
When a user selects a chat thread to send a message, an edge is effectively created, linking them to another user. Each interaction, be it sending a text, voice, or video message, follows a predefined sequence, comparable to the structured schema of LangGraph’s state. It ensures uniformity and interpretability of data passed along edges.
Unlike the dynamic nature of event-driven applications, LangGraph employs a static schema that remains consistent throughout execution. It simplifies communication among nodes, enabling developers to rely on a stable state format, thereby ensuring seamless edge communication.
Flow engineering in LangGraph can be conceptualized as designing a state machine. In this paradigm, each node represents a distinct state or processing step, while edges define the transitions between those states. This approach is particularly beneficial for developers aiming to strike a balance between deterministic task sequences and the dynamic decision-making capabilities of AI. Let's begin constructing our flow by initializing a StateGraph with the TicketState class we defined earlier.
    from langgraph.graph import StateGraph, START, END

    workflow = StateGraph(TicketState)
Node Addition: Nodes are fundamental building blocks, defined to execute such specific tasks as classifying ticket priority or identifying its topic.
Each node function receives the current state, performs its operation, and returns a dictionary to update the state:
   def classify_priority_node(state: TicketState) -> TicketState:
        """Node to classify ticket priority."""
        priority = classify_priority.invoke({"email_body": state["email_body"]})
        return {"priority": priority}

    def identify_topic_node(state: TicketState) -> TicketState:
        """Node to identify ticket topic."""
        topic = identify_topic.invoke({"email_body": state["email_body"]})
        return {"topic": topic}


    workflow.add_node("classify_priority", classify_priority_node)
    workflow.add_node("identify_topic", identify_topic_node)
The classify_priority_node and identify_topic_node methods will change the TicketState and send the parameter input.
Edge Creation: Define edges to connect nodes:
    workflow.add_edge(START, "classify_priority")
    workflow.add_edge("classify_priority", "identify_topic")
    workflow.add_edge("identify_topic", END)
The classify_priority establishes the start, whereas the identify_topic determines the end of our workflow so far.
Compilation and Execution: Once nodes and edges are configured, compile the workflow and execute it.
    graph = workflow.compile()
    result = graph.invoke(initial_state)
Great! You can also generate a visual representation of our LangGraph flow.
graph.get_graph().draw_mermaid_png(output_file_path="graph.png")
If you were to run the code up to this point, you would observe a graph similar to the one below:

This illustration visualizes a sequential execution: start, followed by classifying priority, then identifying the topic, and, finally, ending.
One of the most powerful aspects of LangGraph is its flexibility, which allows us to create more complex flows and applications. For instance, we can modify the workflow to add edges from START to both nodes with the following line:
    workflow.add_edge(START, "classify_priority")
    workflow.add_edge(START, "identify_topic")
This change will imply that the agent executes classify_priority and identify_topic simultaneously.
Another highly valuable feature in LangGraph is the ability to use conditional edges. They allow the workflow to branch based on the evaluation of the current state, enabling dynamic routing of tasks.
Let's enhance our workflow. We will create a new tool that analyzes the content, priority, and topic of the request to determine whether it is a high-priority issue requiring escalation (i.e., opening a ticket for a human team). If not, an automated response will be generated for the user.
    @tool
    def make_escalation_decision(email_body: str, priority: str, topic: str) -> str:
        """Decide whether to auto-respond or escalate to IT team."""
        prompt = ChatPromptTemplate.from_template(
            """Based on this IT support ticket, decide whether to:
            - "auto_respond": Send an automated response for simple/common or medium priority issues
            - "escalate": Escalate to the IT team for complex/urgent issues

            Email: {email}
            Priority: {priority}
            Topic: {topic}

            Consider: High priority items usually require escalation, while complex technical issues necessitate human review.

            Respond with only: auto_respond or escalate"""
        )
        chain = prompt | llm
        response = chain.invoke({
            "email": email_body,
            "priority": priority,
            "topic": topic
        })
        return response.content.strip()
Furthermore, if the request is determined to be of low or medium priority (leading to an "auto_respond" decision), we will perform a vector search to retrieve historical answers. This information will then be used to generate an appropriate automated response. However, it will require two additional tools:
    @tool
    def retrieve_examples(email_body: str) -> str:
        """Retrieve relevant examples from past responses based on email_body."""
        try:
            examples = iris.cls(__name__).Retrieve(email_body)
            return examples if examples else "No relevant examples found."
        except:
            return "No relevant examples found."

    @tool
    def generate_reply(email_body: str, topic: str, examples: str) -> str:
        """Generate a suggested reply based on the email, topic, and RAG examples."""
        prompt = ChatPromptTemplate.from_template(
            """Generate a professional IT support response based on:

            Original Email: {email}
            Topic Category: {topic}
            Example Response: {examples}

            Create a helpful, professional response that addresses the user's concern.
            Keep it concise and actionable."""
        )
        chain = prompt | llm
        response = chain.invoke({
            "email": email_body,
            "topic": topic,
            "examples": examples
        })
        return response.content.strip()
Now, let's define the corresponding nodes for those new tools:
    def decision_node(state: TicketState) -> TicketState:
        """Node to decide on escalation or auto-response."""
        decision = make_escalation_decision.invoke({
            "email_body": state["email_body"],
            "priority": state["priority"],
            "topic": state["topic"]
        })
        return {"decision": decision}


    def rag_node(state: TicketState) -> TicketState:
        """Node to retrieve relevant examples using RAG."""
        examples = retrieve_examples.invoke({"email_body": state["email_body"]})
        return {"rag_examples": examples}

    def generate_reply_node(state: TicketState) -> TicketState:
        """Node to generate suggested reply."""
        reply = generate_reply.invoke({
            "email_body": state["email_body"],
            "topic": state["topic"],
            "examples": state["rag_examples"]
        })
        return {"suggested_reply": reply}


    def execute_action_node(state: TicketState) -> TicketState:
        """Node to execute final action based on decision."""
        if state["decision"] == "escalate":
            action = f"🚨 ESCALATED TO IT TEAM\nPriority: {state['priority']}\nTopic: {state['topic']}\nTicket created in system."
            print(f"[SYSTEM] Escalating ticket to IT team - Priority: {state['priority']}, Topic: {state['topic']}")
        else:
            action = f"✅ AUTO-RESPONSE SENT\nReply: {state['suggested_reply']}\nTicket logged for tracking."
            print(f"[SYSTEM] Auto-response sent to user - Topic: {state['topic']}")

        return {"final_action": action}


    workflow.add_node("make_decision", decision_node)
    workflow.add_node("rag", rag_node)
    workflow.add_node("generate_reply", generate_reply_node)
    workflow.add_node("execute_action", execute_action_node)
The conditional edge will then use the output of the make_decision node to direct the flow:
    workflow.add_conditional_edges(
        "make_decision",
        lambda x: x.get("decision"),
        {
            "auto_respond": "rag",
            "escalate": "execute_action"
        }
    )
If the make_escalation_decision tool (via decision_node) results in "auto_respond", the workflow will proceed through the rag node (to retrieve examples), then to generate_reply (to craft the response), and finally to execute_action (to log the auto-response).
Conversely, if the decision is "escalate", the flow will bypass the RAG and take generation steps, moving directly to execute_action to handle the escalation. To complete the graph by adding the remaining standard edges, do the following:
    workflow.add_edge("rag", "generate_reply")
    workflow.add_edge("generate_reply", "execute_action")
    workflow.add_edge("execute_action", END)
Dataset Note: For this project, the dataset we used to power the Retrieval-Augmented Generation (RAG) was sourced from the Customer Support Tickets dataset on Hugging Face. The dataset was filtered to include exclusively the items categorized as 'Technical Support' and restricted to English entries. It ensured that the RAG system retrieved only highly relevant and domain-specific examples for technical support tasks.
At this point, our graph should resemble the one below:

When you execute this graph with an email that results in a high priority classification and an "escalate" decision, you will see the following response:
.png)
At the same time, a request that is classified as low priority and results in an "auto_respond" decision will trigger a reply resembling the one below:

Not entirely. There a few bumps to watch out for:
However, most of these weak spots can be managed with good planning, the right tools, and — you guessed it — a bit of reflection.
LangGraph turns AI agents from buzzwords into real, working solutions. Whether you want to automate customer support, handle IT tickets, or build autonomous apps, this framework makes it doable and, actually, enjoyable.
Have you got any questions or feedback? Let’s talk. The AI revolution needs builders like you.
We are glad to announce that DBeaver has supported InterSystems IRIS out-of-the-box since version 7.2.4. You don't need to configure it manually anymore, just find the IRIS icon in the Connections list.
.png)
Hey everyone,
I'm diving deeper into Caché ObjectScript and would love to open a discussion around the most useful tips, tricks, and best practices you’ve learned or discovered while working with it.
Whether you're an experienced developer or just getting started, ObjectScript has its own set of quirks and powerful features—some well-documented, others hidden gems. I’m looking to compile a helpful set of ideas from the community.
Some areas I’m especially interested in:
Have you ever needed to change an IP or port before deploying an interface to production? Needed to remove items from an export? What about modifying the value(s) in a lookup table before deploying? Have you wanted to disable an interface before deploying? What about adding a comment, category, or alert setting to an interface before deploying to production?
If you’ve ever needed to make any changes to an interface or lookup table before deploying to production, then Export Editor is for you!
Hi all,
My team is exploring options for handling timezone offsets in DTL and we’re wondering if there are any built-in methods available — ideally low-code or no-code solutions. Specifically, we're looking for a way to adjust timestamps based on the date and whether Daylight Saving Time (DST) is in effect.
For example, if an HL7 message has an MSH-7 value of 20250518144529, it should be converted to 20250518144529-0500 (Central Daylight Time), but if the timestamp were 20250218144529, it should be 20250218144529-0600 (Central Standard Time).