Ready to elevate your Business Intelligence game?
We've got an engaging video, perfect for all skill levels.
Discover how to get started with IRIS BI, optimize cube performance, and drive analytics adoption. Plus, get a sneak peek at what's next!
A database model is a type of data model that determines the logical structure of a database and fundamentally determines in which manner data can be stored, organized and manipulated. The most popular example of a database model is the relational model, which uses a table-based format.
Ready to elevate your Business Intelligence game?
We've got an engaging video, perfect for all skill levels.
Discover how to get started with IRIS BI, optimize cube performance, and drive analytics adoption. Plus, get a sneak peek at what's next!
Dynamic Entities (objects and arrays) in IRIS are incredibly useful in situations where you are having to transform JSON data into an Object Model for storage to the database, such as in REST API endpoints hosted within IRIS. This is because these dynamic objects and arrays can easily serve as a point of conversion from one data structure to the other.
Dynamic Objects are very similar to the standard ObjectScript object model you get when you create a new instance of a class object, but with some key differences:
Is there a way to Remove specific all Addresses from a Provider.Individual.Address before reinserting the Addresses from an HL7 message in Provider Directory?
Most fields we can call %clearFields() however since Addresses come from multiple locations we need to isolate and treat Addresses from this HL7 source as a snapshot.
Thanks
Scott
Maybe this is well known but wanted to help share.
Consider that you have the following persistent class defintions
An Invoice Class with a property reference to Provider
Whats the significance of creating an Index with Data Keyword in Index
Hello,
Our software commonly returns a full result set to the client and we use the DataTables plugin to display table data. This has worked well, but at datasets grow larger, we are trying to move some of these requests server-side so the server handles the bulk of the work rather than the client. This has had me scratching my head in so many ways.
I'm hoping I can get a mix of general best practice advice but also maybe some IRIS specific ideas.
Some background
InterSystems has been at the forefront of database technology since its inception, pioneering innovations that consistently outperform competitors like Oracle, IBM, and Microsoft. By focusing on an efficient kernel design and embracing a no-compromise approach to data performance, InterSystems has carved out a niche in mission-critical applications, ensuring reliability, speed, and scalability.
A History of Technical Excellence
In the world of APIs, REST is very extended. But what happens when you need more flexibility in your data-fetching strategies? For instance letting the client to choose what fields is going to receive. Enter GraphQL, a query language for your APIs that provides a flexible alternative to REST.
In this post, we will:
Grab a coffee ☕ and let's go:
Let’s start by comparing REST and GraphQL side by side:
| Feature | REST | GraphQL |
|---|---|---|
| Data Fetching | Multiple endpoints for resources | Single endpoint for all queries |
| Flexibility | Predefined responses | Query exactly what you need |
| Overfetching | Getting too much data for client needs | Solves overfetching |
| Underfetching | Needing multiple calls to get enough data | Solves underfetching |
| Versioning | Requires version management (e.g. /api/v1/users) | "Versionless" as clients can choose the fields they need. Also, schemas are typed and can evolve |
The good news is that both use HTTP so they are pretty easy to consume from client applications.
GraphQL is built around three main concepts:
Queries: Retrieve data from your API.
 query {
     allEmployees(hiredAfter: "2020-01-01") {
         name
         hiredon
     }
 }
query keyword indicates a read operation (although it can be omitted)allEmployees is the field that represents a list of employees. In the server, a resolver function in the GraphQL schema will fetch the data. It takes (hiredAfter: "2020-01-01") as an argument that is used to filter data.name and hiredon are subfields that we are selecting to be returnedMutations: Modify data
 mutation {
     createEmployee(name: "John", lastname: "Doe", position: "Developer", hiredon: "2021-11-30", departmentId: "1") {
         employee {
             name
             lastname
             department {
                 name
             }
         }
     }
 }
mutation indicates an operation that will modify datacreateEmployee is the mutation field that handles the creation of a new employee (a resolver function in the GraphQL schema will handle that). It takes different arguments to define the new employee.employee and structure containing name, lastname and department with some nested fields)./graphql.For example, the previous query could be sent as:
curl -X POST \
  -H "Content-Type: application/json" \
  -d '{"query": "query { allEmployees(hiredAfter: \"2020-01-01\") { name hiredon } }"}' \
  http://localhost:5000/graphql
And the response data could be:
{"data":{"allEmployees":[{"name":"Alice","hiredon":"2020-06-15"},{"name":"Clara","hiredon":"2021-09-01"},{"name":"Eve","hiredon":"2022-01-05"},{"name":"Frank","hiredon":"2020-11-15"},{"name":"John","hiredon":"2021-11-30"},{"name":"Phileas","hiredon":"2023-11-27"}]}}
We will use this tools ⚒️:
📝 You will find detailed instructions on setting up InterSystems IRIS Community and a Python virtual environment in iris-graphql-demo.
Now let's focus on the main steps you need to do.
We will use a simple model with Employee and Department tables that will be created and populated in InterSystems IRIS.
Create a models.py file with:
from sqlalchemy import *
from sqlalchemy.orm import relationship, declarative_base, Session, scoped_session, sessionmaker, relationship, backref

engine = create_engine('iris://superuser:SYS@localhost:1972/USER')
db_session = scoped_session(sessionmaker(bind=engine))

Base = declarative_base()

Base.query = db_session.query_property()

class Department(Base):
    __tablename__ = 'departments'
    __table_args__ = {'schema': 'dc_graphql'}

    id = Column(Integer, primary_key=True)
    name = Column(String, nullable=False)
    description = Column(String)

    employees = relationship('Employee', back_populates='department')

class Employee(Base):
    __tablename__ = 'employees'
    __table_args__ = {'schema': 'dc_graphql'}

    id = Column(Integer, primary_key=True)
    name = Column(String, nullable=False)
    lastname = Column(String, nullable=False)
    hiredon = Column(Date)
    position = Column(String)
    department_id = Column(Integer, ForeignKey('dc_graphql.departments.id'))

    department = relationship('Department', back_populates='employees')
Let's define the GraphQL Schema using Graphene using the models we have just defined.
In the related OpenExchange application you will find a version that also implements a mutation.
Create a schema.py file with this content:
import graphene
from graphene_sqlalchemy import SQLAlchemyObjectType, SQLAlchemyConnectionField
from models import db_session, Employee, Department

class DepartmentType(SQLAlchemyObjectType):
    class Meta:
        model = Department
        interfaces = ()

class EmployeeType(SQLAlchemyObjectType):
    class Meta:
        model = Employee
        interfaces = ()

class Query(graphene.ObjectType):
    all_departments = graphene.List(DepartmentType)
    all_employees = graphene.List(
        EmployeeType,
        hired_after=graphene.Date(),
        position=graphene.String()
    )

    def resolve_all_departments(self, info):
        return db_session.query(Department).all()

    def resolve_all_employees(self, info, hired_after=None, position=None):
        query = db_session.query(Employee)
        if hired_after:
            query = query.filter(Employee.hiredon > hired_after)
        if position:
            query = query.filter(Employee.position == position)
        return query.all()

schema = graphene.Schema(query=Query)
And we will need also a Flask application that sets up the /graphql endpoint.
Create an app.py file like this:
from flask import Flask, request, jsonify
from flask_graphql import GraphQLView
from schema import schema

app = Flask(__name__)

@app.teardown_appcontext
def shutdown_session(exception=None):
    db_session.remove()

app.add_url_rule(
    '/graphql',
    view_func=GraphQLView.as_view(
        'graphql',
        schema=schema,
        graphiql=True,
    )
)

if __name__ == '__main__':
    app.run(debug=True)
We could create the tables and insert some data using SQL or ObjectScript.
But, if you are exploring the capabilities of Python + InterSystems IRIS I recommend you to use Python 🐍 directly.
Open an interactive Python session:
python
And then:
from models import db_session, engine, Base, Department, Employee

# this will create the tables for you in InterSytems IRIS
Base.metadata.create_all(bind=engine)

# add departments
engineering = Department(name='Engineering', description='Handles product development and technology')
hr = Department(name='Human Resources', description='Manages employee well-being and recruitment')
sales = Department(name='Sales', description='Responsible for sales and customer relationships')
db_session.add_all([engineering, hr, sales])

# add employees
employees = [
    Employee(name='Alice', lastname='Smith', hiredon=date(2020, 6, 15), position='Software Engineer', department=engineering),
    Employee(name='Bob', lastname='Brown', hiredon=date(2019, 3, 10), position='QA Engineer', department=engineering),
    Employee(name='Clara', lastname='Johnson', hiredon=date(2021, 9, 1), position='Recruiter', department=hr),
    Employee(name='David', lastname='Davis', hiredon=date(2018, 7, 22), position='HR Manager', department=hr),
    Employee(name='Eve', lastname='Wilson', hiredon=date(2022, 1, 5), position='Sales Executive', department=sales),
    Employee(name='Frank', lastname='Taylor', hiredon=date(2020, 11, 15), position='Account Manager', department=sales)
]
db_session.add_all(employees)
db_session.commit()
First, you will need to run your server:
python app.py
Then you can start testing your server using an included GraphiQL UI in http://localhost:5000/graphql.

If you need to work with very large datasets or you need pagination, consider using Relay. Relay introduces Edge and Node concepts for efficient pagination and handling of large datasets.
In the related OpenExchange application you will also find a GraphQL schema implementation using Relay.
In case you don't know what WGSI is, just check this article WSGI Support Introduction and the related posts that explain how to deploy Flask, Django and FastAPI applications in IRIS by @Guillaume Rongier
In a nutshell, InterSystems IRIS can deploy WGSI applications now so you can deploy your GraphQL server.
You only need to set up a web application like this:

After that, your endpoint will be http://localhost:52773/graphqlserver/graphql
Congratulations! You’ve built a GraphQL server on top of InterSystems IRIS, explored its basic features, and even deployed it as a WSGI application. This demonstrates how flexible API approaches can integrate seamlessly with enterprise-grade data platforms like InterSystems IRIS.
If you are still awake, thanks for reading 😄! I'll give you a final fun fact:
Hello!
So my question is quite simple, Do the different data models of Intersystems all support the ACID properties?
I assume that for the SQL data model implementation it does, But does it also work for global (i.e the hierarchical data model)?
I searched the docs and the different articles, It seems for example that here its implied that the different data models of Intersystems DO indeed support the ACID properties and allow for safe insertion, deletion etc... in concurrent operations to the server that is.
Would love to get a clarification, Thx!
Hi,
A customer today asked whether we could offer anything like the nice lineage charts that dbt offers, based on SQL view metadata. They are very much aware of our dbt-iris adapter, but were asking in the context of their landing area, which combines foreign tables and views, ahead of possibly using dbt for onward transformations.
In today's data landscape, businesses encounter a number of different challenges. One of them is to do analytics on top of unified and harmonized data layer available to all the consumers. A layer that can deliver the same answers to the same questions irrelative to the dialect or tool being used. InterSystems IRIS Data Platform answers that with and add-on of Adaptive Analytics that can deliver this unified semantic layer. There are a lot of articles in DevCommunity about using it via BI tools. This article will cover the part of how to consume it with AI and also how to put some insights back. Let's go step by step...
You can easily find some definition in developer community website In a few words, it can deliver data in structured and harmonized form to various tools of your choice for further consumption and analysis. It delivers the same data structures to various BI tools. But... it can also deliver same data structures to your AI/ML tools!
Adaptive Analytics has and additional component called AI-Link that builds this bridge from AI to BI.
It is a Python component that is designed to enable programmatic interaction with the semantic layer for the purposes of streamlining key stages of the machine learning (ML) workflow (for example, feature engineering).
With AI-Link you can:
As this is a Python library, it can be used in any Python environment. Including Notebooks. And in this article I'll give a simple example of reaching Adaptive Analytics solution from Jupyter Notebook with the help of AI-Link.
Here is git repository which will have the complete Notebook as example: https://github.com/v23ent/aa-hands-on
Further steps assume that you have the following pre-requisites completed:
First, let's install needed components in our environment. That will download a few packages needed for further steps to work. 'atscale' - this is our main package to connect 'prophet' - package that we'll need to do predictions
pip install atscale prophet
Then we'll need to import key classes representing some key concepts of our semantic layer. Client - class that we'll use to establich a connection to Adaptive Analytics; Project - class to represent projects inside Adaptive Analytics; DataModel - class that will represent our virtual cube;
from atscale.client import Client
from atscale.data_model import DataModel
from atscale.project import Project
from prophet import Prophet
import pandas as pd
Now we should be all set to establish a connection to our source of data.
client = Client(server='http://adaptive.analytics.server', username='sample')
client.connect()
Go ahead and specify connection details of your Adaptive Analytics instance. Once you're asked for the organization respond in the dialog box and then please enter your password from the AtScale instance.
With established connection you'll then need to select your project from the list of projects published on the server. You'll get the list of projects as an interactive prompt and the answer should be the integer ID of the project. And then data model is selected automatically if it's the only one.
project = client.select_project()
data_model = project.select_data_model()
There are a number of methods prepared by AtScale in AI-Link component library. They allow to explore data catalog that you have, query data, and even ingest some data back. AtScale documentation has extensive API reference describing everything that is available. Let's first see what is our dataset by calling few methods of data_model:
data_model.get_features()
data_model.get_all_categorical_feature_names()
data_model.get_all_numeric_feature_names()
The output should look something like this

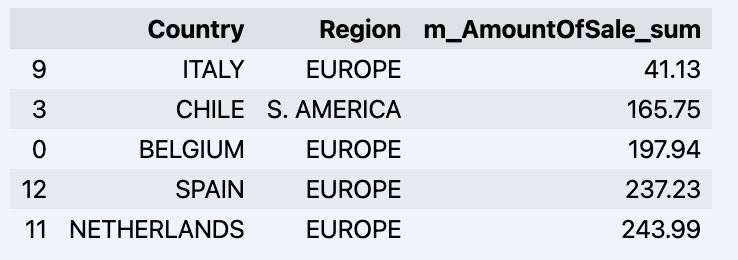
Once we've looked around a bit, we can query the actual data we're interested in using 'get_data' method. It will return back a pandas DataFrame containing the query results.
df = data_model.get_data(feature_list = ['Country','Region','m_AmountOfSale_sum'])
df = df.sort_values(by='m_AmountOfSale_sum')
df.head()
Which will show your datadrame:
Let's prepare some dataset and quickly show it on the graph
import matplotlib.pyplot as plt

# We're taking sales for each date
dataframe = data_model.get_data(feature_list = ['Date','m_AmountOfSale_sum'])

# Create a line chart
plt.plot(dataframe['Date'], dataframe['m_AmountOfSale_sum'])

# Add labels and a title
plt.xlabel('Days')
plt.ylabel('Sales')
plt.title('Daily Sales Data')

# Display the chart
plt.show()
Output:

The next step would be to actually get some value out of AI-Link bridge - let's do some simple prediction!
# Load the historical data to train the model
data_train = data_model.get_data(
    feature_list = ['Date','m_AmountOfSale_sum'],
    filter_less = {'Date':'2021-01-01'}
    )
data_test = data_model.get_data(
    feature_list = ['Date','m_AmountOfSale_sum'],
    filter_greater = {'Date':'2021-01-01'}
    )
We get 2 different datasets here: to train our model and to test it.
# For the tool we've chosen to do the prediction 'Prophet', we'll need to specify 2 columns: 'ds' and 'y'
data_train['ds'] = pd.to_datetime(data_train['Date'])
data_train.rename(columns={'m_AmountOfSale_sum': 'y'}, inplace=True)
data_test['ds'] = pd.to_datetime(data_test['Date'])
data_test.rename(columns={'m_AmountOfSale_sum': 'y'}, inplace=True)

# Initialize and fit the Prophet model
model = Prophet()
model.fit(data_train)
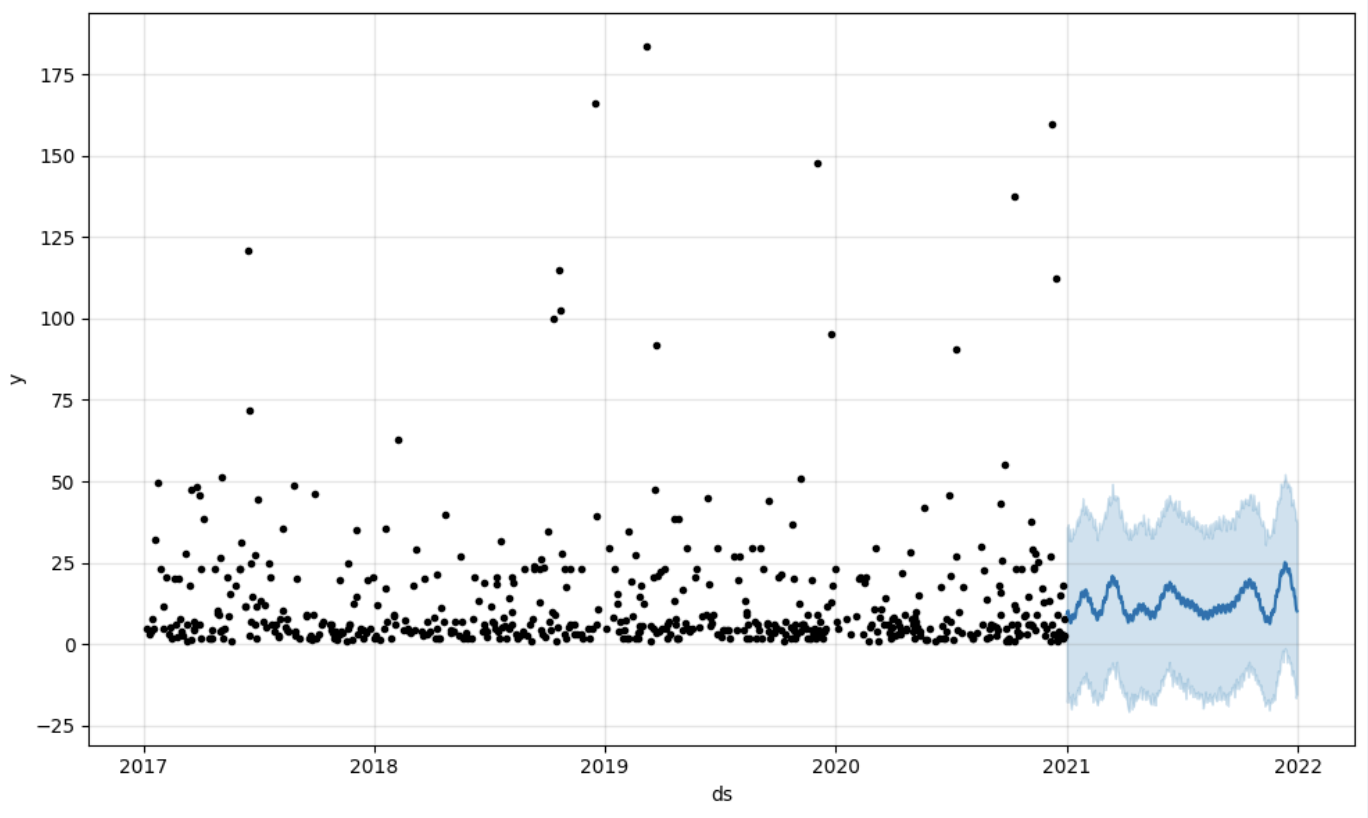
And then we create another dataframe to accomodate our prediction and display it on the graph
# Create a future dataframe for forecasting
future = pd.DataFrame()
future['ds'] = pd.date_range(start='2021-01-01', end='2021-12-31', freq='D')

# Make predictions
forecast = model.predict(future)
fig = model.plot(forecast)
fig.show()
Output:
Once we've got our prediction in place we can then put it back to the data warehouse and add an aggregate to our semantic model to reflect it for other consumers. The prediction would be available through any other BI tool for BI analysts and business users. The prediction itself will be placed into our data warehouse and stored there.
from atscale.db.connections import Iris
db = Iris(
    username,
    host,
    namespace,
    driver,
    schema,
    port=1972,
    password=None,
    warehouse_id=None
    )

data_model.writeback(dbconn=db,
                    table_name= 'SalesPrediction',
                    DataFrame = forecast)

data_model.create_aggregate_feature(dataset_name='SalesPrediction',
                                    column_name='SalesForecasted',
                                    name='sum_sales_forecasted',
                                    aggregation_type='SUM')
That is it! Good luck with your predictions!
Hi All,
On February 8, 2024, we asked for input from the IRIS community regarding exam topics for our InterSystems IRIS Developer Professional exam. We will close the window for providing feedback on the exam topics on Friday, March 8, 2024. If you would like to have your say in what topics are covered on the exam, this is your last chance!
How can I access the survey? You can access it here
Hello Everyone,
The Certification Team of InterSystems Learning Services is developing an InterSystems IRIS Developer Professional certification exam, and we are reaching out to our community for feedback that will help us evaluate and establish the contents of this exam.
Note: This exam will replace the current InterSystems IRIS Core Solutions Developer Specialist exam when it is released. Please note from the target role description below that the focus of the new exam will be more on developer best practices and a lot less on the ObjectScript programming language.
Good morning,
First of all thanks for your help and time.
We find ourselves at a crossroads in our development journey, and we're reaching out to the community for insights and guidance regarding a critical aspect of our data management strategy.
Our current challenge revolves around the persistence of data in Globals, specifically when it comes to purging. The issue at hand is that, despite purging, data stored in Globals under the current %Persistent classes remains intact. To address this, we are contemplating a shift from %Persistent to %SerialObject for each relevant class.
Hello Community,
I have couple of question about the DynamicSQL.
1. The %ObjectSelectMode is working perfectly in the DynamicSQL for the object property in direct query. However this is not supported for class query. Is there any way to resolve this / Get the object value for class query result.
2. What is the reason behind for a stored query prepared using %PrepareClassQuery() you must use the %Get("fieldname") method.
Try a hands-on exercise in the language of your choice to get familiar with the multi-model architecture of InterSystems IRIS!
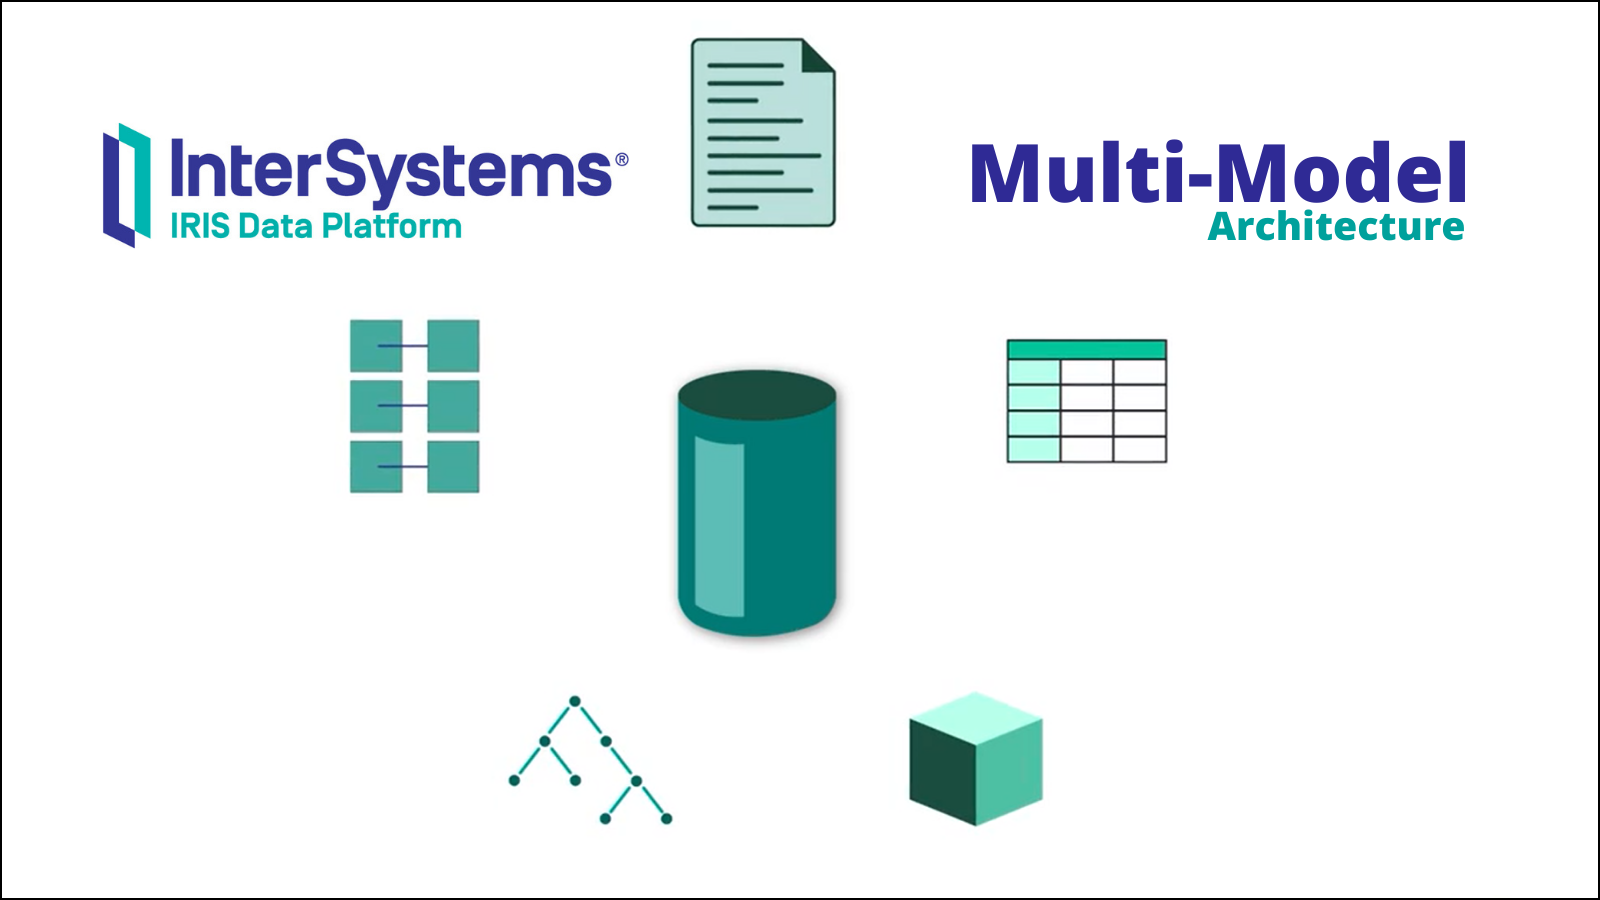
These recently updated exercises are available in ObjectScript, Python, Java, and .NET.
Before we start talking about databases and different data models that exist, first we'd better talk about what a database is and how to use it.
A database is an organized collection of data stored and accessed electronically. It is used to store and retrieve structured, semi-structured, or raw data which is often related to a theme or activity.
At the heart of every database lies at least one model used to describe its data. And depending on the model it is based on, a database may have slightly different characteristics and store different types of data.
To write, retrieve, modify, sort, transform or print the information from the database, a software called Database Management System (DBMS) is used.
The size, capacity, and performance of databases and their respective DBMS have increased by several orders of magnitude. It has been made possible by technological advances in various areas, such as processors, computer memory, computer storage, and computer networks. In general, the development of database technology can be divided into four generations based on the data models or structure: navigational, relational, object and post-relational.


A Quick start to include InterSystems IRIS Tables in Data Build Tool using Python.
It uses the sqlalchemy plugin with sqlalchemy-iris which enables the iris strategy for duckdb as a source for a dbt project.
EDIT: If you stumbled here on Google Geuse for "iris dbt", your best bet is to checkout dbt-iris for the native adapter implementation that follows dbt guidelines.
Im out of town for the Python meetup in Cambridge, but will submit to the InterSystems Python Programming Contest starting in September. Sucks I will miss it, wanted to connect with Thomas Dyer and see how close I got, but this is my virtual hail to the event through the community.
It is a quick start at best, for those perusing it, and even for myself to build upon in the upcoming months.
I am unsure this is solution is the best path to accomplish things, but it is a tested path.
I am not a dbt expert, but use dbt-core in cicd pipelines and its apparent in bash history on a daily basis, so I walk around like I eventually will be.
Made possible by SQLAlchemy-iris by Dmitry Maslennikov and a follow up post by Heloisa Paiva to express in a few lines how great it is.
Also, duckdb is fun software, wicked fast, and a data lake for your /tmp folder. Ducks are cool, Geese are not.
So we used InterSystems IRIS Cloud SQL through the Early Access Program to demonstrate things, it provisioned super fast and anything to avoid local docker these days makes for a happy brogrammer.

Looks like I got a roll of 112 ones left on my trial.
For purposes of the tables referenced in the below, I used DBeaver to create a Table "Persons" in the "SQLUser" schema and loaded it up with a bunch of worthless data.

Install the following python stuff, I am running python3.8, and everything seems to work fine.
pip install dbt-core
pip install dbt-duckdb
pip install sqlalchemy-iris
Optional, but not really if you are serious about things.
https://github.com/sween/dbt-duckdb-iris
Inside the git repository folder:
dbt init iris_project
Setup your profile, if you are familiar with .aws credentials for your system, this is similar, but for the secrets connecting to your sources.
In ~/.dbt/profiles.yml
Construct your sqlalchemy URI from you connectivity details in IRIS SQL, and populate it like so:

dbt_iris_profile:
  target: dev
  outputs:
    dev:
      type: duckdb
      database: dbt
      schema: dev
      path: /tmp/dbt.duckdb
      plugins:
        - module: sqlalchemy
          alias: sql
          config:
            connection_url: "iris://SQLAdmin:PineapplePercussions@k8s-dbt-iris-afc6f28b-09bf882dfc-12345.elb.us-east-1.amazonaws.com:1972/USER"
Modify the dbt_project.yml in the root of the dbt project.
name: 'iris_project'
version: '1.0.0'
config-version: 2

# This setting points to the "profile" we built from previous step.
profile: 'dbt_iris_profile'

model-paths: ["models"]
analysis-paths: ["analyses"]
test-paths: ["tests"]
seed-paths: ["seeds"]
macro-paths: ["macros"]
snapshot-paths: ["snapshots"]

clean-targets:
  - "target"
  - "dbt_packages"

models:
  iris_project:
    example:
      +materialized: view

vars:
  db_name: sql
Two more files to go, lets declare our models\schema.yml first:
version: 2

models:
  - name: my_first_dbt_model
    description: "A starter dbt model"
    columns:
      - name: id
        description: "The primary key for this table"
        tests:
          - unique
          - not_null

  - name: my_second_dbt_model
    description: "A starter dbt model"
    columns:
      - name: id
        description: "The primary key for this table"
        tests:
          - unique
          - not_null

sources:
  - name: dbt_iris_source
    database: dbt
    schema: SQLUser
    tables:
      - name: Persons
        identifier: Persons
        config:
          plugin: sql
          save_mode: overwrite
          query: "SELECT * FROM SQLUser.Persons"
And last but not least, a Python model in models/Persons.py
def model(dbt, session):
    dbt.config(materialized="table")

    persons_df = dbt.source("dbt_iris_source", "Persons")
    return persons_df
Now let's test and see if we can reach IRIS out there in us-east-1 of sorts.
dbt debug
If all goes well, and we are able to connect to IRIS Sql Cloud, you should see something like the following:

Next up, is to actually run the project.
dbt run

Lets generate the clown suit and take a look at our work.
dbt generate docs
dbt serve docs
On http://0.0.0.0:8080, you'll see the auto generated docs.

BOOM!!!!
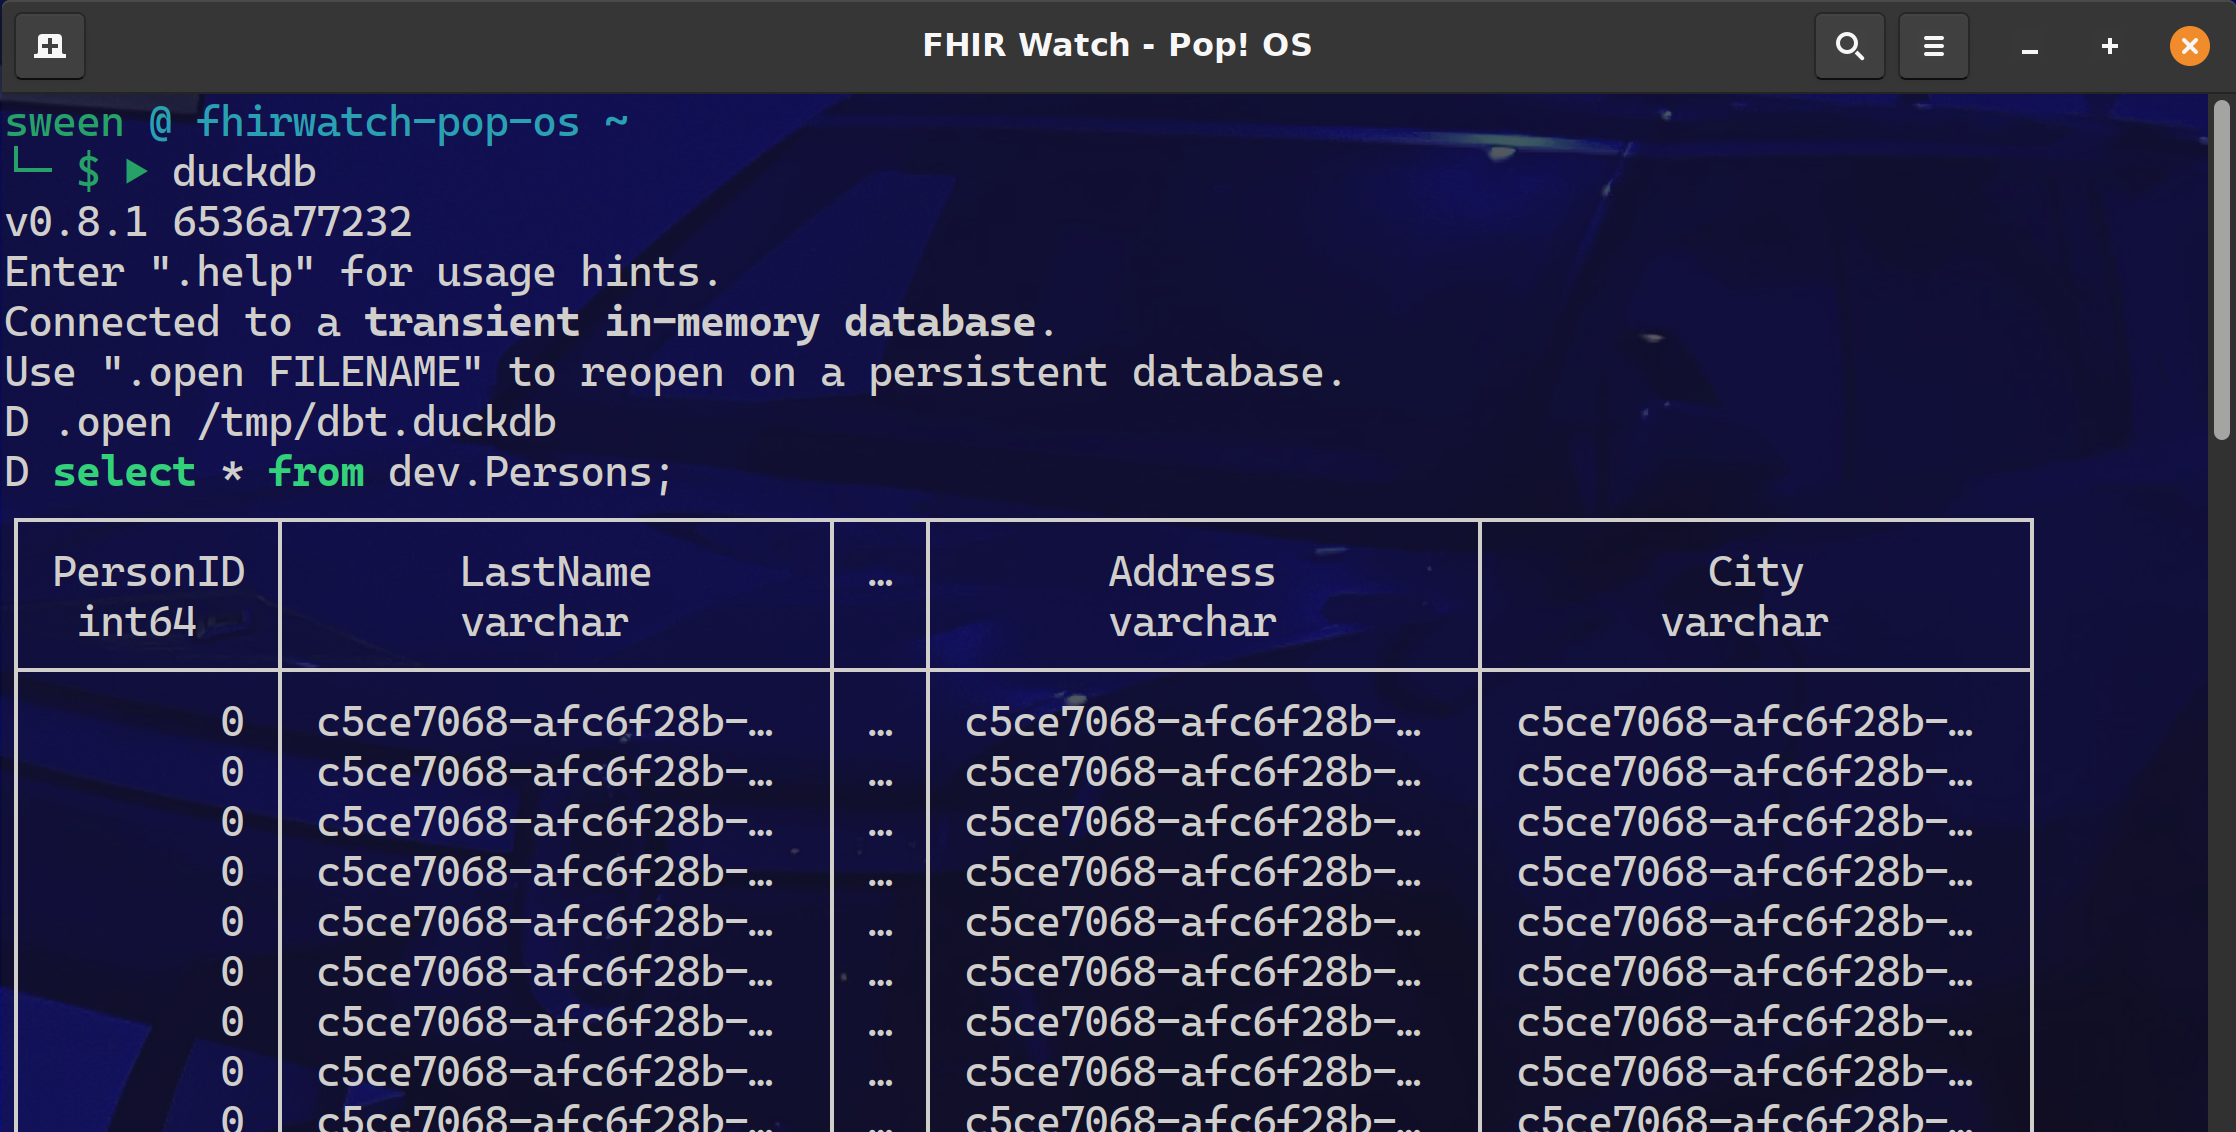
Need some proof we connected to IRIS Sql Cloud and pulled down the Persons data?
Fire up the duckdb cli and query the dev.Persons table.
I am currently down with dbt (yeah you know me) using dbt-core to about 25% of its full potential and pretty much all in and most likely headed to dbt cloud. After a project that implemented Single Table DynamoDB, with a transform to BigQuery, it became apparent that there MUST be a better way to:
Share the project
Github was not enough, there needed to be more ways to share the tribal knowledge and just not show up that day for somebody else to check it out and run. dbt shines here with dbt shampoo, dbt run && dbt test in pipelines.
Changes and Tribal Knowledge
Source control gave us the code lineage, but dbt kept the tribal knowledge right there along side of it, so changes and additions could be made without fear of breaking things.
Testing My experience with some data projects is they get handled with the testing rigor of teams that build web apps and it is not a fit. Though the target data powers the UI (where the testing occurred), it only surfaced a fraction of the data complexity and raised a ton of bugs from the datawarehouse side of the project.
Very Helpful Stuff:
Hello community,
is there anything special to consider when running a foundation production regarding purge jobs (Ens.Util.Tasks.Purge)? I am thinking specifically of the QuickStreams, which according to my information are stored in a temporary database until the system is restarted. Since a system reboot is much less frequent then the purges, I wonder what happens to the QuickStreams whose messages and headers have already been purged. Is there a way to view Quickstreams (not content, but rather metadata) e.g. via the Management Portal?
Thanks for your comments and hints,
best regards, Martin
Hi
Is there a way to read JSON and transform it (in DTL) by using a VDOC of this JSON (without transform it to internal message) like I can do with HL7 or XML?
If it possible, I guess that I should have a schema of the JSON so the second question is how to build a schema for JSON and load it to the IRIS?
Thanks, Ori.
Hello DC Members,
Please welcome the new video on InterSystems Developers YouTube:
⏯ Ten Times Faster Queries with Columnar Storage @ Global Summit 2022
Hello all; I am using a one-to-many relationship. I have a Claim (one), in a relationship with Lines (many), but the Claim is storing a list of Lines IDs, rather than the Lines storing the Claim Id. This seems upside down, and not what I expected.
Class Claim

{
    Relationship ClaimLineRel as ClaimLine [Cardinality = many, Inverse = Claim];
}

Class ClaimLine
{
    Relationship Claim as Claim [ Cardinality = one, Inverse = ClaimLineRel, OnDelete = cascade];
    Index ClaimIndex on Claim;
}
But the storage globals for Claim show data in the ClaimLine spot:
Hey Community,
I have an scenario, please advise or suggest possible ways to solve it.
So i have a persistent class to test results of a diagnostic laboratory. The properties are
This project was thought of when I was thinking of how to let Python code deal naturally with the scalable storage and efficient retrieving mechanism given by IRIS globals, through Embedded Python.
My initial idea was to create a kind of Python dictionary implementation using globals, but soon I realized that I should deal with object abstraction first.
So, I started creating some Python classes that could wrap Python objects, storing and retrieving their data in globals, i.e., serializing and deserializing Python objects in IRIS globals.
Like ObjectScript%DispatchGetProperty(), %DispatchSetProperty() and %DispatchMethod(), Python has methods to delegate object’s properties and methods calls.
When you set or get an object property, the Python interpreter lets you intercept this operation by methods __setattr__(self, name, value) and __getattr(self, name)__.
Check out this pretty basic example:
>>> class Test:
...         def __init(self, prop1):
...                 self.prop1 = prop1
...         def __setattr__(self, name, value):
...                 print(f"setting property {name} to value {value}")
...         def __getattr__(self, name):
...                 print(f"getting property {name}")
...
>>> obj = Test()
>>> obj.prop1 = "test"
setting property prop1 to value test
>>> obj.prop1
getting property prop1
>>> obj.prop2
getting property prop2
>>> obj.prop2
getting property prop2
>>>
Note that the methods __setattr__() and __getattr()__ were called indirectly by set and get operation on objects of class Test - which implements those methods. Even a non-declared property, like prop2 in this example, issues calls to them.
That mechanism is the heart of the serialization test that I tried in my project python-globals-serializer-example. With it, you can intercept set/get operations and store/retrieve data from IRIS globals.
Globals offer a highly customizable structure. By using their hierarchical model for information access, which is pretty similar to JSON objects and Python dictionaries, we can store objects’ properties data and metadata.
Here is how I used global to create a simple object model to serialize Python objects:
For each serialized object, its class name is serialized into a node labeled as “class”:
^test(1,"class")="<class 'employee.SalaryEmployee'>"
The first index is an incremental number which is used as reference to this object in the model. So, in the above example, an object of class employee.SalaryEmployee is stored with the reference value 1.
For properties of primitive data types, their type and value are stored. For instance:
^test(1,"name","type")="<class 'str'>"
^test(1,"name","value")="me"
That structure is interpreted as the object referred to by index 1, has a property called name, with value equals ‘me’.
For properties referencing objects the model is slightly different, because unlike JSON objects or Python dictionaries, globals are intended to store only primitive data type data. So another “class” node is created to this referenced object and its node index (i.e. its reference) is stored in the property node:
^test(1,"company","oref")=2
^test(1,"company","type")="<class 'iris_global_object.IrisGlobalObject'>"
^test(2,"class")="<class 'employee.Company'>"
^test(2,"name","type")="<class 'str'>"
^test(2,"name","value")="Company ABC"
Those structures means that the object 1 has a property called company, which its values are stored in the index 2 - note the value for ^test(1,"company","oref").
When you create a wrapper to serialize or deserialize Python objects, you need to define the name of the global which stores the object.
After that, the serialization process is done when a set operation is executed. The __setattr__() method sets the property value and type in the global defined to store the object, using the simple object model explained before.
In the opposite direction, a deserialization is done by the __getattr__ method, when a get operation is performed.
For primitive data types, this process is straightforward: just get the value stored in the global and returns.
But for objects, the process needs to instantiate their class data type and set all their properties as well, so this way a restored Python object could be used, including calls to its methods.
As said in the beginning of this post, this project was born as a simplification of a way to let Python code use global as a natural storage engine, and aims to be just a proof of concept.
Serializing/deserializing objects is just the beginning of this goal. So, a lot of effort needs to be done to get this idea mature.
I hope this post lets you understand the purpose of my work in this project, and may inspire you to think in new ways of how to use IRIS globals to bring Python even closer to IRIS.
Hi Community,
This post is a introduction of my openexchange iris-globals-graphDB application.
In this article I will demonstrate how to save and retrieve Graph Data into InterSystems Globals with the help of Python Flask Web Framework and PYVIS Interactive network visualizations Library
Hi Developers!
Here're the technology bonuses for the InterSystems IRIS Globals Contest 2022 that will give you extra points in the voting:
See the details below.
Hey Coommunity,
Learn about InterSystems globals, the data model native to InterSystems IRIS® data platform that makes data storing efficient and provides the flexibility your data needs:
Hey community! How are you doing?
I hope to find everyone well, and a happy 2022 to all of you!
Over the years, I've been working on a lot of different projects, and I've been able to find a lot of interesting data.
But, most of the time, the dataset that I used to work with was the customer data. When I started to join the contest in the past couple of years, I began to look for specific web datasets.
I've curated a few data by myself, but I was thinking, "This dataset is enough to help others?"
So, discussing the ideas for this contest with @José Pereira , we decided to approach this contest using a different perspective.
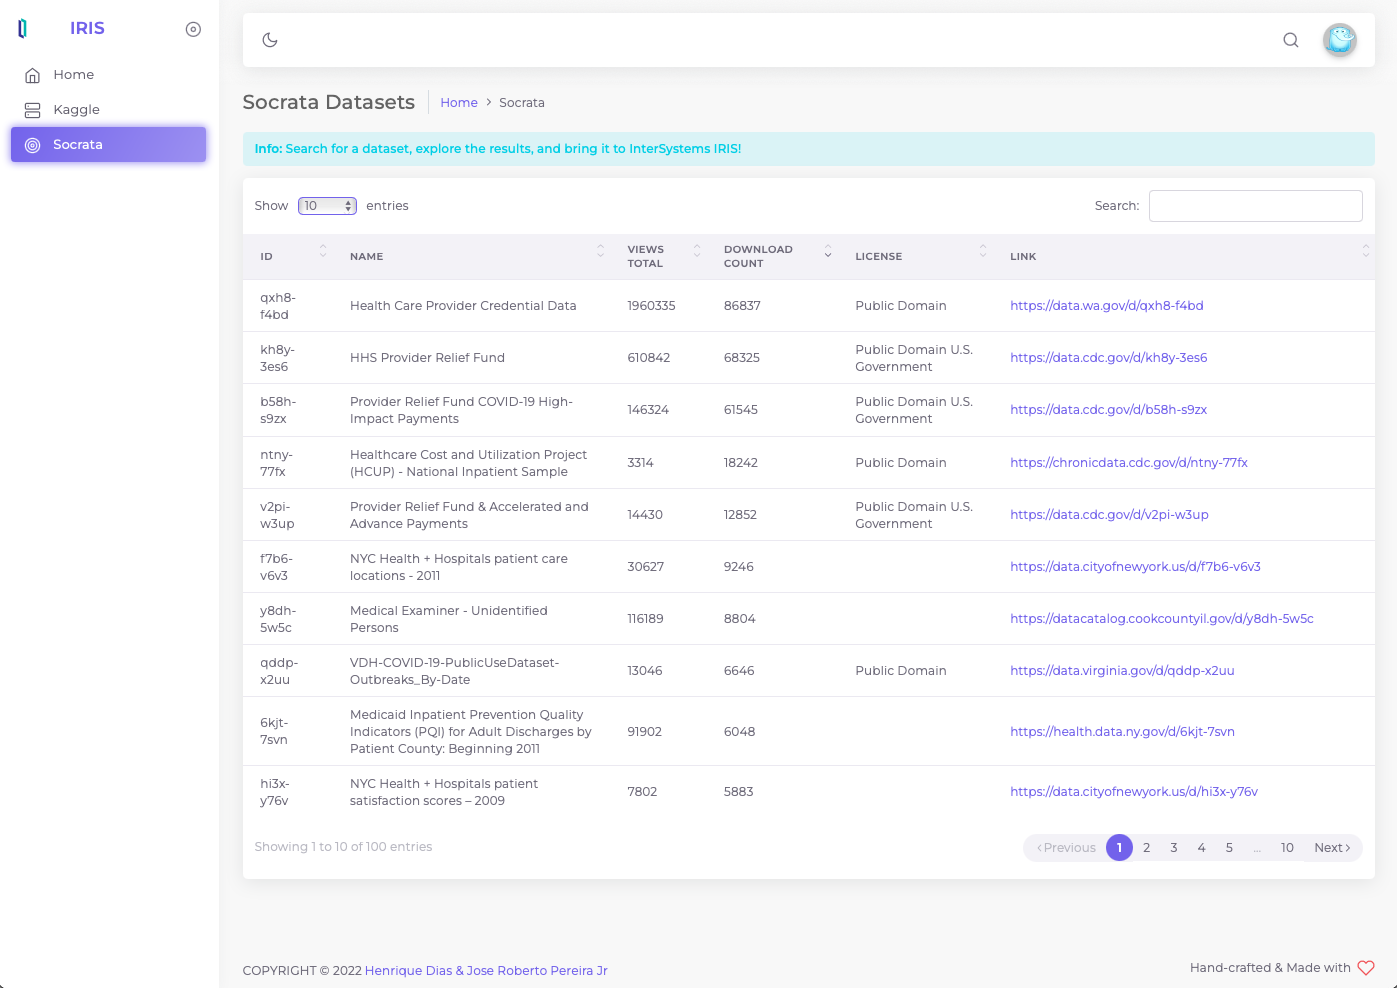
We thought of offering a variety of datasets of any kind from two famous data sources. This way, we can be empowering the users to find and install the desired dataset in a quick and easy way.
The Socrata Open Data API allows you to programmatically access a wealth of open data resources from governments, non-profits, and NGOs around the world.
For this initial release, we are using Socrata APIs to search and download and speficic dataset.
Open the API tool of your preference like Postman, Hoppscotch
GET> https://api.us.socrata.com/api/catalog/v1?only=dataset&q=healthcare
This endpoint will return all healthcare related datasets, like the image below:
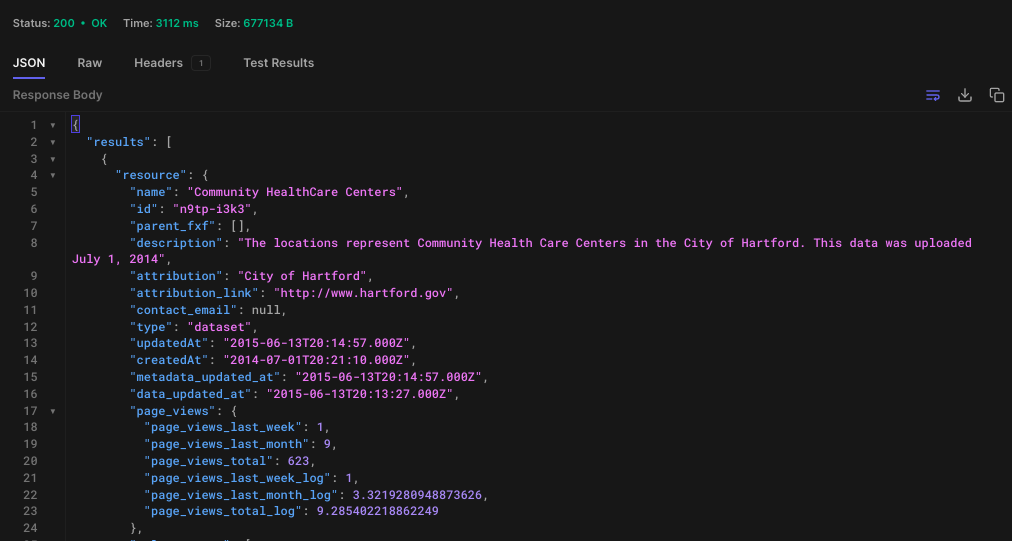
Now, get the ID. In this case the id is: "n9tp-i3k3"
Go the the terminal
IRISAPP>set api = ##class(dc.dataset.importer.service.socrata.SocrataApi).%New()
IRISAPP>do api.InstallDataset({"datasetId": "n9tp-i3k3", "verbose":true})
Compilation started on 01/07/2022 01:01:28 with qualifiers 'cuk'
Compiling class dc.dataset.imported.DsCommunityHealthcareCenters
Compiling table dc_dataset_imported.DsCommunityHealthcareCenters
Compiling routine dc.dataset.imported.DsCommunityHealthcareCenters.1
Compilation finished successfully in 0.108s.
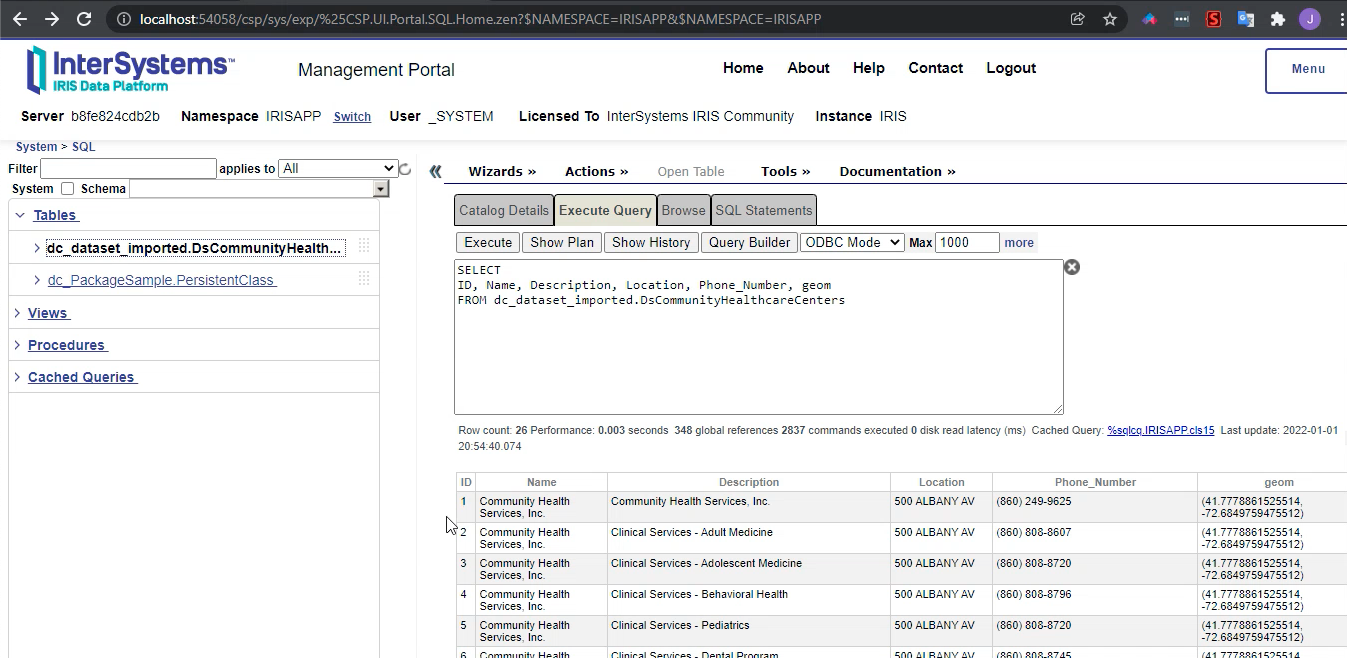
Class name: dc.dataset.imported.DsCommunityHealthcareCenters
Header: Name VARCHAR(250),Description VARCHAR(250),Location VARCHAR(250),Phone_Number VARCHAR(250),geom VARCHAR(250)
Records imported: 26
After the command above, your dataset it's ready to use!
Kaggle, a subsidiary of Google LLC, is an online community of data scientists and machine learning practitioners. Kaggle allows users to find and publish data sets, explore and build models in a web-based data-science environment, work with other data scientists and machine learning engineers, and enter competitions to solve data science challenges.
In June 2017, Kaggle announced that it passed 1 million registered users, or Kagglers, and as of 2021 has over 8 million registered users. The community spans 194 countries. It is a diverse community, ranging from those just starting out to many of the world's best known researchers.
This what I call a huge community, right?!
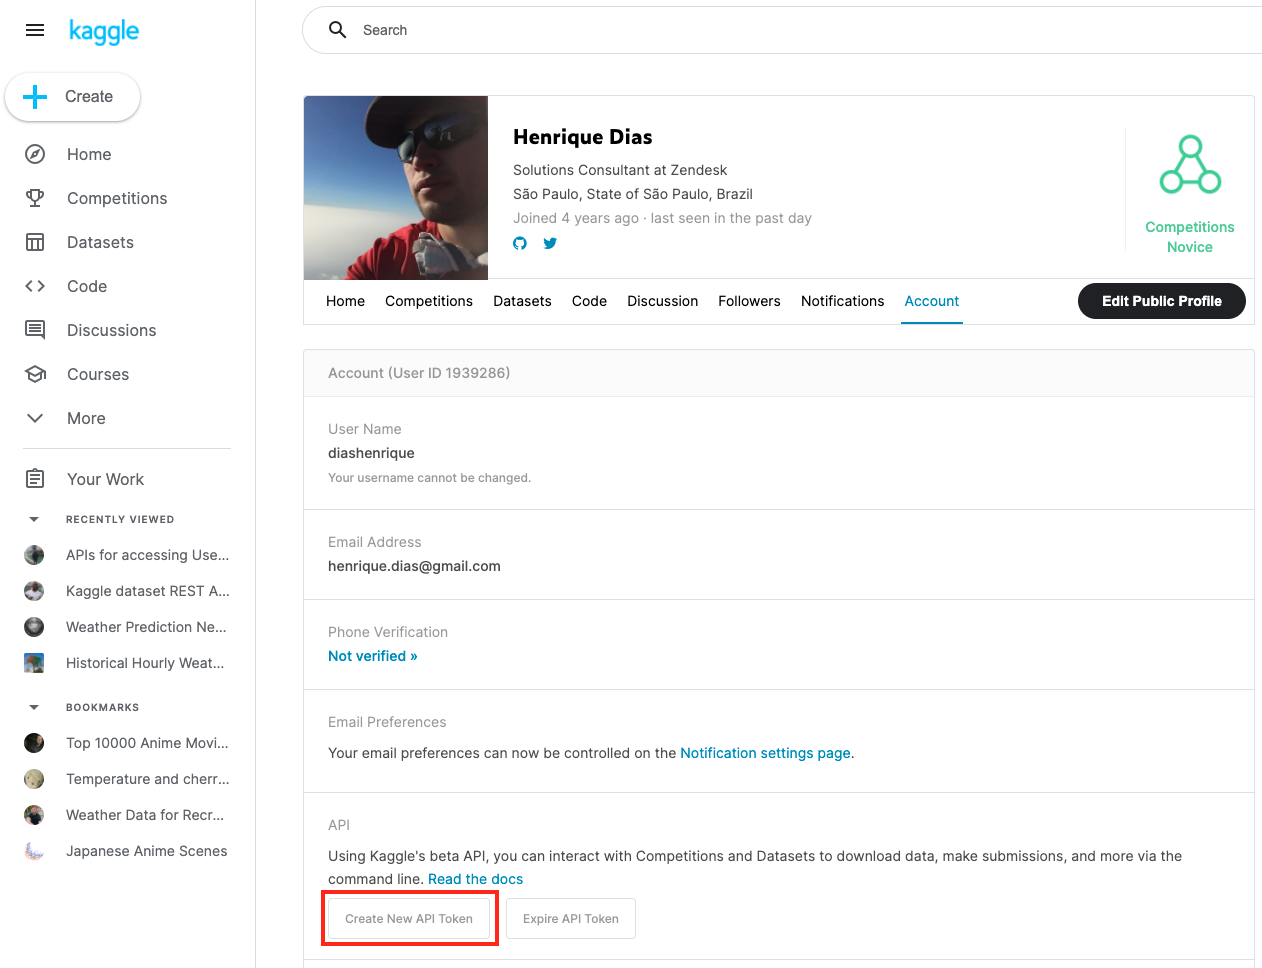
To use the datasets from Kaggle, you need to register on the website. After that, you need to create an API token to use Kaggle's API.
Now, just like with Socrata, you can use the API to search and download the dataset.
GET> https://www.kaggle.com/api/v1/datasets/list?search=appointments
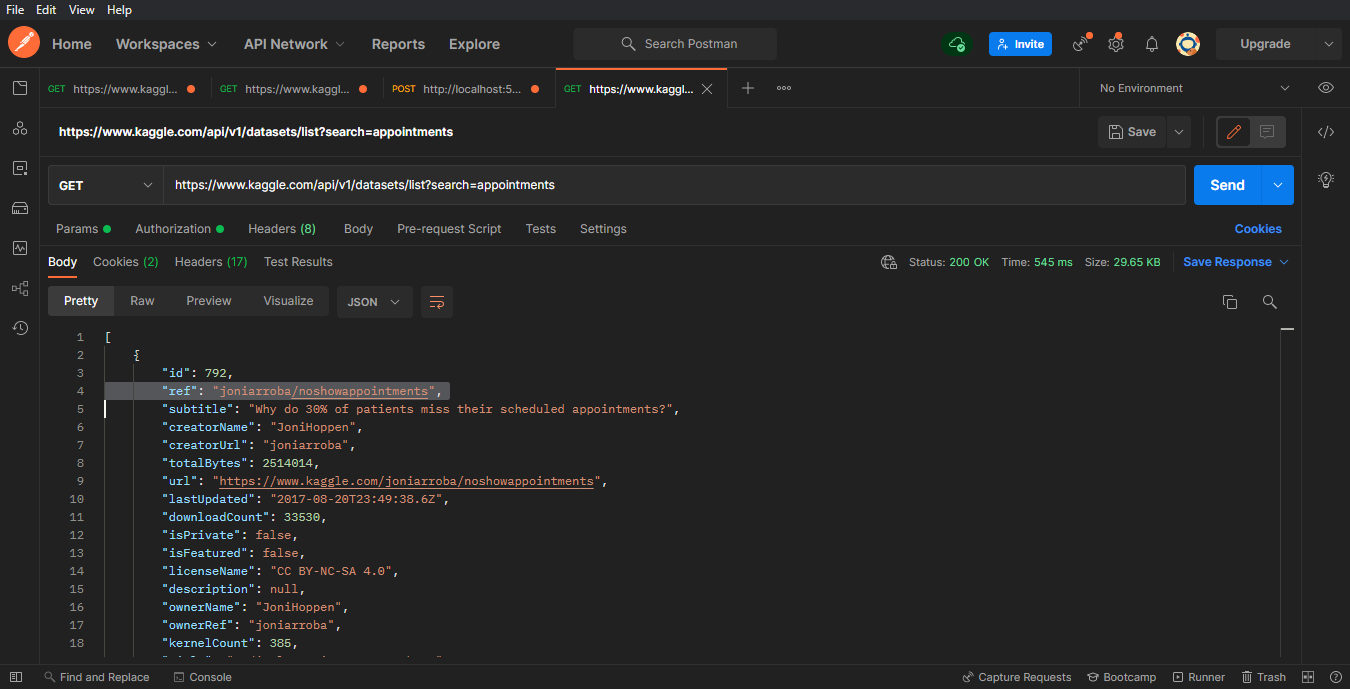
Now, get the ref value. In this case the ref is: "joniarroba/noshowappointments"
The parameters below "your-username", and "your-password" are the parameters provided by Kaggle when you create the API token.
IRISAPP>Set crendtials = ##class(dc.dataset.importer.service.CredentialsService).%New()
IRISAPP>Do crendtials.SaveCredentials("kaggle", "<your-username>", "<your-password>")
IRISAPP>Set api = ##class(dc.dataset.importer.service.kaggle.KaggleApi).%New()
IRISAPP>Do api.InstallDataset({"datasetId":"joniarroba/noshowappointments", "credentials":"kaggle", "verbose":true})
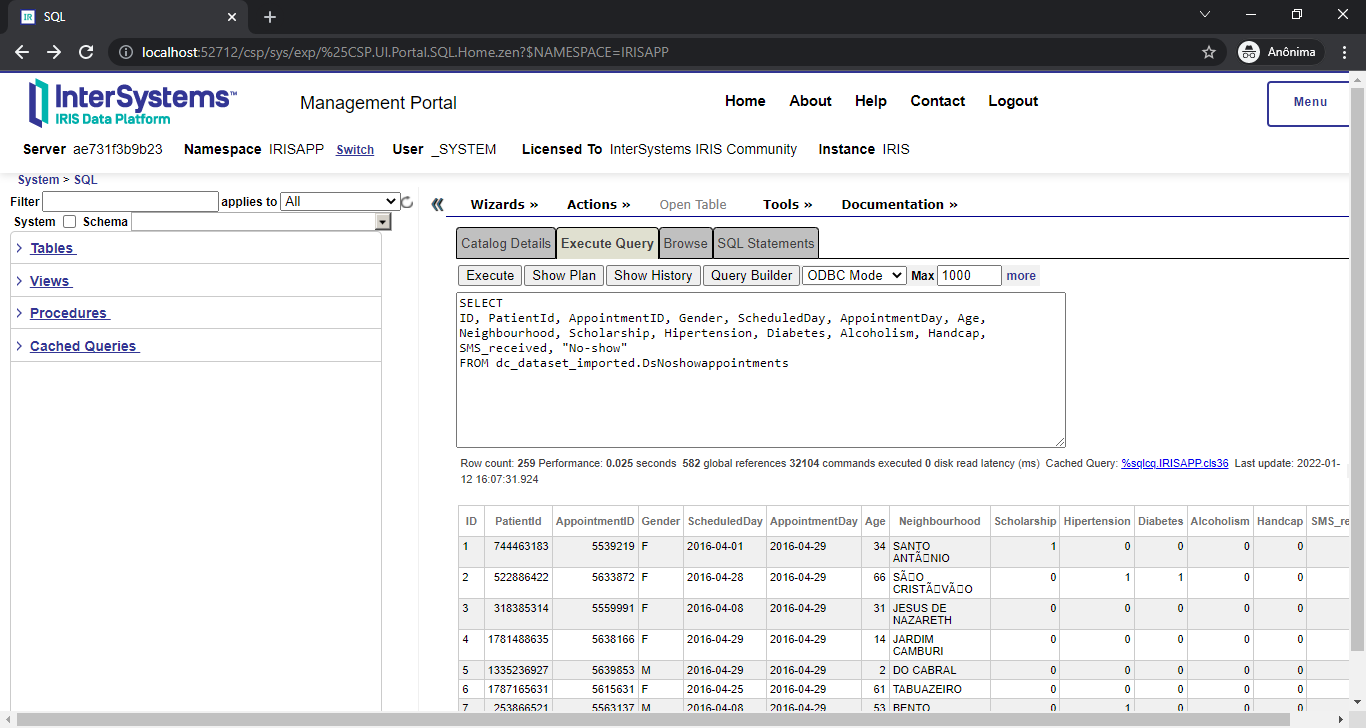
Class name: dc.dataset.imported.DsNoshowappointments
Header: PatientId INTEGER,AppointmentID INTEGER,Gender VARCHAR(250),ScheduledDay DATE,AppointmentDay DATE,Age INTEGER,Neighbourhood VARCHAR(250),Scholarship INTEGER,Hipertension INTEGER,Diabetes INTEGER,Alcoholism INTEGER,Handcap INTEGER,SMS_received INTEGER,No-show VARCHAR(250)
Records imported: 259
After the command above, your dataset it's ready to use!
We're offering a GUI to install the dataset to make things easier. But this is something that we like to discuss in our next article. In the meanwhile, you can check a sneak peek below while we are polishing a few things before the official release:

How is the behavior of downloading a bigger dataset? +400.000 records aren't enough?! How about 1 MILLION RECORDS?! Let's see it!
<iframe width="560" height="315" src="https://www.youtube.com/embed/0T8wXRsaJso" title="YouTube video player" frameborder="0" allow="accelerometer; autoplay; clipboard-write; encrypted-media; gyroscope; picture-in-picture" allowfullscreen></iframe>If you liked the app and think we deserve your vote, please vote for iris-kaggle-socrata-generator!
i'm trying to extend both the MemberEnrollment and the MedicalClaim objects in HS. The CareProvider is perfect for some of my extensions (Operating provider, referring provider, third-party insurer), but the documentation says https://docs.intersystems.com/irisforhealthlatest/csp/docbook/DocBook.U…:
I need something that is just like a CareProvider, and I will be using the CarePRoviderType as a CodeTableDetail.