0 Followers · 433 Posts

JSON (JavaScript Object Notation) is a lightweight data-interchange format. It is easy for humans to read and write.

Question Scott Roth · Jul 14, 2025

I have been struggling sometime with trying to take a FHIR Bundle Response, extract the "entry.resourceType", extract the MRN and Name from the Patient FHIR Response...

Going through learning.intersystems.com, it suggested that I try using fhirPathAPI to parse and search my response for certain values, however I am not sure my syntax is correct. Using the AI code, it suggested to set my tree = "Bundle.entry.resource.resourceType"

0
0 67
Question Aaron Laferty · Jul 11, 2025

So I have been working in Healthcare Interops for about a month now and in IRIS. I am looking to implement SMART on FHIR and I am currently working to make an endpoint that works as the discovery endpoint. It is a custom dispatch class and unauthenticated is selected for access. I am trying to make a simple get request from Postman to test that the proper JSON is sent, but I receive a 403 Forbidden error. It is reaching IRIS it seems so I know its not a reverse proxy error. Here is an example of my custom Dispatch Class. Then also there is a screenshot of my web application I made specifically

2
0 51
Question Scott Roth · Jul 8, 2025

I am receiving a FHIR response bundle back with a resource of patient. Using fromDao, I attempted to take the stream and put it into FHIRModel.R4.Patient but it is not mapping correctly. When I attempt to take FHIRModel.R4.Patient and write it out using toString(), all I am seeing is the resource

{"resourceType":"Patient"}

so the response is not mapping correctly to FHIRModel.R4.Patient. How have others handled this? Do I need to translate it to an SDA since it does fit the model format?

6
0 98
Job Ying Zhang · Jul 8, 2025

I am seeking work with InterSystems HealthConnect/Cache. My experience is working with Rules and DTLs, plus message search, and export of components.With 10 years of dedicated expertise in SOA and ESB platform development, I have successfully designed and implemented enterprise-level integration solutions for large organizations, driving significant improvements in system interoperability and business efficiency.I have actively developed and supported HL7 V2/V3 、FHIR、XML/JSON interfaces.I reside in China. Available for full-time or contract positions, with remote work options preferred.The

0
0 67
Question Shashvati Dash · Jul 1, 2025

The below code is not working. its unable retrieve Record count and merge files

Class Util

{

ClassMethod zPyRecordCount(inputfile) As %Integer [ Language = python ]

{

    import pandas as pd

    import iris

    import io

    try:

        df = pd.read_csv(inputfile, sep='|')

        recordcount=len(df.index)

        sys.stdout.write(len(df.index))

        return recordcount

    except Exception as e:

        return 0

}

ClassMethod zPymergefiles(file1, file2, outputfilename) As %Boolean [ Language = python ]

{

    import pandas as pd

    import iris

    import io

    try:

1
0 57
Question Evgeny Shvarov · Jun 29, 2025

Hi noble devs!

Just building a simple frontend->JSON->IRIS backend story, and figured that IRIS while importing via %JSON.Adaptor wants JSON fields to match property names, meaning even should match the case. Like:

{ name: "John", 

surname: "Doe"}

will have issues while saving the dynamic object to a class Sample.Person with:

Class Sample.Person Extends (%Persistent, %JSON.Adaptor)

{

Property Name: %Sting;Property Surname: %String;
}

As soon as the case is not the same... 

15
0 199
Article Marco Bahamondes · Jun 24, 2025 3m read

Introduction

InterSystems IRIS allows you to build REST APIs using ObjectScript classes and the %CSP.REST framework. This enables the development of modern services to expose data for web apps, mobile apps, or system integrations.

In this article, you'll learn how to create a basic REST API in InterSystems IRIS, including:

  • A persistent data class
  • A REST class with GET and POST methods
  • A web application to expose the API
  • A full demonstration using Docker

Step 1: Create the data class Demo.Producto

3
3 145
Question Ashok Kumar T · Jun 27, 2025

Hello Community,

When handling a %CSP.REST API response for a custom endpoint, how can I capture or access the response content before it is written to the output buffer and sent through the Web Gateway to the UI?

In manually created REST services (for example, with a route like:<Route Url="/test" Method="POST" Call="User.Sample:Test" Cors="true"/> ),
the response is typically written from within any class method in the execution flow.

Is there a way to intercept or log the response content before it is sent to the client?

Thanks!

4
0 77
Article Evgeny Shvarov · May 9, 2025 3m read

Hi developers!

Observing the avalanche of AI-driven and vibe-coding developer tools that have been appearing lately almost every month with more and more exciting dev features, I was puzzled whether it is possible to leverage it with InterSystems IRIS. At least to build a frontend. And the answer - yes! At least with the approach I followed.

Here is my recipe to prompt the UI vs InterSystems IRIS Backend:

  1. Have the REST API on the IRIS side, which reflects some Open API (swagger) spec.
  2. Generate the UI with any vibe-coding tool (e.g., Lovable) and point the UI to the REST API endpoint.
  3. Profit!

Here is the result of my own exercise - a 100% prompted UI vs IRIS REST API that allows to list, create, update delete entries of a persistent class (Open Exchange,frontend source, video):

What is the recipe in detail?

5
1 216
Article Guillaume Rongier · Jul 8, 2024 6m read

Flask_logo

Description

This is a template for a Flask application that can be deployed in IRIS as an native Web Application.

Installation

  1. Clone the repository
  2. Create a virtual environment
  3. Install the requirements
  4. Run the docker-compose file
git clone
cd iris-flask-template
python3 -m venv .venv
source .venv/bin/activate
pip install -r requirements.txt
docker-compose up

Usage

The base URL is http://localhost:53795/flask/.

Endpoints

  • /iris - Returns a JSON object with the top 10 classes present in the IRISAPP namespace.
  • /interop - A ping endpoint to test the interoperability framework of IRIS.
  • /posts - A simple CRUD endpoint for a Post object.
  • /comments - A simple CRUD endpoint for a Comment object.

How to develop from this template

See WSGI introduction article: wsgi-introduction.

TL;DR : You can toggle the DEBUG flag in the Security portal to make changes to be reflected in the application as you develop.

Code presentation

app.py

This is the main file of the application. It contains the Flask application and the endpoints.

from flask import Flask, jsonify, request
from models import Comment, Post, init_db

from grongier.pex import Director

import iris

app = Flask(__name__)
app.config['SQLALCHEMY_DATABASE_URI'] = 'iris+emb://IRISAPP'

db = init_db(app)
  • from flask import Flask, jsonify, request: Import the Flask library.
  • from models import Comment, Post, init_db: Import the models and the database initialization function.
  • from grongier.pex import Director: Import the Director class to bind the flask app to the IRIS interoperability framework.
  • import iris: Import the IRIS library.
  • app = Flask(__name__): Create a Flask application.
  • app.config['SQLALCHEMY_DATABASE_URI'] = 'iris+emb://IRISAPP': Set the database URI to the IRISAPP namespace.
    • The iris+emb URI scheme is used to connect to IRIS as an embedded connection (no need for a separate IRIS instance).
  • db = init_db(app): Initialize the database with the Flask application.

models.py

This file contains the SQLAlchemy models for the application.

from dataclasses import dataclass
from typing import List
from flask_sqlalchemy import SQLAlchemy

db = SQLAlchemy()

@dataclass
class Comment(db.Model):
    id:int = db.Column(db.Integer, primary_key=True)
    content:str = db.Column(db.Text)
    post_id:int = db.Column(db.Integer, db.ForeignKey('post.id'))

@dataclass
class Post(db.Model):
    __allow_unmapped__ = True
    id:int = db.Column(db.Integer, primary_key=True)
    title:str = db.Column(db.String(100))
    content:str = db.Column(db.Text)
    comments:List[Comment] = db.relationship('Comment', backref='post')

Not much to say here, the models are defined as dataclasses and are subclasses of the db.Model class.

The use of the __allow_unmapped__ attribute is necessary to allow the creation of the Post object without the comments attribute.

dataclasses are used to help with the serialization of the objects to JSON.

The init_db function initializes the database with the Flask application.

def init_db(app):
    db.init_app(app)

    with app.app_context():
        db.drop_all()
        db.create_all()
        # Create fake data
        post1 = Post(title='Post The First', content='Content for the first post')
        ...
        db.session.add(post1)
        ...
        db.session.commit()
    return db
  • db.init_app(app): Initialize the database with the Flask application.
  • with app.app_context(): Create a context for the application.
  • db.drop_all(): Drop all the tables in the database.
  • db.create_all(): Create all the tables in the database.
  • Create fake data for the application.
  • return the database object.

/iris endpoint

######################
# IRIS Query example #
######################

@app.route('/iris', methods=['GET'])
def iris_query():
    query = "SELECT top 10 * FROM %Dictionary.ClassDefinition"
    rs = iris.sql.exec(query)
    # Convert the result to a list of dictionaries
    result = []
    for row in rs:
        result.append(row)
    return jsonify(result)

This endpoint executes a query on the IRIS database and returns the top 10 classes present in the IRISAPP namespace.

/interop endpoint

########################
# IRIS interop example #
########################
bs = Director.create_python_business_service('BS')

@app.route('/interop', methods=['GET', 'POST', 'PUT', 'DELETE'])
def interop():
    
    rsp = bs.on_process_input(request)

    return jsonify(rsp)

This endpoint is used to test the interoperability framework of IRIS. It creates a Business Service object and binds it to the Flask application.

NB : The bs object must be outside of the scope of the request to keep it alive.

  • bs = Director.create_python_business_service('BS'): Create a Business Service object named 'BS'.
  • rsp = bs.on_process_input(request): Call the on_process_input method of the Business Service object with the request object as an argument.

/posts endpoint

############################
# CRUD operations posts    #
############################

@app.route('/posts', methods=['GET'])
def get_posts():
    posts = Post.query.all()
    return jsonify(posts)

@app.route('/posts', methods=['POST'])
def create_post():
    data = request.get_json()
    post = Post(title=data['title'], content=data['content'])
    db.session.add(post)
    db.session.commit()
    return jsonify(post)

@app.route('/posts/<int:id>', methods=['GET'])
def get_post(id):
    ...

This endpoint is used to perform CRUD operations on the Post object.

Thanks to the dataclasses module, the Post object can be easily serialized to JSON.

Here we use the sqlalchemy query method to get all the posts, and the add and commit methods to create a new post.

/comments endpoint

############################
# CRUD operations comments #
############################

@app.route('/comments', methods=['GET'])
def get_comments():
    comments = Comment.query.all()
    return jsonify(comments)

@app.route('/comments', methods=['POST'])
def create_comment():
    data = request.get_json()
    comment = Comment(content=data['content'], post_id=data['post_id'])
    db.session.add(comment)
    db.session.commit()
    return jsonify(comment)

@app.route('/comments/<int:id>', methods=['GET'])
def get_comment(id):
    ...

This endpoint is used to perform CRUD operations on the Comment object.

The Comment object is linked to the Post object by a foreign key.

Troubleshooting

How to run the Flask application in a standalone mode

You can always run a standalone Flask application with the following command:

python3 /irisdev/app/community/app.py

NB : You must be inside of the container to run this command.

docker exec -it iris-flask-template-iris-1 bash

Restart the application in IRIS

Be in DEBUG mode make multiple calls to the application, and the changes will be reflected in the application.

How to access the IRIS Management Portal

You can access the IRIS Management Portal by going to http://localhost:53795/csp/sys/UtilHome.csp.

Run this template locally

For this you need to have IRIS installed on your machine.

Next you need to create a namespace named IRISAPP.

Install the requirements.

Install IoP :

#init iop
iop --init

# load production
iop -m /irisdev/app/community/interop/settings.py

# start production
iop --start Python.Production

Configure the application in the Security portal.

4
1 491
Question TAZ.R · May 6, 2025

Hi everyone,

I’m new to this community and could really use some help with creating a production in InterSystems IRIS for Health Community 2024.3. I have deployed my instance using Docker.
Here’s what I’m trying to do:

  1. Input: I have an HL7 file that is processed by the standard EnsLib.HL7.Service.FileService.
  2. DTL Transformation: I’ve created a DTL to transform the HL7 content into a custom class like this:
5
0 185
Article Alex Alcivar · Jul 28, 2024 6m read

For a long time I have wanted to learn the Django framework, but another more pressing project has always taken priority. Like many developers, I use python when it comes to machine learning, but when I first learned web programming PHP was still enjoying primacy, and so when it was time for me to pick up a new complicated framework for creating web applications to publish my machine learning work, I still turned to PHP. For a while I have been using a framework called Laravel to build my websites, and this PHP framework introduced me to the modern Model-View-Controller pattern of web

2
1 376
Article Chi Nguyen-Rettig · Jun 1, 2025 3m read

IRIS supports CCDA and FHIR transformations out-of-the-box, yet the ability to access and view those features requires considerable setup time and product knowledge. The IRIS Interop DevTools application was designed to bridge that gap, allowing implementers to immediately jump in and view the built-in transformation capabilities of the product. 

In addition to the IRIS XML, XPath, and CCDA Transformation environment, the Interop DevTools package now provides:

0
1 104
Article Muhammad Waseem · May 28, 2025 4m read


Hi Community,
In this article, I will introduce my application iris-fhir-bridge 
IRIS-FHIR-Bridge is a robust interoperability engine built on InterSystems IRIS for Health, designed to transform healthcare data across multiple formats into FHIR and vice versa. It leverages the InterSystems FHIR Object Model (HS.FHIRModel.R4.*) to enable smooth data standardization and exchange across modern and legacy healthcare systems.

2
1 155
Article Kate Lau · May 28, 2025 6m read

Hi everyone,

It's me again😁. As usual I would like to share something I study recently, and today, I would like to share about the document DB😁.

1st of all, let's go to the documentation https://docs.intersystems.com/irislatest/csp/docbook/DocBook.UI.Page.cls?KEY=GDOCDB_intro
Well, I must say, this one is much better to follow than the others, which I read before. 😭 Finally😭😭

Ok, let's start walking through it together

Here we go😀, we start a terminal from VSCode to connect to our IRIS

We are going to created Document DB demo.docpatient
 

1.1 Check the Document DB exist or not

0
1 154
Article Elliott Grey · Mar 7, 2023 9m read

Foreword

InterSystems IRIS versions 2022.2 and newer feature the ability to authenticate to a REST API using JSON web tokens (JWTs). This feature enhances security by limiting where and how often passwords transfer over the network in addition to setting an expiration time on access.

The goal of this article is to serve as a tutorial on how to implement a mock REST API using InterSystems IRIS and lock access to it behind JWTs.

NOTE I am NOT a developer. I make no claims as to the efficiency, scalability, or quality of the code samples I use in this article. These examples are for educational purposes ONLY. They are NOT intended for production code.

Prologue

With that disclaimer out of the way, let's explore the concepts we're going to be dissecting here.

What is REST?

REST is an acronym for REpresentational State Transfer. It is an architecture for programs to communicate with web applications and access functions those applications have published.

What is a JWT?

A JSON web token (JWT) is a compact, URL-safe means of representing claims transferred between two parties that can be digitally signed, encrypted, or both. If you want to learn more about JWTs and other JSON web classes InterSystems IRIS supports, read this post.

Getting Our Hands Dirty

According to the Spec

To consume a REST API, we first need to have a REST API. I've provided a sample OpenAPI 2.0 specification here that's Table Top Role Playing Game (TTRPG) flavored. It's the one I'll be using throughout the examples here. There are plenty of examples of how to write your own online so feel free to dive into that, but the specification is just a blueprint. It doesn't do anything other than inform us how to use the API.

REST API Generation

InterSystems IRIS provides a very neat way of generating REST API code stubs. This documentation provides a complete way of generating the code stubs. Feel free to use the OpenAPI 2.0 specification I provided in the previous section here.

Implementation

Here's where we're going to dig deep. The generation section will have created three .cls files for you:

  1. impl.cls
  2. disp.cls
  3. spec.cls

We are going to spend the bulk of our time in impl.cls, maybe touch disp.cls for debugging, and leave spec.cls alone.

In impl.cls are code stubs for the methods disp.cls will call when it receives an API request. The OpenAPI specification defined these signatures. It can tell what you want it to do, but you ultimately need to implement it. So let's do that!

Creation

One of the ways we use a database is adding objects to it. These objects serve as the foundation for our other functions. Without any existing objects, we won't have anything to view so we're going to start with our object model: a Character!

A Character will necessarily have a name and optionally specify their class, race, and level. Below is an example implementation of the TTRPG.Character class

Class TTRPG.Character Extends %Persistent
{

Property Name As %String [ Required ];

Property Race As %String;

Property Class As %String;

Property Level As %String;

Index IndexName On Name [ IdKey ];

ClassMethod GetCharByName(name As %String) As TTRPG.Character
{
    set character = ##class(TTRPG.Character).%OpenId(name)

    Quit character
}
}

Since we want to store Character objects in the database, we need to inherit the %Persistent class. We want to be able to look up our characters by name as opposed to assigning an arbitrary ID key to them so we set the [ IdKey ] attribute on the Index for the Character.Name property. This also guarantees uniqueness of the character name.

With our foundational object model defined, we can dissect the REST API implementation. The first method we'll explore is the PostCharacter method.

As an overview, this part consumes an HTTP POST request to the /characters endpoint with our defined character properties in the body. It should take the provided arguments and create a TTRPG.Character object out of them, save it to the database, and let us know whether it succeeded or not.

ClassMethod PostCharacter(name As %String, class As %String, race As %String, level As %String) As %DynamicObject
{
    set results = {} // create the return %DynamicObject

    //create the character object
    set char = ##class(TTRPG.Character).%New()

    set char.Name = name
    set char.Class = class
    set char.Race = race
    set char.Level = level
    set st = char.%Save()

    if st {
        set charInfo = {}
        set charInfo.Name = char.Name
        set charInfo.Class = char.Class
        set charInfo.Race = char.Race
        set charInfo.Level = char.Level
        set results.Character = charInfo
        Set results.Status = "success"
    }
    else {
        Set results.Status = "error"
        Set results.Message = "Unable to create the character"
    }
    Quit results
}

Now that we can create characters, how do we retrieve the one we just made? According to the OpenAPI specification, the /characters/{charName} endpoint allows us to retrieve a character by name. We retrieve the character instance, if it exists. If it doesn't exist, we return an error letting the user know that a character with the provided name doesn't exist. This is implemented in the GetCharacterByName method.

ClassMethod GetCharacterByName(charName As %String) As %DynamicObject
{
   // Create a new dynamic object to store the results
        Set results = {}

        set char = ##class(TTRPG.Character).GetCharByName(charName)

        if char {
           set charInfo = {}
            set charInfo.Name = char.Name
            set charInfo.Class = char.Class
            set charInfo.Race = char.Race
            set charInfo.Level = char.Level
            set results.Character = charInfo
            Set results.Status = "success"
        }
        // If no character was found, set an error message in the results object
        else {
            Set results.Status = "error"
            Set results.Message = "No characters found"
        }

        // Return the results object
        Quit results
}

But that's just your character. What about all the other characters that other people have made? We can view these characters using the GetCharacterList method. It consumes an HTTP GET request to the /characters endpoint to compile a list of all characters in the database and returns that list.

ClassMethod GetCharacterList() As %DynamicObject
{
    // Create a new dynamic object to store the results
        Set results = {}
        set query = "SELECT Name, Class, Race, ""Level"" FROM TTRPG.""Character"""
        set tStatement = ##class(%SQL.Statement).%New()
        set qstatus = tStatement.%Prepare(query)
        if qstatus '= 1 { Do ##class(TTRPG.impl).%WriteResponse("Error: " _ $SYSTEM.Status.DisplayError(qstatus)) }
        set rset = tStatement.%Execute()
        Set characterList = []
        while rset.%Next(){
            Set characterInfo = {}
            Set characterInfo.Name = rset.Name
            set characterInfo.Race = rset.Race
            Set characterInfo.Class = rset.Class
            Set characterInfo.Level = rset.Level 

            Do characterList.%Push(characterInfo)

        }
        if (rset.%SQLCODE < 0) {write "%Next failed:", !, "SQLCODE ", rset.%SQLCODE, ": ", rset.%Message quit}

        set totalCount = rset.%ROWCOUNT

            // Set the status, totalCount, and characterList properties in the results object
            Set results.Status = "success"
            Set results.TotalCount = totalCount
            Set results.CharacterList = characterList
        

        // Return the results object
        Quit results
}

And that's our API! The current specification does not provide a way to update or delete characters from the database, and that's left as an exercise to the reader!

IRIS Configuration

Now that we have our REST API implemented, how do we get it to communicate with IRIS? In the Management Portal, if you go to System Administration > Security > Applications > Web Applications page, you can create a new web application. The name of the application is the endpoint you'll use when making requests. For example, if you named it /api/TTRPG/, requests for the API will go to http://{IRISServer}:{host}/api/TTRPG/{endpoint}. For a local default normal-security install of IRIS, this looks like http://localhost:52773/api/TTRPG/{endpoint}. Give it a nice description, set the desired namespace, and click the radio button for REST. To enable JWT authentication, select the "Use JWT Authentication" box. The JWT Access Token Timeout determines how often a user will need to receive a new JWT. If you plan on testing the API for an extended time, I'd recommend making this value an hour (3600 seconds) and the JWT Refresh Token Timeout (the period within which you can renew before your token is expired for good) to be 900 seconds.

web app config

Now that the application is configured, we need to configure IRIS itself to allow for JWT authentication. You can configure this option in System Administration > Security > System Security > Authentication/Web Session Options. At the bottom is the JWT issuer field and the signature algorithm to use for signing and validating the JWTs. The issuer field will appear in the claims section of the JWT and its purpose is to inform who gave you this token. You could set it to "InterSystems".

JWT authentication config

Testing Time

Everything's configured and implemented, so let's give it a whirl! Load your favorite API request making tool (I'll be using a Firefox extension called RESTer in the examples) and we'll start constructing REST API requests.

First, let's try to list out any characters that exist.

list no token

We received a 401 Unauthorized error. This is because we aren't logged in. You might be thinking, Elliott, we didn't implement any login functionality to this REST API. That's ok because InterSystems IRIS handles it for us when we use JWT authentication. It provides four endpoints that we can use to manage our session. These are: /login, /logout/revoke and /refresh. They can be customized in the disp.cls as in the below example:

Parameter TokenLoginEndpoint = "mylogin";
Parameter TokenLogoutEndpoint = "mylogout";
Parameter TokenRevokeEndpoint = "myrevoke";
Parameter TokenRefreshEndpoint = "myrefresh";

Let's access the /login endpoint now.

logging in

The body of this request is not shown for security measures, but it follows this JSON structure:

{"user":"{YOURUSER}", "password":"{YOURPASSWORD}"}

In return for our password, we receive a JWT! This is the value of "access_token". We're going to copy this and use it in our requests going forward so we don't have to transmit our password all the time.

Now that we have a JWT for authentication, let's try creating a character!

We format our request as below:

character creation

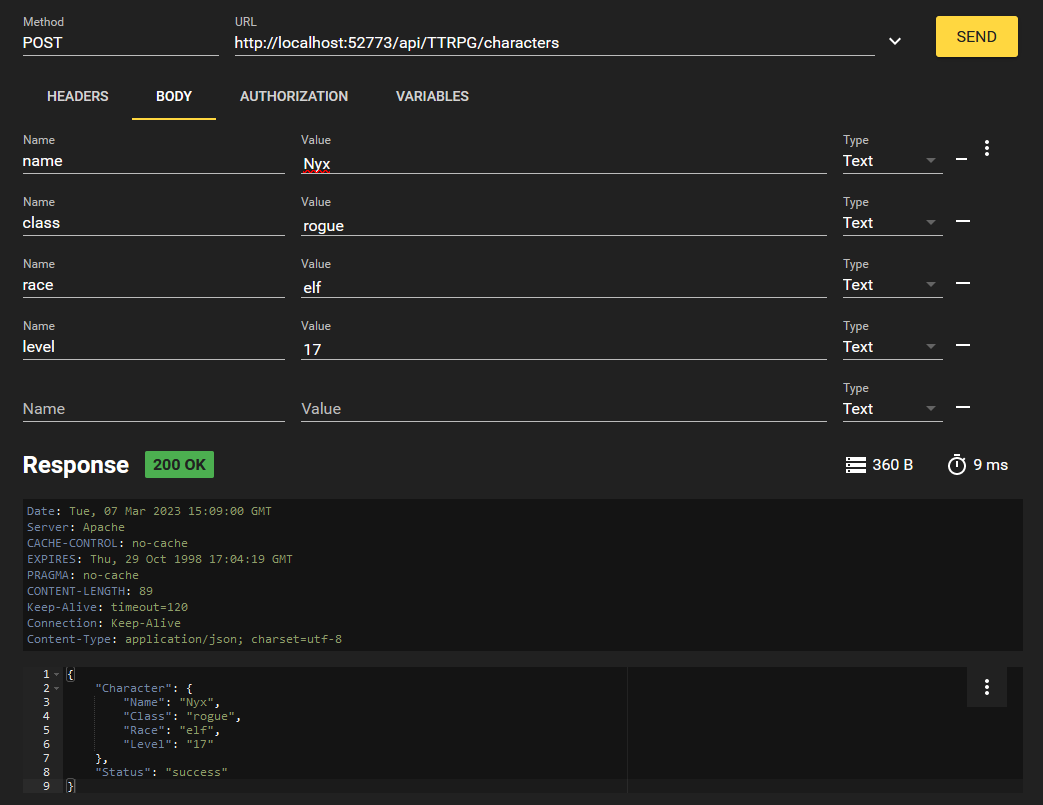
Using the bearer token as a header in the format of "Authorization: Bearer {JWTValue}". In a curl request, you can write this with -H "Authorization: Bearer {JWTValue}"

Let's create another character for fun, use whichever values you'd like.

Now let's trying listing out all characters that exist in the database.

listing characters

We get our two characters we made back! But what if we just wanted to access one? Well, we implemented that with the /characters/{charName} endpoint. We can format that request like this:

retrieving specific character

That's our REST API at work, folks! When done with your session, you can logout at the /logout endpoint using your JWT. This will revoke the JWT and blacklist it so you cannot use it again.

Conclusion

InterSystems IRIS version 2022.2+ features the ability to authenticate to a REST API using JSON web tokens (JWTs). This feature enhances security by limiting password use and setting an expiration date on access to the API.

I hope this primer on generating a REST API and securing it with JWTs through IRIS was helpful. Please let me know if it was! I appreciate any feedback.

3
11 1981
Question Marcio Coelho · May 4, 2025

Hello everyone,

I am using a class that inherits from %RegisteredObject and %JSON.Adaptor to generate a JSON string from its instances.

However, one of the properties in my class is of type %Library.DynamicObject, as in the example:

Class Faces.Option Extends (%RegisteredObject, %JSON.Adaptor)
{ 
Property legend As %String;Property xAxis As %Library.DynamicObject; 
}
1
0 90
Question Evgeny Shvarov · Apr 7, 2025

Hi devs!

Suppose I have an instance of a persistent class:

Set person = ##class(dc.Sample.Person).%OpenId(1)

Class is an ancestor of %JSON.Adapter.

How can I convert it to dynamic object with the properties that person.%JSONExport() provides?

{"Name":"Elon Mask","Title":"Associate Accountant","Company":"InterSystems","Phone":"799-933-5569","DOB":"1926-12-11"}

Couldn't find a right method. 

17
0 355
Article David Hockenbroch · Apr 22, 2025 7m read

The Good Old Days

The %Library.DynamicObject class has been in IRIS since before it became IRIS. If you have been using it since the Cache days, you may want to brush up on some of its changes.

In Cache 2018, the %Get method only had one argument. It was the key to retrieving from the JSON, meaning that if your JSON object called myObj, it would look like the following:

3
3 264
Question Raj Singh · Jun 9, 2020

Say I have an ObjectScript object called Book. It has 2 properties title and author. It extends JSON.%Adaptor, so I can call book.%JSONExport() and get this output:

{ "title": "For Whom the Bell Tolls", "author": "Hemmingway" }

In my web service I want to have a search function that returns an array of Books along with the total number of responses, like this: 

{
    "results": 3,
    "items": [
        { "title": "For Whom the Bell Tolls", "author": "Hemmingway" },
        { "title": "The Invisible Man", "author": "Ellison" }, 
        { "title": "Tender is the Night", "author": "Fitzgerald" }
    ]

}
18
2 2048
InterSystems Official Daniel Palevski · Apr 2, 2025

Summary of Alerts

Alert ID Product & Versions Affected Explicit Requirements
DP-439207 InterSystems IRIS® data platform 2024.3 (AIX) AIX installations Using JSON processing and Unicode non-Latin-1 character sets
DP-439280 InterSystems IRIS 2024.3 (containers with IntegratedML) IntegratedML Containers using TensorFlow

Detail of Alerts

DP-439207 - AIX JSON Unicode Parsing Issue

0
0 85
Article Sanjib Pandey · Mar 3, 2025 5m read

Background:

This guideline provides an overview of how to design and implement a REST API interface for querying patient demographic data from an Electronic Patient Record (EPR) system using HealthConnect. The process involves sending a query request with the patient's identification number, retrieving the response from the EPR system, extracting the required patient demographic data from the HL7 message, and sending it as a JSON response to the supplier. The high-level process diagram is shown below (Screenshot 1).

5
1 217
Question Sanjib Pandey · Apr 1, 2025

 JSON Web Token (JWT) Authentication

Hi Everyone,

I would like to share the code and step-by-step instructions/or guideline for generating a JWT (JSON Web Token) signature, as well as how to test it using Postman / HealthConnect.

JWT is an open standard (RFC 7519) that defines a compact, URL-safe method for securely transmitting information between parties in the form of a JSON object.

Structure of a JWT:

A JWT consists of three parts, separated by dots (.):

Header

.

Payload

.

Signature

0
5 149