#Interoperability

0 Followers · 536 Posts

In healthcare, interoperability is the ability of different information technology systems and software applications to communicate, exchange data, and use the information that has been exchanged.

Article Tani Frankel · Jan 14, 2025 6m read

Using embedded Python while building your InterSystems-based solution can add very powerful and deep capabilities to your toolbox.

I'd like to share one sample use-case I encountered - enabling a CDC (Change Data Capture) for a mongoDB Collection - capturing those changes, digesting them through an Interoperability flow, and eventually updating an EMR via a REST API.

1
2 497
Article Claudio Devecchi · Jan 17, 2025 2m read

Hello everyone

For those interested, here is an implementation example I used in one of my projects to interoperate with MongoDB using the pymongo package.

iris-mongodb

Interoperates with MongoDB (via pymongo package) with InterSystems IRIS (including outbound adapter)

Remember to import pymongo package.

implementation example for testing here

NAMESPACE> do ##class(custom.python.pymongo.test).TestMongoDBCrud()

for interoperability, use the following adapter in your business operation:

Parameter ADAPTER = "custom.python.pymongo.outboundAdapter";

Parameter INVOCATION = "Queue";

Query example:

/// parameters: (dbName, collectionName, query, fields, sort, limit) => query, fields and sort are %DynamicObjects
/// resultset is an array of objects (%DynamicArray)
set resultset = ..Adapter.Query("mydb","mycollection", {"_id":(tId)})

Insert example:

set newUser = {
            "name":"Claudio Devecchi Junior",
            "email":"devechi@inters.com"
}
/// parameters: (dbName, collectionName, objOrArray, filterForUpdate) => objOrArray and filterForUpdate are %DynamicObjects
/// insertResponse is an object with the inserted id/ids (%DynamicObject)
set insertResponse = ..Adapter.InsertOrUpdate("sample_mflix", "users", newUser)

Update example:

set newValues = {"email":"claudio.devechi@inter.com"}
set filter = {"_id":(tObjectId)} //is the filter for update
/// parameters: (dbName, collectionName, objOrArray, filterForUpdate) => objOrArray and filterForUpdate are %DynamicObjects
/// filterForUpdate defines update action
/// updateResponse is an object with the updated id/ids (%DynamicObject)
set updateResponse =..Adapter.InsertOrUpdate("sample_mflix", "users", newValues, filter)

Delete example:

set filter = {"_id":(tObjectId)} //is the filter for deletion
/// parameters: (dbName, collectionName, filter,  deleteMany) => filter is %DynamicObject. deleteMany is false by default
/// deleteResponse is an object with the deleted information (%DynamicObject)
set deleteResponse =..Adapter.Delete("sample_mflix", "users", filter)

ps: It's compatible with IRIS versions that supports embedded python.

Any feedback is welcome!

4
0 270
Article Yuri Marx · Feb 13, 2025 4m read

FHIR repositories, applications and servers typically serve clinical data in small quantities, whether to return data about a patient, their medications, vaccines, allergies, among other information. However, it is common for a large amount of data in FHIR/JSON format to be requested to be used to load into Data Lakes, identifying study cohorts, population health, or transferring data from one EHR to another. To meet these business scenarios that require large extractions and loads of data, it is recommended to use the FHIR Bulk Data Access feature provided by HL7 institution.

0
5 400
Article Chris Stewart · Feb 7, 2025 9m read

Learning LLM Magic

The world of Generative AI has been pretty inescapable for a while, commercial models running on paid Cloud instances are everywhere.  With your data stored securely on-prem in IRIS, it might seem daunting to start getting the benefit of experimentation with Large Language Models without having to navigate a minefield of Governance and rapidly evolving API documentation.   If only there was a way to bring an LLM to IRIS, preferably in a very small code footprint....

Some warnings before we start

0
5 406
Question Frank Jackson · Jan 24, 2025

Hello,

Very much keen if we could gather the per namespace and business component utilization of InterSystems cache server.

For e. I have a PRD server where its CPU utilization is at max all the time and I want to know which namespace and its business process (service/Operation/Process) is utilizing what number of CPU and memory.

** I can get the CPU and Memory utilization per Cache.exe and PID, but not able to get the Namespace and ConfiguratioName to which that particular PID belongs.

Thank you,

5
0 198
InterSystems Official Timothy Leavitt · Dec 4, 2024

It's been a while since I've posted about Embedded Git on the Developer Community, and I'd like to provide an update on the massive amount of work we've done this year and where we're going next.

Context

If you're building solutions on IRIS and want to use Git, that's great! Just use VSCode with a local git repo and push your changes out to the server - it's that easy.

But what if:

6
0 436
Article Tani Frankel · Jan 19, 2025 1m read

In your Interoperability Production you could always have a Business Operation that is an HTTP client, that uses OAuth 2.0 for authentication, but you had to customize the Operation for this authentication methodology. Since v2024.3, which was lately released, there is a new capability, providing new settings, to handle this more easily.

0
0 123
Article Chris Stewart · Jan 17, 2024 9m read

The Lo-Code Challenge

Imagine the scene.  You are working happily at Widgets Direct, the internet's premier retailer of Widgets and Widget Accessories.   Your boss has some devastating news, some customers might not be fully happy with their widgets, and we need a helpdesk application to track these complaints.   To makes things interesting, he wants this with a very small code footprint and challenges you to deliver an application in less than 150 lines of code using InterSystems IRIS.  Is this even possible?

10
8 977
Announcement Anastasia Dyubaylo · Jan 6, 2025

Hi Community,

We're excited to invite you to the webinar 2025 Data Management: Technology Trends & Predictions.

Join this webinar for an engaging and insightful tech talk on the latest trends in data management technology in the UK and Ireland.

⏱ Date & Time: Thursday, January 23, 10:30 AM GMT

👨‍🏫 Speakers

  • Andy Hayler, Practice Leader, Bloor Research
  • @Mike Fuller, Regional Director of Marketing, InterSystems UK&I

2025 Tech Talk Tech Trends & Predictions.png

0
0 169
Article Theo Stolker · Jun 4, 2024 2m read

When developing a new Interoperability Production, it is quite natural that settings are initially added in the Production.

However, as soon as you want to move the Production from development to a test or staging environment, it becomes clear that some settings like HTTP Servers, IP addresses and/or ports need to be changed. In order to avoid these settings being overwritten during a redeployment later on, it is essential that you move these settings from the Production to the System Default settings.

Creating System Default settings manually is possible, but will become hard when you have lots of Business Components in your production. Therefore, @Wietze Drost asked me to develop a tool that automates this process by allowing to specify which settings have to be created as System Default Settings using a filter expression. This expression can be defined like ":HTTPServer,SSLConfig", where "*" means "for any the Host Class Name". After the colon this is followed by a list of settings to be moved. So this expression means "create or update System Default Settings for all settings named "HTTPServer" and "SSLConfig". You can define multiple filter expressions separated by a semicolon, e.g. "*:HTTPServer,SSLConfig;FullClassName2:xxx,yyy"

Based on his request I wrote the Class Method named GetSettingsFromProduction, which does exactly that:

ClassMethod GetSettingsFromProduction(production As %String, filter As %String = "", removeFromProduction As %Boolean = 0, updateSettings As %Boolean = 1) As %Status

production - The name of the production, if left empty the name of the currently running production will be used filter - A filter to select settings, like "*:HTTPServer,SSLConfig". You can add multiple filters separated by ";", and it is allowed to use specific class names. If filter is left empty, all settings will be processed. removeFromProduction - If set to 1, the settings selected by the filter will be removed from the production. updateSettings - If set to 0, the settings will not be updated in the System Default Settings.

When run, information about the actions taken will be written to the terminal.

The complete class file has been pasted in a comment on this article.

Your questions and feedback are appreciated!

2
7 449
Article Kate Lau · Dec 31, 2024 8m read

Last Chapter: Creating a REST client to get Tracks from Spotify REST API - Part3 Get some data (e.g. Artists)

Git link: https://github.com/ecelg/InterSystems-IRIS-as-a-Spotify-REST-client

OK we create a method to get data and lets try to get some Tracks 😁

Now open a terminal and test the code

Run the following line

w ##class(rest.utli.requestUtli).getdata("Spotify","/search","offset=5&limit=10&query=Shape%20of%20you&type=track&market=SG")

ooooo no seems there is huge among of data returns.....😥

I would like to know what information can be found in 1 track....🤔 how about only query 1 track?

0
0 112
Article Kate Lau · Dec 30, 2024 2m read

Last Chapter:  Creating a REST client to get Tracks from Spotify REST API - Part1 Check out token

Git link: https://github.com/ecelg/InterSystems-IRIS-as-a-Spotify-REST-client

Ok... Now we can check out a token but it will be expired in 3600 seconds.

There are 2 questions come up🤔

1. How to save this token????🙄

2. How to refresh this token????🤨🤔 

Lets come back to the API document https://developer.spotify.com/documentation/web-api/tutorials/getting-started

Base on my understanding, this piece of API do not have a token called refresh_token, as a result, we can assume the logic like following

0
0 180
Article Oliver Wilms · Dec 18, 2024 4m read

Implements Idea DPI-I-456

Idea

What The Sample Does

This sample was cloned from iris-interoperability-template. I have reconfigured the interoperability Production with an Inbound HTTP Adapter which is used by a HTTP Business Service. The configuration details for the business service are specified in System Default Settings. I configured Call Interval setting to call HTTPServer once every hour. You can change both the URL and frequency in the service's settings. Screenshot

Originally the HTTP Service had two targets. The response body from each call was sent as a HTTP Generic Message to a BPL business process and also a file operation which saved data to a folder iris-http-calls.

Now the HTTP Service sends a HTTP Generic Message to a file operation. Then a file service sends the file to a BPL business process.

Prerequisites

Make sure you have git and Docker desktop installed.

Installation: ZPM

Open IRIS Namespace with Interoperability Enabled. Open Terminal and call: USER>zpm "install iris-http-calls"

Installation: Docker

Clone/git pull the repo into any local directory

git clone https://github.com/oliverwilms/iris-http-calls.git

Open the terminal in this directory and run:

docker-compose build
  1. Run the IRIS container with your project:
docker-compose up -d

How to Run the Sample

Open the production and start it if it is not already running. It makes HTTP calls to HTTPServer using URL.

How to alter the template

This repository is ready to code in VSCode with the ObjectScript plugin. Install VSCode, Docker and ObjectScript plugin and open the folder in VSCode.

Use the handy VSCode menu to access the production and business rule editor and run a terminal: Screenshot 2020-10-29 at 20 15 56

environment variables usage

this example shows how you can introduce env variables in your dev environment. Suppose you need to setup the production with some secret token to access a limited access API. Of course you don't want to expose the secret to GitHub. In this case Env variables mechanism could be helpful. First introduce .env file and setup .gitignore to filter .env from git.

Then add the secret token in .env in a form ENV_VARIABLE="TOKEN VALUE"

Next introduce make environment variables be imported to dockerfile. to make it work add the environment section into docker-compose.yml, .e.g:

environment:
      - SAMPLE_TOKEN=${SAMPLE_TOKEN}

Then you'll be able to init the running container with the data from env variables e.g. with the following call, which uses the value from .env file as a setting of the production:

USER> d ##class(dc.Demo.Setup).Init($system.Util.GetEnviron("SAMPLE_TOKEN"))

package manager production parameters

Users of this module can use parameters to pass data to the module during installation and customize the File Path for the file operation and file service as well as modify URL. it can be useful when setup parameters are secret tokens to access particular API. You as a developer can provide such parameters with default tag in module.xml.

<Default Name="FilePath" Value="iris_http_calls" />
<Default Name="UrlModify" Value="/Patient?_id=egqBHVfQlt4Bw3XGXoxVxHg3" />

These default parameters enable users to call the installation of the package with the option of passing of parameters. E.g. the installation call could be run as:

zpm "install iris-http-calls -D FilePath=iris_http_calls -D UrlModify=/MedicationStatement?patient=egqBHVfQlt4Bw3XGXoxVxHg3"
USER>zpm "install iris-http-calls -D FilePath=iris_http_calls -D UrlModify=/MedicationStatement?patient=egqBHVfQlt4Bw3XGXoxVxHg3"

[USER|iris-http-calls]        Reload START (/usr/irissys/mgr/.modules/USER/iris-http-calls/0.3.37/)
[USER|iris-http-calls]        Reload SUCCESS
[iris-http-calls]       Module object refreshed.
[USER|iris-http-calls]        Validate START
[USER|iris-http-calls]        Validate SUCCESS
[USER|iris-http-calls]        Compile START
[USER|iris-http-calls]        Compile SUCCESS
[USER|iris-http-calls]        Activate START
[USER|iris-http-calls]        Configure START
[USER|iris-http-calls]        Configure SUCCESS
[USER|iris-http-calls]        Activate SUCCESS

The default parameters are used to setup the production in the following call:

<Invoke Class="dc.Demo.Setup" Method="Init" >
  <Arg>${FilePath}</Arg>
  <Arg>${UrlModify}</Arg>
</Invoke>

Method Init in dc.Demo.Setup class configures File Service and File Operation using the FilePath parameter. The UrlModify parameter is used to modify the URL setting of the HTTP service.

The production makes calls to HTTPServer using modified URL based on CallInterval. The response body is sent in a StreamContainer to a FileOperation. A file service reads the file and passes a Stream Container to a BPL process.

0
0 227
Article Muhammad Waseem · Dec 16, 2024 5m read

image
Hi Community,
In this article, I will introduce my application iris-HL7v2Gen .

IRIS-HL7v2Gen is a CSP application that facilitates the dynamic generation of HL7 test messages. This process is essential for testing, debugging, and integrating healthcare data systems. The application allows users to generate a wide variety of HL7 message types, validate their structure against HL7 specifications, explore the message hierarchy, and transmit messages over TCP/IP to production systems. These features are particularly useful in settings where compliance with HL7 standards is mandatory for interoperability between different healthcare organizations or systems.


Application Features

  • Dynamic HL7 Message Generation: Instantly create HL7 messages for a range of message types, facilitating comprehensive testing.
  • Message Structure Exploration: Visualize the structure of generated messages based on HL7 specifications.
  • Value Set Visualization View predefined sets of allowable coded values for specific fields.
  • Message Validation: Validate messages against HL7 standards to ensure compliance.
  • TCP/IP Communication: Easily transmit messages to production using TCP/IP settings.
  • Broad Message Type Support: Supports 184 different HL7 message types, ensuring versatility for various healthcare integration needs.
  • ClassMethod: Generate a Test Message by Invoking a Class Method
  • Version Support: Currently Supports HL7 Version 2.5
0
4 365
Article Anila Kosaraju · Feb 5, 2025 2m read

Interoperability of systems ensures smooth workflow and management of data in today's connected digital world. InterSystems IRIS extends interoperability a notch higher with its Embedded Python feature, which lets developers seamlessly integrate Python scripts into the IRIS components, like services, operations, and custom functions.

4
0 282
Article Sylvain Guilbaud · Apr 30, 2024 3m read

Production Configuration

This demo has an interoperability production with 16 items. 

Production Configuration HL7 + Kafka Producer

The first part of this demonstration consists of sending an HL7 SIU file which will be transmitted to the 2 other HL7 flows (HTTP and TCP), and transformed and transmitted to the Kafka server. HTTP and TCP flows will transform HL7 messages in the same way before sending them to Kafka as well.

  • 3 HL7 Business Services
  • 1 HL7 router
  • 2 HL7 Business Operations
  • one Business Operation sending the transformed messages to Kafka

Business Rule

3
4 474
Article Jeff Morgan · Aug 6, 2024 10m read

When building a bundle from legacy data, I (and others) wanted to be able to control whether or not the resources were generated with a FHIR Request Method of PUT instead of the hard coded POST.  I have extended the two classes responsible for transforming SDA to FHIR in an Interoperability Production to accomodate a setting that lets the user control the Request Method.

2
1 363
Question Csaba Gyenge · Nov 15, 2024

Is there a way to create and establish DICOM Association with Extended Negotiation? 

I have implemented DICOM Query/Retrieve C-FIND, using EnsLib.DICOM.Operation.TCP and EnsLib.DICOM.Process base classes. My application, acting as an SCU, needs to query by Study Date-Time (combined date-time matching) range with timezone query adjustment. For this, I need to use Extended Negotiation.

I've checked the IRIS Manual - Creating DICOM Associations section but there is no mention of this.

0
0 99
Question Yone Moreno · Nov 4, 2024

Hello,
Please, we would need your help 🙂:

In a development environment, we have added quite a few presentation contexts to the DICOM configurations (the associations). We would need to find a way to export them from this environment to make it easier for us to import them in PRO (and avoid doing it by hand one by one).

2
0 124
Article Lorenzo Scalese · Nov 15, 2020 8m read

Hi Community,   OpenAPI-Client Gen has just released, this is an application to create an IRIS Interoperability Production client from Swagger 2.0 specification.   Instead of the existing tool ^%REST that creates a server-side REST application, OpenAPI-Client Gen creates a complete REST Interoperability Production client template.

Install by ZPM:

zpm "install openapi-client-gen"

  How to generate production from Swagger document?   It's very simple.

Open a terminal and execute:

Set sc = ##class(dc.openapi.client.Spec).generateApp(<applicationName>, <Your Swagger 2.0 document>>)

  The first argument is the target package where production classes will be generated. It must be a valid and non-existing package name.
The second one, the Swagger document. These values are accepted :
 

  1. File path.
  2. %DynamicObject.
  3. URL.
      The specification must be in JSON format.
      If your specification uses YAML format, It can be easily converted to JSON with online tools such as onlineyamltools.com
      Example :
Set sc = ##class(dc.openapi.client.Spec).generateApp("petshop", "https://petstore.swagger.io:443/v2/swagger.json")
Write "Status : ", $SYSTEM.Status.GetOneErrorText(sc)

  Take a look at the generated code, we can see a lot of classes, split into many sub-packages :  

  • Business Service: petshop.bs
  • Business Operation : petshop.bo
  • Business Process: petshop.bp
  • REST Proxy application: petshop.rest
  • Ens.Request and Ens.Response: petshop.msg
  • Parsed input or output object: petshop.model.Definition
  • Production configuration class: petshop.Production    

Business Operation class

For each service defined in the Swagger document, there is a related method named by <VERB><ServiceId>.

Deep dive in a simple generated method GETgetPetById  

/// Returns a single pet
Method GETgetPetById(pRequest As petshop.msg.getPetByIdRequest, pResponse As petshop.msg.GenericResponse) As %Status
{
	Set sc = $$$OK, pURL = "/v2/pet/{petId}"
	Set pHttpRequestIn = ..GetRequest(pRequest)
	Set pHttpRequestIn.ContentType = pRequest.consume
	Set pURL = $Replace(pURL, "{petId}", pRequest.pathpetId)
	$$$QuitOnError(..Adapter.SendFormDataArray(.pHttpResponse, "get", pHttpRequestIn , , , pURL))
	Set pResponse = ##class(petshop.msg.GenericResponse).%New()
	Set sc = ..genericProcessResponse(pRequest, pResponse, "GETgetPetById", sc, $Get(pHttpResponse),"petshop.msg.getPetByIdResponse")
	Return sc
}


  • Firstly, the %Net.HttpRequest object is ever created by the GetRequest method, feel free to editfor adding some headers if needed.
  • Secondly, HttpRequest object's filled using pRequest `petshop.msg.getPetByIdRequest' (Ens.Request subclass).
  • Thirdly, EnsLib.HTTP.OutboundAdapter is used to send http request.
  • And finally there is a generic response processing by genericProcessResponse method :
Method genericProcessResponse(pRequest As Ens.Request, pResponse As petshop.msg.GenericResponse, caller As %String, status As %Status, pHttpResponse As %Net.HttpResponse, parsedResponseClassName As %String) As %Status
{
	Set sc = $$$OK
	Set pResponse.operation = caller
	Set pResponse.operationStatusText = $SYSTEM.Status.GetOneErrorText(status)
	If $Isobject(pHttpResponse) {
		Set pResponse.httpStatusCode = pHttpResponse.StatusCode
		Do pResponse.body.CopyFrom(pHttpResponse.Data)
		Set key = ""
		For  {
			Set key = $Order(pHttpResponse.Headers(key),1 , headerValue)
			Quit:key=""
			Do pResponse.headers.SetAt(headerValue, key)
		}
		Set sc = ##class(petshop.Utils).processParsedResponse(pHttpResponse, parsedResponseClassName, caller, pRequest, pResponse)
	}
	Return sc
}

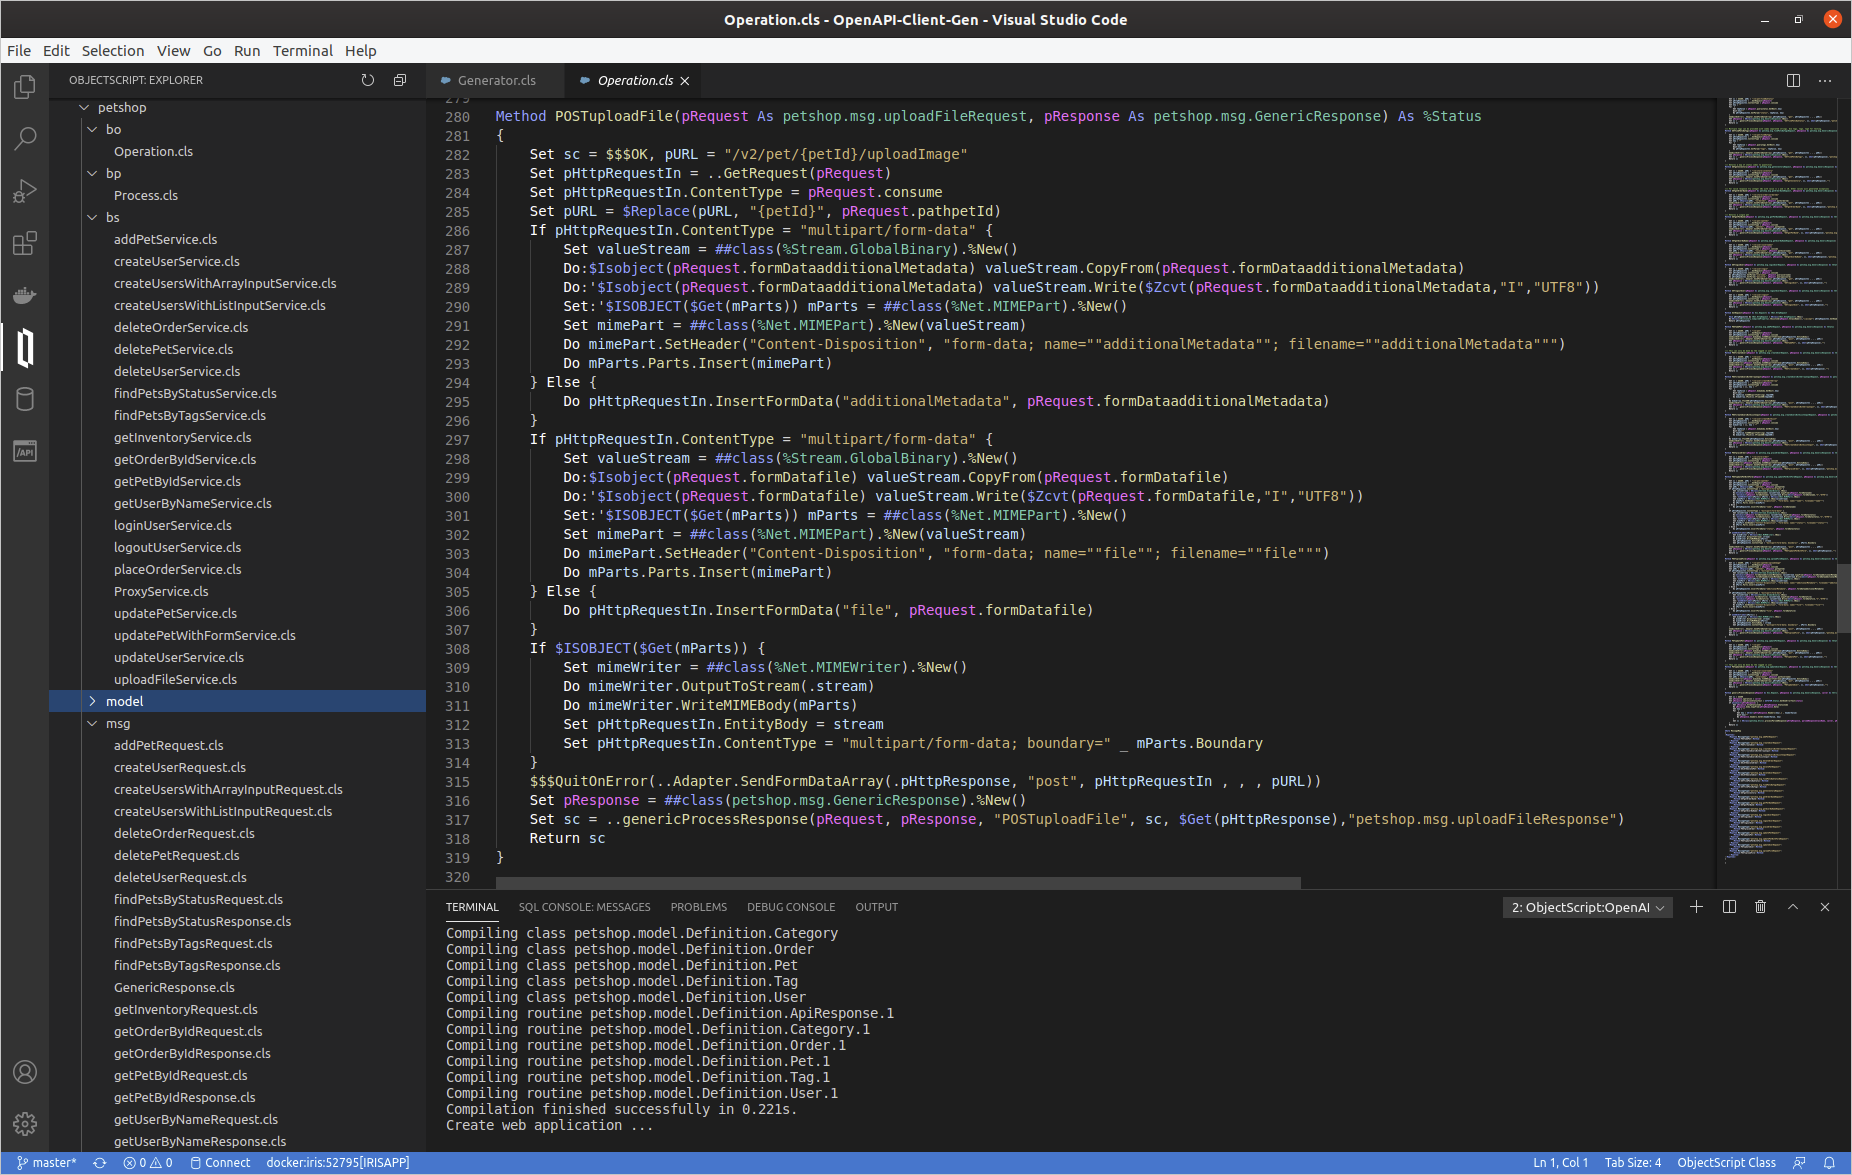
  So, we can analyze a little bit more complex method POSTuploadFile

Method POSTuploadFile(pRequest As petshop.msg.uploadFileRequest, pResponse As petshop.msg.GenericResponse) As %Status
{
	Set sc = $$$OK, pURL = "/v2/pet/{petId}/uploadImage"
	Set pHttpRequestIn = ..GetRequest(pRequest)
	Set pHttpRequestIn.ContentType = pRequest.consume
	Set pURL = $Replace(pURL, "{petId}", pRequest.pathpetId)
	If pHttpRequestIn.ContentType = "multipart/form-data" {
		Set valueStream = ##class(%Stream.GlobalBinary).%New()
		Do:$Isobject(pRequest.formDataadditionalMetadata) valueStream.CopyFrom(pRequest.formDataadditionalMetadata)
		Do:'$Isobject(pRequest.formDataadditionalMetadata) valueStream.Write($Zcvt(pRequest.formDataadditionalMetadata,"I","UTF8"))
		Set:'$ISOBJECT($Get(mParts)) mParts = ##class(%Net.MIMEPart).%New()
		Set mimePart = ##class(%Net.MIMEPart).%New(valueStream)
		Do mimePart.SetHeader("Content-Disposition", "form-data; name=""additionalMetadata""; filename=""additionalMetadata""")
		Do mParts.Parts.Insert(mimePart)
	} Else { 
		Do pHttpRequestIn.InsertFormData("additionalMetadata", pRequest.formDataadditionalMetadata)
	}
	If pHttpRequestIn.ContentType = "multipart/form-data" {
		Set valueStream = ##class(%Stream.GlobalBinary).%New()
		Do:$Isobject(pRequest.formDatafile) valueStream.CopyFrom(pRequest.formDatafile)
		Do:'$Isobject(pRequest.formDatafile) valueStream.Write($Zcvt(pRequest.formDatafile,"I","UTF8"))
		Set:'$ISOBJECT($Get(mParts)) mParts = ##class(%Net.MIMEPart).%New()
		Set mimePart = ##class(%Net.MIMEPart).%New(valueStream)
		Do mimePart.SetHeader("Content-Disposition", "form-data; name=""file""; filename=""file""")
		Do mParts.Parts.Insert(mimePart)
	} Else { 
		Do pHttpRequestIn.InsertFormData("file", pRequest.formDatafile)
	}
	If $ISOBJECT($Get(mParts)) {
		Set mimeWriter = ##class(%Net.MIMEWriter).%New()
		Do mimeWriter.OutputToStream(.stream)
		Do mimeWriter.WriteMIMEBody(mParts)
		Set pHttpRequestIn.EntityBody = stream
		Set pHttpRequestIn.ContentType = "multipart/form-data; boundary=" _ mParts.Boundary
	}
	$$$QuitOnError(..Adapter.SendFormDataArray(.pHttpResponse, "post", pHttpRequestIn , , , pURL))
	Set pResponse = ##class(petshop.msg.GenericResponse).%New()
	Set sc = ..genericProcessResponse(pRequest, pResponse, "POSTuploadFile", sc, $Get(pHttpResponse),"petshop.msg.uploadFileResponse")
	Return sc
}

  As you can see, It's exactly the same logic: GetRequest, filling %Net.HttpRequest, send request, generic response processing.
 

Proxy REST class

A proxy REST application is also generated.
This REST class uses a Projection to create automatically the related web application (ex : "/petshoprest", see petshop.rest.REST and petshop.rest.Projection).   This proxy REST create Ens.Request message and push it to the Business.Process.

Class petshop.rest.REST Extends %CSP.REST [ ProcedureBlock ]
{

Projection WebApp As petshop.rest.Projection;

...

ClassMethod POSTaddPet() As %Status
{
	Set ensRequest = ##class(petshop.msg.addPetRequest).%New()
	Set ensRequest.consume = %request.ContentType
	Set ensRequest.accept = $Get(%request.CgiEnvs("HTTP_ACCEPT"),"*/*")
	Set ensRequest.bodybody = ##class(petshop.model.Definition.Pet).%New()
	Do ensRequest.bodybody.%JSONImport(%request.Content)
	Return ##class(petshop.Utils).invokeHostAsync("petshop.bp.Process", ensRequest, "petshop.bs.ProxyService")
}

ClassMethod GETgetPetById(petId As %String) As %Status
{
	Set ensRequest = ##class(petshop.msg.getPetByIdRequest).%New()
	Set ensRequest.consume = %request.ContentType
	Set ensRequest.accept = $Get(%request.CgiEnvs("HTTP_ACCEPT"),"*/*")
	Set ensRequest.pathpetId = petId
	Return ##class(petshop.Utils).invokeHostAsync("petshop.bp.Process", ensRequest, "petshop.bs.ProxyService")
}
...
ClassMethod POSTuploadFile(petId As %String) As %Status
{
	Set ensRequest = ##class(petshop.msg.uploadFileRequest).%New()
	Set ensRequest.consume = %request.ContentType
	Set ensRequest.accept = $Get(%request.CgiEnvs("HTTP_ACCEPT"),"*/*")
	Set ensRequest.pathpetId = petId
	Set ensRequest.formDataadditionalMetadata = $Get(%request.Data("additionalMetadata",1))
	set mime = %request.GetMimeData("file")
	Do:$Isobject(mime) ensRequest.formDatafile.CopyFrom(mime)
	Return ##class(petshop.Utils).invokeHostAsync("petshop.bp.Process", ensRequest, "petshop.bs.ProxyService")
}
...
}

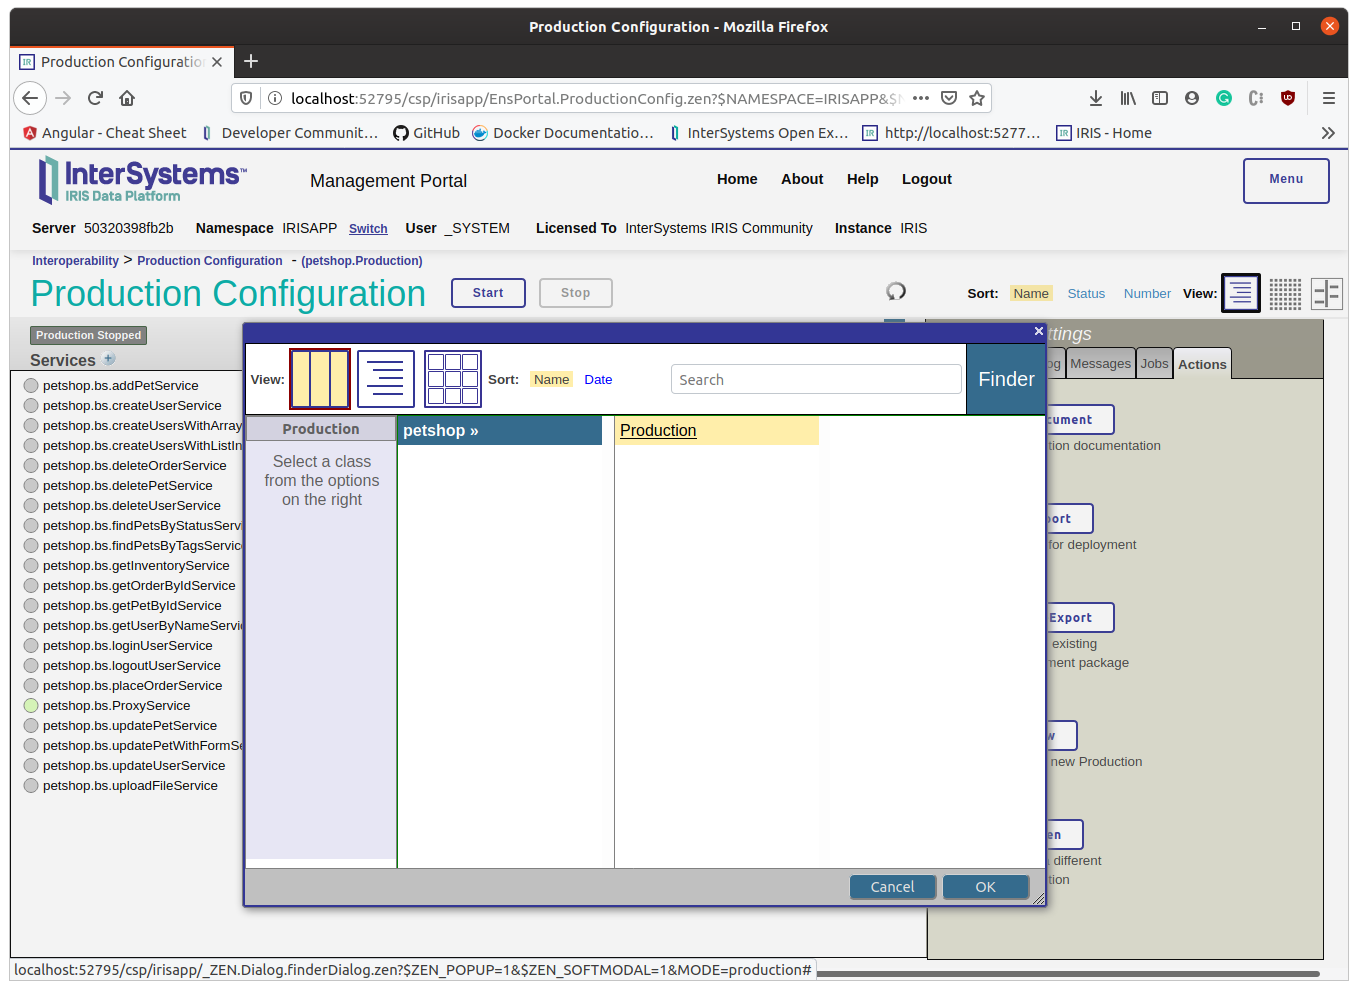
  So let's try the production with this REST proxy.  

Open and start petshop.Production

Create a pet

  Change with your port number if needed:

curl --location --request POST 'http://localhost:52795/petshoprest/pet' \
--header 'Content-Type: application/json' \
--data-raw '{
  "category": {
    "id": 0,
    "name": "string"
  },
  "id" : 456789,
  "name": "Kitty_Galore",
  "photoUrls": [
    "string"
  ],
  "tags": [
    {
      "id": 0,
      "name": "string"
    }
  ],
  "status": "available"
}'

  The production runs in async mode, so the rest proxy application does not wait for the response. This behavior could be edited, but usually, Interoperability production uses async mode.   See the result in message viewer and visual trace

EDIT : since version 1.1.0 Rest Proxy application works in sync mode

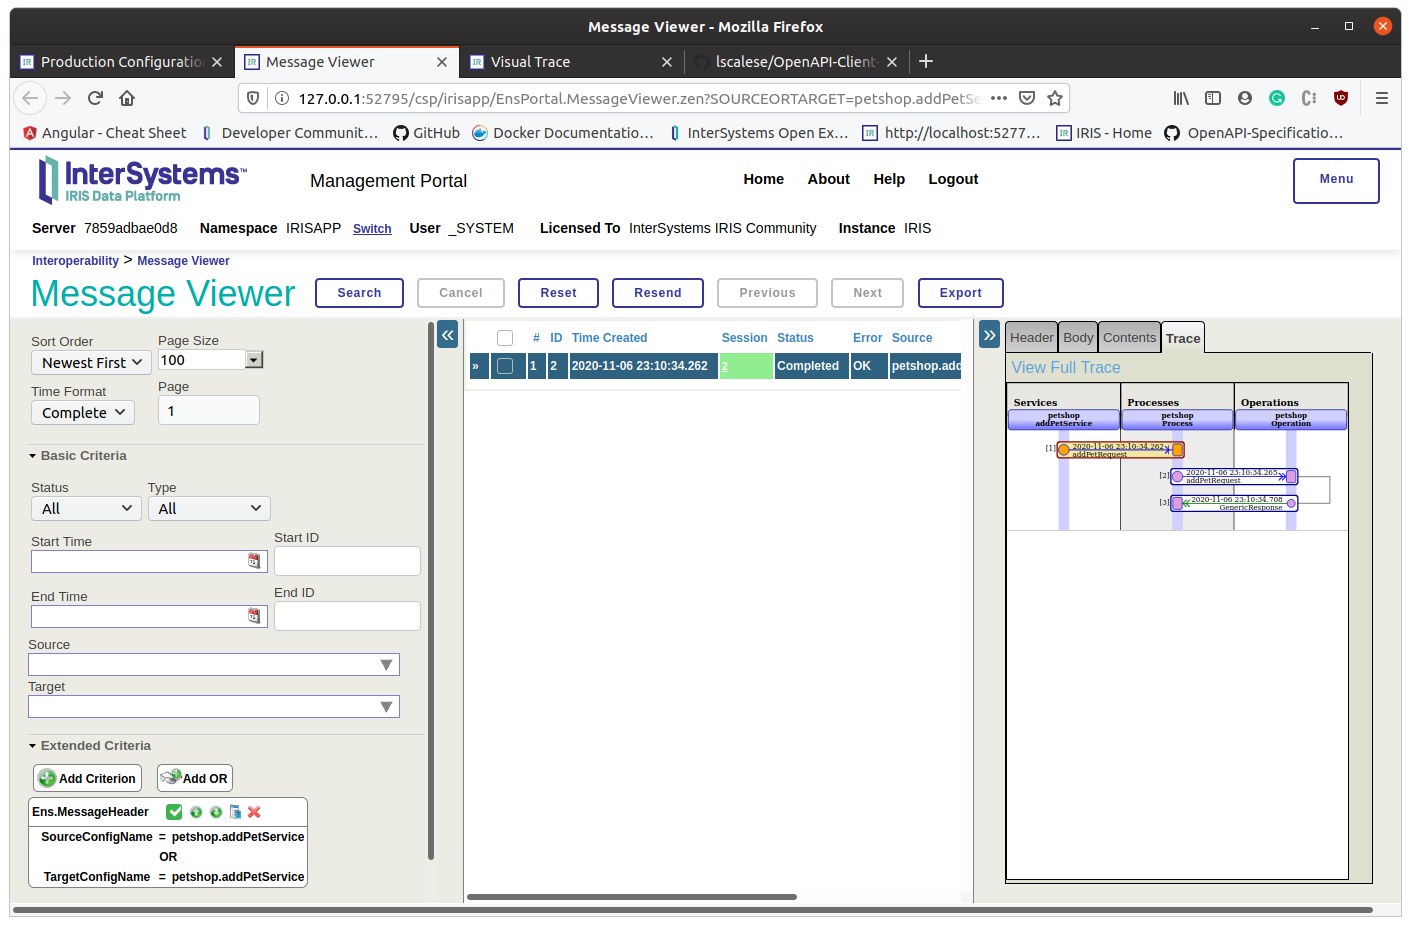
  If everything is fine, we can observ an http status code 200. As you can see, we receive a body response and it's not parsed.

What does it mean?
It occurs when it's not application/json response or the Swagger specification response 200 isn't filled.
In this case, response 200 is not filled.  

Get a pet

  Now, try to get the created pet:

curl --location --request GET 'http://localhost:52795/petshoprest/pet/456789'

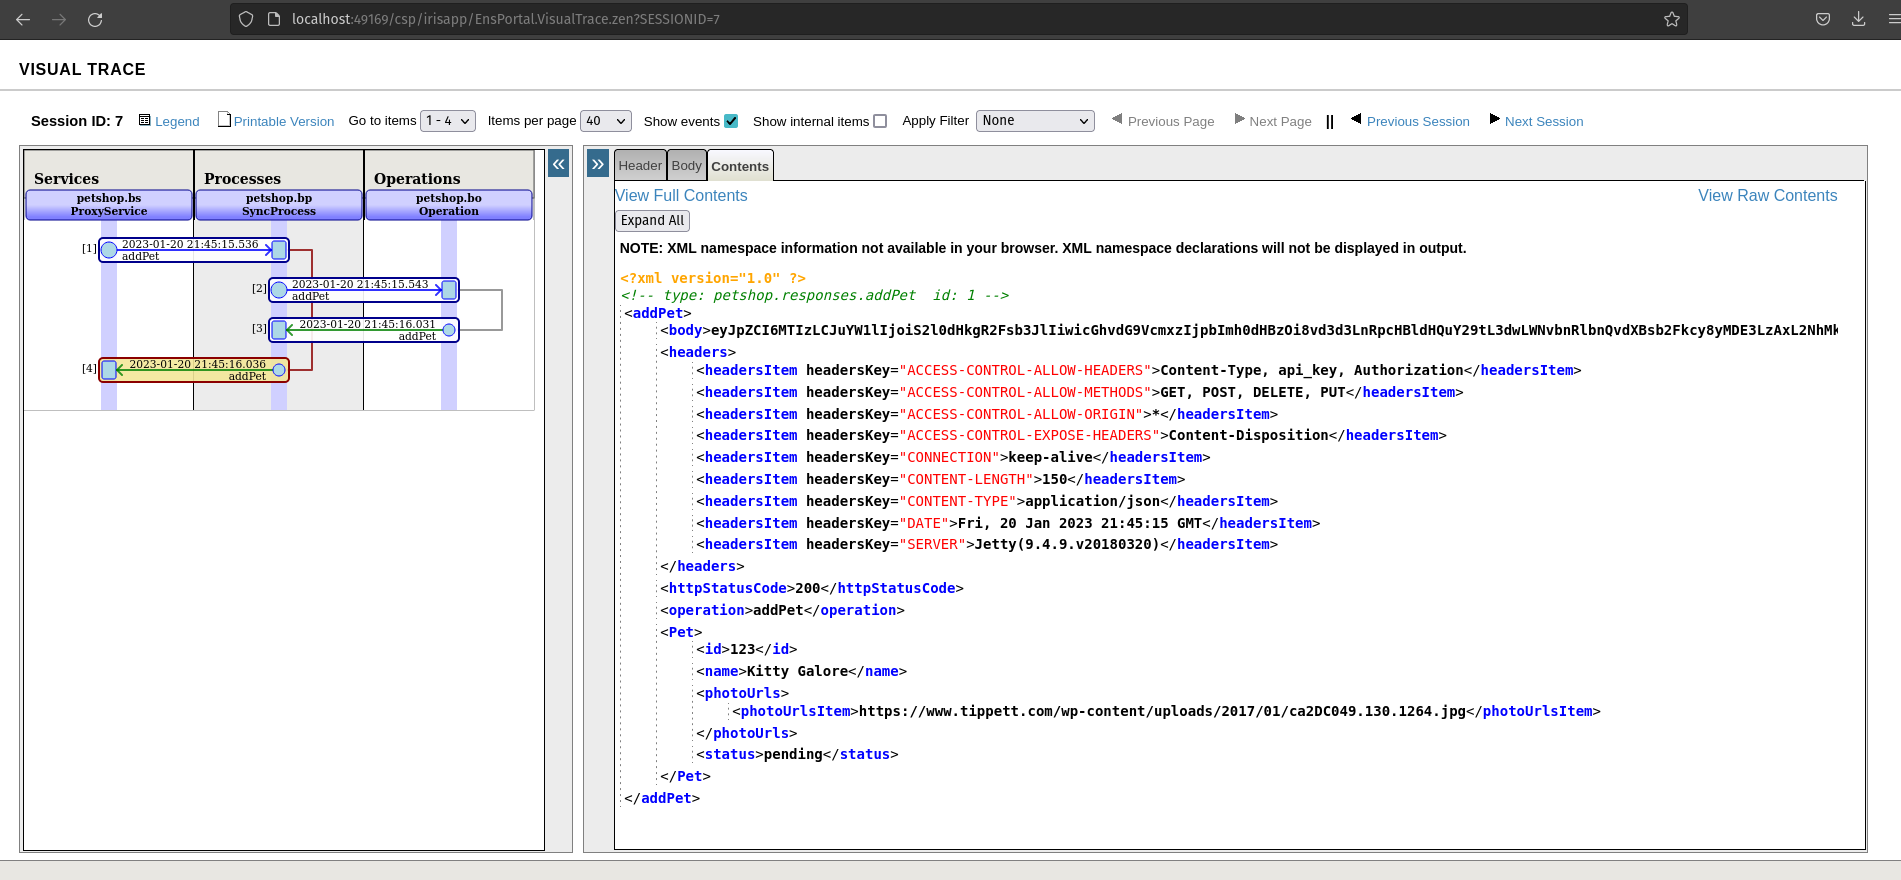
  Check the visual trace :

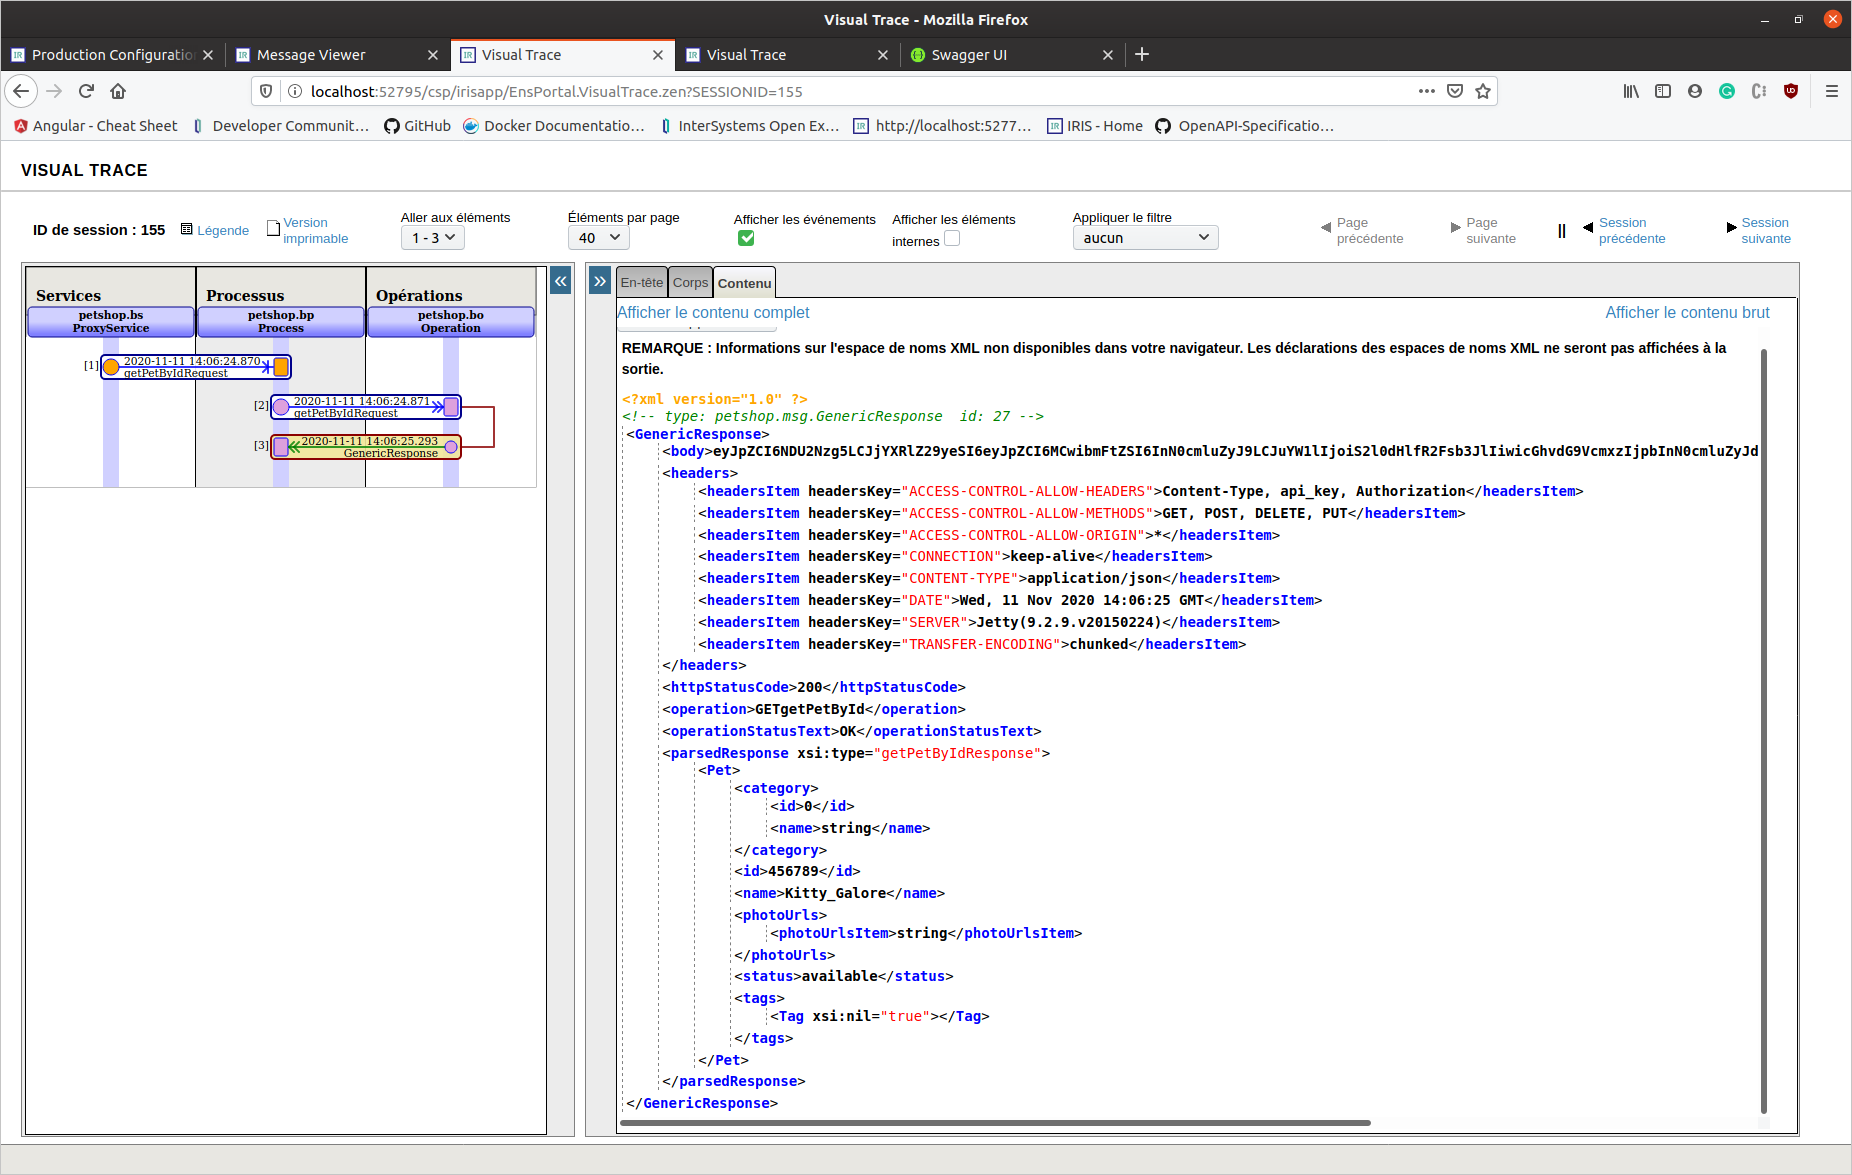
  This time, this is an application/json response (response 200 is completed in Swagger spec.). We can see a parsed response object.   ### REST API - Generate And Download

Also, this tool can be hosted on a server to allow users to generate and download code.   A REST API and a basic form are available :  

In this case, the code is simply generated without compiling, exported, and then everything is deleted.
This feature could be useful for tools centralization.
  See the README.md for up-to-date infos.     Thanks for reading.  

12
0 1273
Article Guillaume Rongier · Jul 8, 2024 6m read

fastapi_logo

Description

This is a template for a FastApi application that can be deployed in IRIS as an native Web Application.

Installation

  1. Clone the repository
  2. Create a virtual environment
  3. Install the requirements
  4. Run the docker-compose file
git clone
cd iris-fastapi-template
python3 -m venv .venv
source .venv/bin/activate
pip install -r requirements.txt
docker-compose up

Usage

The base URL is http://localhost:53795/fastapi/.

Endpoints

  • /iris - Returns a JSON object with the top 10 classes present in the IRISAPP namespace.
  • /interop - A ping endpoint to test the interoperability framework of IRIS.
  • /posts - A simple CRUD endpoint for a Post object.
  • /comments - A simple CRUD endpoint for a Comment object.

How to develop from this template

See WSGI introduction article: wsgi-introduction.

TL;DR : You can toggle the DEBUG flag in the Security portal to make changes to be reflected in the application as you develop.

Code presentation

app.py

This is the main file of the FastAPI application. It contains the FastAPI application and the routes.

from fastapi import FastAPI, Request

import iris

from grongier.pex import Director

# import models
from models import Post, Comment, init_db
from sqlmodel import Session,select

app = FastAPI()

# create a database engine
url = "iris+emb://IRISAPP"
engine = init_db(url)
  • from fastapi import FastAPI, Request - Import the FastAPI class and the Request class.
  • import iris - Import the IRIS module.
  • from grongier.pex import Director: Import the Director class to bind the flask app to the IRIS interoperability framework.
  • from models import Post, Comment, init_db - Import the models and the init_db function.
  • from sqlmodel import Session,select - Import the Session class and the select function from the sqlmodel module.
  • app = FastAPI() - Create a FastAPI application.
  • url = "iris+emb://IRISAPP" - Define the URL of the IRIS namespace.
  • engine = init_db(url) - Create a database engine for the sqlmodel ORM.

models.py

This file contains the models for the application.

from sqlmodel import Field, SQLModel, Relationship, create_engine

class Comment(SQLModel, table=True):
    id: int = Field(default=None, primary_key=True)
    post_id: int = Field(foreign_key="post.id")
    content: str
    post: "Post" = Relationship(back_populates="comments")

class Post(SQLModel, table=True):
    id: int = Field(default=None, primary_key=True)
    title: str
    content: str
    comments: list["Comment"] = Relationship(back_populates="post")

Not much to say here, just the definition of the models with foreign keys and relationships.

The init_db function is used to create the database engine.

def init_db(url):

    engine = create_engine(url)

    # create the tables
    SQLModel.metadata.drop_all(engine)
    SQLModel.metadata.create_all(engine)

    # initialize database with fake data
    from sqlmodel import Session

    with Session(engine) as session:
        # Create fake data
        post1 = Post(title='Post The First', content='Content for the first post')
        ...
        session.add(post1)
        ...
        session.commit()

    return engine
  • engine = create_engine(url) - Create a database engine.
  • SQLModel.metadata.drop_all(engine) - Drop all the tables.
  • SQLModel.metadata.create_all(engine) - Create all the tables.
  • with Session(engine) as session: - Create a session to interact with the database.
  • post1 = Post(title='Post The First', content='Content for the first post') - Create a Post object.
  • session.add(post1) - Add the Post object to the session.
  • session.commit() - Commit the changes to the database.
  • return engine - Return the database engine.

/iris endpoint

######################
# IRIS Query example #
######################

@app.get("/iris")
def iris_query():
    query = "SELECT top 10 * FROM %Dictionary.ClassDefinition"
    rs = iris.sql.exec(query)
    # Convert the result to a list of dictionaries
    result = []
    for row in rs:
        result.append(row)
    return result
  • @app.get("/iris") - Define a GET route for the /iris endpoint.
  • query = "SELECT top 10 * FROM %Dictionary.ClassDefinition" - Define the query to get the top 10 classes in the IRIS namespace.
  • rs = iris.sql.exec(query) - Execute the query.
  • result = [] - Create an empty list to store the results.
  • for row in rs: - Iterate over the result set.
  • result.append(row) - Append the row to the result list.
  • return result - Return the result list.

/interop endpoint

########################
# IRIS interop example #
########################
bs = Director.create_python_business_service('BS')

@app.get("/interop")
@app.post("/interop")
@app.put("/interop")
@app.delete("/interop")
def interop(request: Request):
    
    rsp = bs.on_process_input(request)

    return rsp

  • bs = Director.create_python_business_service('BS') - Create a Python business service.
    • Must be created outside the route definition to prevent multiple instances of the business service.
  • @app.get("/interop") - Define a GET route for the /interop endpoint.
  • @app.post("/interop") - Define a POST route for the /interop endpoint.
  • ...
  • def interop(request: Request): - Define the route handler.
  • rsp = bs.on_process_input(request) - Call the on_process_input method of the business service.
  • return rsp - Return the response.

/posts endpoint

############################
# CRUD operations posts    #
############################

@app.get("/posts")
def get_posts():
    with Session(engine) as session:
        posts = session.exec(select(Post)).all()
        return posts
    
@app.get("/posts/{post_id}")
def get_post(post_id: int):
    with Session(engine) as session:
        post = session.get(Post, post_id)
        return post
    
@app.post("/posts")
def create_post(post: Post):
    with Session(engine) as session:
        session.add(post)
        session.commit()
        return post

This endpoint is used to perform CRUD operations on the Post object.

Note much to say here, just the definition of the routes to get all posts, get a post by id, and create a post.

Everything is done using the sqlmodel ORM.

/comments endpoint

############################
# CRUD operations comments #
############################


@app.get("/comments")
def get_comments():
    with Session(engine) as session:
        comments = session.exec(select(Comment)).all()
        return comments
    
@app.get("/comments/{comment_id}")
def get_comment(comment_id: int):
    with Session(engine) as session:
        comment = session.get(Comment, comment_id)
        return comment
    
@app.post("/comments")
def create_comment(comment: Comment):
    with Session(engine) as session:
        session.add(comment)
        session.commit()
        return comment

This endpoint is used to perform CRUD operations on the Comment object.

Note much to say here, just the definition of the routes to get all comments, get a comment by id, and create a comment.

Everything is done using the sqlmodel ORM.

Troubleshooting

How to run the FastAPI application in a standalone mode

You can always run a standalone Flask application with the following command:

python3 /irisdev/app/community/app.py

NB : You must be inside of the container to run this command.

docker exec -it iris-fastapi-template-iris-1 bash

Restart the application in IRIS

Be in DEBUG mode make multiple calls to the application, and the changes will be reflected in the application.

How to access the IRIS Management Portal

You can access the IRIS Management Portal by going to http://localhost:53795/csp/sys/UtilHome.csp.

Run this template locally

For this you need to have IRIS installed on your machine.

Next you need to create a namespace named IRISAPP.

Install the requirements.

Install IoP :

#init iop
iop --init

# load production
iop -m /irisdev/app/community/interop/settings.py

# start production
iop --start Python.Production

Configure the application in the Security portal.

3
0 528
Article Anthony Master · Oct 17, 2024 2m read

I was working on a DTL but kept getting ERROR #5002... MAXSTRING errors. The problem was that most of the DTL GUI action steps only support the string data type when working with the segments. A %String has a limit of 3,641,144 characters and my OBX5.1 was 5,242,952 characters long as the example provided. Of course PACS admin stated ultra high quality up to and including 4K resolution files were needed, so we could not get the vendor to compress or reformat these files to compressed jpg or something similar.

Initially this vendor sends a 2.3 ORU^R01 and our EHR (Epic) is expecting a 2.3 MDM^T02. Furthermore, we needed the following transformations:

  1. The embedded image was sent in OBX-5.1, and we needed it moved to OBX-5.5
  2. The image format was sent in OBX-6 and we needed it in OBX-5.3 & 4
  3. Needed to create TXA segment
  4. Support a set 25 OBX segments that may be completely empty (>25 x 5Mb = 125Mb+ Message sizes, yikes!)

Example received message (replace ... with 5+ Mb embedded data):

MSH|^~\&|VENDOR||||20241017125335||ORU^R01|1|P|2.3|
PID|||203921||LAST^FIRST^^^||19720706|M||||||||||100001|
PV1||X||||||||GI6|||||||||100001|
ORC|RE||21||SC||1|||||||||||
OBR|1||21|21^VENDOR IMAGES|||20241017123056|||||||||1001^GASTROENTEROLOGY^PHYSICIAN|||||Y||||F||1|
OBX|1|PR|100001|ch1_image_001.bmp|...^^^^^^^|BMP|||||F|
OBX|2|PR|100001|ch1_image_003.bmp|...|BMP|||||F|
OBX|3|PR|100001|ch1_video_01thumbnail.bmp|...|BMP|||||F|
OBX||||||||||||
OBX||||||||||||
OBX||||||||||||
OBX||||||||||||
OBX||||||||||||
OBX||||||||||||
OBX||||||||||||
OBX||||||||||||
OBX||||||||||||
OBX||||||||||||
OBX||||||||||||
OBX||||||||||||
OBX||||||||||||
OBX||||||||||||
OBX||||||||||||
OBX||||||||||||
OBX||||||||||||
OBX||||||||||||
OBX||||||||||||
OBX||||||||||||
OBX||||||||||||
OBX||||||||||||
OBX||||||||||||
OBX||||||||||||
OBX||||||||||||
OBX||||||||||||
OBX||||||||||||
OBX||||||||||||

My normal tools and testing was not up to par with these really large messages. When I used this example replacing the data with the ... of course the normal DTL drag and drop GUI and testing would play nice, but plug in the real data, and it all crumbled.

Eventually I found that I had to use a code block with ObjectScript using the %GlobalCharacterStream data types to work with the large messages correctly.

Sharing my final DTL class for anyone who might come after me and find this helpful

Class OrdRes.VendorMDM Extends Ens.DataTransformDTL [ DependsOn = EnsLib.HL7.Message ]
{

Parameter IGNOREMISSINGSOURCE = 1;

Parameter REPORTERRORS = 1;

Parameter TREATEMPTYREPEATINGFIELDASNULL = 0;

XData DTL [ XMLNamespace = "http://www.intersystems.com/dtl" ]
{
<transform sourceClass='EnsLib.HL7.Message' targetClass='EnsLib.HL7.Message' sourceDocType='2.3:ORU_R01' targetDocType='2.5:MDM_T02' create='new' language='objectscript' >
<assign value='source.{MSH}' property='target.{MSH}' action='set' />
<assign value='"MDM"' property='target.{MSH:MessageType.MessageCode}' action='set' />
<assign value='"T02"' property='target.{MSH:MessageType.TriggerEvent}' action='set' />
<assign value='"2.5"' property='target.{MSH:VersionID.VersionID}' action='set' />
<assign value='source.{MSH:DateTimeofMessage}' property='target.{EVN:2}' action='set' />
<assign value='source.{PIDgrpgrp().PIDgrp.PID}' property='target.{PID}' action='set' />
<assign value='source.{PIDgrpgrp().PIDgrp.PV1grp.PV1}' property='target.{PV1}' action='set' />
<assign value='source.{PIDgrpgrp().ORCgrp().ORC}' property='target.{ORCgrp().ORC}' action='set' />
<assign value='source.{PIDgrpgrp().ORCgrp().OBR}' property='target.{ORCgrp().OBR}' action='set' />
<assign value='source.{PIDgrpgrp().ORCgrp().NTE()}' property='target.{ORCgrp().NTE()}' action='set' />
<assign value='"Endoscopy Image"' property='target.{TXA:DocumentType}' action='set' />
<assign value='"AU"' property='target.{TXA:DocumentCompletionStatus}' action='set' />
<assign value='"AV"' property='target.{TXA:DocumentAvailabilityStatus}' action='set' />
<assign value='source.{PID:18}' property='target.{TXA:12.3}' action='set' />
<code>
<![CDATA[
 set OBXCount=source.GetValueAt("PIDgrpgrp(1).ORCgrp(1).OBXgrp(*)")
 For k1 = 1:1:OBXCount
 {
   // if OBX-1 is empty then it is assumed the rest of the segment will be empty too, so disregard it.
   If source.GetValueAt("PIDgrpgrp(1).ORCgrp(1).OBXgrp("_k1_").OBX:SetIDOBX") '= ""
   {
     // create new stream to read source OBX
     set srcOBXStream=##class(%GlobalCharacterStream).%New()
     // get stream data from source OBX
     set tSC=source.GetFieldStreamRaw(srcOBXStream,"PIDgrpgrp(1).ORCgrp(1).OBXgrp("_k1_").OBX")
     // get the positions of needed delimitters:
     set p1=srcOBXStream.FindAt(1,"|")    // 0>p1="OBX"
     set p2=srcOBXStream.FindAt(p1+1,"|") // p1>p2=OBX-1
     set p3=srcOBXStream.FindAt(p2+1,"|") // p2>p3=OBX-2
     set p4=srcOBXStream.FindAt(p3+1,"|") // p3>p4=OBX-3
     set p5=srcOBXStream.FindAt(p4+1,"|") // p4>p5=OBX-4
     set p6=srcOBXStream.FindAt(p5+1,"^") // p5>p6=OBX-5.1
     set p7=srcOBXStream.FindAt(p6+1,"|") // p6>p7=OBX-5.2 -> OBX 5.*
     // if no OBX-5.2 then there will not be the `^` and p6 and p7 will be `-1`
     // when that is the case, find p7 starting at `p5+1` and make p6 = p7
     if (p6 < 0) {
       set p7=srcOBXStream.FindAt(p5+1,"|") // p5>p7=OBX-5
       set p6=p7
     }
     set p8=srcOBXStream.FindAt(p7+1,"|") // p7>p8=OBX-6
     set tStream=##class(%GlobalCharacterStream).%New()

     // renumber OBX-1 to OBX 
     set tSC=tStream.Write("OBX|"_k1_"|")
     
     // set OBX2-2 to "ED"
     set tSC=tStream.Write("ED|")
     
     // copy source OBX-3 to target OBX-3
     set tSC=srcOBXStream.MoveTo(p3+1)
     set tSC=tStream.Write(srcOBXStream.Read(p4-p3-1))
     set tSC=tStream.Write("|")
     
     // copy source OBX-4 to target OBX-4
     set tSC=srcOBXStream.MoveTo(p4+1)
     set tSC=tStream.Write(srcOBXStream.Read(p5-p4-1))
     
     // copy source OBX-6 to OBX-5.3 & OBX-5.4
     set tSC=srcOBXStream.MoveTo(p7+1)
     set docType=srcOBXStream.Read(p8-p7-1)
     set tSC=tStream.Write("|^^"_docType_"^"_docType_"^")
     
     // copy source OBX-5.1 to target OBX-5.5
     // can only set up to 3,641,144 chars at once, so do while loop...
     set startPos=p5+1
     set remain=p6-p5-1
     // characters to read/write in each loop, max is 3,641,144 since .Write limit is a %String
     set charLimit=3000000
     while remain > 0 {
       set tSC=srcOBXStream.MoveTo(startPos)
       set toRead = charLimit
       if toRead > remain {
         set toRead=remain
       }
       set tSC=tStream.Write(srcOBXStream.Read(toRead))
       set remain=remain-toRead
       set startPos=startPos+toRead
     }
     set tSC=tStream.Write("|")

     set obxSegment=##class(EnsLib.HL7.Segment).%New()
     set obxSegment.SegType="2.5:OBX"
     set tSC=obxSegment.StoreRawDataStream(tStream)
     set tSC=target.setSegmentByPath(obxSegment,"OBXgrp("_k1_").OBX")
   }
 }
]]></code>
</transform>
}

}

For developing and testing this, I used the VSCode Plugins for InterSystems because the integrating testing tools could not handle the message size.

I will also add, that getting HL7 over HTTPS to Epic's InterConnect also involved creating a custom HTTP class and sending the custom Content-Type x-application/hl7-v2+er7

7
1 392
Discussion Otto Medin · Oct 19, 2024

In the past, I've created custom SQL operations, but now I had something trivial to do, so I decided to take EnsLib.SQL.Operation.GenericOperation out for a spin. There's no example in the docs, so it was a little tricky. Here's what I ended up doing:

In my external database, I have 'mytable' with two fields 'id1' and 'id2'. Here are the pertinent Business Operation settings:

SQL: select id2 from mytable where id1 = ?
Input Parameters: [1] *id1
RequestClass: Ens.StringRequest
ResponseClass: MyResponseClass

2
0 183