Hello everyone, I’m a French student that just arrived in Prague for an academical exchange for my fifth year of engineering school and here is my participation in the interop contest.
I hadn’t much time to code since I was moving from France to Prague and I’m participating alone, so I decided to make a project that’s more like a template rather than an application.
I wanted to participate since my field (Data Science and AI) is not often linked with sustainability and the contest was a way for me to express myself in this important subject that is sustainability and Environnement.
As you know, Artificial Intelligence is becoming more and more popular, with many well-known firms trying to follow the movement and sell tools to easily create machine learning models, train them and use them. All of this is practical and easy, but it comes with a cost, a financial one but also an Environnmental one.
Training huge models again and again can take a lot of resources and produce a lot of CO2s. Supercomputers are running for days, and days and the size of the models are just exponentially increasing taking more space than ever. All these effort for some performance improvement that are not even sure to be find in some cases.
Of course, this process is needed by many firms where even 0.1% of improvement in the accuracy of a model could save thousands of lives. That's why this template is designed for more common uses.
However, as I had the opportunity to work with NLP (Natural Language Process) or Image Classification, I realized that some tools and models are already almost usable as is and can help us save hundreds of hours of training and therefore a lot of CO2s production and electricity consumption.
That’s why I decided to create a template using InterSystems technologies to create an interoperable solution that answer some sustainability issues by allowing you to easily, in a few clicks, download pre-trained models from the internet ONCE, use them as much as you want for your own need, and of course, fine-tune these pre-trained models with new content available on an IRIS database and add content to the existing model.
That way, in the template, we are taking an NLP model, trying it, then training it on data to create five new labels in the model to grade internet review.
Therefore, by doing this, we end up with (If you have time and some compute power) a great model that can be used to predict the grade of internet review, that for free and for a small amount of CO2 produced.
See the GitHub and the Open Exchange post linked to this article.
Or see the ReadMe here :
1. Contest-Sustainability
This is an template using InterSystems technologies to create an interoperable solution that answer some sustainability issues by allowing you to easily, in a few clicks, download pre-trained models from the internet ONCE, use them as much as you want for your own need, and of course, fine-tune these pre-trained models with new content available on an IRIS database and add content to the existing model.
In this example we are taking an NLP model, trying it, then training it on data to create five new labels in the model to grade internet review. Saving in the process a lot of resources and CO2 emission.
Here are some models as example you can try :
https://huggingface.co/gpt2
https://huggingface.co/Jean-Baptiste/camembert-ner
https://huggingface.co/bert-base-uncased
https://huggingface.co/facebook/detr-resnet-50
https://huggingface.co/facebook/detr-resnet-50-panoptic
TABLE OF CONTENT :
2. Installation
2.1. Starting the Production
While in the contest-sustainability folder, open a terminal and enter :
docker-compose up
The very first time, it may take a few minutes to build the image correctly and install all the needed modules for Python.
2.2. Access the Production
Following this link, access the production :
Access the Production
2.3. Closing the Production
docker-compose down
3. How it works
For now, some models may not work with this implementation since everything is automatically done, which means, no matter what model you input, we will try to make it work through transformerspipeline library.
Pipeline is a powerful tool by the HuggingFace team that will scan the folder in which we downloaded the model, then understand what library it should use between PyTorch, Keras, Tensorflow or JAX to then load that model using AutoModel.
From here, by inputting the task, the pipeline knows what to do with the model, tokenizer or even feature-extractor in this folder, and manage your input automatically, tokenize it, process it, pass it into the model, then give back the output in a decoded form usable directly by us.
4. HuggingFace API
Some people or some systems can not download models or use them due to some restriction, that's why it is possible to use the HuggingFace API and call some models directly throught this service.
It is made easier for you here :
You must first start the demo, using the green Start button or Stop and Start it again to apply your config changes.
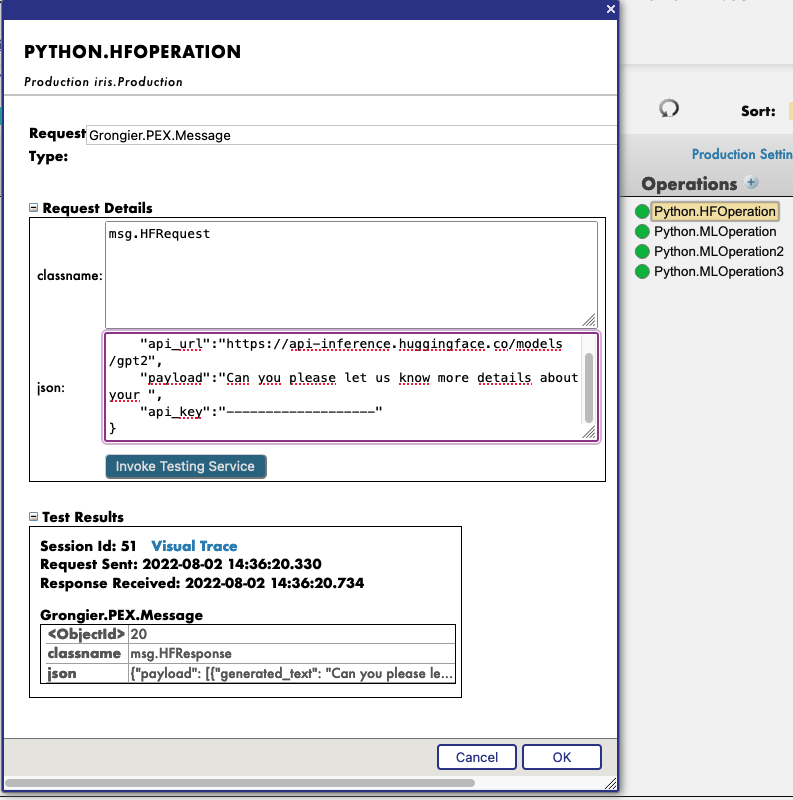
Then, by clicking on the operation Python.HFOperation of your choice, and selecting in the right tab action, you can test the demo.
In this test window, select :
Type of request : Grongier.PEX.Message
For the classname you must enter :
msg.HFRequest
And for the json, here is an example of a call to GPT2 :
{
    "api_url":"https://api-inference.huggingface.co/models/gpt2",
    "payload":"Can you please let us know more details about your ",
    "api_key":"----------------------"
}
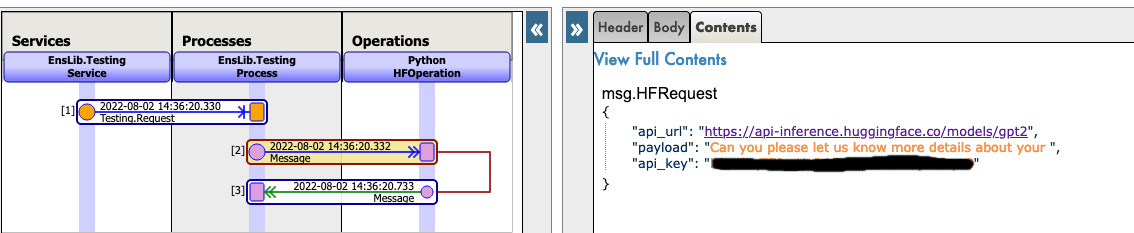
Now you can click on Visual Trace to see in details what happened and see the logs.
NOTE that you must have an API key from HuggingFace before using this Operation ( the api-keys are free, you just need to register to HF )
NOTE that you can change the url to try any other models from HuggingFace, you may need to change the payload.
See as example:

5. Use any model from the web
In the section we will teach you how to use almost any pre-trained model from the internet, HuggingFace or not in order to save some resource or simply use these model inside IRIS.
5.1. FIRST CASE : YOU HAVE YOUR OWN MODEL
In this case, you must copy paste your model, with the config, the tokenizer.json etc inside a folder inside the model folder.
Path : src/model/yourmodelname/
From here you must create a new operation, call it as you wish, go to the parameters of this operation.
Then go to settings in the right tab, then in the Python part, then in the %settings part.
Here, you can enter or modify any parameters ( don't forget to press apply once your are done ).
Here's the default configuration for this case :
%settings
name=yourmodelname
task=text-generation
NOTE that any settings that are not name or model_url will go into the PIPELINE settings.
Now you can double-click on the operation and start it.
You must see in the Log part the starting of your model.
From here, we create a PIPELINE using transformers that uses your config file find in the folder as seen before.
To call that pipeline, click on the operation, and select in the right tab action, you can test the demo.
In this test window, select :
Type of request : Grongier.PEX.Message
For the classname you must enter :
msg.MLRequest
And for the json, you must enter every arguments needed by your model.
Here is an example of a call to GPT2 :
{
    "text_inputs":"Unfortunately, the outcome",
    "max_length":100,
    "num_return_sequences":3
}
Click Invoke Testing Service and wait for the model to operate.
See for example:

Now you can click on Visual Trace to see in details what happened and see the logs.
See for example :

5.2. SECOND CASE : YOU WANT TO DOWNLOAD A MODEL FROM HUGGINGFACE
In this case, you must find the URL of the model on HuggingFace.
Find a model that does what you are looking for and use it without spending resources and using the InterSystems technologies.
5.2.1. Settings
From here you must go to the parameters of the Hugging.
Click on the HuggingFace operation of your choice then go to settings in the right tab, then in the Python part, then in the %settings part.
Here, you can enter or modify any parameters ( don't forget to press apply once your are done ).
Here's some example configuration for some models we found on HuggingFace :
%settings for gpt2
model_url=https://huggingface.co/gpt2
name=gpt2
task=text-generation
%settings for camembert-ner
name=camembert-ner
model_url=https://huggingface.co/Jean-Baptiste/camembert-ner
task=ner
aggregation_strategy=simple
%settings for bert-base-uncased
name=bert-base-uncased
model_url=https://huggingface.co/bert-base-uncased
task=fill-mask
%settings for detr-resnet-50
name=detr-resnet-50
model_url=https://huggingface.co/facebook/detr-resnet-50
task=object-detection
%settings for detr-resnet-50-protnic
name=detr-resnet-50-panoptic
model_url=https://huggingface.co/facebook/detr-resnet-50-panoptic
task=image-segmentation
NOTE that any settings that are not name or model_url will go into the PIPELINE settings, so in our second example, the camembert-ner pipeline requirers an aggregation_strategy and a task that are specified here while the gpt2 requirers only a task.
See as example:
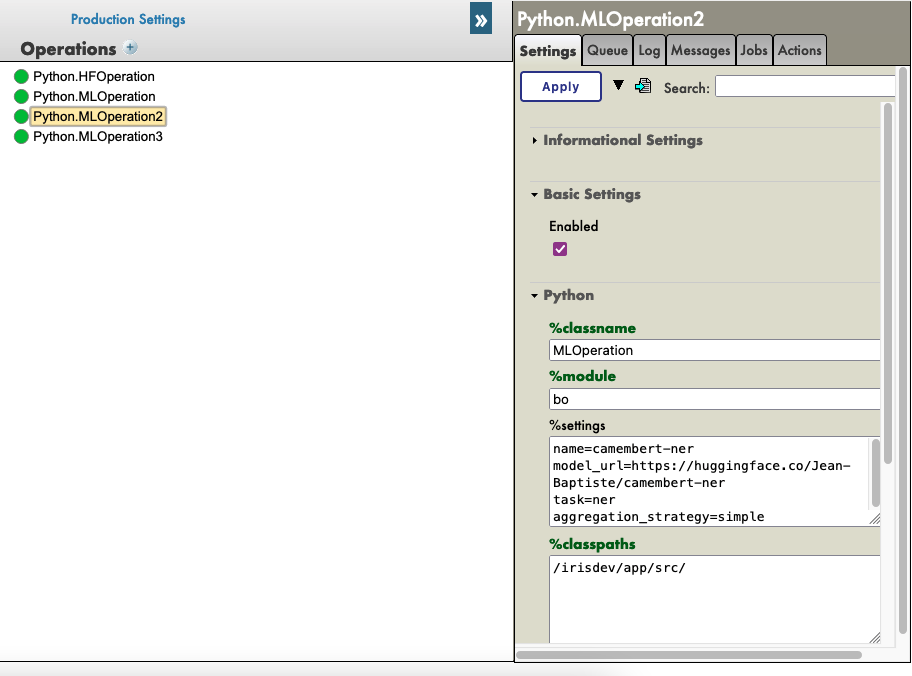
Now you can double-click on the operation and start it.
You must see in the Log part the starting of your model and the downloading.
NOTE You can refresh those logs every x seconds to see the advancement with the downloads.

From here, we create a PIPELINE using transformers that uses your config file find in the folder as seen before.
5.2.2. Testing
To call that pipeline, click on the operation , and select in the right tab action, you can test the demo.
In this test window, select :
Type of request : Grongier.PEX.Message
For the classname you must enter :
msg.MLRequest
And for the json, you must enter every arguments needed by your model.
Here is an example of a call to GPT2 :
{
    "text_inputs":"George Washington lived",
    "max_length":30,
    "num_return_sequences":3
}
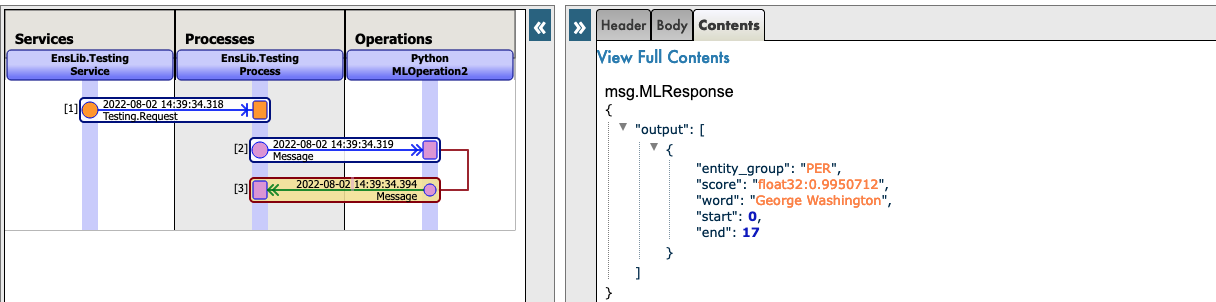
Here is an example of a call to Camembert-ner :
{
    "inputs":"George Washington lived in washington"
}
Here is an example of a call to bert-base-uncased :
{
    "inputs":"George Washington lived in [MASK]."
}
Here is an example of a call to detr-resnet-50 using an online url :
{
    "url":"http://images.cocodataset.org/val2017/000000039769.jpg"
}
Here is an example of a call to detr-resnet-50-panoptic using the url as a path:
{
    "url":"/irisdev/app/misc/000000039769.jpg"
}
Click Invoke Testing Service and wait for the model to operate.
Now you can click on Visual Trace to see in details what happened and see the logs.
NOTE that once the model was downloaded once, the production won't download it again but get the cached files found at src/model/TheModelName/.
If some files are missing, the Production will download them again.
See as example:
See as example:


6. Fine-tune the models
In this part we are trying to fine-tune a model in order to repurpose an existing model and make it even better without using too much resources.
6.1. Tunning the model
6.1.1. Download the model
In order to use this GitHub you need to have a model from HuggingFace compatible with pipeline to use and train, and have a dataset you want to train your model on.
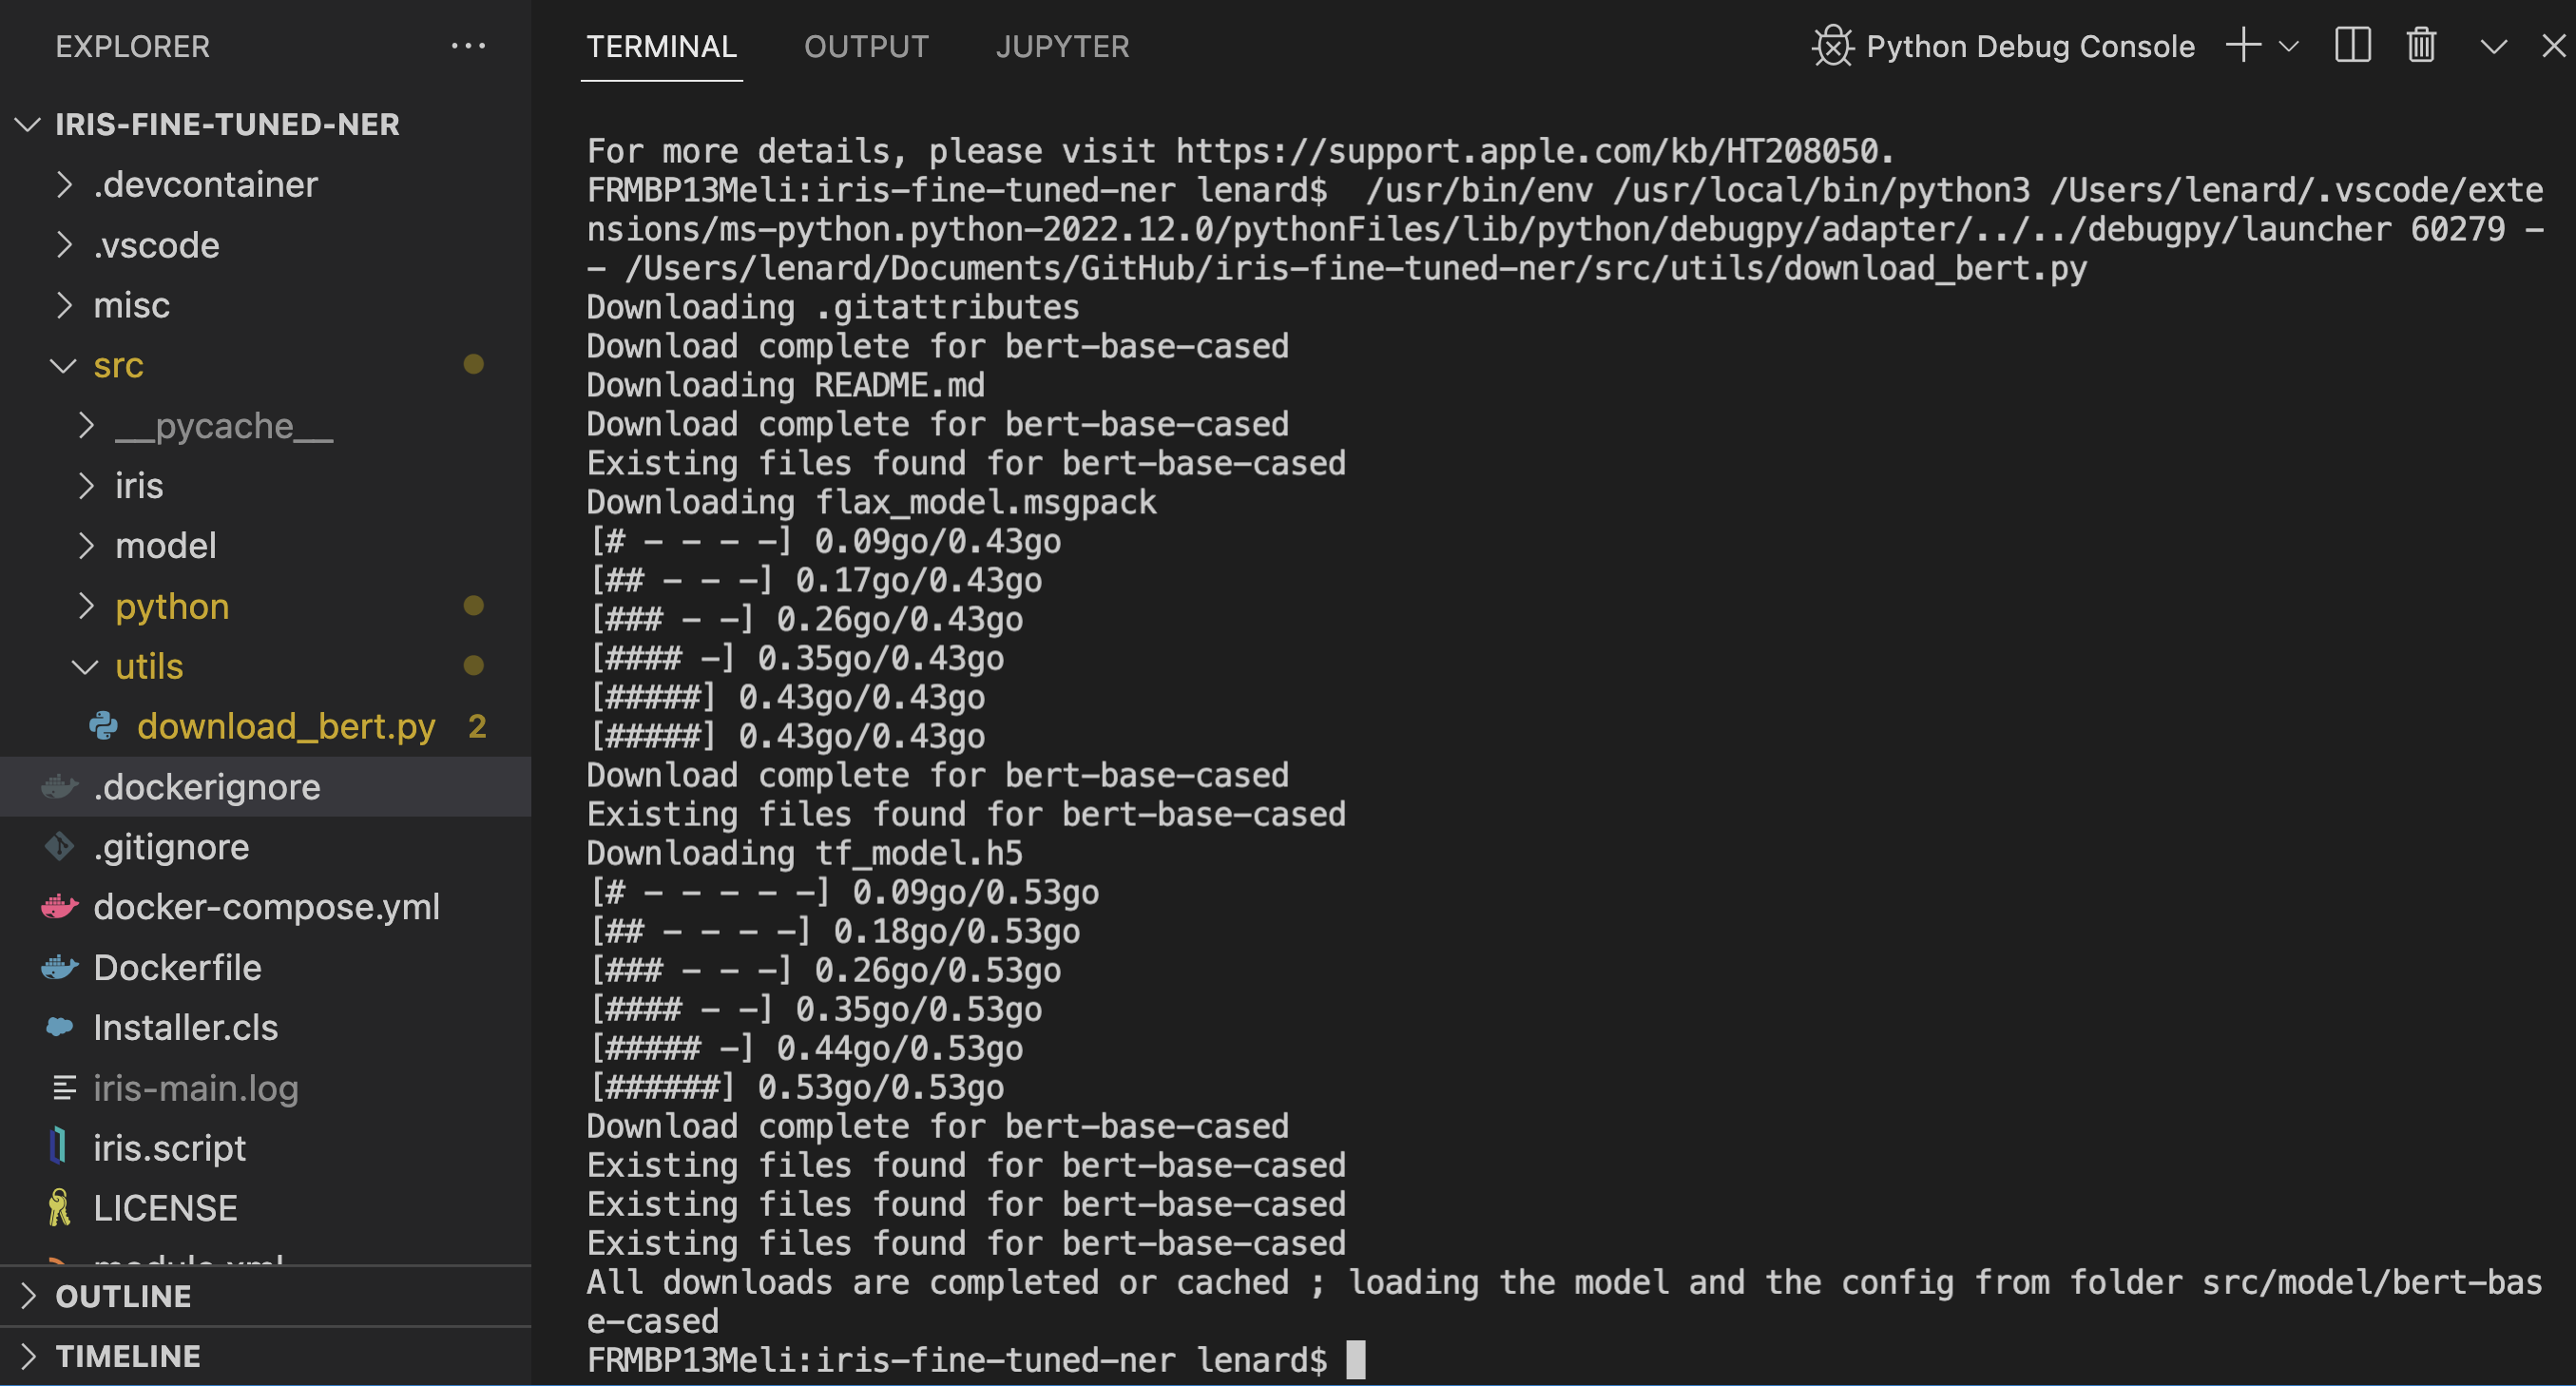
In order to help, we let you the possibility to use the Python script in src/utils/download_bert.py. It will download for you the "https://huggingface.co/bert-base-cased" model and put inside the src/model/bert-base-cased folder if it's not already here.
Moreover we also give you a DataSet to train the bert model on, this dataset was already loaded inside the IRIS DataBase and nothing else needs to be done if you want to use it. ( You can access it going to the SQL part of the portal and in the iris database namespace then to the review table )
To use the script, if you are inside the container, you can execute it without worry, if you are in local, you may need to pip3 install requests and pip3 install beautifulsoup4
See the output :
6.1.2. Settings
If you want to use the bert-base-cased model, and you did downloaded it using the script, nothing needs to be added to the settings and you can advance to the train the model part.
If you want to use your own model, click on the Python.TuningOperation, and select in the right tab Settings, then Python then in the %settings part, enter the path to the model, the name of the folder and the number of label you want it trained on.
Example :
path=/irisdev/app/src/model/
model_name=bert-base-cased
num_labels=5
6.1.3. Train the model
To train the model you must go the Production following this link :
http://localhost:52795/csp/irisapp/EnsPortal.ProductionConfig.zen?PRODUCTION=iris.Production
And connect using :
SuperUser as username and SYS as password.
To call the training, click on the Python.TuningOperation, and select in the right tab Actions, you can Test the demo.
In this test window, select :
Type of request : Grongier.PEX.Message
For the classname you must enter :
msg.TrainRequest
And for the json, you must enter every arguments needed by the trainer to train.
Here is an example that train on the first 20 rows ( This isn't a proper training but it is fast ):
{
    "columns":"ReviewLabel,ReviewText",
    "table":"iris.Review",
    "limit":20,
    "p_of_train":0.8,

    "output_dir":"/irisdev/app/src/model/checkpoints",
    "evaluation_strategy":"steps",
    "learning_rate":0.01,
    "num_train_epochs":1
}
As for example :

As you can see, you must enter
table to use.columns to use ( first is the label, second is the input to be tokenized )limit of rows to take in ( if you don't precise a number of rows, all the data will be used )p_of_train the percentage of training data to take from the dataset and 1 - p_of_train the percentage of testing data to take from the dataset.
After that, the other parameters are up to you and can be anything according to https://huggingface.co/docs/transformers/main_classes/trainer parameters.
NOTE that the batch size for training and testing is automatically calculated if not input in the request. ( It's the biggest divider of the number of rows that's less than the square root of the number of row and less than 32 )
Click Invoke Testing Service and close the testing window without waiting.
Now access the Python.TuningOperation, and select in the right tab log ; Here you can see the advancement of the training and evaluations.
Once it is over, you will see a log saying that the new model was saved in a temporary folder.
Now access the Python.TuningOperation, and select in the right tab message and select the last one by clicking on it's header. Here you can see the advancement of the training and evaluations and at the end you can have access to the Metrics of the old and the new model for you to compare.
6.1.4. Replace the model
If you want to keep the old model, nothing must be done, the old one will stay on the non-temporary folder and is still loaded for further training.
If you want to keep the new model, you must click on the Python.TuningOperation, and select in the right tab Actions and test.
In this test window, select :
Type of request : Grongier.PEX.Message
For the classname you must enter :
msg.OverrideRequest
And for the json, empty brackets:
{}
Click Invoke Testing Service and see the response message. The new model was moved from the temporary folder to the non-temporary folder.
6.2. Use the model
Training a model is interesting but you can also try it out.
6.2.1. Settings
If you want to use the bert-base-cased model, and you did downloaded it using the script, nothing needs to be added to the settings and you can advance to the test the model part.
If you want to use your own model, click on the Python.TuningOperation, and select in the right tab Settings, then Python then in the %settings part, enter the parameter to add to the pipeline.
6.2.2. Test the model
To test the model you must go the Production following this link :
http://localhost:52795/csp/irisapp/EnsPortal.ProductionConfig.zen?PRODUCTION=iris.Production
And connect using :
SuperUser as username and SYS as password.
To call the testing, click on the Python.MLOperation, and select in the right tab Actions, you can Test the demo.
In this test window, select :
Type of request : Grongier.PEX.Message
For the classname you must enter :
msg.MLRequest
And for the json, you must enter every arguments needed by the model to work
{
    "inputs":"This was a really bad experience"
}
Press Call test services and then watch the result.
7. Important note
Fine-tuning models can take a LOT of time and resources, however it will always consume less resource than training a model from scratch.
You can already see that it's taking a long time and a lot of computer power to fine-tune the model so imagine the cost if you had to train it from scratch and start over multiple times to get the right results.
8. TroubleShooting
If you have issues, reading is the first advice we can give you, most errors are easily understood just by reading the logs as almost all errors will be captured by a try / catch and logged.
If you need to install a new module, or Python dependence, open a terminal inside the container and enter for example : "pip install new-module"
To open a terminal there are many ways,
- If you use the InterSystems plugins, you can click in the below bar in VSCode, the one looking like
docker:iris:52795[IRISAPP] and select Open Shell in Docker. - In any local terminal enter :
docker-compose exec -it iris bash - From Docker-Desktop find the IRIS container and click on
Open in terminal
Some models may require some changes for the pipeline or the settings for example, it is your task to add in the settings and in the request the right information.
9. Conclusion
From here you should be able to use some models that you may need on IRIS and fine-tune them as you wish.
This template is supposed to be modified to suits your need and was created as a base for any AI and IRIS project that has sustainability and interoperability in mind.
Due to the lack of time I was unable to add an API that was supposed to use a Director to directly communicate with the production and allow the users to make request to the models.
However, if you are still interested in an IRIS API using this Python module you can check my GitHub or you can directly go to my example of API in Python for IRIS.
Link to my DC profile : https://community.intersystems.com/user/lucas-enard-0
.png)