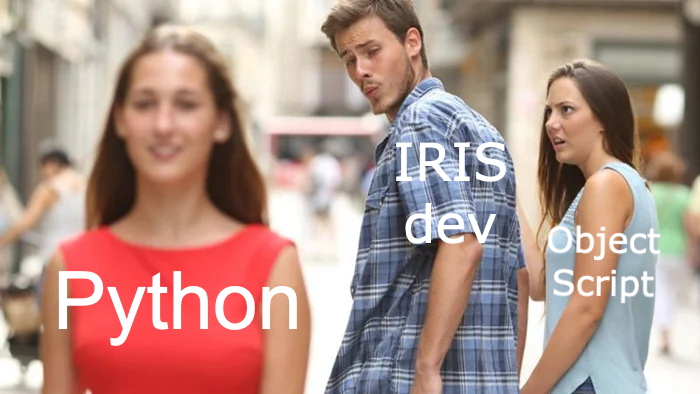
This formation, accessible on my GitHub, will cover, in half a hour, how to read and write in csv and txt files, insert and get inside the IRIS database and a distant database using Postgres or how to use a FLASK API, all of that using the Interoperability framework using ONLY Python following the PEP8 convention.
This formation can mostly be done using copy paste and will guide you through everystep before challenging you with a global exercise.
We are available to answer any question or doubt in the comment of that post, on teams or even by mail at lucas.enard@intersystems.com .
We would really appreciate any feedback and remarks regarding every and any aspect of this formation.
1. Ensemble / Interoperability Formation
The goal of this formation is to learn InterSystems' interoperability framework using python, and particularly the use of:
- Productions
- Messages
- Business Operations
- Adapters
- Business Processes
- Business Services
- REST Services and Operations
TABLE OF CONTENTS:
2. Framework
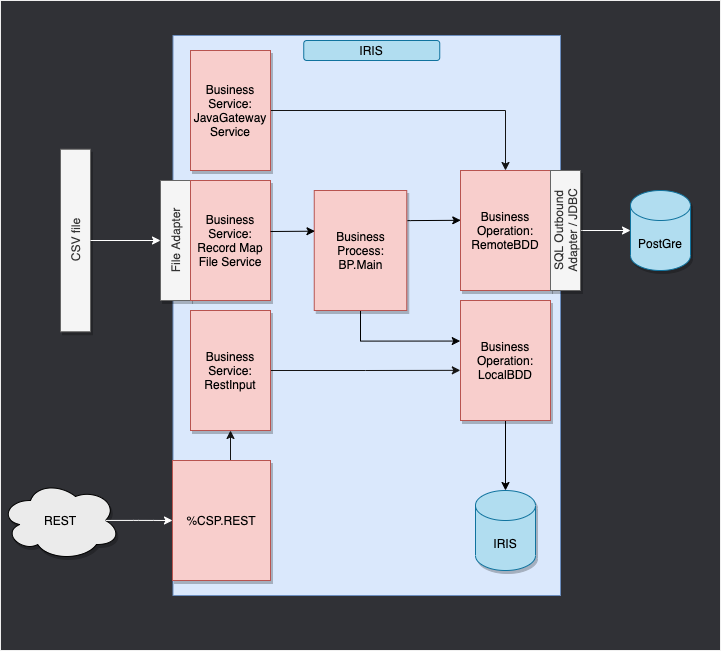
This is the IRIS Framework.
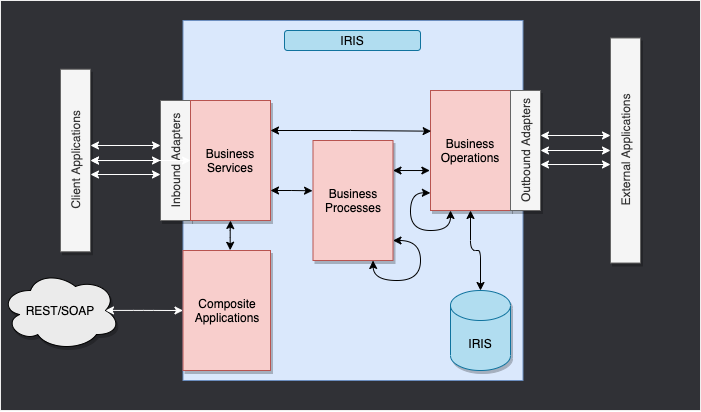
The components inside of IRIS represent a production. Inbound adapters and outbound adapters enable us to use different kind of format as input and output for our databse.
The composite applications will give us access to the production through external applications like REST services.
The arrows between them all of this components are messages. They can be requests or responses.
3. Adapting the framework
In our case, we will read lines from a csv file and save it into the IRIS database and in a .txt file.
We will then add an operation that will enable us to save objects in an extern database too, using a db-api. This database will be located in a docker container, using postgre.
Finally, we will see how to use composite applications to insert new objects in our database or to consult this database (in our case, through a REST service).
The framework adapted to our purpose gives us:
WIP
4. Prerequisites
For this formation, you'll need:
5. Setting up
5.1. Docker containers
In order to have access to the InterSystems images, we need to go to the following url: http://container.intersystems.com. After connecting with our InterSystems credentials, we will get our password to connect to the registry. In the docker VScode addon, in the image tab, by pressing connect registry and entering the same url as before (http://container.intersystems.com) as a generic registry, we will be asked to give our credentials. The login is the usual one but the password is the one we got from the website.
From there, we should be able to build and compose our containers (with the docker-compose.yml and Dockerfile files given).
5.2. Management Portal and VSCode
This repository is ready for VS Code.
Open the locally-cloned formation-template-python folder in VS Code.
If prompted (bottom right corner), install the recommended extensions.
5.3. Having the folder open inside the container
It is really important to be inside the container before coding.
Mainly to be able to have autocompletion enabled.
For this, docker must be on before opening VSCode.
Then, inside VSCode, when prompted (in the right bottom corner), reopen the folder inside the container so you will be able to use the python components within it.
The first time you do this it may take several minutes while the container is readied.
More information here

By opening the folder remote you enable VS Code and any terminals you open within it to use the python components within the container. Configure these to use /usr/irissys/bin/irispython

5.4. Register components
In order to register the components we are creating in python to the production it is needed to use the register_component function from the grongier.pex._utils module.
IMPORTANT: The components were already registered before ( expect for the HelloWorldOperation and the global exercise ).
For the HelloWorldOperation and for the global exercise, here are the steps to register components:
For this we advise you to use the build-in python console to add manually the component at first when you are working on the project.
You will find those commands in the misc/register.py file.
To use them you need to firstly create the component then you can start a terminal in VSCode ( it will be automatically in the container if you followed step 5.2. and 5.3)
To launch an IrisPython console enter :
/usr/irissys/bin/irispython
Then enter :
from grongier.pex._utils import register_component
Now you can register your component using something like :
register_component("bo","HelloWorldOperation","/irisdev/app/src/python/",1,"Python.HelloWorldOperation")
This line will register the class HelloWorldOperation that is coded inside the module bo, file situated at /irisdev/app/src/python/ (which is the right path if you follow this course) using the name Python.HelloWorldOperation in the management portal.
It is to be noted that if you don't change the name of the file, the class or the path, if a component was registered you can modify it on VSCode without the need to register it again. Just don't forget to restart it in the management portal.
5.5. The solution
If at any point in the formation you feel lost, or need further guidance, the solution branche on github holds all the correction and a working production.
6. Productions
A production is the base of all our work on Iris, it must be seen as the shell of our framework that will hold the services, processes and operations.
Everything in the production is going to inherit functions ; Those are the on_init function that resolve at the creation of an instance of this class and the on_tear_down function that resolve when the instance is killed.
This will be useful to set variables or close a used open file when writing.
It is to be noted that a production with almost all the services, processes and operations was alredy created.
If you are asked to connect use username:SuperUser and password:SYS
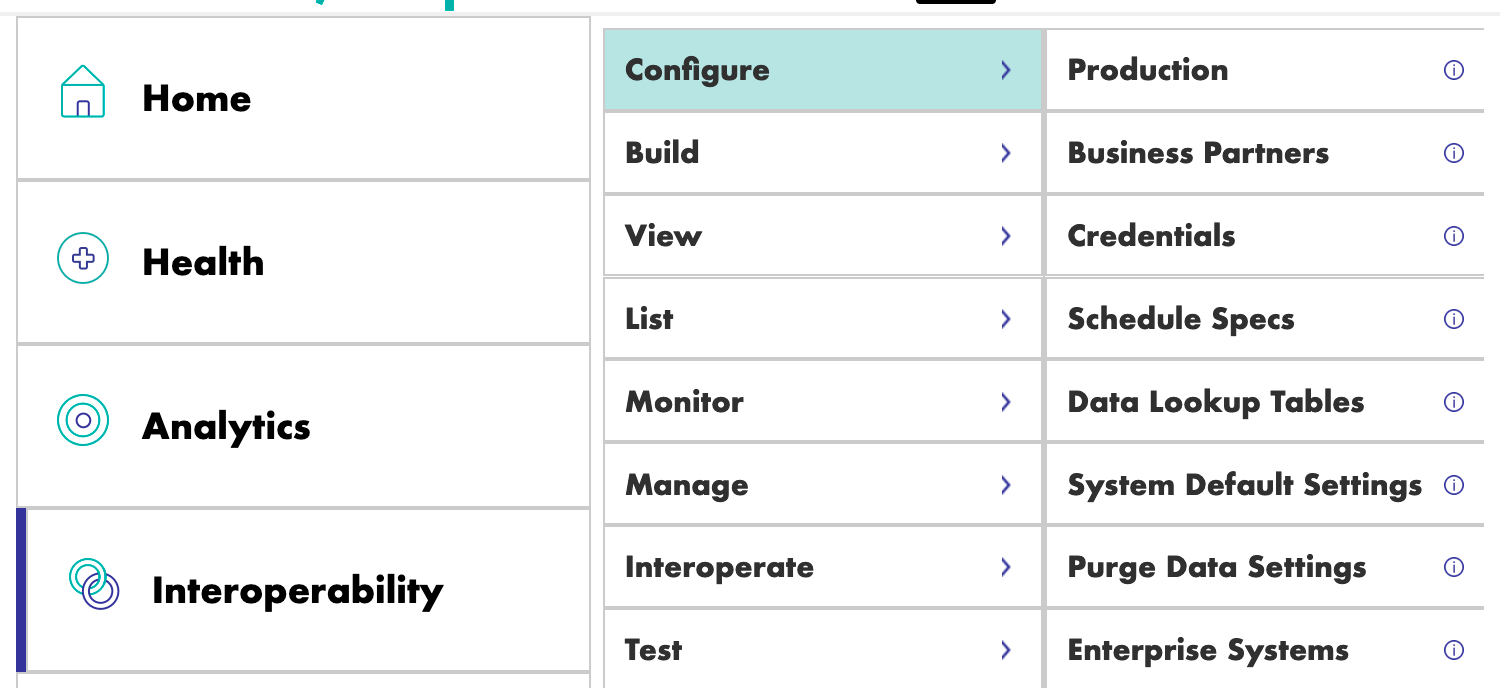
Then, we will go through the [Interoperability] and [Configure] menus and click Production:
If the production isn't open do :
Go to the [Interoperability] and [Configure] menu then click[Production].
Now click [Open] then chose iris / Production
If the production ins't in iris/production, note that it is important to
choose the namespace IRISAPP in the management portal.

From here you can go directly to Business Operations.
But if you are interested on how to create a production, the steps to create one if needed or just for information are:
Go to the management portal and to connect using username:SuperUser and password:SYS
Then, we will go through the [Interoperability] and [Configure] menus:
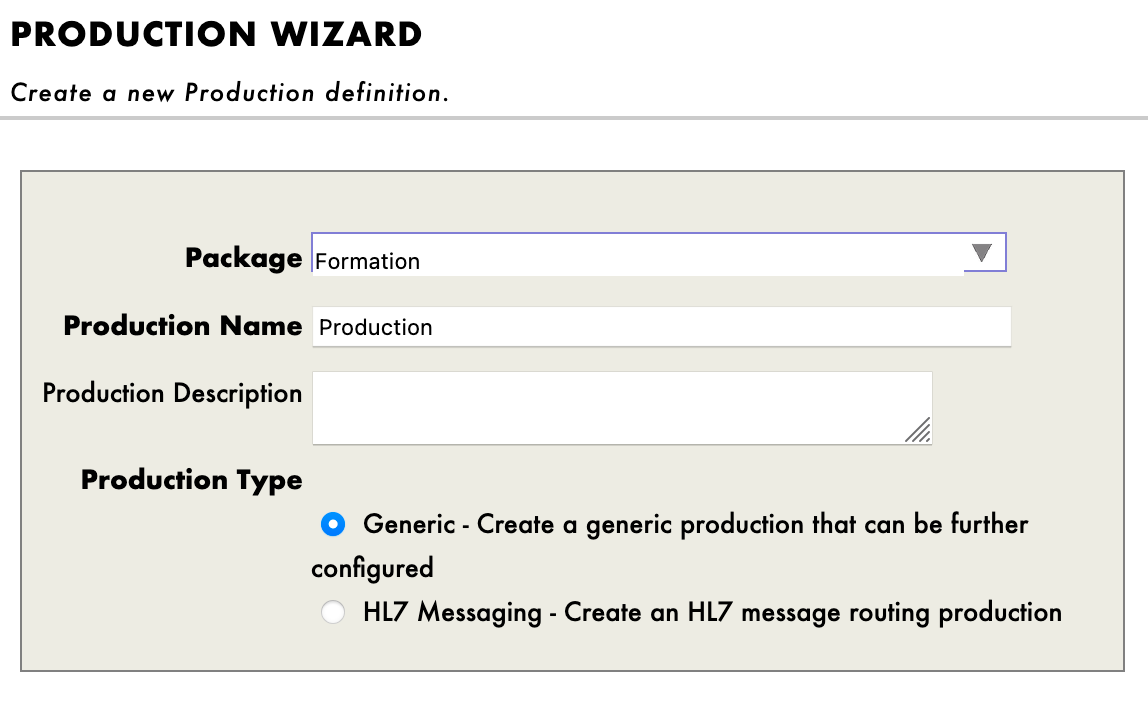
We then have to press [New], select the [Formation] package and chose a name for our production:
Immediately after creating our production, we will need to click on [Production Settings] just above the [Operations] section. In the right sidebar menu, we will have to activate [Testing Enabled] in the [Development and Debugging] part of the [Settings] tab (don't forget to press [Apply]).

In this first production we will now add Business Operations.
7. Business Operations
A Business Operation (BO) is a specific operation that will enable us to send requests from IRIS to an external application / system. It can also be used to directly save in IRIS what we want.
BO also have an on_message function that will be called every time this instance receive a message from any source, this will allow us to receive information and send it, as seen in the framework, to an external client.
We will create those operations in local in VSCode, that is, in the src/python/bo.py file.
Saving this file will compile them in IRIS.
To start things we will design the simplest operation possible and try it out.
In the src/python/bo.py file we will create a class called HelloWorldOperation that will write a message in the logs when it receive any request.
To do so we just have to add in the src/python/bo.py file, right after the import line and just before the class FileOperation: :
class HelloWorldOperation(BusinessOperation):
    def on_message(self, request):
        self.log_info("Hello World!")
Now we need to register it to our production, add it to the production and finally try it out.
To register it follow step by step How to register a component.
Now go to the management portal and click on the [Production] tab.
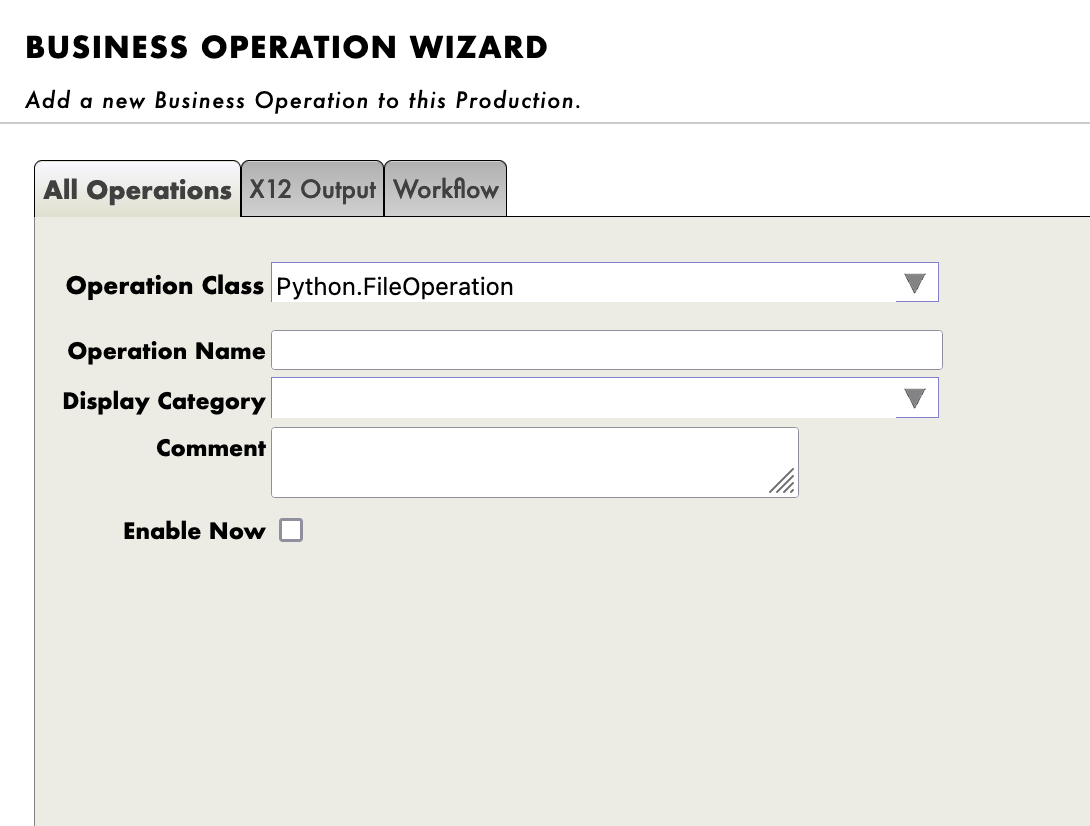
To add the operation, we use the Management Portal. By pressing the [+] sign next to [Operations], we have access to the [Business Operation Wizard].
There, we chose the operation classes we just created in the scrolling menu.
Now double click on the operation we just created and press start, then start the production.
IMPORTANT:To test the operation,select the Python.HelloWorldOperationoperation and going in the [Actions] tabs in the right sidebar menu, we should be able to test the operation
(if it doesn't work, activate testing and check if the production is started and reload the operation by double clicking it and clicking restart).
Testing on HelloWorldOperation
By using the test function of our management portal, we will send the operation a message.
Using as Request Type:
Ens.request in the scrolling menu.
( Or almost any other message type )
Then click Call test service
Then by going to the visual trace and clicking the white square you should read : "Hello World".
Well done, you have created your first full python operation on IRIS.
Now, for our firsts big operations we will save the content of a message in the local database and write the same information locally in a .txt file.
We need to have a way of storing this message first.
7.1. Creating our object classes
We will use dataclass to hold information in our messages.
In our src/python/obj.py file we have,
for the imports:
from dataclasses import dataclass
for the code:
@dataclass
class Formation:
    id_formation:int = None
    nom:str = None
    salle:str = None
The Formation class will be used as a Python object to store information from a csv and send it to the # 8. business process.
Your turn to create your own object class
The same way, create the Training class, in the same file, that will be used to send information from the # 8. business process to the multiple operation, to store it into the Iris database or write it down on a .txt file.
We only need to store a name which is a string and a room which is a string.
Try it by yourself before checking the solution.
Solution :
The final form of the obj.py file:
from dataclasses import dataclass

@dataclass
class Formation:
    id_formation:int = None
    nom:str = None
    salle:str = None

@dataclass
class Training:
    name:str = None
    room:str = None
7.2. Creating our message classes
These messages will contain a Formation object or a Training object, located in the obj.py file created in 7.1
Note that messages, requests and responses all inherit from the grongier.pex.Message class.
In the src/python/msg.py file we have,
for the imports:
from dataclasses import dataclass
from grongier.pex import Message

from obj import Formation,Training
for the code:
@dataclass
class FormationRequest(Message):
    formation:Formation = None
Again,the FormationRequest class will be used as a message to store information from a csv and send it to the # 8. business process.
Your turn to create your own message class
The same way, create the TrainingRequest class, in the same file, it will be used to send information from the # 8. business process to the multiple operation, to store it into the Iris database or write it down on a .txt file.
We only need to store a training which is a Training object.
Try it by yourself before checking the solution.
Solution :
The final form of the msg.py file:
from dataclasses import dataclass
from grongier.pex import Message

from obj import Formation,Training

@dataclass
class FormationRequest(Message):
    formation:Formation = None

@dataclass
class TrainingRequest(Message):
    training:Training = None
7.3. Creating our operations
Now that we have all the elements we need, we can create our operations.
Note that any Business Operation inherit from the grongier.pex.BusinessOperation class.
All of our operations will be in the file src/python/bo.py, to differentiate them we will have to create multiple classes as seen right now in the file as all the classes for our operations are already there, but of course, almost empty for now.
When an operation receive a message/request, it will automatically dispatch the message/request to the correct function depending of the type of the message/request specified in the signature of each function.
If the type of the message/request is not handled, it will be forwarded to the on_message function.
Now, we will create an operation that will store data to our database.
In the src/python/bo.py file we have for the code of the class IrisOperation:
class IrisOperation(BusinessOperation):
    """
    It is an operation that write trainings in the iris database
    """

    def insert_training(self, request:TrainingRequest):
        """
        It takes a `TrainingRequest` object, inserts a new row into the `iris.training` table, and returns a
        `TrainingResponse` object

        :param request: The request object that will be passed to the function
        :type request: TrainingRequest
        :return: A TrainingResponse message
        """
        sql = """
        INSERT INTO iris.training
        ( name, room )
        VALUES( ?, ? )
        """
        name = request.training.name
        room = request.training.room
        iris.sql.exec(sql,name,room)
        return None

    def on_message(self, request):
        return None
As we can see, if the IrisOperation receive a message of the type msg.TrainingRequest, the information hold by the message will be transformed into an SQL query and executed by the iris.sql.exec IrisPython function. This method will save the message in the IRIS local database.
As you can see, we gathered the name and the room from the request by getting the training object and then the name and room strings from the training object.
It is now time to write that data to a .csv file.
Your turn to create your own operation
The same way that for IrisOperation, you have to fill the FileOperation class.
First of all, write the put_line function inside the FileOperation class:
    def put_line(self,filename,string):
        """
        It opens a file, appends a string to it, and closes the file

        :param filename: The name of the file to write to
        :param string: The string to be written to the file
        """
        try:
            with open(filename, "a",encoding="utf-8",newline="") as outfile:
                outfile.write(string)
        except Exception as error:
            raise error
Now you can try to create the write_training function, which will call the put_line function once.
It will gather the name and the room from the request by getting the training object and then the name and room strings from the training object.
Then it will call the put_line function with the name of the file of your choice and the string to be written to the file.
Solution :
In the src/python/bo.py file we have,
for the imports:
from grongier.pex import BusinessOperation
import os
import iris

from msg import TrainingRequest,FormationRequest
for the code of the class FileOperation:
class FileOperation(BusinessOperation):
    """
    It is an operation that write a training or a patient in a file
    """
    def on_init(self):
        """
        It changes the current working directory to the one specified in the path attribute of the object, or to /tmp if no path attribute is specified.
        It also sets the filename attribute to toto.csv if it is not already set
        :return: None
        """
        if hasattr(self,'path'):
            os.chdir(self.path)
        else:
            os.chdir("/tmp")
        return None

    def write_training(self, request:TrainingRequest):
        """
        It writes a training to a file

        :param request: The request message
        :type request: TrainingRequest
        :return: None
        """
        room = name = ""
        if request.training is not None:
            room = request.training.room
            name = request.training.name
        line = room+" : "+name+"\n"
        filename = 'toto.csv'
        self.put_line(filename, line)
        return None

    def on_message(self, request):
        return None

    def put_line(self,filename,string):
        """
        It opens a file, appends a string to it, and closes the file

        :param filename: The name of the file to write to
        :param string: The string to be written to the file
        """
        try:
            with open(filename, "a",encoding="utf-8",newline="") as outfile:
                outfile.write(string)
        except Exception as error:
            raise error
As we can see, if the FileOperation receive a message of the type msg.TrainingRequest it will dispatch it to the write_training function since it's signature on request is TrainingRequest.
In this function, the information hold by the message will be written down on the toto.csv file.
Note that path is already a parameter of the operation and you could make filename a variable with a base value of toto.csv that can be changed directly in the management portal.
To do so, we need to edit the on_init function like this:
    def on_init(self):
        if hasattr(self,'path'):
            os.chdir(self.path)
        else:
            os.chdir("/tmp")
        if not hasattr(self,'filename'):
            self.filename = 'toto.csv'
        return None
Then, we would call self.filename instead of coding it directly inside the operation and using filename = 'toto.csv'.
Then, the write_training function would look like this:
    def write_training(self, request:TrainingRequest):
        room = name = ""
        if request.training is not None:
            room = request.training.room
            name = request.training.name
        line = room+" : "+name+"\n"
        self.put_line(self.filename, line)
        return None
See the part Testing below in 7.5 for further information on how to choose our own filename.
Those components were already registered to the production in advance.
For information, the steps to register your components are:
Following 5.4. and using:
register_component("bo","FileOperation","/irisdev/app/src/python/",1,"Python.FileOperation")
And:
register_component("bo","IrisOperation","/irisdev/app/src/python/",1,"Python.IrisOperation")
7.4. Adding the operations to the production
Our operations are already on our production since we have done it for you in advance.
However if you create a new operation from scratch you will need to add it manually.
If needed for later of just for information, here are the steps to register an operation.
For this, we use the Management Portal. By pressing the [+] sign next to [Operations], we have access to the [Business Operation Wizard].
There, we chose the operation classes we just created in the scrolling menu.
Don't forget to do it with all your new operations !
7.5. Testing
Double clicking on the operation will enable us to activate it or restart it to save our changes.
IMPORTANT: Note that this step of deactivating it and reactivating it is crucial to save our changes.
IMPORTANT: After that, by selecting the Python.IrisOperationoperation and going in the [Actions] tabs in the right sidebar menu, we should be able to test the operation
(if it doesn't work, activate testing and check if the production is started and reload the operation by double clicking it and clicking restart).
Testing on IrisOperation
For IrisOperation it is to be noted that the table was created automatically.
For information, the steps to create it are:
Access the Iris DataBase using the management portal by seeking [System Explorer] then [SQL] then [Go].
Now you can enter in the [Execute Query] :
CREATE TABLE iris.training (
	name varchar(50) NULL,
	room varchar(50) NULL
)
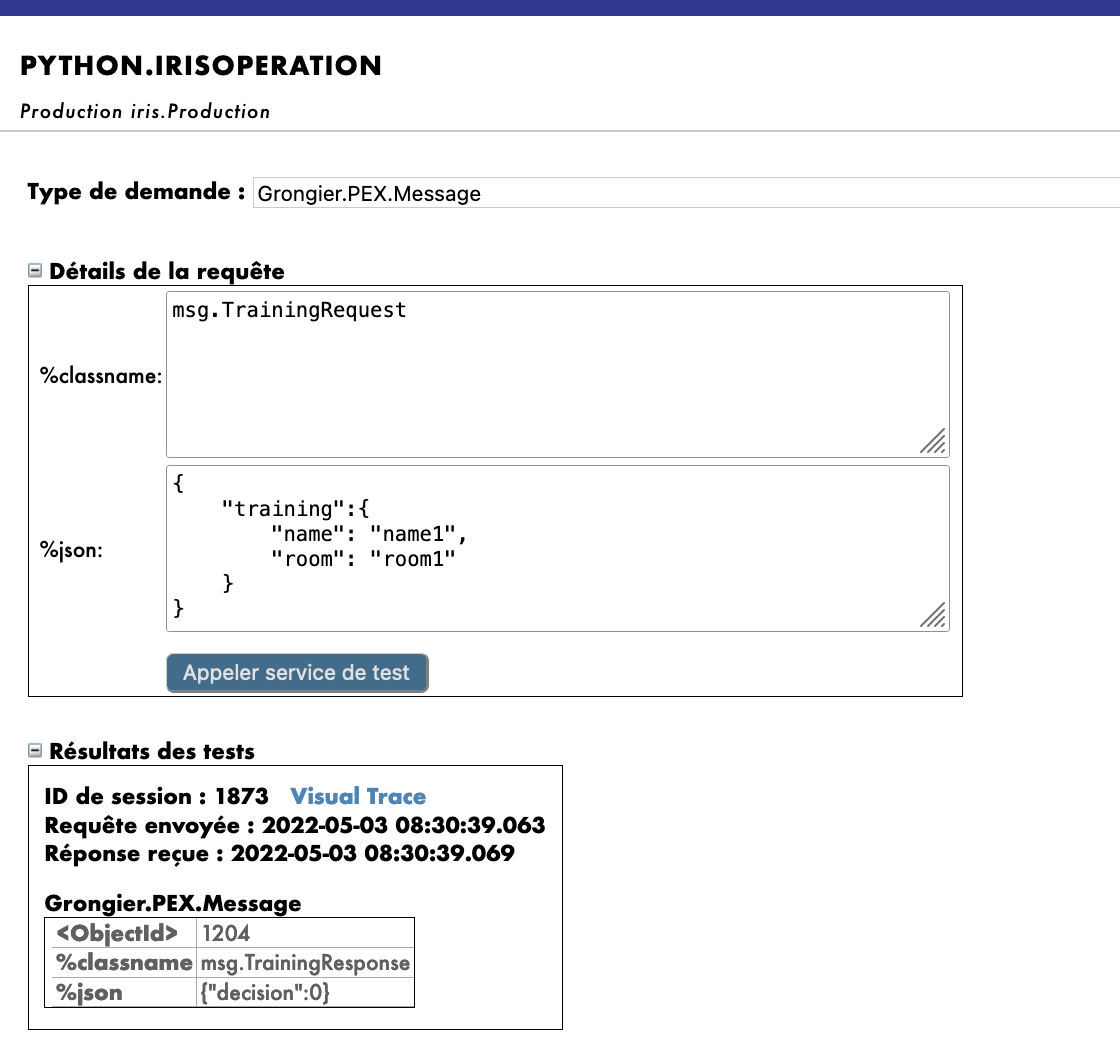
By using the test function of our management portal, we will send the operation a message of the type we declared earlier. If all goes well, showing the visual trace will enable us to see what happened between the processes, services and operations.
Using as Request Type:
Grongier.PEX.Message in the scrolling menu.
Using as %classname:
msg.TrainingRequest
Using as %json:
{
    "training":{
        "name": "name1",
        "room": "room1"
    }
}
Then click Call test service
Here, we can see the message being sent to the operation by the process, and the operation sending back a response (It must say no response since in the code used return None, we will see later how to return messages).
You should get a result like this :
Testing on FileOperation
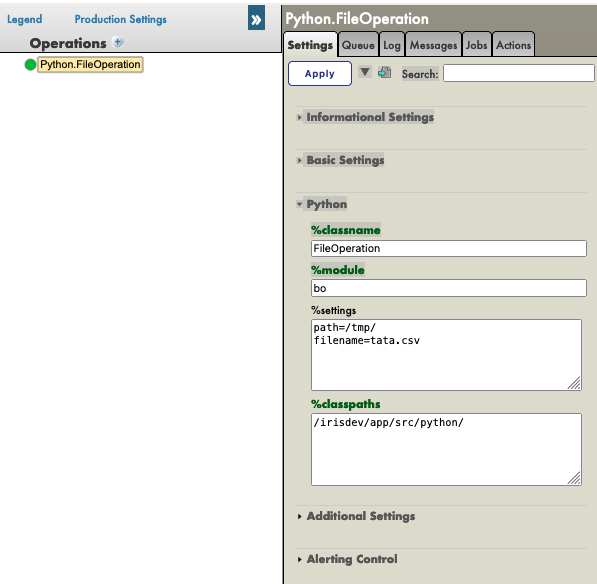
For FileOperation it is to be noted that you can fill the path in the %settings available on the Management Portal as follow ( and you can add in the settings the filename if you have followed the filename note from 7.3. ) using:
path=/tmp/
or this:
path=/tmp/
filename=tata.csv
You should get a result like this:
Again, by selecting the Python.FileOperationoperation and going in the [Actions] tabs in the right sidebar menu, we should be able to test the operation
(if it doesn't work, activate testing and check if the production is started).
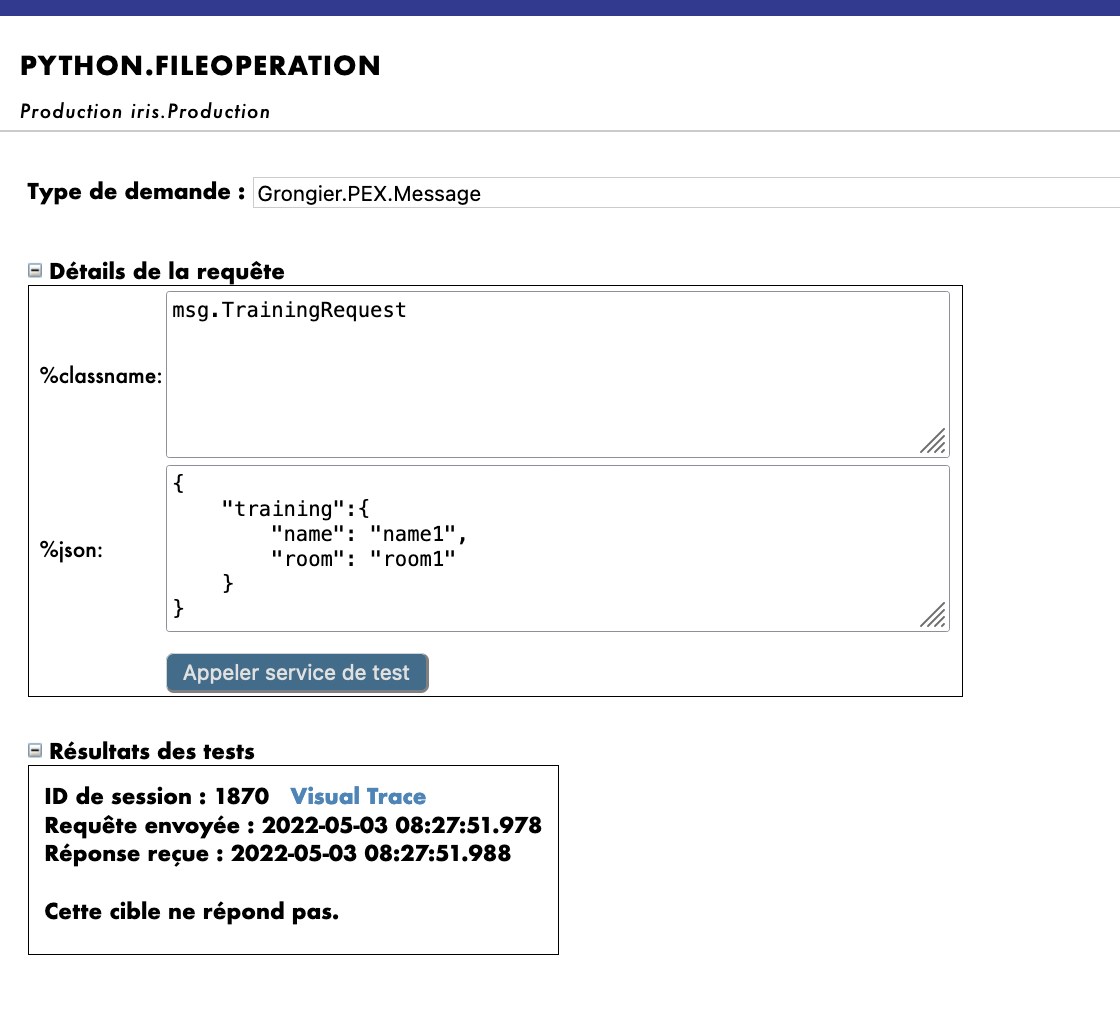
Using as Request Type:
Grongier.PEX.Message in the scrolling menu.
Using as %classname:
msg.TrainingRequest
Using as %json:
{
    "training":{
        "name": "name1",
        "room": "room1"
    }
}
Then click Call test service
You should get a result like this :
In order to see if our operations worked it is needed for us to acces the toto.csv (or tata.csv if you have followed the filename note from 7.3.) file and the Iris DataBase to see the changes.
It is needed to be inside the container for the next step, if 5.2. and 5.3 were followed it should be good.
To access the toto.csv you will need to open a terminal then type:
bash
cd /tmp
cat toto.csv
or use "cat tata.csv" if needed.
IMPORTANT: If the file doesn't exist you may not have restarted the operation on the management portal therefore nothing happened !
To do that, double click on the operation and select restart ( or deactivate then double click again and activate)
You may need to test again
To access the Iris DataBase you will need to access the management portal and seek [System Explorer] then [SQL] then [Go].
Now you can enter in the [Execute Query] :
SELECT * FROM iris.training
8. Business Processes
Business Processes (BP) are the business logic of our production. They are used to process requests or relay those requests to other components of the production.
BP also have an on_request function that will be called everytime this instance receive a request from any source, this will allow us to receive information and process it in anyway and disptach it to the right BO.
We will create those process in local in VSCode, that is, in the src/python/bp.py file.
Saving this file will compile them in IRIS.
8.1. Simple BP
We now have to create a Business Process to process the information coming from our future services and dispatch it accordingly. We are going to create a simple BP that will call our operations.
Since our BP will only redirect information we will call it Router and it will be in the file src/python/bp.py like this,
for the imports:
from grongier.pex import BusinessProcess

from msg import FormationRequest, TrainingRequest
from obj import Training
for the code:
class Router(BusinessProcess):

    def on_request(self, request):
        """
        It receives a request, checks if it is a formation request, and if it
        is, it sends a TrainingRequest request to FileOperation and to IrisOperation

        :param request: The request object that was received
        :return: None
        """
        if isinstance(request,FormationRequest):

            msg = TrainingRequest()
            msg.training = Training()
            msg.training.name = request.formation.nom
            msg.training.room = request.formation.salle

            self.send_request_sync('Python.FileOperation',msg)
            self.send_request_sync('Python.IrisOperation',msg)
        return None
The Router will receive a request of the type FormationRequest and will create and send a message of the type TrainingRequest to the IrisOperation and the FileOperation operations.
If the message/request is not an instance of the type we are looking for, we will just do nothing and not dispatch it.
Those components were already registered to the production in advance.
For information, the steps to register your components are:
Following 5.4. and using:
register_component("bp","Router","/irisdev/app/src/python/",1,"Python.Router")
8.2. Adding the process to the production
Our process is already on our production since we have done it for you in advance.
However if you create a new process from scratch you will need to add it manually.
If needed for later of just for information, here are the steps to register a process.
For this, we use the Management Portal. By pressing the [+] sign next to [Process], we have access to the [Business Process Wizard].
There, we chose the process class we just created in the scrolling menu.
8.3. Testing
Double clicking on the process will enable us to activate it or restart it to save our changes.
IMPORTANT: Note that this step of deactivating it and reactivating it is crucial to save our changes.
IMPORTANT: After that, by selecting the process and going in the [Actions] tabs in the right sidebar menu, we should be able to test the process
(if it doesn't work, activate testing and check if the production is started and reload the process by double clicking it and clicking restart).
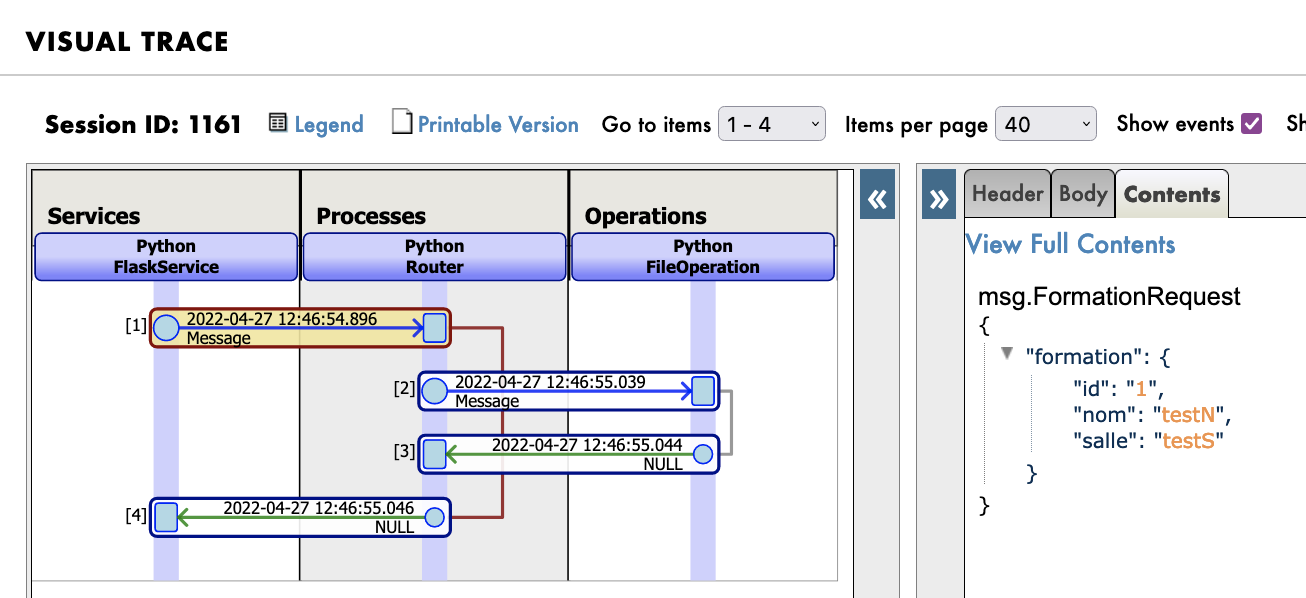
By doing so, we will send the process a message of the type msg.FormationRequest.
Using as Request Type:
Grongier.PEX.Message in the scrolling menu.
Using as %classname:
msg.FormationRequest
Using as %json:
{
    "formation":{
        "id_formation": 1,
        "nom": "nom1",
        "salle": "salle1"
    }
}
Then click Call test service
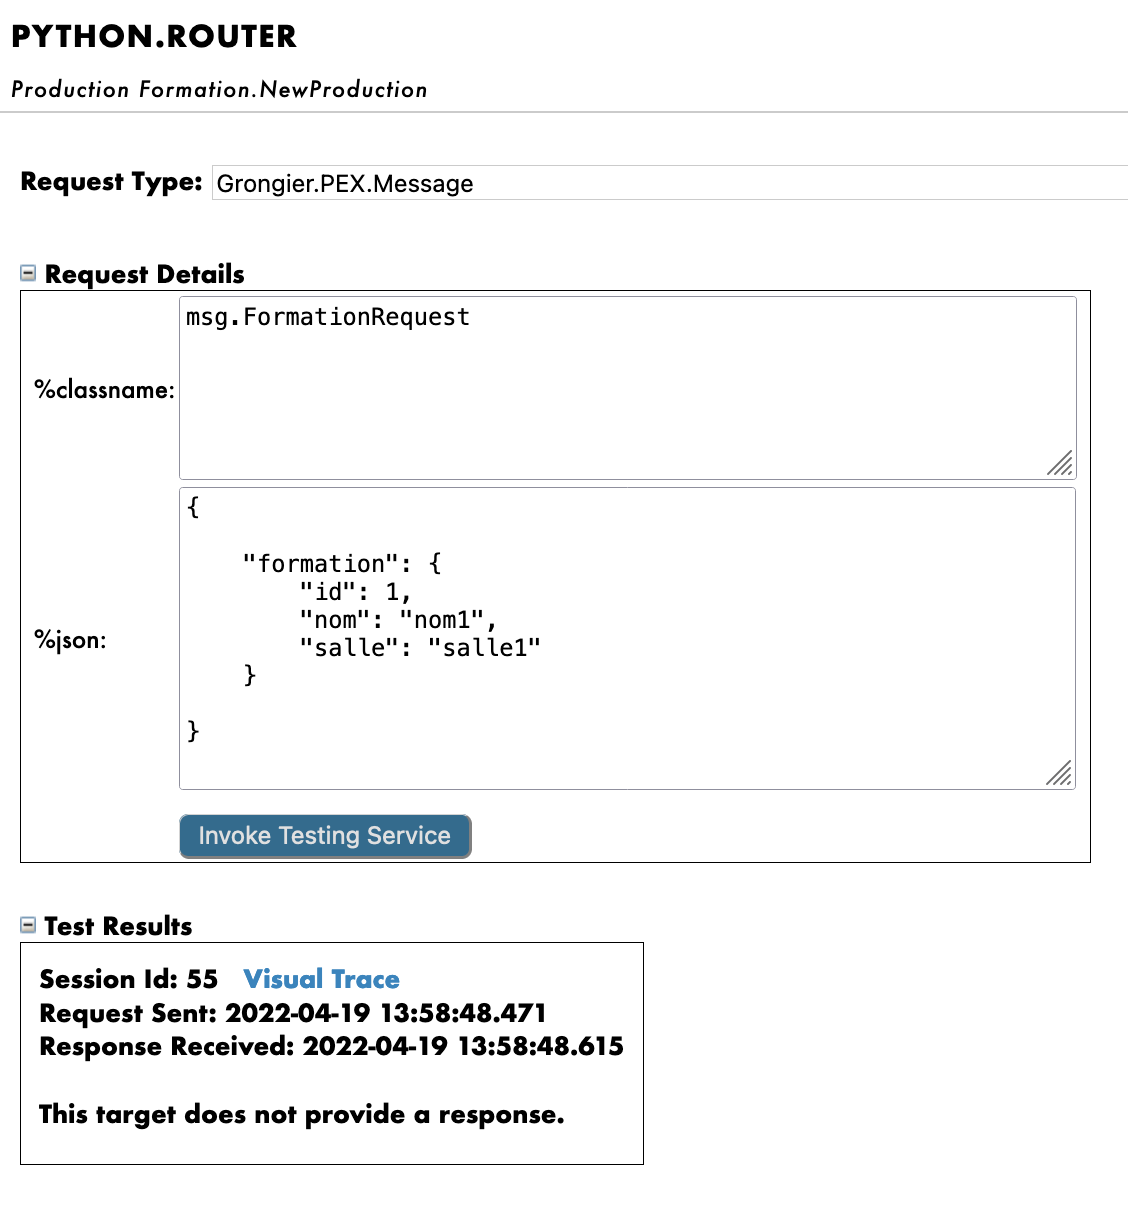
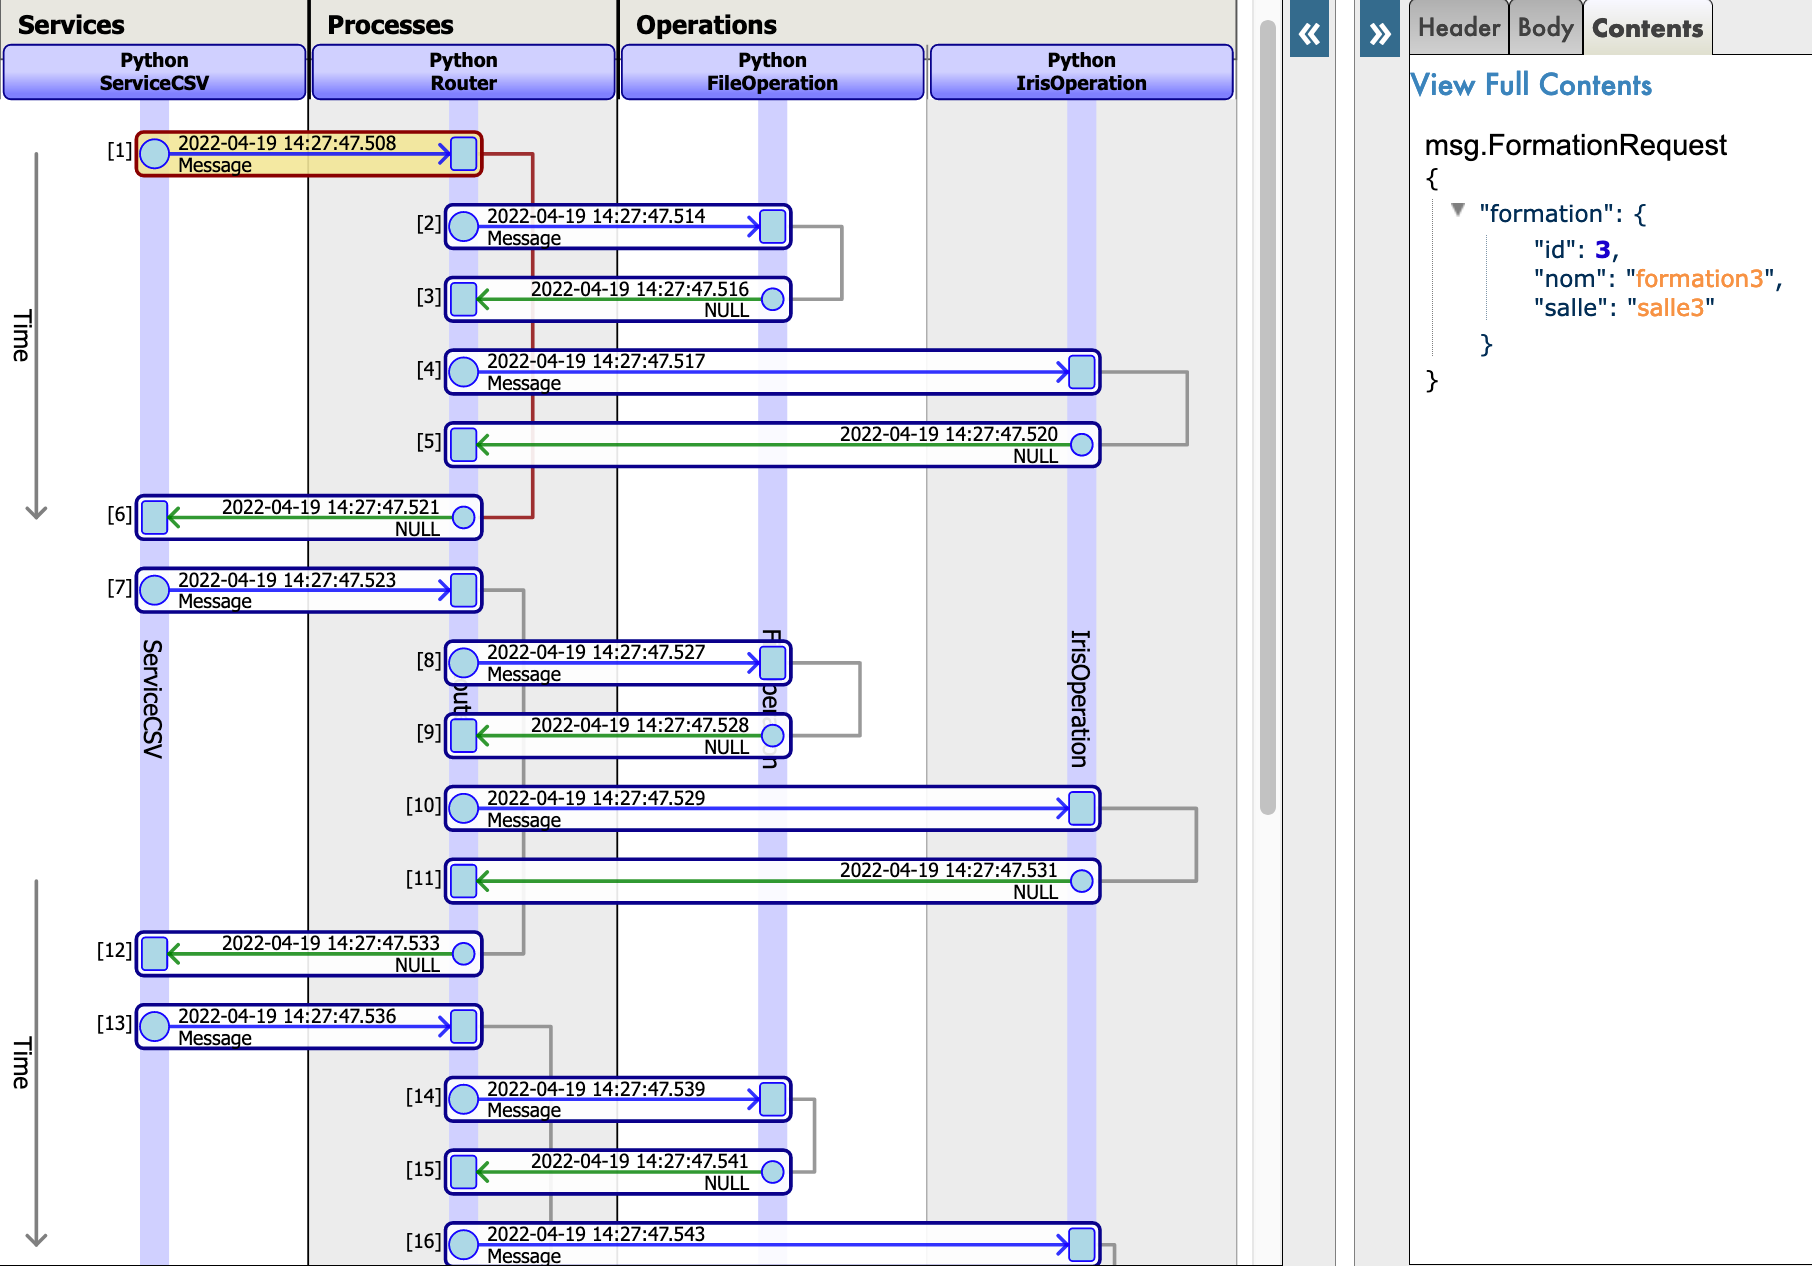
If all goes well, showing the visual trace will enable us to see what happened between the process, services and processes.
Here, we can see the messages being sent to the operations by the process, and the operations sending back a response.

9. Business Service
Business Service (BS) are the ins of our production. They are used to gather information and send them to our routers.
BS also have an on_process_input function that often gather information in our framework, it can be called by multiple ways such as a REST API or an other service, or by the service itself to execute his code again.
BS also have a get_adapter_type function that allow us to allocate an adapter to the class, for example Ens.InboundAdapter that will make it so that the service will call his own on_process_input every 5 seconds.
We will create those services in local in VSCode, that is, in the python/bs.py file.
Saving this file will compile them in IRIS.
9.1. Simple BS
We now have to create a Business Service to read a CSV and send each line as a msg.FormationRequest to the router.
Since our BS will read a csv we will call it ServiceCSV and it will be in the file src/python/bs.py like this,
for the imports:
from grongier.pex import BusinessService

from dataclass_csv import DataclassReader

from obj import Formation
from msg import FormationRequest
for the code:
class ServiceCSV(BusinessService):
    """
    It reads a csv file every 5 seconds, and sends each line as a message to the Python Router process.
    """

    def get_adapter_type():
        """
        Name of the registred adaptor
        """
        return "Ens.InboundAdapter"

    def on_init(self):
        """
        It changes the current path to the file to the one specified in the path attribute of the object,
        or to '/irisdev/app/misc/' if no path attribute is specified
        :return: None
        """
        if not hasattr(self,'path'):
            self.path = '/irisdev/app/misc/'
        return None

    def on_process_input(self,request):
        """
        It reads the formation.csv file, creates a FormationRequest message for each row, and sends it to
        the Python.Router process.

        :param request: the request object
        :return: None
        """
        filename='formation.csv'
        with open(self.path+filename,encoding="utf-8") as formation_csv:
            reader = DataclassReader(formation_csv, Formation,delimiter=";")
            for row in reader:
                msg = FormationRequest()
                msg.formation = row
                self.send_request_sync('Python.Router',msg)
        return None
It is advised to keep the FlaskService as it is and juste fill the ServiceCSV.
As we can see, the ServiceCSV gets an InboundAdapter that will allow it to function on it's own and to call on_process_input every 5 seconds ( parameter that can be changed in the basic settings of the settings of the service on the Management Portal)
Every 5 seconds, the service will open the formation.csv to read each line and create a msg.FormationRequest that will be send to the Python.Router.
Those components were already registered to the production in advance.
For information, the steps to register your components are:
Following 5.4. and using:
register_component("bs","ServiceCSV","/irisdev/app/src/python/",1,"Python.ServiceCSV")
9.2. Adding the service to the production
Our service is already on our production since we have done it for you in advance.
However if you create a new service from scratch you will need to add it manually.
If needed for later of just for information, here are the steps to register a service.
For this, we use the Management Portal. By pressing the [+] sign next to [service], we have access to the [Business Services Wizard].
There, we chose the service class we just created in the scrolling menu.
9.3. Testing
Double clicking on the service will enable us to activate it or restart it to save our changes.
IMPORTANT: Note that this step of deactivating it and reactivating it is crucial to save our changes.
As explained before, nothing more has to be done here since the service will start on his own every 5 seconds.
If all goes well, showing the visual trace will enable us to see what happened between the process, services and processes.
Here, we can see the messages being sent to the process by the service, the messages to the operations by the process, and the operations sending back a response.
10. Getting access to an extern database using a db-api
In this section, we will create an operation to save our objects in an extern database. We will be using the db-api, as well as the other docker container that we set up, with postgre on it.
10.1. Prerequisites
In order to use postgre we need psycopg2 which is a python module allowing us to connect to the postegre database with a simple command.
It was already done automatically but for informations,the steps are : access the inside of the docker container to install psycopg2 using pip3.
Once you are in the terminal enter :
pip3 install psycopg2-binary
Or add your module in the requirements.txt and rebuild the container.
10.2. Creating our new operation
Our new operation needs to be added after the two other one in the file src/python/bo.py.
Our new operation and the imports are as follows,
for the imports:
import psycopg2
for the code:
class PostgresOperation(BusinessOperation):
    """
    It is an operation that write trainings in the Postgre database
    """

    def on_init(self):
        """
        it is a function that connects to the Postgre database and init a connection object
        :return: None
        """
        self.conn = psycopg2.connect(
        host="db",
        database="DemoData",
        user="DemoData",
        password="DemoData",
        port="5432")
        self.conn.autocommit = True

        return None

    def on_tear_down(self):
        """
        It closes the connection to the database
        :return: None
        """
        self.conn.close()
        return None

    def insert_training(self,request:TrainingRequest):
        """
        It inserts a training in the Postgre database

        :param request: The request object that will be passed to the function
        :type request: TrainingRequest
        :return: None
        """
        cursor = self.conn.cursor()
        sql = "INSERT INTO public.formation ( name,room ) VALUES ( %s , %s )"
        cursor.execute(sql,(request.training.name,request.training.room))
        return None

    def on_message(self,request):
        return None
This operation is similar to the first one we created. When it will receive a message of the type msg.TrainingRequest, it will use the psycopg module to execute SQL requests. Those requests will be sent to our postgre database.
As you can see here the connection is written directly into the code, to improve our code we could do as before for the other operations and make, host, database and the other connection information, variables with a base value of db and DemoData etc that can be change directly onto the management portal.
To do this we can change our on_init function by :
    def on_init(self):
        if not hasattr(self,'host'):
          self.host = 'db'
        if not hasattr(self,'database'):
          self.database = 'DemoData'
        if not hasattr(self,'user'):
          self.user = 'DemoData'
        if not hasattr(self,'password'):
          self.password = 'DemoData'
        if not hasattr(self,'port'):
          self.port = '5432'

        self.conn = psycopg2.connect(
        host=self.host,
        database=self.database,
        user=self.user,
        password=self.password,
        port=self.port)

        self.conn.autocommit = True

        return None
Those components were already registered to the production in advance.
For information, the steps to register your components are:
Following 5.4. and using:
register_component("bo","PostgresOperation","/irisdev/app/src/python/",1,"Python.PostgresOperation")
10.3. Configuring the production
Our operation is already on our production since we have done it for you in advance.
However if you create a new operation from scratch you will need to add it manually.
If needed for later of just for information, here are the steps to register an operation.
For this, we use the Management Portal. By pressing the [+] sign next to [Operations], we have access to the [Business Operation Wizard].
There, we chose the operation classes we just created in the scrolling menu.
Afterward, if you wish to change the connection, you can simply add in the %settings in [Python] in the [parameter] window of the operation the parameter you wish to change.
See the second image of 7.5. Testing for more details.
10.4. Testing
Double clicking on the operation will enable us to activate it or restart it to save our changes.
IMPORTANT: Note that this step of deactivating it and reactivating it is crucial to save our changes.
IMPORTANT: After that, by selecting the operation and going in the [Actions] tabs in the right sidebar menu, we should be able to test the operation
(if it doesn't work, activate testing and check if the production is started and reload the operation by double clicking it and clicking restart).
For PostGresOperation it is to be noted that the table was created automatically.
By doing so, we will send the operation a message of the type msg.TrainingRequest.
Using as Request Type:
Grongier.PEX.Message in the scrolling menu.
Using as %classname:
msg.TrainingRequest
Using as %json:
{
    "training":{
        "name": "name1",
        "room": "room1"
    }
}
Then click Call test service
Like this:
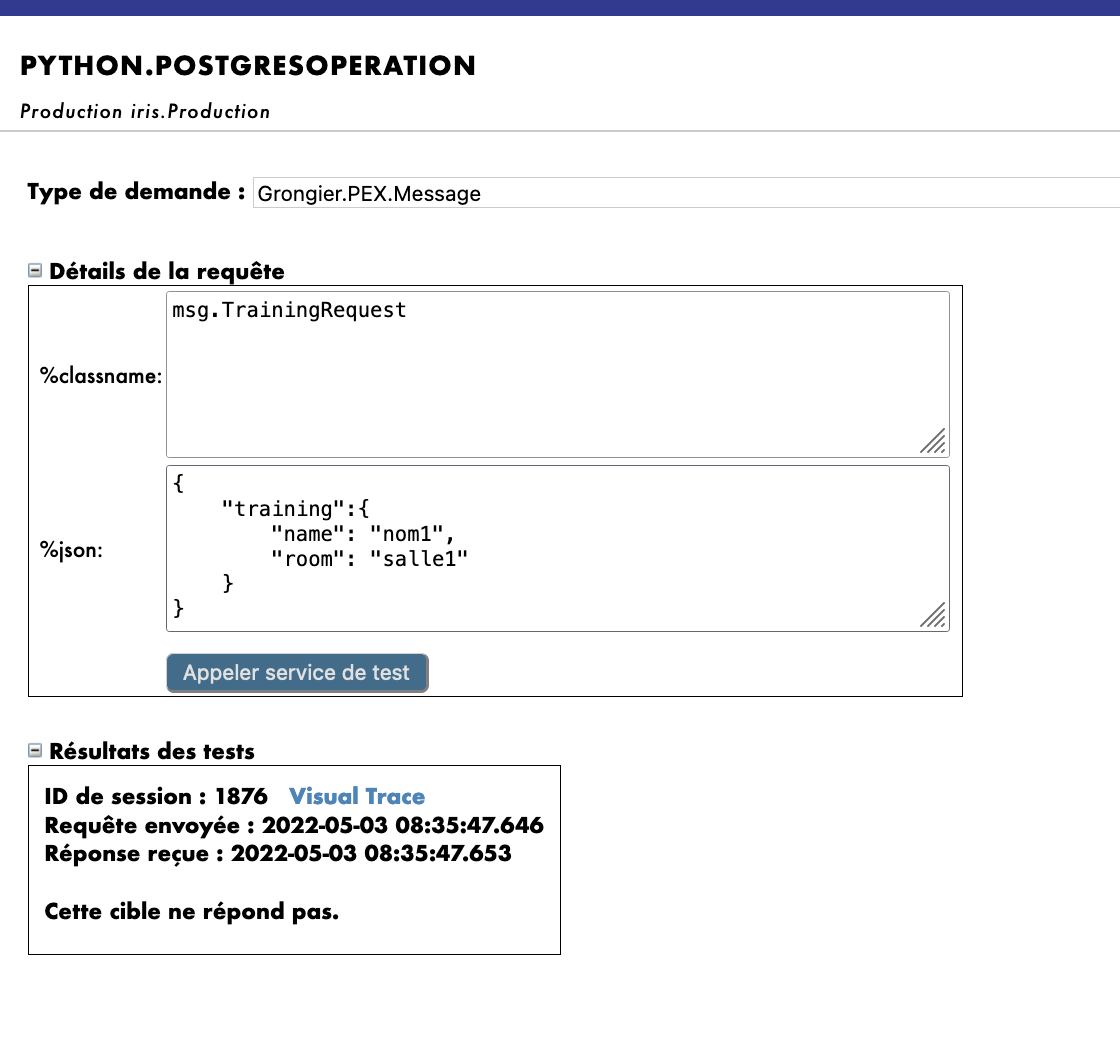
When testing the visual trace should show a success.
We have successfully connected with an extern database.
If you have followed this formation so far you should have understand that for now, no processes nor services calls our new PostgresOperation meaning that without using the test function of our management portal, it will not be called.
10.5. Exercise
As an exercise, it could be interesting to modify bo.IrisOperation so that it returns a boolean that will tell the bp.Router to call bo.PostgresOperation depending on the value of that boolean.
That way, our new operation will be called.
Hint: This can be done by changing the type of reponse bo.IrisOperation returns and by adding to that new type of message/response a new boolean property and using the if activity in our bp.Router.
10.6. Solution
First, we need to have a response from our bo.IrisOperation . We are going to create a new message after the other two, in the src/python/msg.py like,
for the code:
@dataclass
class TrainingResponse(Message):
    decision:int = None
Then, we change the response of bo.IrisOperation by that response, and set the value of its decision to 1 or 0 randomly.
In the src/python/bo.pyyou need to add two imports and change the IrisOperation class,
for the imports:
import random
from msg import TrainingResponse
for the code:
class IrisOperation(BusinessOperation):
    """
    It is an operation that write trainings in the iris database
    """

    def insert_training(self, request:TrainingRequest):
        """
        It takes a `TrainingRequest` object, inserts a new row into the `iris.training` table, and returns a
        `TrainingResponse` object

        :param request: The request object that will be passed to the function
        :type request: TrainingRequest
        :return: A TrainingResponse message
        """
        resp = TrainingResponse()
        resp.decision = round(random.random())
        sql = """
        INSERT INTO iris.training
        ( name, room )
        VALUES( ?, ? )
        """
        iris.sql.exec(sql,request.training.name,request.training.room)
        return resp

    def on_message(self, request):
        return None
We will now change our process `bp.Router` in `src/python/bp.py`, where we will make it so that if the response from the IrisOperation is 1 it will call the PostgesOperation.
Here is the new code :
class Router(BusinessProcess):

    def on_request(self, request):
        """
        It receives a request, checks if it is a formation request, and if it
        is, it sends a TrainingRequest request to FileOperation and to IrisOperation, which in turn sends it to the PostgresOperation if IrisOperation returned a 1.

        :param request: The request object that was received
        :return: None
        """
        if isinstance(request,FormationRequest):

            msg = TrainingRequest()
            msg.training = Training()
            msg.training.name = request.formation.nom
            msg.training.room = request.formation.salle

            self.send_request_sync('Python.FileOperation',msg)

            form_iris_resp = self.send_request_sync('Python.IrisOperation',msg)
            if form_iris_resp.decision == 1:
                self.send_request_sync('Python.PostgresOperation',msg)
        return None
VERY IMPORTANT : we need to make sure we use send_request_sync and not send_request_async in the call of our operations, or else the activity will set off before receiving the boolean response.
Before testing don't forget to double click on every modified service/process/operation to restart them or your changes won't be effective.
In the visual trace, after testing, we should have approximately half of objects read in the csv saved also in the remote database.
Note that to test you can just start the bs.ServiceCSV and it will automatically send request to the router that will then dispatch properly the requests.
Also note that you must double click on a service/operation/process and press reload or restart if you want your saved changes on VSCode to apply.
11. REST service
In this part, we will create and use a REST Service.
11.1. Prerequisites
In order to use Flask we will need to install flask which is a python module allowing us to easily create a REST service.
It was already done automatically but for information the steps are : access the inside of the docker container to install flask on iris python.
Once you are in the terminal enter :
pip3 install flask
Or add your module in the requirements.txt and rebuild the container.
11.2. Creating the service
To create a REST service, we will need a service that will link our API to our production, for this we create a new simple service in src/python/bs.py just after the ServiceCSV class.
class FlaskService(BusinessService):

    def on_init(self):
        """
        It changes the current target of our API to the one specified in the target attribute of the object,
        or to 'Python.Router' if no target attribute is specified
        :return: None
        """
        if not hasattr(self,'target'):
            self.target = "Python.Router"
        return None

    def on_process_input(self,request):
        """
        It is called to transmit information from the API directly to the Python.Router process.
        :return: None
        """
        return self.send_request_sync(self.target,request)
on_process_input this service will simply transfer the request to the Router.
Those components were already registered to the production in advance.
For information, the steps to register your components are:
Following 5.4. and using:
register_component("bs","FlaskService","/irisdev/app/src/python/",1,"Python.FlaskService")
To create a REST service, we will need Flask to create an API that will manage the get and post function:
We need to create a new file as python/app.py:
from flask import Flask, jsonify, request, make_response
from grongier.pex import Director
import iris

from obj import Formation
from msg import FormationRequest


app = Flask(__name__)

# GET Infos
@app.route("/", methods=["GET"])
def get_info():
    info = {'version':'1.0.6'}
    return jsonify(info)

# GET all the formations
@app.route("/training/", methods=["GET"])
def get_all_training():
    payload = {}
    return jsonify(payload)

# POST a formation
@app.route("/training/", methods=["POST"])
def post_formation():
    payload = {}

    formation = Formation()
    formation.nom = request.get_json()['nom']
    formation.salle = request.get_json()['salle']

    msg = FormationRequest(formation=formation)

    service = Director.CreateBusinessService("Python.FlaskService")
    response = service.dispatchProcessInput(msg)

    return jsonify(payload)

# GET formation with id
@app.route("/training/<int:id>", methods=["GET"])
def get_formation(id):
    payload = {}
    return jsonify(payload)

# PUT to update formation with id
@app.route("/training/<int:id>", methods=["PUT"])
def update_person(id):
    payload = {}
    return jsonify(payload)

# DELETE formation with id
@app.route("/training/<int:id>", methods=["DELETE"])
def delete_person(id):
    payload = {}
    return jsonify(payload)

if __name__ == '__main__':
    app.run('0.0.0.0', port = "8081")
Note that the Flask API will use a Director to create an instance of our FlaskService from earlier and then send the right request.
We made the POST formation functional in the code above, if you wish, you can make the other functions in order to get/post the right information using all the things we have learned so far, however note that no solution will be provided for it.
11.3. Testing
We now need to start our flask app using Python Flask:

Finally, we can test our service with any kind of REST client after having reloaded the Router service.
Using any REST service (as RESTer for Mozilla), it is needed to fill the headers like this:
Content-Type : application/json
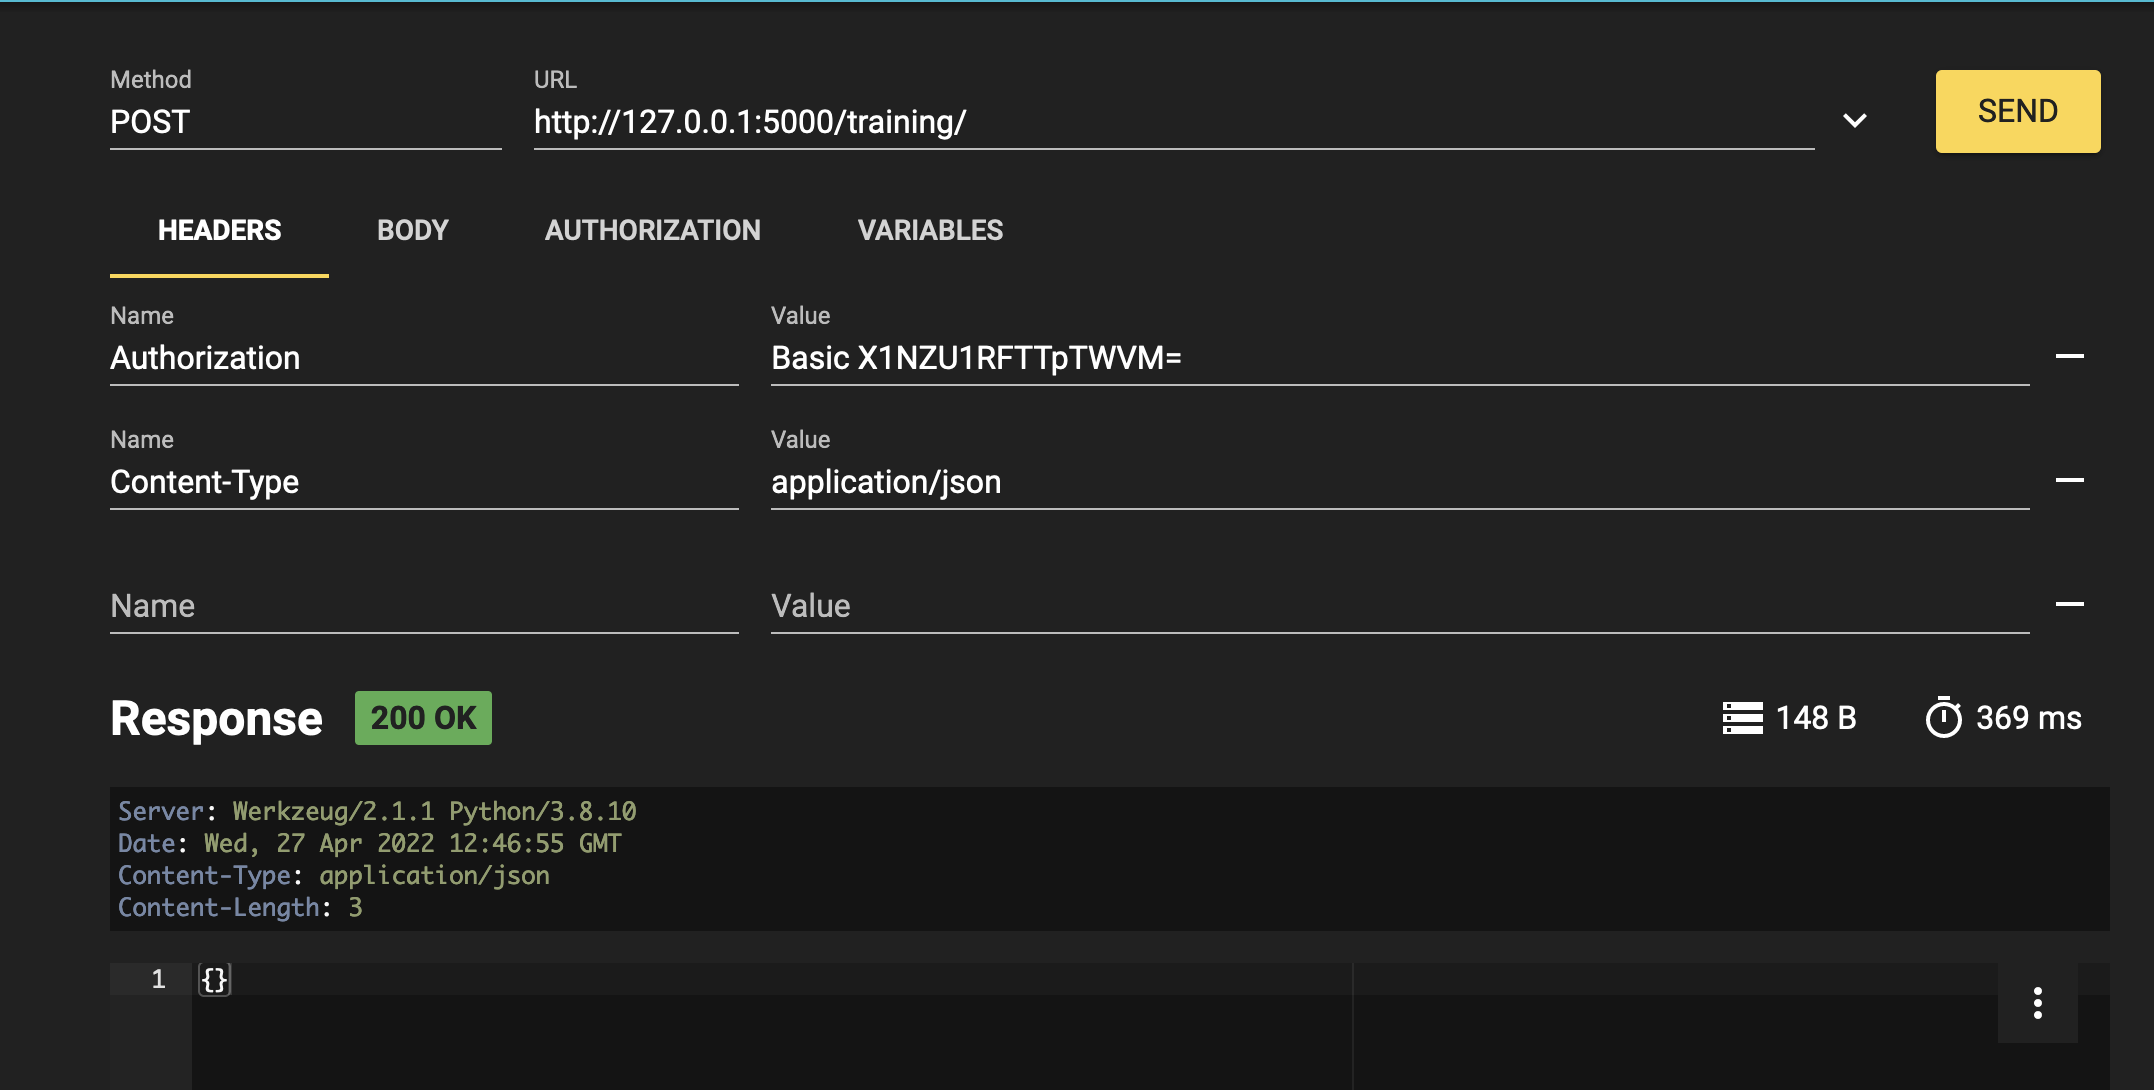
The body like this:
{
    "nom":"testN",
    "salle":"testS"
}
The authorization like this:
Username:
SuperUser
Password:
SYS
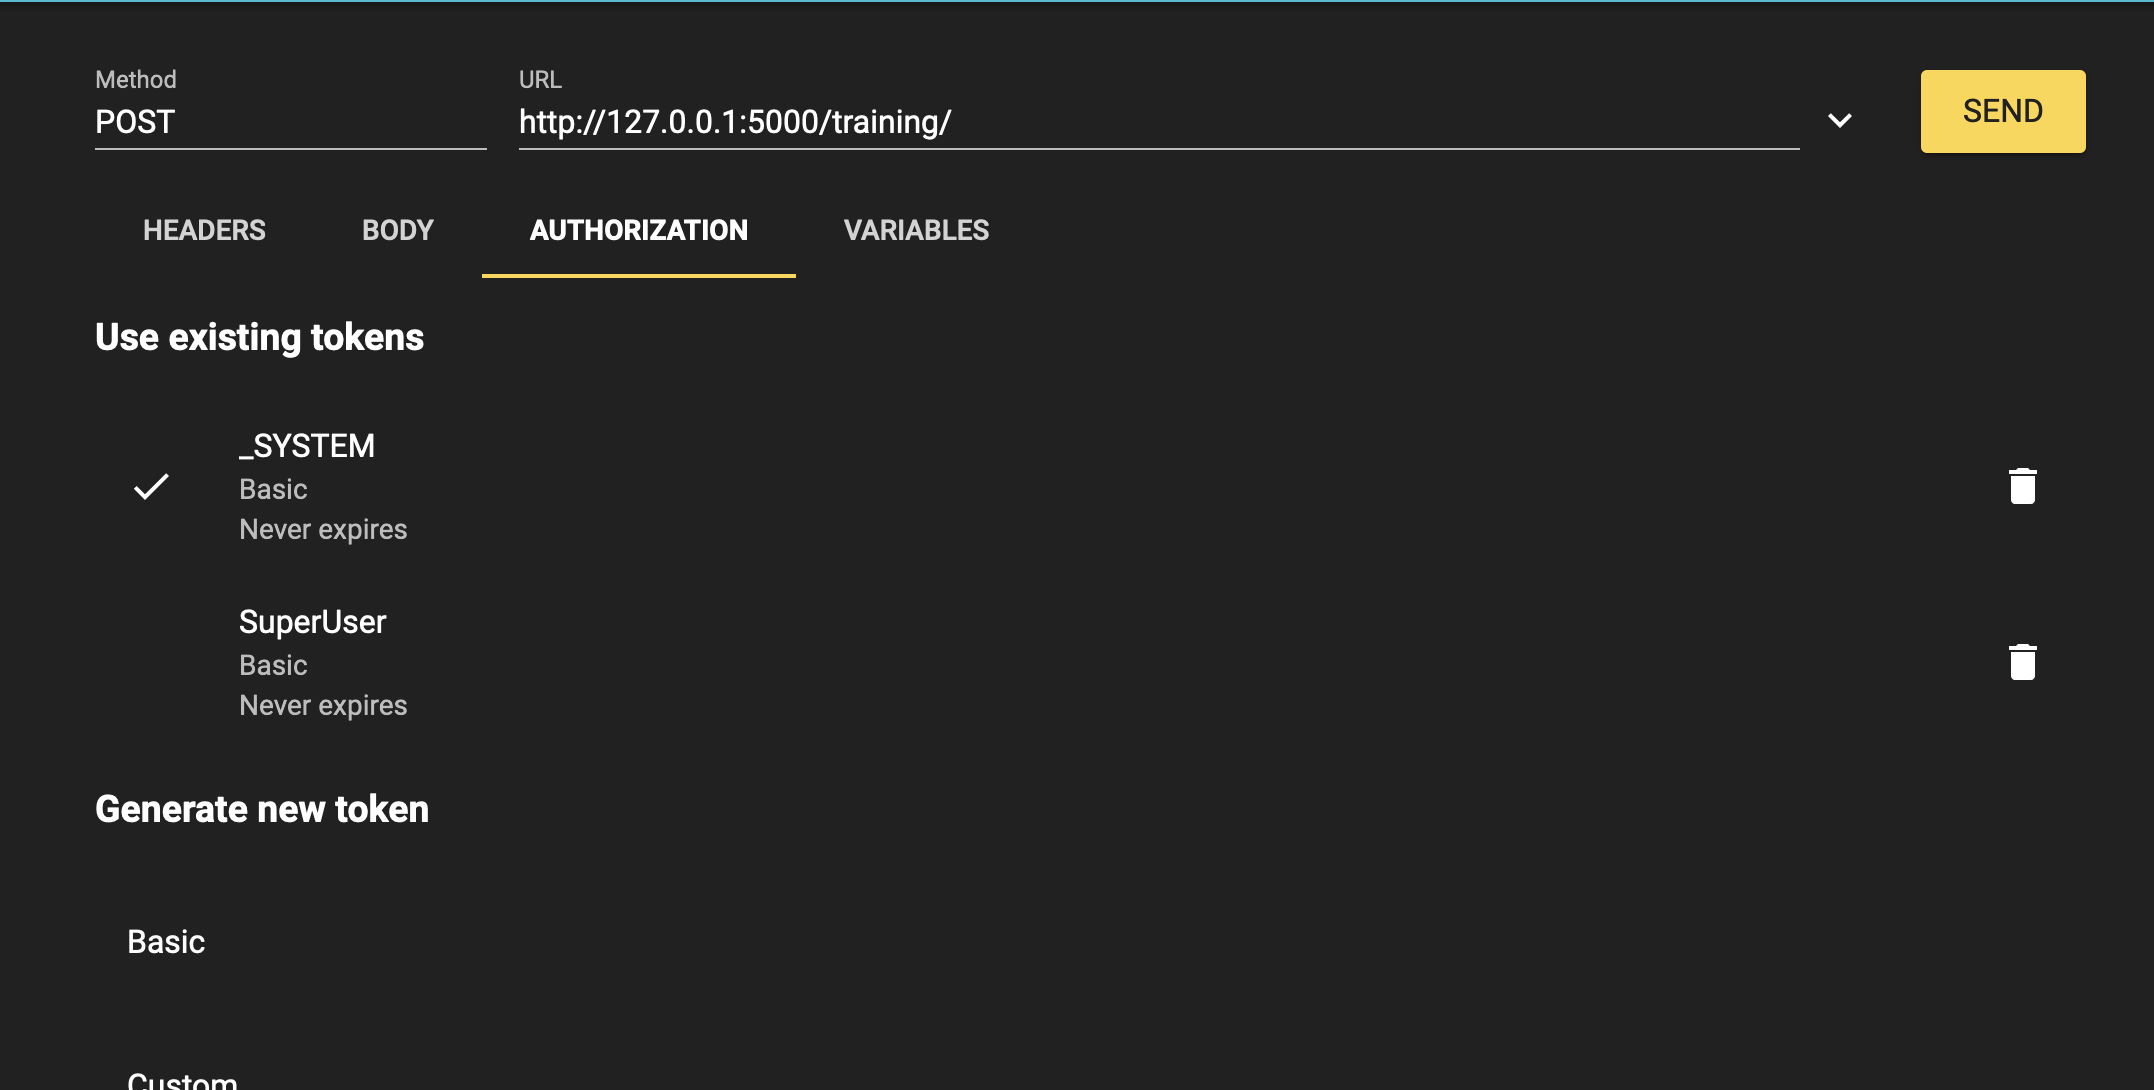
Finally, the results should be something like this:
12. Global exercise
Now that we are familliar with all the important concepts of the Iris DataPlatform and its Framework it is time to try ourselves on a global exercise that will make us create a new BS and BP, modify greatly our BO and also explore new concept in Python.
12.1. Instructions
Using this endpoint : https://lucasenard.github.io/Data/patients.json we have to automatically get information about patients and their number of steps.
Then, we must calculate the average number of steps per patient before writing it down on a csv file locally.
If needed, it is advised to seek guidance by rereading through the whole formation or the parts needed or by seeking help using the hints below.
Don't forget to register your components to acces them on the management portal.
When everything is done and tested, or if the hints aren't enough to complete the exercise, the solution step-by-step is present to walk us through the whole procedure.
12.2. Hints
In this part we can find hints to do the exercise.
The more you read through a part the more hints you get, it is advised to read only what you need and not all the part every time.
For example you can read How to gather information and How to gather information with request in the bs part and not read the rest.
12.2.1. bs
12.2.1.1. Get information
To get the information from the endpoint it is advised to search for the requests module of python and use json and json.dumps to make it into str to send it in the bp
12.2.1.2. Get information with requests
An online python website or any local python file can be used to use requests and print the output and it's type to go further and understand what we get.
12.2.1.3. Get information with requests and using it
It is advised to create a new message type and object type to hold information and send it to a process to calculate the average.
12.2.1.4. Get information solution
Solution on how to use request to get data and in our case, partially what to do with it.
r = requests.get(https://lucasenard.github.io/Data/patients.json)
data = r.json()
for key,val in data.items():
    ...
Again, in an online python website or any local python file, it is possible to print key, val and their type to understand what can be done with them.
It is advised to store val usign json.dumps(val) and then, after the SendRequest,when you are in the process, use json.loads(request.patient.infos)to get it ( if you have stored the informations of val into patient.infos )
12.2.2. bp
12.2.2.1. Average number of steps and dict
statistics is a native library that can be used to do math.
12.2.2.2. Average number of steps and dict : hint
The native map function in python can allow you to seperate information within a list or a dict for example.
Don't forget to transform the result of map back to a list using the list native function.
12.2.2.3. Average number of steps and dict : with map
Using an online python website or any local python file it is possible to calculate average of a list of lists or a list of dict doing :
l1 = [[0,5],[8,9],[5,10],[3,25]]
l2 = [["info",12],["bidule",9],[3,3],["patient1",90]]
l3 = [{"info1":"7","info2":0},{"info1":"15","info2":0},{"info1":"27","info2":0},{"info1":"7","info2":0}]

#avg of the first columns of the first list (0/8/5/3)
avg_l1_0 = statistics.mean(list(map(lambda x: x[0]),l1))

#avg of the second columns of the first list (5/9/10/25)
avg_l1_1 = statistics.mean(list(map(lambda x: x[1]),l1))

#avg of 12/9/3/90
avg_l2_1 = statistics.mean(list(map(lambda x: x[1]),l2))

#avg of 7/15/27/7
avg_l3_info1 = statistics.mean(list(map(lambda x: int(x["info1"])),l3))

print(avg_l1_0)
print(avg_l1_1)
print(avg_l2_1)
print(avg_l3_info1)
12.2.2.4. Average number of steps and dict : the answer
If your request hold a patient which as an atribute infos which is a json.dumps of a dict of date and number of steps, you can calculate his avergae number of steps using :
statistics.mean(list(map(lambda x: int(x['steps']),json.loads(request.patient.infos))))
12.2.3. bo
It is advised to use something really similar to bo.FileOperation.WriteFormation
Something like bo.FileOperation.WritePatient
12.3. Solutions
12.3.1. obj & msg
In our obj.py we can add :
@dataclass
class Patient:
    name:str = None
    avg:int = None
    infos:str = None
In our msg.py we can add,
for the imports:
from obj import Formation,Training,Patient
for the code:
@dataclass
class PatientRequest(Message):
    patient:Patient = None
We will hold the information in a single obj and we will put the str of the dict out of the get request directly into the infos attribute.
The average will be calculated in the Process.
12.3.2. bs
In our bs.py we can add,
for the imports:
import requests
for the code:
class PatientService(BusinessService):

    def get_adapter_type():
        """
        Name of the registred adaptor
        """
        return "Ens.InboundAdapter"

    def on_init(self):
        """
        It changes the current target of our API to the one specified in the target attribute of the object,
        or to 'Python.PatientProcess' if no target attribute is specified.
        It changes the current api_url of our API to the one specified in the target attribute of the object,
        or to 'https://lucasenard.github.io/Data/patients.json' if no api_url attribute is specified.
        :return: None
        """
        if not hasattr(self,'target'):
            self.target = 'Python.PatientProcess'
        if not hasattr(self,'api_url'):
            self.api_url = "https://lucasenard.github.io/Data/patients.json"
        return None

    def on_process_input(self,request):
        """
        It makes a request to the API, and for each patient it finds, it creates a Patient object and sends
        it to the target

        :param request: The request object that was sent to the service
        :return: None
        """
        req = requests.get(self.api_url)
        if req.status_code == 200:
            dat = req.json()
            for key,val in dat.items():
                patient = Patient()
                patient.name = key
                patient.infos = json.dumps(val)
                msg = PatientRequest()
                msg.patient = patient
                self.send_request_sync(self.target,msg)
        return None
It is advised to make the target and the api url variables ( see on_init ).
After the requests.getputting the information in the req variable, it is needed to extract the information in json, which will make dat a dict.
Using dat.items it is possible to iterate on the patient and its info directly.
We then create our object patient and put val into a string into the patient.infos variable using json.dumps that transform any json data to string.
Then, we create the request msg which is a msg.PatientRequest to call our process.
Don't forget to register your component :
Following 5.4. and using:
register_component("bs","PatientService","/irisdev/app/src/python/",1,"Python.PatientService")
12.3.3. bp
In our bp.py we can add,
for the imports:
import statistic
for the code:
class PatientProcess(BusinessProcess):

    def on_request(self, request):
        """
        It takes a request, checks if it's a PatientRequest, and if it is, it calculates the average number
        of steps for the patient and sends the request to the Python.FileOperation service.

        :param request: The request object that was sent to the service
        :return: None
        """
        if isinstance(request,PatientRequest):
            request.patient.avg = statistics.mean(list(map(lambda x: int(x['steps']),json.loads(request.patient.infos))))
            self.send_request_sync('Python.FileOperation',request)

        return None
We take the request we just got, and if it is a PatientRequest we calculate the mean of the steps and we send it to our FileOperation.
This fills the avg variable of our patient with the right information ( see the hint on the bp for more information )
Don't forget to register your component :
Following 5.4. and using:
register_component("bp","PatientProcess","/irisdev/app/src/python/",1,"Python.PatientProcess")
12.3.4. bo
In our bo.py we can add, inside the class FileOperation :
    def write_patient(self, request:PatientRequest):
        """
        It writes the name and average number of steps of a patient in a file

        :param request: The request message
        :type request: PatientRequest
        :return: None
        """
        name = ""
        avg = 0
        if request.patient is not None:
            name = request.patient.name
            avg = request.patient.avg
        line = name + " avg nb steps : " + str(avg) +"\n"
        filename = 'Patients.csv'
        self.put_line(filename, line)
        return None
As explained before, it is not needed to register FileOperation again since we did it already before.
12.4. Testing
See 7.4. to add our operation.
See 9.2. to add our service.
Now we can head towards the management portal and do as before.
Remember that our new service will execute automatically since we added an InboundAdapter to it.
The same way we checked for the toto.csv we can check the Patients.csv
12.5. Conclusion of the global exercise
Through this exercise it is possible to learn and understand the creation of messages, services, processes and operation.
We discovered how to fecth information in Python and how to execute simple task on our data.
In the github, a solution branch is available with everything already completed.
13. Conclusion
Through this formation, we have created a fully fonctional production using only IrisPython that is able to read lines from a csv file and save the read data into a local txt, the IRIS database and an extern database using a db-api.
We also added a REST service in order to use the POST verb to save new objects.
We have discovered the main elements of InterSystems' interoperability Framework.
We have done so using docker, vscode and InterSystems' IRIS Management Portal.


.png)