Hi, Community!
Want to dive deeper into the concepts of vector searches and embeddings? Learn from an InterSystems expert:
Artificial Intelligence (AI) is the simulation of human intelligence processes by machines, especially computer systems. These processes include learning (the acquisition of information and rules for using the information), reasoning (using rules to reach approximate or definite conclusions) and self-correction.
Hi, Community!
Want to dive deeper into the concepts of vector searches and embeddings? Learn from an InterSystems expert:
Hi, Community!
What components and libraries can you add to your retrieval-augmented generation (RAG) applications? Find out in this video:
Identifying Useful Components for Your Generative AI Application
Hi Community,
Play the new video on InterSystems Developers YouTube:
⏯ InterSystems IRIS Vector Search and the Python Ecosystem @ Global Summit 2024
In today's data landscape, businesses encounter a number of different challenges. One of them is to do analytics on top of unified and harmonized data layer available to all the consumers. A layer that can deliver the same answers to the same questions irrelative to the dialect or tool being used. InterSystems IRIS Data Platform answers that with and add-on of Adaptive Analytics that can deliver this unified semantic layer. There are a lot of articles in DevCommunity about using it via BI tools. This article will cover the part of how to consume it with AI and also how to put some insights back. Let's go step by step...
You can easily find some definition in developer community website In a few words, it can deliver data in structured and harmonized form to various tools of your choice for further consumption and analysis. It delivers the same data structures to various BI tools. But... it can also deliver same data structures to your AI/ML tools!
Adaptive Analytics has and additional component called AI-Link that builds this bridge from AI to BI.
It is a Python component that is designed to enable programmatic interaction with the semantic layer for the purposes of streamlining key stages of the machine learning (ML) workflow (for example, feature engineering).
With AI-Link you can:
As this is a Python library, it can be used in any Python environment. Including Notebooks. And in this article I'll give a simple example of reaching Adaptive Analytics solution from Jupyter Notebook with the help of AI-Link.
Here is git repository which will have the complete Notebook as example: https://github.com/v23ent/aa-hands-on
Further steps assume that you have the following pre-requisites completed:
First, let's install needed components in our environment. That will download a few packages needed for further steps to work. 'atscale' - this is our main package to connect 'prophet' - package that we'll need to do predictions
pip install atscale prophet
Then we'll need to import key classes representing some key concepts of our semantic layer. Client - class that we'll use to establich a connection to Adaptive Analytics; Project - class to represent projects inside Adaptive Analytics; DataModel - class that will represent our virtual cube;
from atscale.client import Client
from atscale.data_model import DataModel
from atscale.project import Project
from prophet import Prophet
import pandas as pd
Now we should be all set to establish a connection to our source of data.
client = Client(server='http://adaptive.analytics.server', username='sample')
client.connect()
Go ahead and specify connection details of your Adaptive Analytics instance. Once you're asked for the organization respond in the dialog box and then please enter your password from the AtScale instance.
With established connection you'll then need to select your project from the list of projects published on the server. You'll get the list of projects as an interactive prompt and the answer should be the integer ID of the project. And then data model is selected automatically if it's the only one.
project = client.select_project()
data_model = project.select_data_model()
There are a number of methods prepared by AtScale in AI-Link component library. They allow to explore data catalog that you have, query data, and even ingest some data back. AtScale documentation has extensive API reference describing everything that is available. Let's first see what is our dataset by calling few methods of data_model:
data_model.get_features()
data_model.get_all_categorical_feature_names()
data_model.get_all_numeric_feature_names()
The output should look something like this

Once we've looked around a bit, we can query the actual data we're interested in using 'get_data' method. It will return back a pandas DataFrame containing the query results.
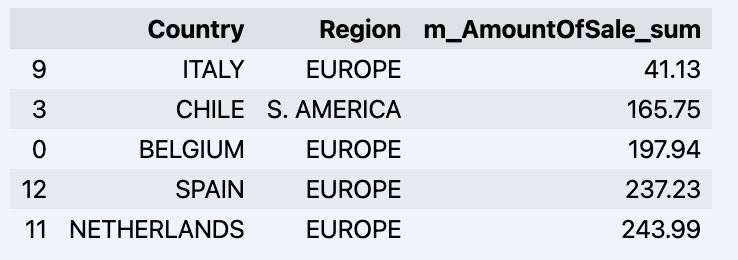
df = data_model.get_data(feature_list = ['Country','Region','m_AmountOfSale_sum'])
df = df.sort_values(by='m_AmountOfSale_sum')
df.head()
Which will show your datadrame:
Let's prepare some dataset and quickly show it on the graph
import matplotlib.pyplot as plt

# We're taking sales for each date
dataframe = data_model.get_data(feature_list = ['Date','m_AmountOfSale_sum'])

# Create a line chart
plt.plot(dataframe['Date'], dataframe['m_AmountOfSale_sum'])

# Add labels and a title
plt.xlabel('Days')
plt.ylabel('Sales')
plt.title('Daily Sales Data')

# Display the chart
plt.show()
Output:

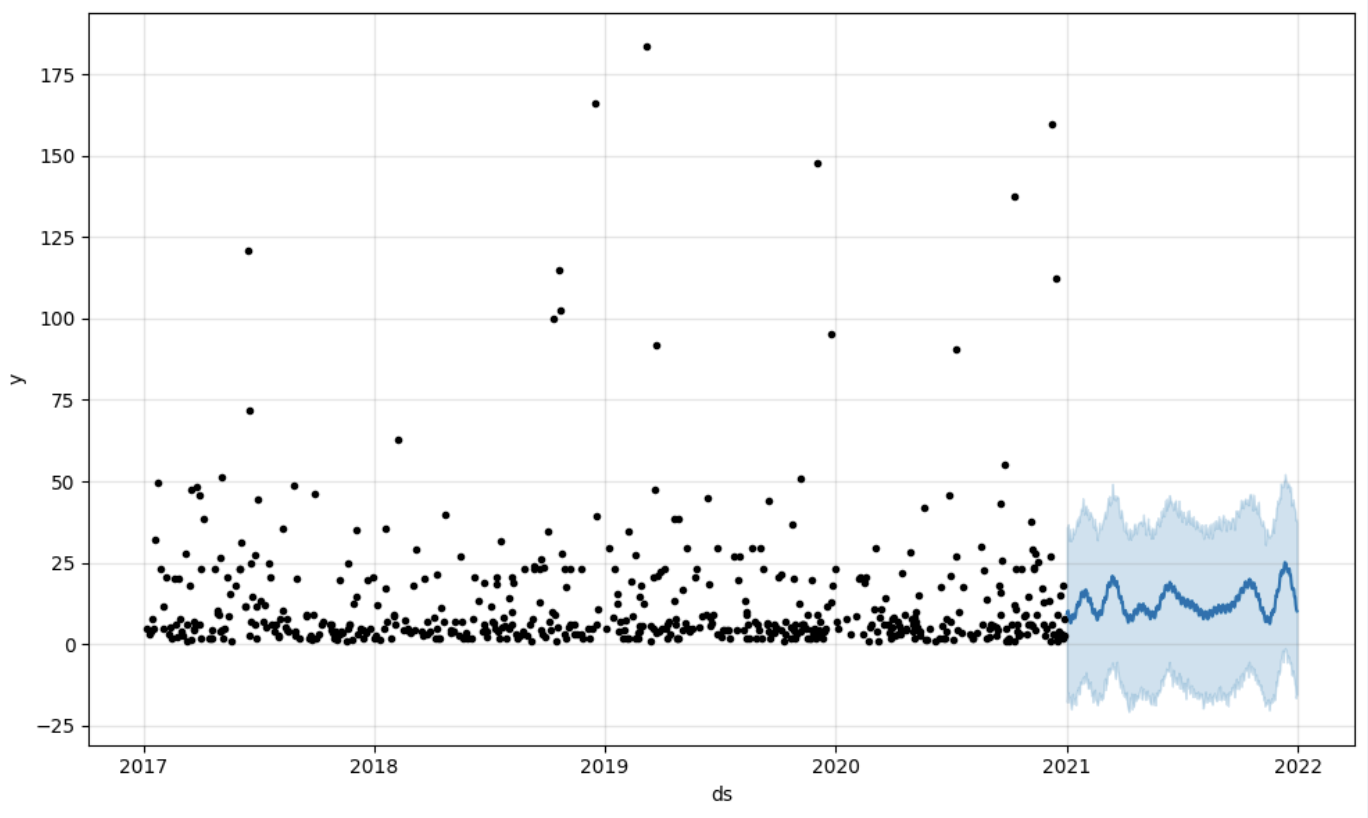
The next step would be to actually get some value out of AI-Link bridge - let's do some simple prediction!
# Load the historical data to train the model
data_train = data_model.get_data(
    feature_list = ['Date','m_AmountOfSale_sum'],
    filter_less = {'Date':'2021-01-01'}
    )
data_test = data_model.get_data(
    feature_list = ['Date','m_AmountOfSale_sum'],
    filter_greater = {'Date':'2021-01-01'}
    )
We get 2 different datasets here: to train our model and to test it.
# For the tool we've chosen to do the prediction 'Prophet', we'll need to specify 2 columns: 'ds' and 'y'
data_train['ds'] = pd.to_datetime(data_train['Date'])
data_train.rename(columns={'m_AmountOfSale_sum': 'y'}, inplace=True)
data_test['ds'] = pd.to_datetime(data_test['Date'])
data_test.rename(columns={'m_AmountOfSale_sum': 'y'}, inplace=True)

# Initialize and fit the Prophet model
model = Prophet()
model.fit(data_train)
And then we create another dataframe to accomodate our prediction and display it on the graph
# Create a future dataframe for forecasting
future = pd.DataFrame()
future['ds'] = pd.date_range(start='2021-01-01', end='2021-12-31', freq='D')

# Make predictions
forecast = model.predict(future)
fig = model.plot(forecast)
fig.show()
Output:
Once we've got our prediction in place we can then put it back to the data warehouse and add an aggregate to our semantic model to reflect it for other consumers. The prediction would be available through any other BI tool for BI analysts and business users. The prediction itself will be placed into our data warehouse and stored there.
from atscale.db.connections import Iris
db = Iris(
    username,
    host,
    namespace,
    driver,
    schema,
    port=1972,
    password=None,
    warehouse_id=None
    )

data_model.writeback(dbconn=db,
                    table_name= 'SalesPrediction',
                    DataFrame = forecast)

data_model.create_aggregate_feature(dataset_name='SalesPrediction',
                                    column_name='SalesForecasted',
                                    name='sum_sales_forecasted',
                                    aggregation_type='SUM')
That is it! Good luck with your predictions!
Hi, Community!
Curious how a retrieval-augmented generation (RAG) application works? Take a look at this demonstration:
Hi Community!
We hope you enjoyed our Developer Community AI sweepstakes and learned something new while interacting with our DC AI. Now, it's time to announce the winner!
Hi, Community!
Ready to create a retrieval-augmented generation (RAG) architecture for your next GenAI application? See how to get started:
Hey Community!
As you may know, our Developer Community AI has been out for over a month now 🎉 We hope you were curious enough to give it a try 😁 If you haven't yet, please do! Anyway, since it's still in beta, we're very interested in learning what you think about it, and we look forward to hearing your thoughts and experiences.

Since we value your time and effort, we will give away a cute prize to a random member of the Community who shares how DC AI helped you. To participate in this sweepstakes, you have to follow the guidelines:
Hey Community!
We’re thrilled to invite you to an exciting LinkedIn Live session dedicated to the most common myths and misconceptions surrounding AI!
🌐 Debunking AI Myths with Expert Insights 🌐
📅 Thursday, September 5th, 10 am EDT | 4 pm CEST
🗣 Presenters:
Hi, Community!
Hi, Community!
Are you building generative AI applications? See how a retrieval-augmented generation (RAG) architecture can help:
Hi, Community!
How can you get your data ready for generative AI applications? Get some key tips from an InterSystems expert:
Hi, Community!
Are you using generative AI tools for development? Let InterSystems principles be your guiding star! 🌟 Learn about the company's approach:
I received some really excellent feedback from a community member on my submission to the Python 2024 contest. I hope its okay if I repost it here:
you build a container more than 5 times the size of pure IRIS
and this takes time
container start is also slow but completes
backend is accessible as described
a production is hanging around
frontend reacts
I fail to understand what is intended to show
the explanation is meant for experts other than me
The submission is here: https://openexchange.intersystems.com/package/IRIS-RAG-App
In the previous article we presented the d[IA]gnosis application developed to support the coding of diagnoses in ICD-10. In this article we will see how InterSystems IRIS for Health provides us with the necessary tools for the generation of vectors from the ICD-10 code list using a pre-trained language model, its storage and the subsequent search for similarities on all these generated vectors.
Hi, Community!
Need to learn how to write better prompts for GenAI? This video from Learning Services introduces six key strategies:
The invention and popularization of Large Language Models (such as OpenAI's GPT-4) has launched a wave of innovative solutions that can leverage large volumes of unstructured data that was impractical or even impossible to process manually until recently. Such applications may include data retrieval (see Don Woodlock's ML301 course for a great intro to Retrieval Augmented Generation), sentiment analysis, and even fully-autonomous AI agents, just to name a few!
Hi, Community!
Do you think Generative AI can make your life easier? See some potential use cases for GenAI in the latest video from Learning Services:
Hi Community!
How can you create a balanced approach to using Generative AI? Get help from InterSystems experts in the latest video from Learning Services:
Hi Community,
Watch this video to learn about the PainChek artificial intelligence technology, which assesses patient pain at the hospital bedside, leverages InterSystems IRIS interoperability to connect to third-party electronic medical record systems:
Hi Community!
Need an introduction to Generative AI? Learning Services is excited to announce the first video in a new series about GenAI basics:
Hey Community!
We're happy to share our newest learning path dedicated to the essentials of GenAI, accessible on the Learning Portal via your SSO:
🤖 Getting Started with Generative AI 🤖

Here is what you can expect:
.png)
Hi,
Is anyone using a 3rd party software for dictating notes, and has a way to integrate that with TrakCare?
We are exploring introducing an AI-scribe software for medical professionals note taking and wondering how to connect the two.
Thanks

Looking to get started with generative AI? Try two brand-new learning paths. In Getting Started with Generative AI (2h 45m), learn the basics of interacting with GenAI. Then, try Developing Generative AI Applications (2h) to start developing your own GenAI application. Plus, earn badges for completing each path!
We have a yummy dataset with recipes written by multiple Reddit users, however most of the information is free text as the title or description of a post. Let's find out how we can very easily load the dataset, extract some features and analyze it using features from OpenAI large language model within Embedded Python and the Langchain framework.
First things first, we need to load the dataset or can we just connect to it?
There are different ways you can achieve this: for instance CSV Record Mapper you can use in an interoperability production or even nice OpenExchange applications like csvgen.
We will use Foreign Tables. A very useful capability to project data physically stored elsewhere to IRIS SQL. We can use that to have a very first view of the dataset files.
We create a Foreign Server:
CREATE FOREIGN SERVER dataset FOREIGN DATA WRAPPER CSV HOST '/app/data/'
And then a Foreign Table that connects to the CSV file:
CREATE FOREIGN TABLE dataset.Recipes (
  CREATEDDATE DATE,
  NUMCOMMENTS INTEGER,
  TITLE VARCHAR,
  USERNAME VARCHAR,
  COMMENT VARCHAR,
  NUMCHAR INTEGER
) SERVER dataset FILE 'Recipes.csv' USING
{
  "from": {
    "file": {
       "skip": 1
    }
  }
}
And that's it, immediately we can run SQL queries on dataset.Recipes:

## What data do we need? The dataset is interesting and we are hungry. However if we want to decide a recipe to cook we will need some more information that we can use to analyze.
We are going to work with two persistent classes (tables):
We can now load our yummy.data* tables with the contents from the dataset:
do ##class(yummy.Utils).LoadDataset()
It looks good but still we need to find out how are going to generate data for the Score, Difficulty, Ingredients, PreparationTime and CuisineType fields.
## Analyze the recipes We want to process each recipe title and description and:
We are going to use the following:
LLM (large language models) are really a great tool to process natural language.
LangChain is ready to work in Python, so we can use it directly in InterSystems IRIS using Embedded Python.
The full SimpleOpenAI class looks like this:
/// Simple OpenAI analysis for recipes
Class yummy.analysis.SimpleOpenAI Extends Analysis
{

Property CuisineType As %String;

Property PreparationTime As %Integer;

Property Difficulty As %String;

Property Ingredients As %String;

/// Run
/// You can try this from a terminal:
/// set a = ##class(yummy.analysis.SimpleOpenAI).%New(##class(yummy.data.Recipe).%OpenId(8))
/// do a.Run()
/// zwrite a
Method Run()
{
    try {
        do ..RunPythonAnalysis()

        set reasons = ""

        // my favourite cuisine types
        if "spanish,french,portuguese,italian,korean,japanese"[..CuisineType {
            set ..Score = ..Score + 2
            set reasons = reasons_$lb("It seems to be a "_..CuisineType_" recipe!")
        }

        // don't want to spend whole day cooking :)
        if (+..PreparationTime < 120) {
            set ..Score = ..Score + 1
            set reasons = reasons_$lb("You don't need too much time to prepare it")
        }

        // bonus for fav ingredients!
        set favIngredients = $listbuild("kimchi", "truffle", "squid")
        for i=1:1:$listlength(favIngredients) {
            set favIngred = $listget(favIngredients, i)
            if ..Ingredients[favIngred {
                set ..Score = ..Score + 1
                set reasons = reasons_$lb("Favourite ingredient found: "_favIngred)
            }
        }

        set ..Reason = $listtostring(reasons, ". ")

    } catch ex {
        throw ex
    }
}

/// Update recipe with analysis results
Method UpdateRecipe()
{
    try {
        // call parent class implementation first
        do ##super()

        // add specific OpenAI analysis results
        set ..Recipe.Ingredients = ..Ingredients
        set ..Recipe.PreparationTime = ..PreparationTime
        set ..Recipe.Difficulty = ..Difficulty
        set ..Recipe.CuisineType = ..CuisineType

    } catch ex {
        throw ex
    }
}

/// Run analysis using embedded Python + Langchain
/// do ##class(yummy.analysis.SimpleOpenAI).%New(##class(yummy.data.Recipe).%OpenId(8)).RunPythonAnalysis(1)
Method RunPythonAnalysis(debug As %Boolean = 0) [ Language = python ]
{
    # load OpenAI APIKEY from env
    import os
    from dotenv import load_dotenv, find_dotenv
    _ = load_dotenv('/app/.env')

    # account for deprecation of LLM model
    import datetime
    current_date = datetime.datetime.now().date()
    # date after which the model should be set to "gpt-3.5-turbo"
    target_date = datetime.date(2024, 6, 12)
    # set the model depending on the current date
    if current_date > target_date:
        llm_model = "gpt-3.5-turbo"
    else:
        llm_model = "gpt-3.5-turbo-0301"

    from langchain.chat_models import ChatOpenAI
    from langchain.prompts import ChatPromptTemplate
    from langchain.chains import LLMChain

    from langchain.output_parsers import ResponseSchema
    from langchain.output_parsers import StructuredOutputParser

    # init llm model
    llm = ChatOpenAI(temperature=0.0, model=llm_model)

    # prepare the responses we need
    cuisine_type_schema = ResponseSchema(
        name="cuisine_type",
        description="What is the cuisine type for the recipe? \
                     Answer in 1 word max in lowercase"
    )
    preparation_time_schema = ResponseSchema(
        name="preparation_time",
        description="How much time in minutes do I need to prepare the recipe?\
                     Anwer with an integer number, or null if unknown",
        type="integer",
    )
    difficulty_schema = ResponseSchema(
        name="difficulty",
        description="How difficult is this recipe?\
                     Answer with one of these values: easy, normal, hard, very-hard"
    )
    ingredients_schema = ResponseSchema(
        name="ingredients",
        description="Give me a comma separated list of ingredients in lowercase or empty if unknown"
    )
    response_schemas = [cuisine_type_schema, preparation_time_schema, difficulty_schema, ingredients_schema]

    # get format instructions from responses
    output_parser = StructuredOutputParser.from_response_schemas(response_schemas)
    format_instructions = output_parser.get_format_instructions()

    analysis_template = """\
    Interprete and evaluate a recipe which title is: {title}
    and the description is: {description}

    {format_instructions}
    """
    prompt = ChatPromptTemplate.from_template(template=analysis_template)

    messages = prompt.format_messages(title=self.Recipe.Title, description=self.Recipe.Description, format_instructions=format_instructions)
    response = llm(messages)

    if debug:
        print("======ACTUAL PROMPT")
        print(messages[0].content)
        print("======RESPONSE")
        print(response.content)

    # populate analysis with results
    output_dict = output_parser.parse(response.content)
    self.CuisineType = output_dict['cuisine_type']
    self.Difficulty = output_dict['difficulty']
    self.Ingredients = output_dict['ingredients']
    if type(output_dict['preparation_time']) == int:
        self.PreparationTime = output_dict['preparation_time']

    return 1
}

}
The RunPythonAnalysis method is where the OpenAI stuff happens :). You can run it directly from your terminal for a given recipe:
do ##class(yummy.analysis.SimpleOpenAI).%New(##class(yummy.data.Recipe).%OpenId(12)).RunPythonAnalysis(1)
We will get an output like this:
USER>do ##class(yummy.analysis.SimpleOpenAI).%New(##class(yummy.data.Recipe).%OpenId(12)).RunPythonAnalysis(1)
======ACTUAL PROMPT
                    Interprete and evaluate a recipe which title is: Folded Sushi - Alaska Roll
                    and the description is: Craving for some sushi but don't have a sushi roller? Try this easy version instead. It's super easy yet equally delicious!
[Video Recipe](https://www.youtube.com/watch?v=1LJPS1lOHSM)
# Ingredients
Serving Size:  \~5 sandwiches
* 1 cup of sushi rice
* 3/4 cups + 2 1/2 tbsp of water
* A small piece of konbu (kelp)
* 2 tbsp of rice vinegar
* 1 tbsp of sugar
* 1 tsp of salt
* 2 avocado
* 6 imitation crab sticks
* 2 tbsp of Japanese mayo
* 1/2 lb of salmon
# Recipe
* Place 1 cup of sushi rice into a mixing bowl and wash the rice at least 2 times or until the water becomes clear. Then transfer the rice into the rice cooker and add a small piece of kelp along with 3/4 cups plus 2 1/2 tbsp of water. Cook according to your rice cookers instruction.
* Combine 2 tbsp rice vinegar, 1 tbsp sugar, and 1 tsp salt in a medium bowl. Mix until everything is well combined.
* After the rice is cooked, remove the kelp and immediately scoop all the rice into the medium bowl with the vinegar and mix it well using the rice spatula. Make sure to use the cut motion to mix the rice to avoid mashing them. After thats done, cover it with a kitchen towel and let it cool down to room temperature.
* Cut the top of 1 avocado, then slice into the center of the avocado and rotate it along your knife. Then take each half of the avocado and twist. Afterward, take the side with the pit and carefully chop into the pit and twist to remove it. Then, using your hand, remove the peel. Repeat these steps with the other avocado. Dont forget to clean up your work station to give yourself more space. Then, place each half of the avocado facing down and thinly slice them. Once theyre sliced, slowly spread them out. Once thats done, set it aside.
* Remove the wrapper from each crab stick. Then, using your hand, peel the crab sticks vertically to get strings of crab sticks. Once all the crab sticks are peeled, rotate them sideways and chop them into small pieces, then place them in a bowl along with 2 tbsp of Japanese mayo and mix until everything is well mixed.
* Place a sharp knife at an angle and thinly slice against the grain. The thickness of the cut depends on your preference. Just make sure that all the pieces are similar in thickness.
* Grab a piece of seaweed wrap. Using a kitchen scissor, start cutting at the halfway point of seaweed wrap and cut until youre a little bit past the center of the piece. Rotate the piece vertically and start building. Dip your hand in some water to help with the sushi rice. Take a handful of sushi rice and spread it around the upper left hand quadrant of the seaweed wrap. Then carefully place a couple slices of salmon on the top right quadrant. Then place a couple slices of avocado on the bottom right quadrant. And finish it off with a couple of tsp of crab salad on the bottom left quadrant. Then, fold the top right quadrant into the bottom right quadrant, then continue by folding it into the bottom left quadrant. Well finish off the folding by folding the top left quadrant onto the rest of the sandwich. Afterward, place a piece of plastic wrap on top, cut it half, add a couple pieces of ginger and wasabi, and there you have it.

                    The output should be a markdown code snippet formatted in the following schema, including the leading and trailing "```json" and "```":
json
{
        "cuisine_type": string  // What is the cuisine type for the recipe?                                  Answer in 1 word max in lowercase
        "preparation_time": integer  // How much time in minutes do I need to prepare the recipe?                                    Anwer with an integer number, or null if unknown
        "difficulty": string  // How difficult is this recipe?                               Answer with one of these values: easy, normal, hard, very-hard
        "ingredients": string  // Give me a comma separated list of ingredients in lowercase or empty if unknown
}


======RESPONSE
json
{
        "cuisine_type": "japanese",
        "preparation_time": 30,
        "difficulty": "easy",
        "ingredients": "sushi rice, water, konbu, rice vinegar, sugar, salt, avocado, imitation crab sticks, japanese mayo, salmon"
}
That looks good. It seems that our OpenAI prompt is capable of returning some useful information. Let's run the whole analysis class from the terminal:
set a = ##class(yummy.analysis.SimpleOpenAI).%New(##class(yummy.data.Recipe).%OpenId(12))
do a.Run()
zwrite a
USER>zwrite a
a=37@yummy.analysis.SimpleOpenAI  ; <OREF>
+----------------- general information ---------------
|      oref value: 37
|      class name: yummy.analysis.SimpleOpenAI
| reference count: 2
+----------------- attribute values ------------------
|        CuisineType = "japanese"
|         Difficulty = "easy"
|        Ingredients = "sushi rice, water, konbu, rice vinegar, sugar, salt, avocado, imitation crab sticks, japanese mayo, salmon"
|    PreparationTime = 30
|             Reason = "It seems to be a japanese recipe!. You don't need too much time to prepare it"
|              Score = 3
+----------------- swizzled references ---------------
|           i%Recipe = ""
|           r%Recipe = "30@yummy.data.Recipe"
+-----------------------------------------------------
## Analyzing all the recipes! Naturally, you would like to run the analysis on all the recipes we have loaded.
You can analyze a range of recipes IDs this way:
USER>do ##class(yummy.Utils).AnalyzeRange(1,10)
> Recipe 1 (1.755185s)
> Recipe 2 (2.559526s)
> Recipe 3 (1.556895s)
> Recipe 4 (1.720246s)
> Recipe 5 (1.689123s)
> Recipe 6 (2.404745s)
> Recipe 7 (1.538208s)
> Recipe 8 (1.33001s)
> Recipe 9 (1.49972s)
> Recipe 10 (1.425612s)
After that, have a look again at your recipe table and check the results
select * from yummy_data.Recipe

I think I could give a try to Acorn Squash Pizza or Korean Tofu Kimchi with Pork :). I will have to double check at home anyway :)
You can find the full example in https://github.com/isc-afuentes/recipe-inspector
With this simple example we've learned how to use LLM techniques to add features or to analyze some parts of your data in InterSystems IRIS.
With this starting point, you could think about:
What other things could you try? Let me know what you think!
Hi All,
We invite you to join our next Meetup in Boston on June 25 5:30-7:30 pm.
>> RSVP here <<

Continuing with the series of articles on voice file management, we are going to see how we can convert text into audio and receive the file with the chosen voice.
We will also explore how a service from OpenAI can help us analyze a text and determine the mood expressed in it.
Let's analyze how you can create your own voice file and how it can “read” your feelings.
ChatIRIS Health Coach, a GPT-4 based agent that leverages the Health Belief Model as a psychological framework to craft empathetic replies. This article elaborates on the backend architecture and its components, focusing on how InterSystems IRIS supports the system's functionality.
The backend architecture of ChatIRIS Health Coach is built around the following key components:

The Scoring Agent evaluates user inputs to tailor the health advice based on psychological models, specifically the Health Belief Model. This involves dynamically adjusting belief scores to reflect the user's perceptions and concerns.
Initialization
ScoreOperation.on_init : Sets up the scoring agent with an initial prompt and belief map. This provides a framework for understanding and responding to user inputs.Belief Score Calculation
ScoreOperation.ask: Analyzes user inputs to calculate belief scores, which reflect the user’s perceptions of health risks and benefits, as well as barriers to taking preventive action.Prompt Creation
ScoreOperation.create_belief_prompt: Uses the belief scores to generate tailored prompts that address the user's specific concerns and motivations, enhancing the persuasive power of the responses.
The Retrieval-Augmented Generation (RAG) pipeline is a core feature that combines large language models with a robust retrieval system to provide contextually relevant responses. InterSystems IRIS is integral to this process, enhancing data retrieval through its vector store capabilities.
Initialization
IrisVectorOperation.init_data: Initializes the vector store with the initial knowledge base. This involves encoding the textual data into vector representations that capture semantic meanings.Query Processing
ChatProcess.ask: When a user query is received, the system invokes the VectorSearchRequest to perform a semantic search within the vector store. This ensures that the retrieved information is highly relevant to the user’s query, going beyond simple keyword matching.
By combining the RAG pipeline with the Scoring Agent, ChatIRIS can generate responses that are both contextually accurate and psychologically tailored. The backend processes involve:

The backend of ChatIRIS Health Coach leverages the powerful data handling and semantic search capabilities of InterSystems IRIS, combined with dynamic belief scoring to provide personalized and persuasive health coaching. This integration enhances the system’s ability to engage users effectively and motivate preventive health behaviors.
See a demo of ChatIRIS in action here.
💭 Find out more
In the previous article, we saw in detail about Connectors, that let user upload their file and get it converted into embeddings and store it to IRIS DB. In this article, we'll explore different retrieval options that IRIS AI Studio offers - Semantic Search, Chat, Recommender and Similarity.
