#Python

0 Followers · 456 Posts

Python is an interpreted high-level programming language for general-purpose programming. Created by Guido van Rossum and first released in 1991, Python has a design philosophy that emphasizes code readability, notably using significant whitespace

Official site.

InterSystems Python Binding Documentation.

Article Guillaume Rongier · Jul 30, 2025 15m read

img

In this section, we will explore how to use Python as the primary language in IRIS, allowing you to write your application logic in Python while still leveraging the power of IRIS.

How to use it (irispython)

First, let's start by the official way of doing things, which is using the irispython interpreter.

You can use the irispython interpreter to run Python code directly in IRIS. This allows you to write Python code and execute it in the context of your IRIS application.

What is irispython?

irispython is a Python interpreter that is located in the IRIS installation directory (<installation_directory>/bin/irispython), and it is used to run Python code in the context of IRIS.

It will for you:

  • Set up the sys.path to include the IRIS Python libraries and modules.
    • This is done by the site.py file, which is located in <installation_directory>/lib/python/iris_site.py.
    • See the module article Introduction to Python Modules for more details.
  • Allow you to import iris modules which is a special module that provides access to IRIS features and functionality like bridging any ObjectScript class to Python, and vice versa.
  • Fix permissions issues and dynamic loading of iris kernel libraries.

Example of using irispython

You can run the irispython interpreter from the command line:

<installation_directory>/bin/irispython

Let's run a simple example:

# src/python/article/irispython_example.py
import requests
import iris

def run():
    response = requests.get("https://2eb86668f7ab407989787c97ec6b24ba.api.mockbin.io/")

    my_dict = response.json()

    for key, value in my_dict.items():
        print(f"{key}: {value}")  # print message: Hello World

    return my_dict

if __name__ == "__main__":
    print(f"Iris version: {iris.cls('%SYSTEM.Version').GetVersion()}")
    run()

You can run this script using the irispython interpreter:

<installation_directory>/bin/irispython src/python/article/irispython_example.py

You will see the output:

Iris version: IRIS for UNIX (Ubuntu Server LTS for x86-64 Containers) 2025.1 (Build 223U) Tue Mar 11 2025 18:23:31 EDT
message: Hello World

This demonstrates how to use the irispython interpreter to run Python code in the context of IRIS.

Pros

  • Python First: You can write your application logic in Python, which allows you to leverage Python's features and libraries.
  • IRIS Integration: You can easily integrate your Python code with IRIS features and functionality.

Cons

  • Limited Debugging: Debugging Python code in irispython is not as straightforward as in a dedicated Python environment.
    • Don't mean it is not possible, but it is not as easy as in a dedicated Python environment.
    • See the bonus section for more details.
  • Virtual Environment: It's difficult to set up a virtual environment for your Python code in irispython.
    • Doesn't mean it is not possible, but it's difficult to do it due to virtual environment look by default to an interpreter called python or python3, which is not the case in IRIS.
    • See the bonus section for more details.

Conclusion

In conclusion, using irispython allows you to write your application logic in Python while still leveraging the power of IRIS. However, it has its limitations with debugging and virtual environment setup.

Using WSGI

In this section, we will explore how to use WSGI (Web Server Gateway Interface) to run Python web applications in IRIS.

WSGI is a standard interface between web servers and Python web applications or frameworks. It allows you to run Python web applications in a web server environment.

IRIS supports WSGI, which means you can run Python web applications in IRIS using the built-in WSGI server.

How to use it

To use WSGI in IRIS, you need to create a WSGI application and register it with the IRIS web server.

See the official documentation for more details.

Example of using WSGI

You can find a full template here iris-flask-example.

Pros

  • Python Web Frameworks: You can use popular Python web frameworks like Flask or Django to build your web applications.
  • IRIS Integration: You can easily integrate your Python web applications with IRIS features and functionality.

Cons

  • Complexity: Setting up a WSGI application can be more complex than just using uvicorn or gunicorn with a Python web framework.

Conclusion

In conclusion, using WSGI in IRIS allows you to build powerful web applications using Python while still leveraging the features and functionality of IRIS.

DB-API

In this section, we will explore how to use the Python DB-API to interact with IRIS databases.

The Python DB-API is a standard interface for connecting to databases in Python. It allows you to execute SQL queries and retrieve results from the database.

How to use it

You can install it using pip:

pip install intersystems-irispython

Then, you can use the DB-API to connect to an IRIS database and execute SQL queries.

Example of using DB-API

You use it like any other Python DB-API, here is an example:

# src/python/article/dbapi_example.py
import iris

def run():
    # Connect to the IRIS database
# Open a connection to the server
    args = {
        'hostname':'127.0.0.1', 
        'port': 1972,
        'namespace':'USER', 
        'username':'SuperUser', 
        'password':'SYS'
    }
    conn = iris.connect(**args)

    # Create a cursor
    cursor = conn.cursor()

    # Execute a query
    cursor.execute("SELECT 1")

    # Fetch all results
    results = cursor.fetchall()

    for row in results:
        print(row)

    # Close the cursor and connection
    cursor.close()
    conn.close()
if __name__ == "__main__":
    run()

You can run this script using any Python interpreter:

python3 /irisdev/app/src/python/article/dbapi_example.py

You will see the output:

(1,)

Pros

  • Standard Interface: The DB-API provides a standard interface for connecting to databases, making it easy to switch between different databases.
  • SQL Queries: You can execute SQL queries and retrieve results from the database using Python.
  • Remote access: You can connect to remote IRIS databases using the DB-API.

Cons

  • Limited Features: The DB-API only provides SQL access to the database, so you won't be able to use advanced IRIS features like ObjectScript or Python code execution.

Alternatives

It also exists a community edition of the DB-API, available here : intersystems-irispython-community.

It has better support of SQLAlchemy, Django, langchain, and other Python libraries that use the DB-API.

See bonus section for more details.

Conclusion

In conclusion, using the Python DB-API with IRIS allows you to build powerful applications that can interact with your database seamlessly.

Notebook

Now that we have seen how to use Python in IRIS, let's explore how to use Jupyter Notebooks with IRIS.

Jupyter Notebooks are a great way to write and execute Python code interactively, and they can be used with IRIS to leverage its features.

How to use it

To use Jupyter Notebooks with IRIS, you need to install the notebook and ipykernel packages:

pip install notebook ipykernel

Then, you can create a new Jupyter Notebook and select the Python 3 kernel.

Example of using Notebook

You can create a new Jupyter Notebook and write the following code:

# src/python/article/my_notebook.ipynb
# Import the necessary modules
import iris
# Do the magic
iris.system.Version.GetVersion()

You can run this notebook using Jupyter Notebook:

jupyter notebook src/python/article/my_notebook.ipynb

Pros

  • Interactive Development: Jupyter Notebooks allow you to write and execute Python code interactively, which is great for data analysis and exploration.
  • Rich Output: You can display rich output, such as charts and tables, directly in the notebook.
  • Documentation: You can add documentation and explanations alongside your code, making

Cons

  • Tricky Setup: Setting up Jupyter Notebooks with IRIS can be tricky, especially with the kernel configuration.

Conclusion

In conclusion, using Jupyter Notebooks with IRIS allows you to write and execute Python code interactively while leveraging the features of IRIS. However, it can be tricky to set up, especially with the kernel configuration.

Bonus Section

Starting from this section, we will explore some advanced topics related to Python in IRIS, such as remote debugging Python code, using virtual environments, and more.

Most of these topics are not officially supported by InterSystems, but they are useful to know if you want to use Python in IRIS.

Using a native interpreter (no irispython)

In this section, we will explore how to use a native Python interpreter instead of the irispython interpreter.

This allows you to use virtual environments out of the box, and to use the Python interpreter you are used to.

How to use it

To use a native Python interpreter, you to have IRIS install locally on your machine, and you need to have the iris-embedded-python-wrapper package installed.

You can install it using pip:

pip install iris-embedded-python-wrapper

Next, you need to setup some environment variables to point to your IRIS installation:

export IRISINSTALLDIR=<installation_directory>
export IRISUSERNAME=<username>
export IRISPASSWORD=<password>
export IRISNAMESPACE=<namespace>

Then, you can run your Python code using your native Python interpreter:

python3 src/python/article/irispython_example.py
# src/python/article/irispython_example.py
import requests
import iris

def run():
    response = requests.get("https://2eb86668f7ab407989787c97ec6b24ba.api.mockbin.io/")

    my_dict = response.json()

    for key, value in my_dict.items():
        print(f"{key}: {value}")  # print message: Hello World

    return my_dict

if __name__ == "__main__":
    print(f"Iris version: {iris.cls('%SYSTEM.Version').GetVersion()}")
    run()

For more details, see the iris-embedded-python-wrapper documentation.

Pros

  • Virtual Environments: You can use virtual environments with your native Python interpreter, allowing you to manage dependencies more easily.
  • Familiar Workflow: You can use the Python interpreter you are used to, making it easier to integrate with your existing workflows.
  • Debugging: You can use your favorite Python debugging tools, such as pdb or ipdb, to debug your Python code in IRIS.

Cons

  • Setup Complexity: Setting up the environment variables and the iris-embedded-python-wrapper package can be complex, especially for beginners.
  • Not Officially Supported: This approach is not officially supported by InterSystems, so you may encounter issues that are not documented or supported.

DB-API Community Edition

In this section, we will explore the community edition of the DB-API, which is available on GitHub.

How to use it

You can install it using pip:

pip install sqlalchemy-iris

Which will install the community edition of the DB-API.

Or with a specific version:

pip install https://github.com/intersystems-community/intersystems-irispython/releases/download/3.9.3/intersystems_iris-3.9.3-py3-none-any.whl

Then, you can use the DB-API to connect to an IRIS database and execute SQL queries or any other Python code that uses the DB-API, like SQLAlchemy, Django, langchain, pandas, etc.

Example of using DB-API

You can use it like any other Python DB-API, here is an example:

# src/python/article/dbapi_community_example.py
import intersystems_iris.dbapi._DBAPI as dbapi

config = {
    "hostname": "localhost",
    "port": 1972,
    "namespace": "USER",
    "username": "_SYSTEM",
    "password": "SYS",
}

with dbapi.connect(**config) as conn:
    with conn.cursor() as cursor:
        cursor.execute("select ? as one, 2 as two", 1)   # second arg is parameter value
        for row in cursor:
            one, two = row
            print(f"one: {one}")
            print(f"two: {two}")

You can run this script using any Python interpreter:

python3 /irisdev/app/src/python/article/dbapi_community_example.py

Or with sqlalchemy:

from sqlalchemy import create_engine, text

COMMUNITY_DRIVER_URL = "iris://_SYSTEM:SYS@localhost:1972/USER"
OFFICIAL_DRIVER_URL = "iris+intersystems://_SYSTEM:SYS@localhost:1972/USER"
EMBEDDED_PYTHON_DRIVER_URL = "iris+emb:///USER"

def run(driver):
    # Create an engine using the official driver
    engine = create_engine(driver)

    with engine.connect() as connection:
        # Execute a query
        result = connection.execute(text("SELECT 1 AS one, 2 AS two"))

        for row in result:
            print(f"one: {row.one}, two: {row.two}")

if __name__ == "__main__":
    run(OFFICIAL_DRIVER_URL)
    run(COMMUNITY_DRIVER_URL)
    run(EMBEDDED_PYTHON_DRIVER_URL)

You can run this script using any Python interpreter:

python3 /irisdev/app/src/python/article/dbapi_sqlalchemy_example.py

You will see the output:

one: 1, two: 2
one: 1, two: 2
one: 1, two: 2

Pros

  • Better Support: It has better support of SQLAlchemy, Django, langchain, and other Python libraries that use the DB-API.
  • Community Driven: It is maintained by the community, which means it is more likely to be updated and improved over time.
  • Compatibility: It is compatible with the official InterSystems DB-API, so you can switch between the official and community editions easily.

Cons

  • Speed: The community edition may not be as optimized as the official version, potentially leading to slower performance in some scenarios.

Debugging Python Code in IRIS

In this section, we will explore how to debug Python code in IRIS.

By default, debugging Python code in IRIS (in objectscript with the language tag or %SYS.Python) is not possible, but a community solution exists to allow you to debug Python code in IRIS.

How to use it

First install IoP Interoperability on Python:

pip install iris-pex-embedded-python
iop --init

This will install IoP and new ObjectScript classes that will allow you to debug Python code in IRIS.

Then, you can use the IOP.Wrapper class to wrap your Python code and enable debugging.

Class Article.DebuggingExample Extends %RegisteredObject
{
ClassMethod Run() As %Status
{
    set myScript = ##class(IOP.Wrapper).Import("my_script", "/irisdev/app/src/python/article/", 55550) // Adjust the path to your module
    Do myScript.run()
    Quit $$$OK
}
}

Then configure VsCode to use the IoP debugger by adding the following configuration to your launch.json file:

{
    "version": "0.2.0",
    "configurations": [
        {
            "name": "Python in IRIS",
            "type": "python",
            "request": "attach",
            "port": 55550,
            "host": "localhost",
            "pathMappings": [
                {
                    "localRoot": "${workspaceFolder}/src/python/article",
                    "remoteRoot": "/irisdev/app/src/python/article"
                }
            ]
        }
    ]
}

Now, you can run your ObjectScript code that imports the Python module, and then attach the debugger in VsCode to the port 55550.

You can run this script using the following command:

iris session iris -U IRISAPP '##class(Article.DebuggingExample).Run()'

You can then set breakpoints in your Python code, and the debugger will stop at those breakpoints, allowing you to inspect variables and step through the code.

Video of remote debugging in action (for IoP but the concept is the same):

And you have also tracebacks in your Python code, which is very useful for debugging.

With tracebacks enabled:

Traceback enabled

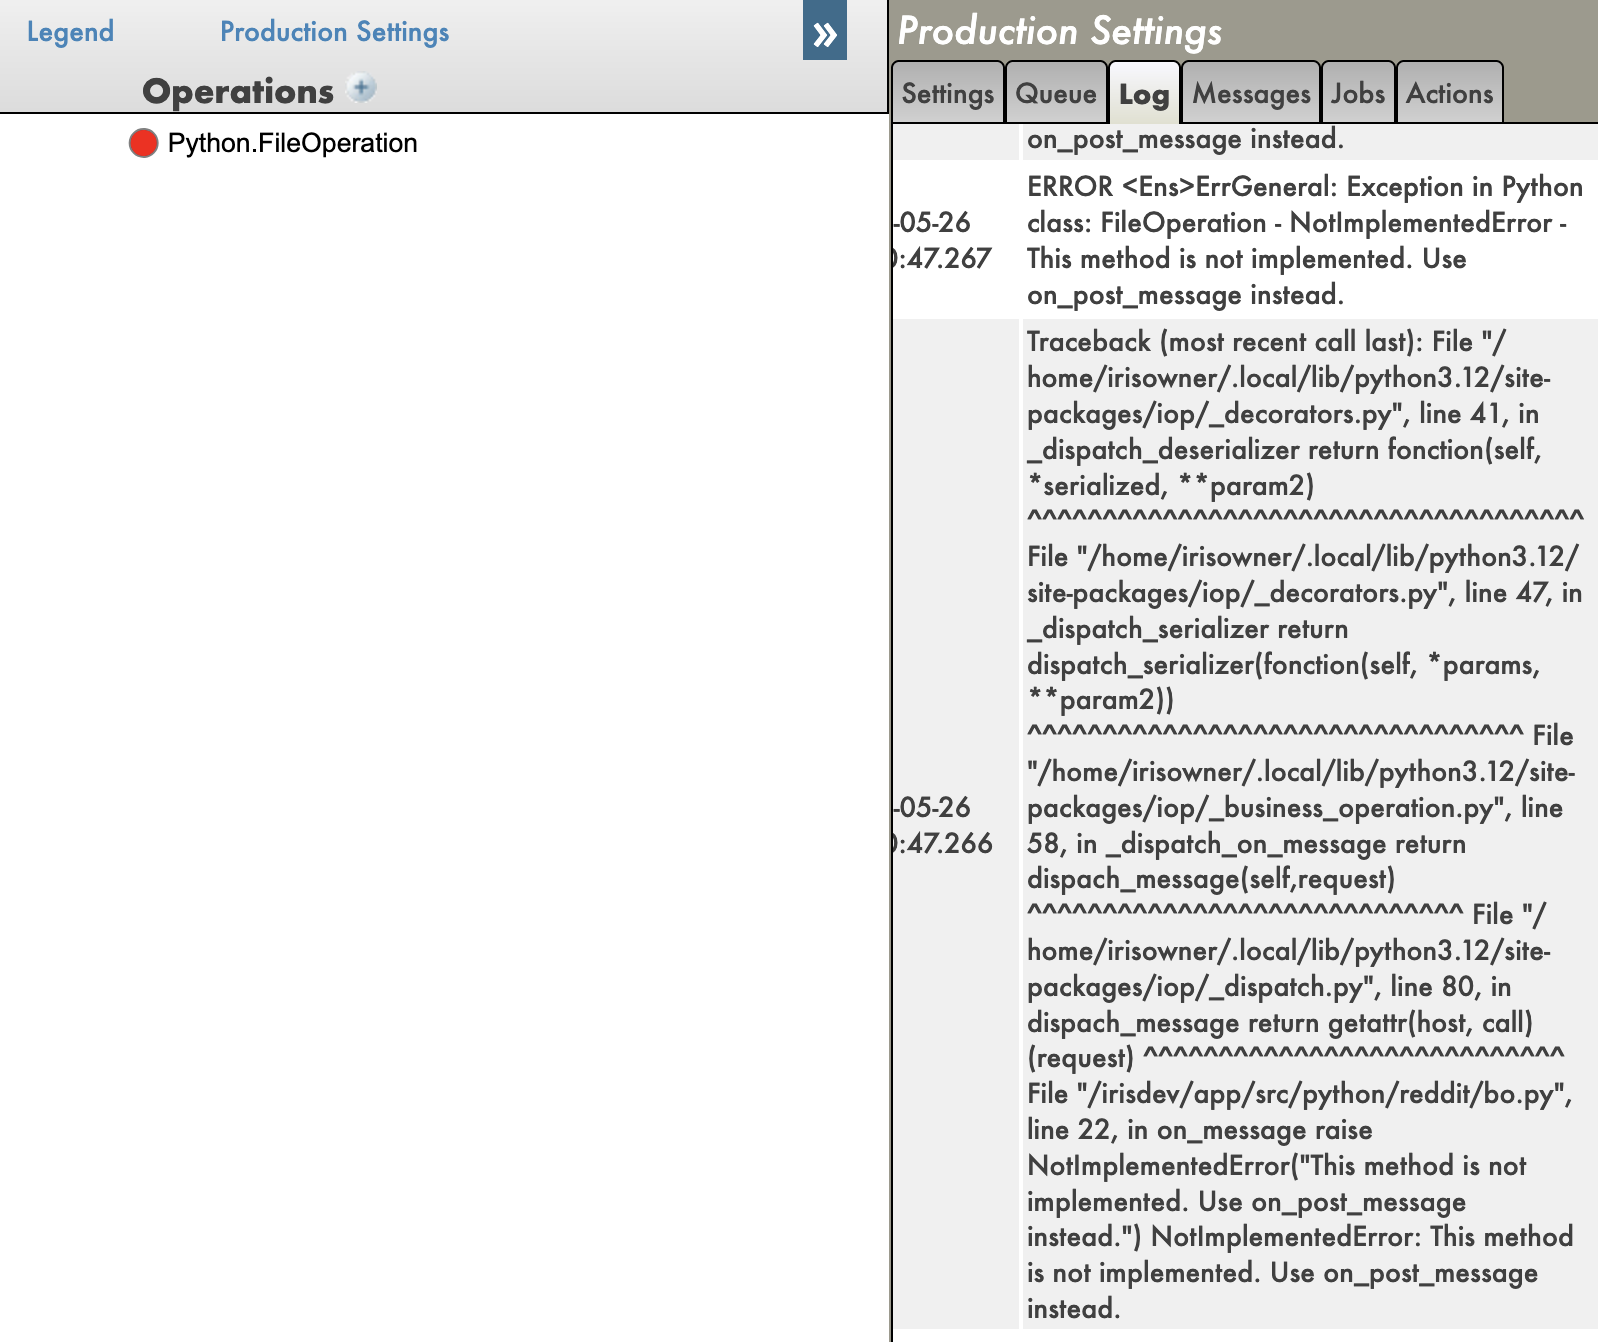
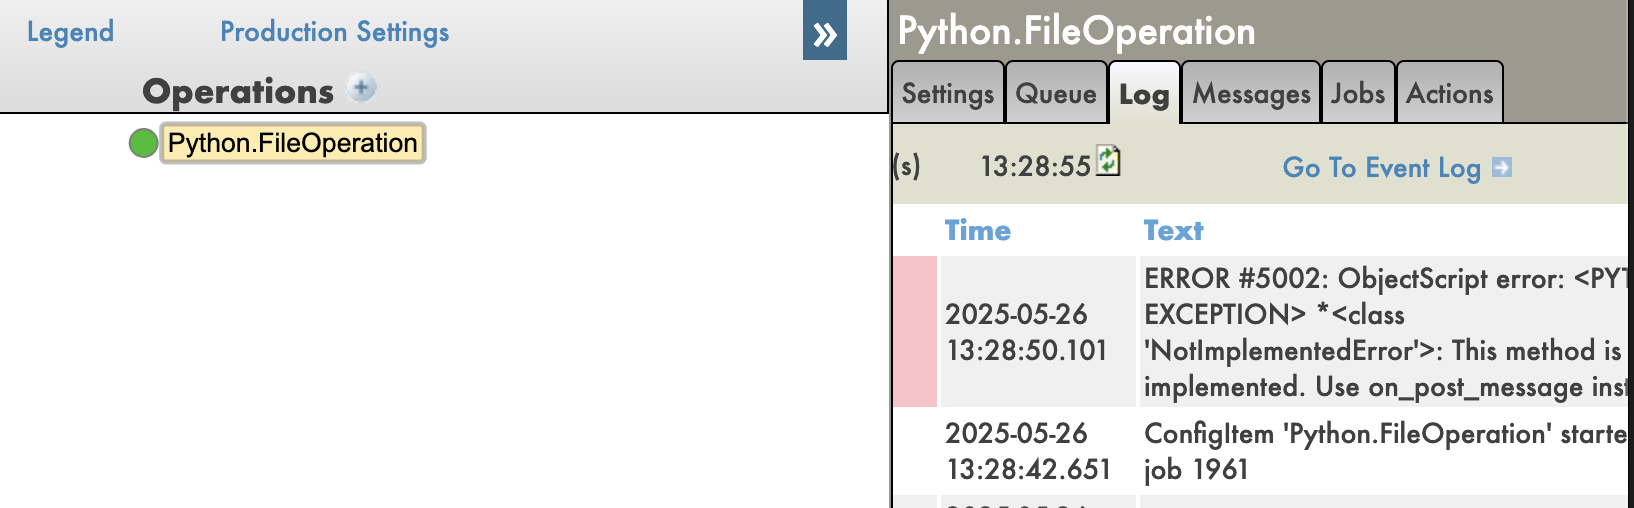
With tracebacks disabled:

Traceback disabled

Pros

  • Remote Debugging: You can debug Python code running in IRIS remotely, which is IMO a game changer.
  • Python Debugging Features: You can use all the Python debugging features, such as breakpoints, variable inspection, and stepping through code.
  • Tracebacks: You can see the full traceback of errors in your Python code, which is very useful for debugging.

Cons

  • Setup Complexity: Setting up the IoP and the debugger can be complex, especially for beginners.
  • Community Solution: This is a community solution, so it may not be as stable or well-documented as official solutions.

Conclusion

In conclusion, debugging Python code in IRIS is possible using the IoP community solution, which allows you to use the Python debugger to debug your Python code running in IRIS. However, it requires some setup and may not be as stable as official solutions.

IoP (Interoperability on Python)

In this section, we will explore the IoP (Interoperability on Python) solution, which allows you to run Python code in IRIS in a python-first approach.

I have been developing this solution for a while now, this is my baby, it tries to solve or enhance all the previous points we have seen in this series of articles.

Key points of IoP:

  • Python First: You can write your application logic in Python, which allows you to leverage Python's features and libraries.
  • IRIS Integration: You can easily integrate your Python code with IRIS features and functionality.
  • Remote Debugging: You can debug your Python code running in IRIS remotely.
  • Tracebacks: You can see the full traceback of errors in your Python code, which is very useful for debugging.
  • Virtual Environments: You have a support of virtual environments, allowing you to manage dependencies more easily.

To learn more about IoP, you can check the official documentation.

Then you can read those articles to learn more about IoP:

🐍❤️ As you can see, IoP provides a powerful way to integrate Python with IRIS, making it easier to develop and debug your applications.

You don't need to use irispython anymore, you don't have to set your sys.path manually, you can use virtual environments, and you can debug your Python code running in IRIS.

Conclusion

I hope you enjoyed this series of articles about Python in IRIS.

Feel free to reach out to me if you have any questions or feedback about this series of articles.

GL HF with Python in IRIS!

0
7 195
Article Guillaume Rongier · Jul 28, 2025 6m read

img

Now that we have a good understanding of Python and its features, let's explore how we can leverage Python within IRIS.

Language Tag

The language tag is a feature of IRIS that allows you to write Python code directly in your ObjectScript classes.

This is useful for quick prototyping or when you want to use Python's features without creating a separate Python script.

How to use it?

To use the language tag, you need to define a class method with the Language = python attribute. Here's an example:

Class Article.LanguageTagExample Extends %RegisteredObject
{

ClassMethod Run() [ Language = python ]
{
        import requests

        response = requests.get("https://2eb86668f7ab407989787c97ec6b24ba.api.mockbin.io/")

        my_dict = response.json()

        for key, value in my_dict.items():
            print(f"{key}: {value}") # print message: Hello World
}

}

So what are the pros and cons of using the language tag?

Pros

  • Simplicity: You can write Python code directly in your ObjectScript classes without needing to create separate Python files.
  • Quick Prototyping: It's great for quick prototyping or testing small pieces of Python code.
  • Integration: You can easily integrate Python code with your ObjectScript code

Cons

  • Mixed Code: Mixing Python and ObjectScript code can make your code harder to read and maintain.
  • Debugging: You can't remotely debug Python code written in the language tag, which can be a limitation for complex applications.
  • Tracebacks: Python tracebacks are not displayed, you only see an ObjectScript error message, which can make debugging more difficult.

Conclusion

The language tag is a powerful feature that allows you to write Python code directly in your ObjectScript classes. However, it has its limitations, and it's important to use it wisely. For larger projects or when you need to debug your Python code, it's better to create separate Python scripts and import them into your ObjectScript classes.

Importing Python Modules (pypi modules)

Now that we have a good understanding of the language tag, let's explore how to import Python modules and use them in ObjectScript.

First, we will do it only with the built-in and third-party modules that come from PyPI, like requests, numpy, etc.

How to use it

So here, we will do the same thing, but using only the requests module from PyPI.

Class Article.RequestsExample Extends %RegisteredObject
{

ClassMethod Run() As %Status
{
    set builtins = ##class(%SYS.Python).Import("builtins")
    Set requests = ##class(%SYS.Python).Import("requests")

    Set response = requests.get("https://2eb86668f7ab407989787c97ec6b24ba.api.mockbin.io/")
    Set myDict = response.json()

    for i=0:1:builtins.len(myDict)-1 {
        set key = builtins.list(myDict.keys())."__getitem__"(i)
        set value = builtins.list(myDict.values())."__getitem__"(i)
        write key, ": ", value, !
    }
}

}

Let's run it:

iris session iris -U IRISAPP '##class(Article.RequestsExample).Run()'

You will see the output:

message: Hello World

Pros

  • Access to Python Libraries: You can use any Python library available on PyPI, which gives you access to a vast ecosystem of libraries and tools.
  • One type of code: You are only writing ObjectScript code, which makes it easier to read and maintain.
  • Debugging: You can debug your ObjectScript as it was only ObjectScript code, which it is :)

Cons

  • Good knowledge of Python: You need to have a good understanding of Python to use its libraries effectively.
  • Not writing Python code: You are not writing Python code, but ObjectScript code that calls Python code, which avoids the sugar syntax of Python.

Conclusion

In conclusion, importing Python modules into ObjectScript can greatly enhance your application's capabilities by leveraging the vast ecosystem of Python libraries. However, it's essential to understand the trade-offs involved, such as the need for a solid grasp of Python.

Importing Python Modules (custom modules)

Let's keep going with the same example, but this time we will create a custom Python module and import it into ObjectScript.

This time, we will be using python as much as possible, and we will only use ObjectScript to call the Python code.

How to use it

Let's create a custom Python module named my_script.py with the following content:

import requests

def run():
    response = requests.get("https://2eb86668f7ab407989787c97ec6b24ba.api.mockbin.io/")

    my_dict = response.json()

    for key, value in my_dict.items():
        print(f"{key}: {value}") # print message: Hello World

Now, we will create an ObjectScript class to import and run this Python module:

Class Article.MyScriptExample Extends %RegisteredObject
{
    ClassMethod Run() As %Status
    {
        set sys = ##class(%SYS.Python).Import("sys")
        do sys.path.append("/irisdev/app/src/python/article")  // Adjust the path to your module

        Set myScript = ##class(%SYS.Python).Import("my_script")

        Do myScript.run()

        Quit $$$OK
    }
}

Now, let's run it:

iris session iris -U IRISAPP '##class(Article.MyScriptExample).Run()'

⚠️ Don't forget to change your iris session to make sure you are on the last version of the code, see the first article for more details.

You will see the output:

message: Hello World

This demonstrates how to import a custom Python module into ObjectScript and execute its code.

Pros

  • Modularity: You can organize your Python code into modules, making it easier to manage and maintain.
  • Python Syntax: You can write Python code with its syntax and features
  • Debugging: Not of the box today, but in the next article, we will see how to debug Python code in IRIS.

Cons

  • Path Management: You need to manage the path to your Python module, see the article about sys.path for more details.
  • Python Knowledge: You still need to have a good understanding of Python to write and maintain your modules.
  • ObjectScript Knowledge: You need to know how to use ObjectScript to import and call your Python modules.

Conclusion

In conclusion, importing Python modules into ObjectScript can greatly enhance your application's capabilities by leveraging the vast ecosystem of Python libraries. However, it's essential to understand the trade-offs involved, such as the need for a solid grasp of Python.

2
4 153
Article Nikolay Solovyev · Jul 29, 2025 3m read

Sending emails is a common requirement in integration scenarios — whether for client reminders, automatic reports, or transaction confirmations. Static messages quickly become hard to maintain and personalize. This is where the templated_email module comes in, combining InterSystems IRIS Interoperability with the power of Jinja2 templates.

Why Jinja2 for Emails

Jinja2 is a popular templating engine from the Python ecosystem that enables fully dynamic content generation. It supports:

0
0 54
Article Guillaume Rongier · Jul 28, 2025 3m read

img

This will be a short article about Python dunder methods, also known as magic methods.

What are Dunder Methods?

Dunder methods are special methods in Python that start and end with double underscores (__). They allow you to define the behavior of your objects for built-in operations, such as addition, subtraction, string representation, and more.

Some common dunder methods include:

  • __init__(self, ...): Called when an object is created.
    • Like our %OnNew method in ObjectScript.
  • __str__(self): Called by the str() built-in function and print to represent the object as a string.
  • __repr__(self): Called by the repr() built-in function to represent the object for debugging.
  • __add__(self, other): Called when the + operator is used.
  • __len__(self): Called by the len() built-in function to return the length of the object.
  • __getitem__(self, key): Called to retrieve an item from a collection using the indexing syntax.
  • __setitem__(self, key, value): Called to set an item in a collection using the indexing syntax.
  • ... and many more.

Why are Dunder Methods Important and Relevant in an IRIS Context?

In ObjectScript, we don't have the sugar syntax like in Python, but we can achieve similar behavior using dunder methods.

Example, we have imported a Python module, it has a function that returns a python list, and we want to use it in ObjectScript. We must use the __getitem__ dunder method to access the items in the list.

# src/python/article/dunder_example.py
def get_list():
    return [1, 2, 3, 4, 5]
Class Article.DunderExample Extends %RegisteredObject
{

ClassMethod Run()
{
    Set sys = ##class(%SYS.Python).Import("sys")
    do sys.path.append("/irisdev/app/src/python/article")
    set dunderExample = ##class(%SYS.Python).Import("dunder_example")
    set myList = dunderExample."get_list"()
    for i=0:1:myList."__len__"()-1 {
        write myList."__getitem__"(i), !
    }
}

}

Let's run it:

iris session iris -U IRISAPP '##class(Article.DunderExample).Run()'

This will output:

1
2
3
4
5

This demonstrates how to use dunder methods to interact with Python objects in an IRIS context, allowing you to leverage Python's capabilities while working within the ObjectScript environment.

Bonus

A good use of dunder is to put at the end of your python script a if __name__ == "__main__": block to prevent the code from being executed when the script is imported as a module.

Remember, the first article explained that when you import a script, the code is executed. This block allows you to define code that should only run when the script is executed directly, not when it's imported.

Example:

# src/python/article/dunder_example.py
def get_list():
    return [1, 2, 3, 4, 5]

if __name__ == "__main__":
    print(get_list())

Conclusion

What you can do in python even with it's sugar syntax, you can do it in ObjectScript with dunder methods.

0
2 107
Article Vachan C Rannore · Jul 24, 2025 1m read

Are you curious about how to run Python scripts directly in your InterSystems IRIS or Caché terminal? 🤔 Good news it's easy! 😆 IRIS supports Embedded Python, allowing you to use Python interactively within its terminal environment. 

How to access the Python Shell?

To launch the Python shell from the IRIS terminal, simply run the following command:

do##class(%SYS.Python).Shell()

This opens an interactive Python shell inside the IRIS terminal. From here, you can write and run Python code just as you would in a normal Python environment.

Exiting the Shell:

>>> quit()

4
1 135
Article Guillaume Rongier · Jul 24, 2025 5m read

img

Modules what a topic! We don't have this notion in ObjectScript, but it's a fundamental concept in Python. Let's discover it together.

What is a Module?

I see modules as an intermediate layer between classes and packages. Let see it by example.

A bad example :

# MyClass.py
class MyClass:
    def my_method(self):
        print("Hello from MyClass!")

When you try to use this class in another script, you would do:

# class_usage.py
from MyClass import MyClass # weird, right?

my_instance = MyClass()
my_instance.my_method()

Why this is a bad example?

First because file names should be in snake_case according to PEP 8, so it should be my_class.py. Second, because you are importing a class from a file that has the same name as the class. This is not a good practice in Python.

I know this can be confusing, especially if you come from ObjectScript where classes are defined in files with the same name as the class.

Advanced notions

A Module is a Python File

So we just saw that modules can be a python file but without the .py extension.

But wait, does it mean that a python script is a module too? Yes, it is!

That's why you should be careful when importing a script, because it will execute the code in that script. See the Introduction to Python article for more details.

A Module is a Folder with an __init__.py File

Wow, can a folder be a module? Yes, it can!

A folder can be a module if it contains an __init__.py file. This file can be empty or contain initialization code for the module.

Let's see an example:

src/python/article/
└── my_folder_module/
    ├── __init__.py
    ├── my_sub_module.py
    └── another_sub_module.py
# my_folder_module/my_sub_module.py
class MySubModule:
    def my_method(self):
        print("Hello from MySubModule!")
# my_folder_module/another_sub_module.py
class AnotherSubModule:
    def another_method(self):
        print("Hello from AnotherSubModule!")
# my_folder_module/__init__.py
# This file can be empty or contain initialization code for the module.

In this case, my_folder_module is a module, and you can import it like this:

from my_folder_module import my_sub_module, another_sub_module

Or if you define an __init__.py file with the following content:

# my_folder_module/__init__.py
from .my_sub_module import MySubModule
from .another_sub_module import AnotherSubModule

You can import it like this:

from my_folder_module import MySubModule, AnotherSubModule

You see the subtility? You can import the classes directly from the module without specifying the sub-module, because the __init__.py file is executed when you import the module, and it can define what is available in the module's namespace.

sys.path

When you import a module, Python looks for it in the directories listed in sys.path. This is a list of strings that specifies the search path for modules.

You can view the current sys.path by running the following code:

import sys
print(sys.path)

By default, it includes the current directory and other various directories depending on your Python installation.

You can also add directories to sys.path at runtime, which is useful when you want to import modules from a specific location. For example:

import sys
sys.path.append('/path/to/your/module')
from your_module import YourClass

This is why in the previous article, we added the path to the module before importing it:

Set sys = ##class(%SYS.Python).Import("sys")
do sys.path.append("/irisdev/app/src/python/article")
set my_module = ##class(%SYS.Python).Import("my_module")

sys.path and the other directories

What are the other directories in sys.path? They are usually:

  • The directory containing the input script (or the current directory if no script is specified).
  • The standard library directories, which contain the built-in modules that come with Python.
  • site-packages directories where third-party packages are installed.

site-packages

How site-packages works? When you install a package using pip, it is installed in the site-packages directory, which is automatically included in sys.path. This allows you to import the package without having to specify its location.

🤨🔍 But how and where the site-packages directory are set and by who?

The site-packages directory is created during the installation of Python and is typically located in the lib directory of your Python installation. The exact location depends on your operating system and how Python was installed.

For example, on a typical Linux installation, the site-packages directory might be located at:

/usr/local/lib/python3.x/site-packages

On Windows, it might be located at:

C:\Python3x\Lib\site-packages

When you install a package using pip, it is installed in the site-packages directory, which is automatically included in sys.path. This allows you to import the package without having to specify its location.

import site
print(site.getsitepackages())

🤨🔍 When and where python interpreter reads the site.py file?

The site.py file (which is located in the standard library directory) is executed automatically when the Python interpreter starts. It is responsible for setting up the site-packages directory and adding it to sys.path. This file is located in the standard library directory of your Python installation.

sys.path in IRIS

In IRIS, we also have a site.py file, which is located in <installation_directory>/lib/python/iris_site.py. This file is executed when you start or import aa script/module in IRIS, and it sets up the sys.path for you.

Roughly, the iris_site.py file does the following:

Conclusion

A module can be :

  • a Python file (with or without the .py extension)
  • a folder with an __init__.py file
  • a Python script (which is also a module)
  • if you can't import a module, check if it is in the sys.path list
0
2 125
Article Guillaume Rongier · Jul 21, 2025 2m read

img

This will be a short article about PEP 8, the Python style guide.

What is PEP 8?

In a nutshell, PEP 8 provides guidelines and best practices on how to write Python code.

  • variable names should be in snake_case
  • class names should be in CamelCase
  • function names should be in snake_case
  • constants should be in UPPER_CASE
  • indentation should be 4 spaces (no tabs)
  • private variables/functions should start with an underscore (_)
    • because in Python private variables and fonctions doesn't exist, it's just a convention
  • your script should not run when imported
    • remember that when you import a script, the code is executed see first article
  • ...

No need to say them all, but keep it in mind that will help you to understand other's code and help others to understand your code ^^.

Also, you may have heard about the words pythonic. Following PEP 8 is a way to write Python code that is considered "pythonic" (it's not only that but it's part of it).

Why PEP 8 is important and relevant to IRIS Python developers?

In IRIS and especially in ObjectScript, we also have a style guide, which is mainly based on camelCase for variable names and PascalCase for class names.

Unfortunately, PEP 8 recommends using snake_case for variable names and functions.

And you already know it, in ObjectScript underscore (_) is for concatenation and it obviously doesn't suit us well.

How to overcome this issue ? Use double quotes to call an variable/function names in Python in ObjectScript code.

Example:

Class Article.PEP8Example Extends %RegisteredObject
{

ClassMethod Run()
{
    Set sys = ##class(%SYS.Python).Import("sys")
    do sys.path.append("/irisdev/app/src/python/article")
    set pep8Example = ##class(%SYS.Python).Import("pep8_example")
    do pep8Example."my_function"() // Notice the double quotes around the function name
}

}

This will call the my_function function in the pep8_example.py file, which is defined as follows:

# src/python/article/pep8_example.py
def my_function():
    print("Hello, World!")

When you run the Run method of the Article.PEP8Example class, it will output:

iris session iris -U IRISAPP '##class(Article.PEP8Example).Run()'
Hello, World!

That's it!

1
0 136
Article Sylvain Guilbaud · Jul 18, 2025 8m read

🛠️ Managing InterSystems InterSystems API Manager (IAM = Kong Gateway) configurations in CI/CD

🔍 Context: InterSystems IAM configurations 

As part of integrating InterSystems IRIS into a secure and controlled environment, InterSystems IAM relies on Kong Gateway to manage exposed APIs.
Kong acts as a modern API Gateway, capable of handling authentication, security, traffic management, plugins, and more.

0
1 61
Article Guillaume Rongier · Jul 17, 2025 5m read

img

This will be an introduction to Python programming in the context of IRIS.

Before anything I will cover an important topic: How python works, this will help you understand some issues and limitations you may encounter when working with Python in IRIS.

All the articles and examples can be found in this git repository: iris-python-article

How Python works

Interpreted Language

Python is an interpreted language, which means that the code is executed line by line at runtime even when you import a script.

What does this mean ? Let's take a look at the following code:

# introduction.py

def my_function():
    print("Hello, World!")

my_function()

When you run this script, the Python interpreter reads the code line by line. It first defines the function my_function, and then it calls that function, which prints "Hello, World!" to the console.

Example of running the script directly:

python3 /irisdev/app/src/python/article/introduction.py 

This will output:

Hello, World!

In an IRIS context, what will happen if we import this script ?

Class Article.Introduction Extends %RegisteredObject
{
    ClassMethod Run()
    {
        Set sys = ##class(%SYS.Python).Import("sys")
        do sys.path.append("/irisdev/app/src/python/article")

        do ##class(%SYS.Python).Import("introduction")
    }
}

Let's run it:

iris session iris -U IRISAPP '##class(Article.Introduction).Run()'

You will see the output:

Hello, World!

This is because the Python interpreter imports the code by interpreting it, first it defines the function and then calls it, just like it would if you ran the script directly but you are not running you are importing it.

⚠️ Important Note: If you import the script without calling the function, nothing will happen. The function is defined, but it won't execute until you explicitly call it.

Did you get it? The Python interpreter executes the code in the file, and if you don't call the function, it won't run.

Example of importing without calling:

# introduction1.py
def my_function():
    print("Hello, World!")

Let's run it in an python interpreter:

python3 /irisdev/app/src/python/article/introduction1.py 

Output:

# No output, because the function is defined but not called

In an IRIS context, if you import this script:

Class Article.Introduction1 Extends %RegisteredObject
{
    ClassMethod Run()
    {
        Set sys = ##class(%SYS.Python).Import("sys")
        do sys.path.append("/irisdev/app/src/python/article")
        do ##class(%SYS.Python).Import("introduction1")
    }
}

Let's run it:

iris session iris -U IRISAPP '##class(Article.Introduction1).Run()'

You will see no output, because the function is defined but not called.

🤯 Why this subtlety is important ?

  • When you import a Python script, it executes the code in that script.
    • You may don't want this to happen
  • You can be confused by guessing importing a script it's like running it, but it's not.

Import caching

When you import a Python script, the Python interpreter caches the imported script. This means that if you import the same script again, it will not re-execute the code in that script, but will use the cached version.

Demonstration by example:

Let's reuse the introduction.py script:

# introduction.py
def my_function():
    print("Hello, World!")

my_function()

Now, same thing let's reuse the Article.Introduction class:

Class Article.Introduction Extends %RegisteredObject
{
    ClassMethod Run()
    {
        Set sys = ##class(%SYS.Python).Import("sys")
        do sys.path.append("/irisdev/app/src/python/article")
        do ##class(%SYS.Python).Import("introduction")
    }
}

But now, we will be running it twice in a row in the same IRIS session:

iris session iris -U IRISAPP 

IRISAPP>do ##class(Article.Introduction).Run()
Hello, World!

IRISAPP>do ##class(Article.Introduction).Run()

IRISAPP>

🤯 What the heck ?

Yes, Hello, World! is printed only once !

⚠️ Your imported script is cached. This means if you change the script after importing it, the changes will not be reflected until you change the IRIS session.

This is even true if you use the language tag python in IRIS:

Class Article.Introduction2 Extends %RegisteredObject
{

ClassMethod Run() [ Language = python ]
{
    import os

    if not hasattr(os, 'foo'):
        os.foo = "bar"
    else:
        print("os.foo already exists:", os.foo)
}

}

Let's run it:

iris session iris -U IRISAPP

IRISAPP>do ##class(Article.Introduction2).Run()

IRISAPP>do ##class(Article.Introduction2).Run()
os.foo already exists: bar

OMG, the os module is cached, and the foo attribute is not redefined to non existing.

Conclusion

I hope this introduction helped you understand why when you work with Python in IRIS, you may encounter some unexpected behaviors, especially when it comes to importing scripts and caching.

Takeway, when working with Python in IRIS:

  • Change everytime the IRIS session to see changes in your Python scripts.
    • This is not a bug, it's how Python works.
  • Be aware that importing a script executes its code.

Bonus

Wait ! It doesn't make sense, if you say that when you import a script, it's cached. Why when I work with the language tag = python, when I change the script, it works without changing the IRIS session?

Good question, this is because the language tag is built in a way that everytime you run it, it will read the script again and execute it line by line as it was new lines in an native Python interpreter, language tag doesn't import the script, it just executes it as if you were running it directly in a Python interpreter without restarting it.

Example:

Class Article.Introduction2 Extends %RegisteredObject
{
ClassMethod Run() [ Language = python ]
{
    import os

    if not hasattr(os, 'foo'):
        os.foo = "bar"
    else:
        print("os.foo already exists:", os.foo)
}
}

Let's run it:

iris session iris -U IRISAPP
IRISAPP>do ##class(Article.Introduction2).Run()

IRISAPP>do ##class(Article.Introduction2).Run()
os.foo already exists: bar  

In a python interpreter it will look like this:

import os

if not hasattr(os, 'foo'):
    os.foo = "bar"
else:
    print("os.foo already exists:", os.foo)

import os
if not hasattr(os, 'foo'):
    os.foo = "bar"
else:
    print("os.foo already exists:", os.foo)

Output:

os.foo already exists: bar # only printed once

Make sense now?

Next :

  • Pep8
  • Modules
  • Dunder methods
  • Working with Python in IRIS
  • ...
0
3 184
Article Liam Evans · Jul 14, 2025 3m read

For my intern project, I am building a Flask REST API backend. My goal is to host it on InterSystems IRIS using the WSGI interface. This is a relatively new approach and is currently only being used in a handful of projects such as AskMe. To help others get started, I decided to write this article to simplify the process.

Creating a Basic Flask App

First, let’s create a minimal Flask application. Here is the code:

0
1 105
Question Kunal Tiwari · Jul 10, 2025

Hello,

I'm trying to connect a Python backend application to an InterSystems IRIS Community Edition instance running in a Docker container on an AWS EC2 instance. I'm facing persistent connection issues and an SSL Error despite the Superserver apparently having SSL disabled. I'm hoping for some insight into what might be causing this contradictory behavior.

My Setup:

2
0 62
Article Henry Ames · Jun 18, 2025 2m read

I am writing this post primarily to gather an informal consensus on how developers are using Python in conjunction with IRIS, so please respond to the poll at the end of this article! In the body of the article, I'll give some background on each choice provided, as well as the advantages for each, but feel free to skim over it and just respond to the poll.

5
2 206
Article Henry Pereira · Jun 11, 2025 15m read

Learn how to design scalable, autonomous AI agents that combine reasoning, vector search, and tool integration using LangGraph.

cover

Too Long; Didn't Read

  • AI Agents are proactive systems that combine memory, context, and initiative to automate tasks beyond simple chatbots.
  • LangGraph is a framework that enables us to build complex AI workflows, utilizing nodes (tasks) and edges (connections) with built-in state management.
  • This guide will walk you through building an AI-powered customer support agent that classifies priorities, identifies relevant topics, and determines whether to escalate or auto-reply.

So, What Exactly Are AI Agents?

Let’s face it — “AI agents” can sound like the robots that will take over your boardroom. In reality, they are your proactive sidekicks that can streamline complex workflows and eliminate repetitive tasks. Think of them as the next evolutionary step beyond chatbots: they do not just simply wait for prompts; they initiate actions, coordinate multiple steps, and adapt as they go.

Back in the day, crafting a “smart” system meant juggling separate models for language understanding, code generation, data lookup, you name it, and then duct-taping them together. Half of your time used to vanish in integration hell, whereas the other half you spent debugging the glue.

Agents flip that script. They bundle context, initiative, and adaptability into a single orchestrated flow. It is not just automation; it is intelligence with a mission. And thanks to such frameworks as LangGraph, assembling an agent squad of your own can actually be… dare I say, fun?

image

What Is LangGraph, Exactly?

LangGraph is an innovative framework that revolutionizes the way we build complex applications involving Large Language Models (LLMs).

Imagine that you are conducting an orchestra: every instrument (or “node”) needs to know when to play, how loud, and in what sequence. LangGraph, in this case**,** is your baton, giving you the following:

  • Graph Structure: It employs a graph-like structure with nodes and edges, enabling developers to design flexible, non-linear workflows that accommodate branches and loops. It mirrors complex decision-making processes resembling the way neural pathways might work.
  • State Management: LangGraph offers built-in tools for state persistence and error recovery, simplifying the maintenance of contextual data across various stages within an application. It can effectively switch between short-term and long-term memory, enhancing interaction quality thanks to such tools as Zep.
  • Tool Integration: With LangGraph, LLM agents can easily collaborate with external services or databases to fetch real-world data, improving the functionality and responsiveness of your applications.
  • Human-in-the-Loop: Beyond automation, LangGraph accommodates human interventions in workflows, which are crucial for decision-making processes that require analytical oversight or ethical consideration.

Whether you are building a chatbot with real memory, an interactive story engine, or a team of agents tackling a complex problem, LangGraph turns headache-inducing plumbing into a clean, visual state machine.

Getting Started

To start with LangGraph, you will need a basic setup that typically involves installing such essential libraries as langgraph and langchain-openai. From there, you can define the nodes (tasks) and edges (connections) within the graph, effectively implementing checkpoints for short-term memory and utilizing Zep for more persistent memory needs.

When operating LangGraph, keep in mind the following:

  • Design with Flexibility: Leverage the powerful graph structure to account for potential workflow branches and interactions that are not strictly linear.
  • Interact with Tools Thoughtfully: Enhance but do not replace LLM capabilities with external tools. Provide each tool with comprehensive descriptions to enable precise usage.
  • Employ Rich Memory Solutions: Use memory efficiently, be mindful of the LLM's context window, and consider integrating external solutions for automatic fact management.

Now that we have covered the basics of LangGraph, let's dive into a practical example. To achieve this, we will develop an AI agent specifically designed for customer support.

This agent will receive email requests, analyze the problem description in the email body, and then determine the request's priority and appropriate topic/category/sector.

So buckle up and let's go!

buckle up

To begin, we need to define what a 'Tool' is. You can think of it as a specialized "assistant manager" for your agent, allowing it to interact with external functionalities.

The @tool decorator is essential here. LangChain simplifies custom tool creation, meaning that first, you define a Python function, and then apply the @tool decorator.

tools

Let's illustrate this by creating our first tool. This tool will help the agent classify the priority of an IT support ticket based on its email content:

    from langchain_core.tools import tool
    
    @tool
    def classify_priority(email_body: str) -> str:
        """Classify the priority of an IT support ticket based on email content."""
        prompt = ChatPromptTemplate.from_template(
            """Analyze this IT support email and classify its priority as High, Medium, or Low.
            
            High: System outages, security breaches, critical business functions down
            Medium: Non-critical issues affecting productivity, software problems
            Low: General questions, requests, minor issues
            
            Email: {email}
            
            Respond with only: High, Medium, or Low"""
        )
        chain = prompt | llm
        response = chain.invoke({"email": email_body})
        return response.content.strip()

Excellent! Now we have a prompt that instructs the AI to receive the email body, analyze it, and classify its priority as High, Medium, or Low.

That’s it! You have just composed a tool your agent can call!

Next, let's create a similar tool to identify the main topic (or category) of the support request:


    @tool
    def identify_topic(email_body: str) -> str:
        """Identify the main topic/category of the IT support request."""
        prompt = ChatPromptTemplate.from_template(
            """Analyze this IT support email and identify the main topic category.
            
            Categories: password_reset, vpn, software_request, hardware, email, network, printer, other
            
            Email: {email}
            
            Respond with only the category name (lowercase with underscores)."""
        )
        chain = prompt | llm
        response = chain.invoke({"email": email_body})
        return response.content.strip()

Now we need to create a state, and in LangGraph this little piece is, kind of, a big deal.

Think of it as the central nervous system of your graph. It is how nodes talk to each other, passing notes like overachievers in class.

According to the docs:

“A state is a shared data structure that represents the current snapshot of your application.”

In practice? The state is a structured message that moves between nodes. It carries the output of one step as the input for the next one. Basically, it is the glue that holds your entire workflow together.

Therefore, before constructing the graph, we must first define the structure of our state. In this example, our state will include the following:

  • The user’s request (email body)
  • The assigned priority
  • The identified topic (category)

It is simple and clean, so you can move through the graph like a pro.

    from typing import TypedDict

    # Define the state structure
    class TicketState(TypedDict):
        email_body: str
        priority: str
        topic: str
        
    
    # Initialize state
    initial_state = TicketState(
        email_body=email_body,
        priority="",
        topic=""
    )

Nodes vs. Edges: Key Components of LangGraph

The fundamental building blocks of LangGraph include nodes and edges.

  • Nodes: They are the operational units within the graph, performing the actual work. A node typically consists of Python code that can execute any logic, ranging from computations to interactions with language models (LLMs) or external integrations. Essentially, nodes are like individual functions or agents in traditional programming.
  • Edges: Edges define the flow of execution between nodes, determining what happens next. They act as the connectors that allow the state to transition from one node to another based on predefined conditions. In the context of LangGraph, edges are crucial in orchestrating the sequence and decision flow between nodes.

To grasp the functionality of edges, let’s consider a simple analogy of a messaging application:

  • Nodes are akin to users (or their devices) actively participating in a conversation.
  • Edges symbolize the chat threads or connections between users that facilitate communication.

When a user selects a chat thread to send a message, an edge is effectively created, linking them to another user. Each interaction, be it sending a text, voice, or video message, follows a predefined sequence, comparable to the structured schema of LangGraph’s state. It ensures uniformity and interpretability of data passed along edges.

Unlike the dynamic nature of event-driven applications, LangGraph employs a static schema that remains consistent throughout execution. It simplifies communication among nodes, enabling developers to rely on a stable state format, thereby ensuring seamless edge communication.

Designing a Basic Workflow

Flow engineering in LangGraph can be conceptualized as designing a state machine. In this paradigm, each node represents a distinct state or processing step, while edges define the transitions between those states. This approach is particularly beneficial for developers aiming to strike a balance between deterministic task sequences and the dynamic decision-making capabilities of AI. Let's begin constructing our flow by initializing a StateGraph with the TicketState class we defined earlier.

    from langgraph.graph import StateGraph, START, END
    
    workflow = StateGraph(TicketState)

Node Addition: Nodes are fundamental building blocks, defined to execute such specific tasks as classifying ticket priority or identifying its topic.

Each node function receives the current state, performs its operation, and returns a dictionary to update the state:

   def classify_priority_node(state: TicketState) -> TicketState:
        """Node to classify ticket priority."""
        priority = classify_priority.invoke({"email_body": state["email_body"]})
        return {"priority": priority}

    def identify_topic_node(state: TicketState) -> TicketState:
        """Node to identify ticket topic."""
        topic = identify_topic.invoke({"email_body": state["email_body"]})
        return {"topic": topic}
        
        
    workflow.add_node("classify_priority", classify_priority_node)
    workflow.add_node("identify_topic", identify_topic_node)

The classify_priority_node and identify_topic_node methods will change the TicketState and send the parameter input.

Edge Creation: Define edges to connect nodes:


    workflow.add_edge(START, "classify_priority")
    workflow.add_edge("classify_priority", "identify_topic")
    workflow.add_edge("identify_topic", END)

The classify_priority establishes the start, whereas the identify_topic determines the end of our workflow so far.

Compilation and Execution: Once nodes and edges are configured, compile the workflow and execute it.


    graph = workflow.compile()
    result = graph.invoke(initial_state)

Great! You can also generate a visual representation of our LangGraph flow.

graph.get_graph().draw_mermaid_png(output_file_path="graph.png")

If you were to run the code up to this point, you would observe a graph similar to the one below:

first_graph.png

This illustration visualizes a sequential execution: start, followed by classifying priority, then identifying the topic, and, finally, ending.

One of the most powerful aspects of LangGraph is its flexibility, which allows us to create more complex flows and applications. For instance, we can modify the workflow to add edges from START to both nodes with the following line:

    workflow.add_edge(START, "classify_priority")
    workflow.add_edge(START, "identify_topic")

This change will imply that the agent executes classify_priority and identify_topic simultaneously.

Another highly valuable feature in LangGraph is the ability to use conditional edges. They allow the workflow to branch based on the evaluation of the current state, enabling dynamic routing of tasks.

Let's enhance our workflow. We will create a new tool that analyzes the content, priority, and topic of the request to determine whether it is a high-priority issue requiring escalation (i.e., opening a ticket for a human team). If not, an automated response will be generated for the user.


    @tool
    def make_escalation_decision(email_body: str, priority: str, topic: str) -> str:
        """Decide whether to auto-respond or escalate to IT team."""
        prompt = ChatPromptTemplate.from_template(
            """Based on this IT support ticket, decide whether to:
            - "auto_respond": Send an automated response for simple/common or medium priority issues
            - "escalate": Escalate to the IT team for complex/urgent issues
            
            Email: {email}
            Priority: {priority}
            Topic: {topic}
            
            Consider: High priority items usually require escalation, while complex technical issues necessitate human review.
            
            Respond with only: auto_respond or escalate"""
        )
        chain = prompt | llm
        response = chain.invoke({
            "email": email_body,
            "priority": priority,
            "topic": topic
        })
        return response.content.strip()
        

Furthermore, if the request is determined to be of low or medium priority (leading to an "auto_respond" decision), we will perform a vector search to retrieve historical answers. This information will then be used to generate an appropriate automated response. However, it will require two additional tools:


    @tool
    def retrieve_examples(email_body: str) -> str:
        """Retrieve relevant examples from past responses based on email_body."""
        try:
            examples = iris.cls(__name__).Retrieve(email_body)
            return examples if examples else "No relevant examples found."
        except:
            return "No relevant examples found."

    @tool
    def generate_reply(email_body: str, topic: str, examples: str) -> str:
        """Generate a suggested reply based on the email, topic, and RAG examples."""
        prompt = ChatPromptTemplate.from_template(
            """Generate a professional IT support response based on:
            
            Original Email: {email}
            Topic Category: {topic}
            Example Response: {examples}
            
            Create a helpful, professional response that addresses the user's concern.
            Keep it concise and actionable."""
        )
        chain = prompt | llm
        response = chain.invoke({
            "email": email_body,
            "topic": topic,
            "examples": examples
        })
        return response.content.strip()

Now, let's define the corresponding nodes for those new tools:

    
    def decision_node(state: TicketState) -> TicketState:
        """Node to decide on escalation or auto-response."""
        decision = make_escalation_decision.invoke({
            "email_body": state["email_body"],
            "priority": state["priority"],
            "topic": state["topic"]
        })
        return {"decision": decision}
        
    
    def rag_node(state: TicketState) -> TicketState:
        """Node to retrieve relevant examples using RAG."""
        examples = retrieve_examples.invoke({"email_body": state["email_body"]})
        return {"rag_examples": examples}

    def generate_reply_node(state: TicketState) -> TicketState:
        """Node to generate suggested reply."""
        reply = generate_reply.invoke({
            "email_body": state["email_body"],
            "topic": state["topic"],
            "examples": state["rag_examples"]
        })
        return {"suggested_reply": reply}
        
    
    def execute_action_node(state: TicketState) -> TicketState:
        """Node to execute final action based on decision."""
        if state["decision"] == "escalate":
            action = f"&#x1f6a8; ESCALATED TO IT TEAM\nPriority: {state['priority']}\nTopic: {state['topic']}\nTicket created in system."
            print(f"[SYSTEM] Escalating ticket to IT team - Priority: {state['priority']}, Topic: {state['topic']}")
        else:
            action = f"&#x2705; AUTO-RESPONSE SENT\nReply: {state['suggested_reply']}\nTicket logged for tracking."
            print(f"[SYSTEM] Auto-response sent to user - Topic: {state['topic']}")
        
        return {"final_action": action}


    workflow.add_node("make_decision", decision_node)
    workflow.add_node("rag", rag_node)
    workflow.add_node("generate_reply", generate_reply_node)
    workflow.add_node("execute_action", execute_action_node)

The conditional edge will then use the output of the make_decision node to direct the flow:

    workflow.add_conditional_edges(
        "make_decision",
        lambda x: x.get("decision"),
        {
            "auto_respond": "rag",
            "escalate": "execute_action"
        }
    )

If the make_escalation_decision tool (via decision_node) results in "auto_respond", the workflow will proceed through the rag node (to retrieve examples), then to generate_reply (to craft the response), and finally to execute_action (to log the auto-response).

Conversely, if the decision is "escalate", the flow will bypass the RAG and take generation steps, moving directly to execute_action to handle the escalation. To complete the graph by adding the remaining standard edges, do the following:

    workflow.add_edge("rag", "generate_reply")
    workflow.add_edge("generate_reply", "execute_action")
    workflow.add_edge("execute_action", END)

Dataset Note: For this project, the dataset we used to power the Retrieval-Augmented Generation (RAG) was sourced from the Customer Support Tickets dataset on Hugging Face. The dataset was filtered to include exclusively the items categorized as 'Technical Support' and restricted to English entries. It ensured that the RAG system retrieved only highly relevant and domain-specific examples for technical support tasks.

At this point, our graph should resemble the one below:

graph.png

When you execute this graph with an email that results in a high priority classification and an "escalate" decision, you will see the following response:

image.png

At the same time, a request that is classified as low priority and results in an "auto_respond" decision will trigger a reply resembling the one below:

image.png

So... Is It All Sunshine?

Not entirely. There a few bumps to watch out for:

  • Data Privacy: Be careful with sensitive info — these agents require guardrails.
  • Compute Costs: Some advanced setups require serious resources.
  • Hallucinations: LLMs can occasionally make things up (still smarter than most interns, though).
  • Non-Determinism: The same input might return different outputs, which is great for creativity, but tricky for strict processes.

However, most of these weak spots can be managed with good planning, the right tools, and — you guessed it — a bit of reflection.

LangGraph turns AI agents from buzzwords into real, working solutions. Whether you want to automate customer support, handle IT tickets, or build autonomous apps, this framework makes it doable and, actually, enjoyable.

Have you got any questions or feedback? Let’s talk. The AI revolution needs builders like you.

4
3 458
Article Hannah Kimura · Jun 23, 2025 19m read

INTRO

Barricade is a tool developed by ICCA Ops to streamline and scale support for FHIR-to-OMOP transformations for InterSystems OMOP. Our clients will be using InterSystems OMOP to transform FHIR data to this OMOP structure. As a managed service, our job is to troubleshoot any issues that come with the transformation process. Barricade is the ideal tool to aid us in this process for a variety of reasons. First, effective support demands knowledge across FHIR standards, the OHDSI OMOP model, and InterSystems-specific operational workflows—all highly specialized areas. Barricade helps bridge knowledge gaps by leveraging large language models to provide expertise regarding FHIR and OHDSI. In addition to that, even when detailed explanations are provided to resolve specific transformation issues, that knowledge is often buried in emails or chats and lost for future use. Barricade can capture, reuse, and scale that knowledge across similar cases. Lastly, we often don’t have access to the source data, which means we must diagnose issues without seeing the actual payload—relying solely on error messages, data structure, and transformation context. This is exactly where Barricade excels: by drawing on prior patterns, domain knowledge, and contextual reasoning to infer the root cause and recommend solutions without direct access to the underlying data.

IMPLEMENTATION OVERVIEW

Barricade is built off of Vanna.AI. So, while I use Barricade a lot in this article to refer to the AI agent we created, the underlying model is really a Vanna model. At its core, Vanna is a Python package that uses retrieval augmentation to help you generate accurate SQL queries for your database using LLMs. We customized our vanna model to not only generate SQL queries, but to also be able to answer conceptual questions. Setting up vanna is extremely easy and quick. For our setup, we used chatgpt as the LLM, ChromaDB as our vector database, and Postgres as the database that stores the data we want to query (our run data -- data related to the transformation from FHIR-to-OMOP). You can choose from many different options for your LLM, vector database, and Postgres. Valid options are detailed here: Quickstart with your own data.

HOW THIS IS DIFFERENT THAN CHATGPT

ChatGPT is a standalone large language model (LLM) that generates responses based solely on patterns learned during its training. It does not access external data at inference time. Barricade, on the other hand, is built on Vanna.ai, a Retrieval-Augmented Generation (RAG) system. RAG enhances LLMs by layering dynamic retrieval over the model, which allows it to query external sources for real-time, relevant information and incorporate those results into its output. By integrating our Postgres database directly with Vanna.ai, Barricade can access:

  • The current database schema.
  • Transformation run logs.
  • Internal documentation.
  • Proprietary transformation rules.
    This live access is critical when debugging production data issues, because the model isn't just guessing- it’s seeing and reasoning with real data. In short, Barricade merges the language fluency of ChatGPT with the real-time accuracy of direct data access, resulting in more reliable, context-aware insights.

HOW BARRICADE WAS CREATED

STEP 1: CREATE VIRTUAL ENVIRONMENT

This step creates all the files that make up Vanna.

virtualenv --python="/usr/bin/python3.10" barricade
source barricade/bin/activate
pip install ipykernel
python -m ipykernel install --user --name=barricade
jupyter notebook --notebook-dir=.

For barricade, we will be editing many of these files to customize our experience. Notable files include:

  • barricade/lib/python3.13/site-packages/vanna/base/base.py
  • barricade/lib/python3.13/site-packages/vanna/openai/openai_chat.py
  • barricade/lib/python3.13/site-packages/vanna/flask/__init__.py
  • barricade/lib/python3.13/site-packages/vanna/flask/assets.py

STEP 2: INITIALIZE BARRICADE

This step includes importing the packages needed and initializing the model. The minimum imports needed are: from vanna.chromadb import ChromaDB_VectorStore from vanna.openai import OpenAI_Chat

NOTE: Each time you create a new model, make sure to remove all remnants of old training data or vector dbs. To use the code we used below, import os and shutil.

if os.path.exists("chroma.sqlite3"):
    os.remove("chroma.sqlite3")
    print("Unloading Vectors...")
else:
    print("The file does not exist")
base_path = os.getcwd() 
for root, dirs, files in os.walk(base_path, topdown=False):
    if "header.bin" in files:
        print(f"Removing directory: {root}")
        shutil.rmtree(root)

Now, it's time to initialize our model:

class MyVanna(ChromaDB_VectorStore, OpenAI_Chat):
    def __init__(self, config=None):
        # initialize the vector store (this calls VannaBase.__init__)
        ChromaDB_VectorStore.__init__(self, config=config)
        # initialize the chat client (this also calls VannaBase.__init__ but more importantly sets self.client)
        OpenAI_Chat.__init__(self, config=config)
        self._model = "barricade"
vn = MyVanna(config={'api_key': CHAT GPT API KEY, 'model': 'gpt-4.1-mini'})

STEP 3: TRAINING THE MODEL

This is where the customization begins. We begin my connecting to the Postgres tables. This has our run data. Fill in the arguments with your host, dbname, username, password, and port for the Postgres database.

vn.connect_to_postgres(host='POSTGRES DATABASE ENDPOINT', dbname='POSTGRES DB NAME', user='', password='', port='')

From there, we trained the model on the information schemas.

df_information_schema = vn.run_sql("SELECT * FROM INFORMATION_SCHEMA.COLUMNS") 
plan = vn.get_training_plan_generic(df_information_schema)
vn.train(plan=plan) 

After that, we went even further and decided to send Barricade to college. We loaded all of Chapters 4-7 from the book of OHDSI to give barricade a good understanding of OMOP core principals. We loaded FHIR documentation, specifically explanations of various FHIR resource types, which describe how healthcare data is structured, used, and interrelated so barricade understood FHIR resources. We loaded FHIR-to-OMOP mappings, so barricade understood which FHIR resource mapped to which OMOP table(s). And finally, we loaded specialized knowledge regarding edge cases that need to be understood for FHIR-to-OMOP transformations. Here is a brief overview of how that training looked:

FHIR resource example:

def load_fhirknowledge(vn): 
    url = "https://build.fhir.org/datatypes.html#Address" 
    response = requests.get(url) 
    soup = BeautifulSoup(response.text, "html.parser") 
    text_only = soup.get_text(separator="\n", strip=True) 
    vn.train(documentation=text_only) 

MAPPING example:

def load_mappingknowledge(vn): 
    # Transform 
    url = "https://docs.intersystems.com/services/csp/docbook/DocBook.UI.Page.cls?KEY=RDP_transform" 
    response = requests.get(url) 
    soup = BeautifulSoup(response.text, "html.parser") 
    text_only = soup.get_text(separator="\n", strip=True) 
    vn.train(documentation=text_only) 

The book of OHDSI example:

def load_omopknowledge(vn): 
    # Chapter 4 
    url = "https://ohdsi.github.io/TheBookOfOhdsi/CommonDataModel.html" 
    response = requests.get(url) 
    soup = BeautifulSoup(response.text, "html.parser") 
    text_only = soup.get_text(separator="\n", strip=True) vn.train(documentation=text_only) 

Specialized knowledge example:

def load_opsknowledge(vn):
    vn.train(documentation="Our business is to provide tools for generating evidence for the transformation Runs")

Finally, we train barricade to understand the SQL queries that are commonly used. This will help the system understand the context of the questions that are being asked:

cdmtables = ["conversion_warnings","conversion_issues","ingestion_report","care_site", "cdm_source", "cohort", "cohort_definition", "concept", "concept_ancestor", "concept_class", "concept_relationship", "concept_synonym", "condition_era", "condition_occurrence", "cost", "death", "device_exposure", "domain", "dose_era", "drug_era", "drug_exposure", "drug_strength", "episode", "episode_event", "fact_relationship", "location", "measurement", "metadata", "note", "note_nlp", "observation", "observation_period", "payer_plan_period", "person", "procedure_occurrence", "provider", "relationship", "source_to_concept_map", "specimen", "visit_detail", "visit_occurrence", "vocabulary"] 
for table in cdmtables: vn.train(sql="SELECT * FROM WHERE omopcdm54." + table) 

STEP 4: CUSTOMIZATIONS (OPTIONAL)

Barricade is quite different from the Vanna base model, and these customizations are a big reason for that. UI CUSTOMIZATIONS To customize anything related to the UI (what you see when you spin up the flask app and barricade comes to life), you should edit the barricade/lib/python3.13/site-packages/vanna/flask/__init__.py and barricade/lib/python3.13/site-packages/vanna/flask/assets.py paths. For barricade, we customized the suggested questions and the logos. To edit the suggested questions, modify the generate_questions function in barricade/lib/python3.13/site-packages/vanna/flask/__init__.py.

We added this:

if hasattr(self.vn, "_model") and self.vn._model == "barricade":
                return jsonify(
                    {
                        "type": "question_list",
                        "questions": [
                           "What are the transformation warnings?", 
                           "What does a fhir immunization resource map to in omop?",
                           "Can you retrieve the observation period of the person with PERSON_ID 61?",
                           "What are the mappings for the ATC B03AC?",
                           "What is the Common Data Model, and why do we need it for observational healthcare data?"
                        ],
                        "header": "Here are some questions you can ask:",
                    }
                )

Note that these suggested questions will only come up if you set self._model= barricade in STEP 2.

To change the logo, you must edit assets.py. This is tricky, because assets.py contains the compiled js and css code. To find the logo you want to replace, go to your browser that has the flask app running, and inspect element. Find the SVG block that corresponds to the logo, and replace that block in assets.py with the SVG block of the new image you want.

We also customized the graph response. In relevant questions, a graph is generated using plotly. The default prompts were generating graphs that were almost nonsensical. To fix this, we edited the generate_plotly_figure function in barricade/lib/python3.13/site-packages/vanna/flask/__init__.py. We specifically changed the prompt:

def generate_plotly_figure(user: any, id: str, df, question, sql):
            table_preview = df.head(10).to_markdown()  # or .to_string(), or .to_json()
            prompt = (
                f"Here is a preview of the result table (first 10 rows):\n{table_preview}\n\n"
                "Based on this data, generate Plotly Python code that produces an appropriate chart."
            )
            try:
                question = f"{question}. When generating the chart, use these special instructions: {prompt}"
                code = vn.generate_plotly_code(
                    question=question,
                    sql=sql,
                    df_metadata=f"Running df.dtypes gives:\n {df.dtypes}",
                )
                self.cache.set(id=id, field="plotly_code", value=code)
                fig = vn.get_plotly_figure(plotly_code=code, df=df, dark_mode=False)
                fig_json = fig.to_json()
                self.cache.set(id=id, field="fig_json", value=fig_json)
                return jsonify(
                    {
                        "type": "plotly_figure",
                        "id": id,
                        "fig": fig_json,
                    }
                )
            except Exception as e:
                import traceback
                traceback.print_exc()
                return jsonify({"type": "error", "error": str(e)})

The last UI customization we did was we chose to provide our own index.html. You specify the path to your index.html file when you initialize the flask app (otherwise it will use the default index.html).

PROMPTING/MODEL/LLM CUSTOMIZATIONS: We made many modifications in barricade/lib/python3.13/site-packages/vanna/base/base.py. Notable modifications include setting the temperature for the LLM dynamically (depending on the task), creating different prompts based on if the question was conceptual or one that required sql generation, and adding a check for hallucinations in the SQL generated by the LLM.

Temperature controls the randomness of text that is generated by LLMs during inference. A lower temperature essentially makes those tokens with the highest probability more likely to be selected; a higher temperature increases a model's likelihood of selecting less probable tokens. For tasks such as generating SQL, we want the temperature to be lower to prevent hallucinations. Hallucinations are when the LLM makes up something that doesn't exist. In SQL generation, a hallucination may look like the LLM querying a column that doesn't exist. This renders the query unusable, and throws an error. Thus, we edited the generate_sql function to change the temperature dynamically. The temperature is between 0 - 1. For questions deemed to be conceptual, we set the temperature to be 0.6, and for questions that require generating sql, we set the temperature to be 0.2. Furthermore, for tasks such as generating sql, the temperature is 0.2, while for tasks such as generating graphs and summaries, the default temperature is 0.5. We decided on 0.5 for the graph and summary tasks, because they require more creativity.

We added two helper functions: decide_temperature and is_conceptual. the keyword to indicate a conceptual question is if the user says "barricade" in their question.

def is_conceptual(self, question:str):
        q = question.lower()
        return (
            "barricade" in q and
            any(kw in q for kw in ["how", "why", "what", "explain", "cause", "fix", "should", "could"])
        )

def decide_temperature(self, question: str) -> float:
        if "barricade" in question.lower():
            return 0.6  # Conceptual reasoning
        return 0.2  # Precise SQL generation

If a question is conceptual, sql is not generated, and the LLM response is returned. We specified this in the prompt for the LLM. The prompt is different depending on if the question requires sql generation or if the question is conceptual. We do this in get_sql_prompt, which is called in generate_sql:

def get_sql_prompt(self, initial_prompt : str, question: str, question_sql_list: list, ddl_list: list, doc_list: list, conceptual: bool = False, **kwargs):
        if initial_prompt is None:
            if not conceptual:
                initial_prompt = f"You are a {self.dialect} expert. " + \
                "Please help to generate a SQL query to answer the question. Your response should ONLY be based on the given context and follow the response guidelines and format instructions. "
            else:
                initial_prompt = "Your name is barricade. If someone says the word barricade, it is not a part of the question, they are just saying your name. You are an expert in FHIR to OMOP transformations. Do not generate SQL. Your role is to conceptually explain the issue, root cause, or potential resolution. If the user mentions a specific table or field, provide interpretive guidance — not queries. Focus on summarizing, explaining, and advising based on known documentation and transformation patterns."
        initial_prompt = self.add_ddl_to_prompt(
            initial_prompt, ddl_list, max_tokens=self.max_tokens
        )
        if self.static_documentation != "":
            doc_list.append(self.static_documentation)
        initial_prompt = self.add_documentation_to_prompt(
            initial_prompt, doc_list, max_tokens=self.max_tokens
        )
        if not conceptual: 
            initial_prompt += (
                "===Response Guidelines \n"
                "1. If the provided context is sufficient, please generate a valid SQL query without any explanations for the question. \n"
                "2. If the provided context is almost sufficient but requires knowledge of a specific string in a particular column, please generate an intermediate SQL query to find the distinct strings in that column. Prepend the query with a comment saying intermediate_sql \n"
                "3. If the provided context is insufficient, please explain why it can't be generated. \n"
                "4. Please use the most relevant table(s). \n"
                "5. If the question has been asked and answered before, please repeat the answer exactly as it was given before. \n"
                f"6. Ensure that the output SQL is {self.dialect}-compliant and executable, and free of syntax errors. \n"
            )
        else: 
            initial_prompt += (
                "===Response Guidelines \n"
                "1. Do not generate SQL under any circumstances. \n"
                "2. Provide conceptual explanations, interpretations, or guidance based on FHIR-to-OMOP transformation logic. \n"
                "3. If the user refers to warnings or issues, explain possible causes and common resolutions. \n"
                "4. If the user references a table or field, provide high-level understanding of its role in the transformation process. \n"
                "5. Be concise but clear. Do not make assumptions about schema unless confirmed in context. \n"
                "6. If the question cannot be answered due to lack of context, state that clearly and suggest what additional information would help. \n"
                )
        message_log = [self.system_message(initial_prompt)]
        for example in question_sql_list:
            if example is None:
                print("example is None")
            else:
                if example is not None and "question" in example and "sql" in example:
                    message_log.append(self.user_message(example["question"]))
                    message_log.append(self.assistant_message(example["sql"]))
        message_log.append(self.user_message(question))
        return message_log

def generate_sql(self, question: str, allow_llm_to_see_data=True, **kwargs) -> str:
        temperature = self.decide_temperature(question)
        conceptual = self.is_conceptual(question)
        question = re.sub(r"\bbarricade\b","",question,flags=re.IGNORECASE).strip()
        if self.config is not None:
            initial_prompt = self.config.get("initial_prompt", None)
        else:
            initial_prompt = None
        question_sql_list = self.get_similar_question_sql(question, **kwargs)
        ddl_list = self.get_related_ddl(question, **kwargs)
        doc_list = self.get_related_documentation(question, **kwargs)
        prompt = self.get_sql_prompt(
            initial_prompt=initial_prompt,
            question=question,
            question_sql_list=question_sql_list,
            ddl_list=ddl_list,
            doc_list=doc_list,
            conceptual=conceptual,
            **kwargs,
        )
        self.log(title="SQL Prompt", message=prompt)
        llm_response = self.submit_prompt(prompt, temperature, **kwargs)
        self.log(title="LLM Response", message=llm_response)
        if 'intermediate_sql' in llm_response:
            if not allow_llm_to_see_data:
                return "The LLM is not allowed to see the data in your database. Your question requires database introspection to generate the necessary SQL. Please set allow_llm_to_see_data=True to enable this."
            if allow_llm_to_see_data:
                intermediate_sql = self.extract_sql(llm_response,conceptual)
                try:
                    self.log(title="Running Intermediate SQL", message=intermediate_sql)
                    df = self.run_sql(intermediate_sql,conceptual)
                    prompt = self.get_sql_prompt(
                        initial_prompt=initial_prompt,
                        question=question,
                        question_sql_list=question_sql_list,
                        ddl_list=ddl_list,
                        doc_list=doc_list+[f"The following is a pandas DataFrame with the results of the intermediate SQL query {intermediate_sql}: \n" + df.to_markdown()],
                        **kwargs,
                    )
                    self.log(title="Final SQL Prompt", message=prompt)
                    llm_response = self.submit_prompt(prompt, **kwargs)
                    self.log(title="LLM Response", message=llm_response)
                except Exception as e:
                    return f"Error running intermediate SQL: {e}"
        return self.extract_sql(llm_response,conceptual)

Even with a low temperature, the LLM would still generate hallucinations sometimes. To further prevent hallucinations, we added a check for them before returning the sql. We created a helper function, clean_sql_by_schema, which takes the generated SQL, and finds any columns that do not exist. It then removes that SQL, and returns the cleaned version with no hallucinations. For cases where the SQL is something like "SELECT cw.id FROM omop.conversion_issues", it uses the extract_alias_mapping to map cw to the conversion_issues table. Here are those functions for reference:

def extract_alias_mapping(self,sql: str) -> dict[str,str]:
        """
        Parse the FROM and JOIN clauses to build alias → table_name.
        """
        alias_map = {}
        # pattern matches FROM schema.table alias  or  FROM table alias
        for keyword in ("FROM", "JOIN"):
            for tbl, alias in re.findall(
                rf'{keyword}\s+([\w\.]+)\s+(\w+)', sql, flags=re.IGNORECASE
            ):
                # strip schema if present:
                table_name = tbl.split('.')[-1]
                alias_map[alias] = table_name
        return alias_map

def clean_sql_by_schema(self, sql: str,
                            schema_dict: dict[str,list[str]]
                        ) -> str:
        """
        Returns a new SQL where each SELECT-line is kept only if its alias.column
        is in the allowed columns for that table.
        schema_dict: { 'conversion_warnings': [...], 'conversion_issues': [...] }
        """
        alias_to_table = self.extract_alias_mapping(sql)
        lines = sql.splitlines()
        cleaned = []
        in_select = False
        for line in lines:
            stripped = line.strip()
            # detect start/end of the SELECT clause
            if stripped.upper().startswith("SELECT"):
                in_select = True
                cleaned.append(line)
                continue
            if in_select and re.match(r'FROM\b', stripped, re.IGNORECASE):
                in_select = False
                cleaned.append(line)
                continue
            if in_select:
                # try to find alias.column in this line
                m = re.search(r'(\w+)\.(\w+)', stripped)
                if m:
                    alias, col = m.group(1), m.group(2)
                    table = alias_to_table.get(alias)
                    if table and col in schema_dict.get(table, []):
                        cleaned.append(line)
                    else:
                        # drop this line entirely
                        continue
                else:
                    # no alias.column here (maybe a comma, empty line, etc)
                    cleaned.append(line)
            else:
                cleaned.append(line)
        # re-join and clean up any dangling commas before FROM
        out = "\n".join(cleaned)
        out = re.sub(r",\s*\n\s*FROM", "\nFROM", out, flags=re.IGNORECASE)
        self.log("RESULTING SQL:" + out)
        return out

STEP 5: Initialize the Flask App

Now we are ready to bring Barricade to life! The code below will spin up a flask app, which lets you communicate with the AI agent, barricade. As you can see, we specified our own index_html_path, subtitle, title, and more. This is all optional. These arguments are defined here: web customizations

from vanna.flask import VannaFlaskApp
app = VannaFlaskApp(vn,
                    chart=True,
                    sql=False,
                    allow_llm_to_see_data=True,ask_results_correct=False, 
                    title="InterSystems Barricade",
                    subtitle="Your AI-powered Transformation Cop for InterSystems OMOP",
                    index_html_path=current_dir + "/static/index.html"
                    )

Once your app is running, you will see barricade:

RESULTS/DEMO

Barricade can help you gain a deeper understanding about omop and fhir, and it can also help you debug transformation issues that you run into when you are trying to transform your fhir data to omop. To showcase Barricade's ability, I will show a real life example. A few months ago, we got an iService ticket, with the following description:

To test Barricade, I copied this description into Barricade, and here is the response:

First, Barricade gave me a table documenting the issues:

Then, Barricade gave me a graph to visualize the issues:

And, most importantly, Barricade gave me a description of the exact issue that was causing problems AND told me how to fix it:

READY 2025 demo Infographic

Here is a link to download the handout from our READY 2025 demo:

Download the handout.

0
3 122
Question Scott Fadden · Nov 11, 2020
I am trying to create a database using python. The example shows setting a Name string and a Properties object containing Directory=.

; Use class methods to create an instance
 %SYS>s Name="ABC"
 %SYS>s Properties("Directory")="c:\abc\"
 %SYS>s Status=##Class(Config.Databases).Create(Name,.Properties)
 %SYS>i '$$$ISOK(Status) w !,"Error="_$SYSTEM.Status.GetErrorText(Status)

How do I update and pass the Directory property using Python?

4
0 333
Article Guillaume Rongier · Jul 8, 2024 6m read

Flask_logo

Description

This is a template for a Flask application that can be deployed in IRIS as an native Web Application.

Installation

  1. Clone the repository
  2. Create a virtual environment
  3. Install the requirements
  4. Run the docker-compose file
git clone
cd iris-flask-template
python3 -m venv .venv
source .venv/bin/activate
pip install -r requirements.txt
docker-compose up

Usage

The base URL is http://localhost:53795/flask/.

Endpoints

  • /iris - Returns a JSON object with the top 10 classes present in the IRISAPP namespace.
  • /interop - A ping endpoint to test the interoperability framework of IRIS.
  • /posts - A simple CRUD endpoint for a Post object.
  • /comments - A simple CRUD endpoint for a Comment object.

How to develop from this template

See WSGI introduction article: wsgi-introduction.

TL;DR : You can toggle the DEBUG flag in the Security portal to make changes to be reflected in the application as you develop.

Code presentation

app.py

This is the main file of the application. It contains the Flask application and the endpoints.

from flask import Flask, jsonify, request
from models import Comment, Post, init_db

from grongier.pex import Director

import iris

app = Flask(__name__)
app.config['SQLALCHEMY_DATABASE_URI'] = 'iris+emb://IRISAPP'

db = init_db(app)
  • from flask import Flask, jsonify, request: Import the Flask library.
  • from models import Comment, Post, init_db: Import the models and the database initialization function.
  • from grongier.pex import Director: Import the Director class to bind the flask app to the IRIS interoperability framework.
  • import iris: Import the IRIS library.
  • app = Flask(__name__): Create a Flask application.
  • app.config['SQLALCHEMY_DATABASE_URI'] = 'iris+emb://IRISAPP': Set the database URI to the IRISAPP namespace.
    • The iris+emb URI scheme is used to connect to IRIS as an embedded connection (no need for a separate IRIS instance).
  • db = init_db(app): Initialize the database with the Flask application.

models.py

This file contains the SQLAlchemy models for the application.

from dataclasses import dataclass
from typing import List
from flask_sqlalchemy import SQLAlchemy

db = SQLAlchemy()

@dataclass
class Comment(db.Model):
    id:int = db.Column(db.Integer, primary_key=True)
    content:str = db.Column(db.Text)
    post_id:int = db.Column(db.Integer, db.ForeignKey('post.id'))

@dataclass
class Post(db.Model):
    __allow_unmapped__ = True
    id:int = db.Column(db.Integer, primary_key=True)
    title:str = db.Column(db.String(100))
    content:str = db.Column(db.Text)
    comments:List[Comment] = db.relationship('Comment', backref='post')

Not much to say here, the models are defined as dataclasses and are subclasses of the db.Model class.

The use of the __allow_unmapped__ attribute is necessary to allow the creation of the Post object without the comments attribute.

dataclasses are used to help with the serialization of the objects to JSON.

The init_db function initializes the database with the Flask application.

def init_db(app):
    db.init_app(app)

    with app.app_context():
        db.drop_all()
        db.create_all()
        # Create fake data
        post1 = Post(title='Post The First', content='Content for the first post')
        ...
        db.session.add(post1)
        ...
        db.session.commit()
    return db
  • db.init_app(app): Initialize the database with the Flask application.
  • with app.app_context(): Create a context for the application.
  • db.drop_all(): Drop all the tables in the database.
  • db.create_all(): Create all the tables in the database.
  • Create fake data for the application.
  • return the database object.

/iris endpoint

######################
# IRIS Query example #
######################

@app.route('/iris', methods=['GET'])
def iris_query():
    query = "SELECT top 10 * FROM %Dictionary.ClassDefinition"
    rs = iris.sql.exec(query)
    # Convert the result to a list of dictionaries
    result = []
    for row in rs:
        result.append(row)
    return jsonify(result)

This endpoint executes a query on the IRIS database and returns the top 10 classes present in the IRISAPP namespace.

/interop endpoint

########################
# IRIS interop example #
########################
bs = Director.create_python_business_service('BS')

@app.route('/interop', methods=['GET', 'POST', 'PUT', 'DELETE'])
def interop():
    
    rsp = bs.on_process_input(request)

    return jsonify(rsp)

This endpoint is used to test the interoperability framework of IRIS. It creates a Business Service object and binds it to the Flask application.

NB : The bs object must be outside of the scope of the request to keep it alive.

  • bs = Director.create_python_business_service('BS'): Create a Business Service object named 'BS'.
  • rsp = bs.on_process_input(request): Call the on_process_input method of the Business Service object with the request object as an argument.

/posts endpoint

############################
# CRUD operations posts    #
############################

@app.route('/posts', methods=['GET'])
def get_posts():
    posts = Post.query.all()
    return jsonify(posts)

@app.route('/posts', methods=['POST'])
def create_post():
    data = request.get_json()
    post = Post(title=data['title'], content=data['content'])
    db.session.add(post)
    db.session.commit()
    return jsonify(post)

@app.route('/posts/<int:id>', methods=['GET'])
def get_post(id):
    ...

This endpoint is used to perform CRUD operations on the Post object.

Thanks to the dataclasses module, the Post object can be easily serialized to JSON.

Here we use the sqlalchemy query method to get all the posts, and the add and commit methods to create a new post.

/comments endpoint

############################
# CRUD operations comments #
############################

@app.route('/comments', methods=['GET'])
def get_comments():
    comments = Comment.query.all()
    return jsonify(comments)

@app.route('/comments', methods=['POST'])
def create_comment():
    data = request.get_json()
    comment = Comment(content=data['content'], post_id=data['post_id'])
    db.session.add(comment)
    db.session.commit()
    return jsonify(comment)

@app.route('/comments/<int:id>', methods=['GET'])
def get_comment(id):
    ...

This endpoint is used to perform CRUD operations on the Comment object.

The Comment object is linked to the Post object by a foreign key.

Troubleshooting

How to run the Flask application in a standalone mode

You can always run a standalone Flask application with the following command:

python3 /irisdev/app/community/app.py

NB : You must be inside of the container to run this command.

docker exec -it iris-flask-template-iris-1 bash

Restart the application in IRIS

Be in DEBUG mode make multiple calls to the application, and the changes will be reflected in the application.

How to access the IRIS Management Portal

You can access the IRIS Management Portal by going to http://localhost:53795/csp/sys/UtilHome.csp.

Run this template locally

For this you need to have IRIS installed on your machine.

Next you need to create a namespace named IRISAPP.

Install the requirements.

Install IoP :

#init iop
iop --init

# load production
iop -m /irisdev/app/community/interop/settings.py

# start production
iop --start Python.Production

Configure the application in the Security portal.

4
1 491
Article Harry Tong · Jun 6, 2025 2m read

If you're migrating from Oracle to InterSystems IRIS—like many of my customers—you may run into Oracle-specific SQL patterns that need translation.

Take this example:

SELECT (TO_DATE('2023-05-12','YYYY-MM-DD') - LEVEL + 1) AS gap_date
FROM dual
CONNECT BY LEVEL <= (TO_DATE('2023-05-12','YYYY-MM-DD') - TO_DATE('2023-05-02','YYYY-MM-DD') + 1);

In Oracle:

1
0 99
Article Ashok Kumar T · Aug 30, 2024 3m read

Hello Community

I have previously experimented with embedded Python in IRIS; however, I have not yet had the opportunity to implement IRIS using native Python. In this article, I aim to outline the steps I took to begin learning and implementing IRIS within the Python source. I would also like thank to @Guillaume Rongier and @Luis Angel Pérez Ramos for their help in resolving the issues I encountered during my recent PIP installation of IRIS in Python, which ultimately enabled it to function properly.

Let's begin to write IRIS in python.

7
5 571
Article Heloisa Paiva · Mar 17, 2023 2m read

Why I've decided to write this

In my last article I've talked about returning values with Python. But returning them is simple, what can make it harder is what I'm going to talk about today: where the value is treated.
 

Python object in IRIS

Following the example of the last aricle, we have the method:

Class python.returnTest [ Abstract ]
{

ClassMethod returnSomething(pValue... As%String) As%Integer [ Language = python ]
{
	return pValue
}

}


Then, we'll have as a return a Python object, that IRIS interprets as  the class %SYS.Python. So if I call the method with two values, like this:

4
4 572
Article Alex Alcivar · Jul 28, 2024 6m read

For a long time I have wanted to learn the Django framework, but another more pressing project has always taken priority. Like many developers, I use python when it comes to machine learning, but when I first learned web programming PHP was still enjoying primacy, and so when it was time for me to pick up a new complicated framework for creating web applications to publish my machine learning work, I still turned to PHP. For a while I have been using a framework called Laravel to build my websites, and this PHP framework introduced me to the modern Model-View-Controller pattern of web

2
1 376
Article Henry Pereira · May 29, 2025 6m read

image

You know that feeling when you get your blood test results and it all looks like Greek? That's the problem FHIRInsight is here to solve. It started with the idea that medical data shouldn't be scary or confusing – it should be something we can all use. Blood tests are incredibly common for checking our health, but let's be honest, understanding them is tough for most folks, and sometimes even for medical staff who don't specialize in lab work. FHIRInsight wants to make that whole process easier and the information more actionable.

FHIRInsight logo

🤖 Why We Built FHIRInsight

It all started with a simple but powerful question:

“Why is reading a blood test still so hard — even for doctors sometimes?”

If you’ve ever looked at a lab result, you’ve probably seen a wall of numbers, cryptic abbreviations, and a “reference range” that may or may not apply to your age, gender, or condition. It’s a diagnostic tool, sure — but without context, it becomes a guessing game. Even experienced healthcare professionals sometimes need to cross-reference guidelines, research papers, or specialist opinions to make sense of it all.

That’s where FHIRInsight steps in.

We didn’t build it just for patients — we built it for the people on the frontlines of care. For the doctors pulling back-to-back shifts, for the nurses catching subtle patterns in vitals, for every health worker trying to make the right call with limited time and lots of responsibility. Our goal is to make their jobs just a little bit easier — by turning dense, clinical FHIR data into something clear, useful, and grounded in real medical science. Something that speaks human.

FHIRInsight does more than just explain lab values. It also:

  • Provides contextual advice on whether a test result is mild, moderate, or severe
  • Suggests potential causes and differential diagnoses based on clinical signs
  • Recommends next steps — whether that’s follow-up tests, referrals, or urgent care
  • Leverages RAG (Retrieval-Augmented Generation) to pull in relevant scientific articles that support the analysis

Imagine a young doctor reviewing a patient’s anemia panel. Instead of Googling every abnormal value or digging through medical journals, they receive a report that not only summarizes the issue but cites recent studies or WHO guidelines that support the reasoning. That’s the power of combining AI and vector search over curated research.

And what about the patient?

They’re no longer left staring at a wall of numbers, wondering what something like “bilirubin 2.3 mg/dL” is supposed to mean — or whether they should be worried. Instead, they get a simple, thoughtful explanation. One that feels more like a conversation than a clinical report. Something they can actually understand — and bring into the discussion with their doctor, feeling more prepared and less anxious.

Because that’s what FHIRInsight is really about: turning medical complexity into clarity, and helping both healthcare professionals and patients make better, more confident decisions — together.

🔍 Under the Hood

Of course, all that simplicity on the surface is made possible by some powerful tech working quietly in the background.

Here’s what FHIRInsight is built on:

  • FHIR (Fast Healthcare Interoperability Resources) — This is the global standard for health data. It’s how we receive structured information like lab results, patient history, demographics, and encounters. FHIR is the language that medical systems speak — and we translate that language into something people can actually use.
  • Vector Search for RAG (Retrieval-Augmented Generation): FHIRInsight enhances its diagnostic reasoning by indexing scientific PDF papers and trusted URLs into a vector database using InterSystems IRIS native vector search. When a lab result looks ambiguous or nuanced, the system retrieves relevant content to support its recommendations — not from memory, but from real, up-to-date research.
  • Prompt Engineering for Medical Reasoning: We’ve fine-tuned our prompts to guide the LLM toward identifying a wide spectrum of blood-related conditions. Whether it’s iron deficiency anemia, coagulopathies, hormonal imbalances, or autoimmune triggers — the prompt guides the LLM through variations in symptoms, lab patterns, and possible causes.
  • LiteLLM Integration: A custom adapter routes requests to multiple LLM providers (OpenAI, Anthropic, Ollama, etc.) through a unified interface, enabling fallback, streaming, and model switching with ease.

All of this happens in a matter of seconds — turning raw lab values into explainable, actionable medical insight, whether you’re a doctor reviewing 30 patient charts or a patient trying to understand what your numbers mean.

🧩 Creating the LiteLLM Adapter: One Interface to Rule All Models

Behind the scenes, FHIRInsight’s AI-powered reporting is driven by LiteLLM — a brilliant abstraction layer that allows us to call over 100+ LLMs (OpenAI, Claude, Gemini, Ollama, etc.) through a single OpenAI-style interface.

But integrating LiteLLM into InterSystems IRIS required something more permanent and reusable than Python scripts tucked away in a Business Operation. So, we created our own LiteLLM Adapter.

Meet LiteLLMAdapter

This adapter class handles everything you’d expect from a robust LLM integration:

  • Accepts parameters like prompt, model, and temperature
  • Loads your environment variables (e.g., API keys) dynamically

To plug this into our interoperability production, we wrapped it in a dedicated Business Operation:

  • Handles production configuration via standard LLMModel setting
  • Integrates with the FHIRAnalyzer component for real-time report generation
  • Acts as a central “AI bridge” for any future components needing LLM access

Here’s the core flow simplified:

set response = ##class(dc.LLM.LiteLLMAdapter).CallLLM("Tell me about hemoglobin.", "openai/gpt-4o", 0.7)
write response

🧭 Conclusion

When we started building FHIRInsight, our mission was simple: make blood tests easier to understand — for everyone. Not just patients, but doctors, nurses, caregivers... anyone who’s ever stared at a lab result and thought, “Okay, but what does this actually mean?”

We’ve all been there.

By blending the structure of FHIR, the speed of InterSystems IRIS, the intelligence of LLMs, and the depth of real medical research through vector search, we created a tool that turns confusing numbers into meaningful stories. Stories that help people make smarter decisions about their health — and maybe even catch something early that would’ve gone unnoticed.

But FHIRInsight isn’t just about data. It’s about how we feel when we look at data. We want it to feel clear, supportive, and empowering. We want the experience to be... well, kind of like “vibecoding” healthcare — that sweet spot where smart code, good design, and human empathy come together.

We hope you’ll try it, break it, question it — and help us improve it.

Tell us what you’d like to see next. More conditions? More explainability? More personalization?

This is just the beginning — and we’d love for you to help shape what comes next.

2
0 95
Question Touggourt · Apr 25, 2025

Hi Guys,

I'm a newbie running IRIS in a container (IRIS for UNIX (Ubuntu Server LTS for x86-64 Containers) 2024.3 (Build 217U) Thu Nov 14 2024 17:30:43 EST) and trying to setup Python so I can start working on ML & Autosklearn,my understanding is that IRIS already comes with embedded Python but unable to do something like "import pandas as pd"  in VSCode which looks like I need install a more complete version of Python or packages, so what I'm missing?


2
0 154
Article Jim Liu · May 14, 2025 7m read

This article presents a potential solution for semantic code search in TrakCare using IRIS Vector Search.

Here's a brief overview of results from the TrakCare Semantic code search for the query: "Validation before database object save".


  • Code Embedding model 

There are numerous embedding models designed for sentences and paragraphs, but they are not ideal for code specific embeddings.

0
0 187
Article Kunal Pandey · May 12, 2025 1m read

Introducing Smart Clinical Sidechick — the intelligent, no-drama partner your EHR wishes it could be. She reads FHIR data in real time, interprets lab results without ghosting, and explains clinical alerts like she actually cares. Built with GPT-4 brains and YAML sass, she’s not here to replace your main EHR—just to make it look bad. Tired of irrelevant alerts and cryptic warnings? Sidechick serves up real, explainable insights, not vague “elevated risk” vibes. And when your backend crashes, she doesn’t panic—she self-heals. Secure, responsive, and (unlike your last vendor) emotionally

0
1 139
Article sween · Mar 4, 2024 8m read

If you are a customer of the new InterSystems IRIS® Cloud SQL and InterSystems IRIS® Cloud IntegratedML® cloud offerings and want access to the metrics of your deployments and send them to your own Observability platform, here is a quick and dirty way to get it done by sending the metrics to Google Cloud Platform Monitoring (formerly StackDriver).

1
2 338