In this article, we’ll build a highly available IRIS configuration using Kubernetes Deployments with distributed persistent storage instead of the “traditional” IRIS mirror pair. This deployment would be able to tolerate infrastructure-related failures, such as node, storage and Availability Zone failures. The described approach greatly reduces the complexity of the deployment at the expense of slightly extended RTO.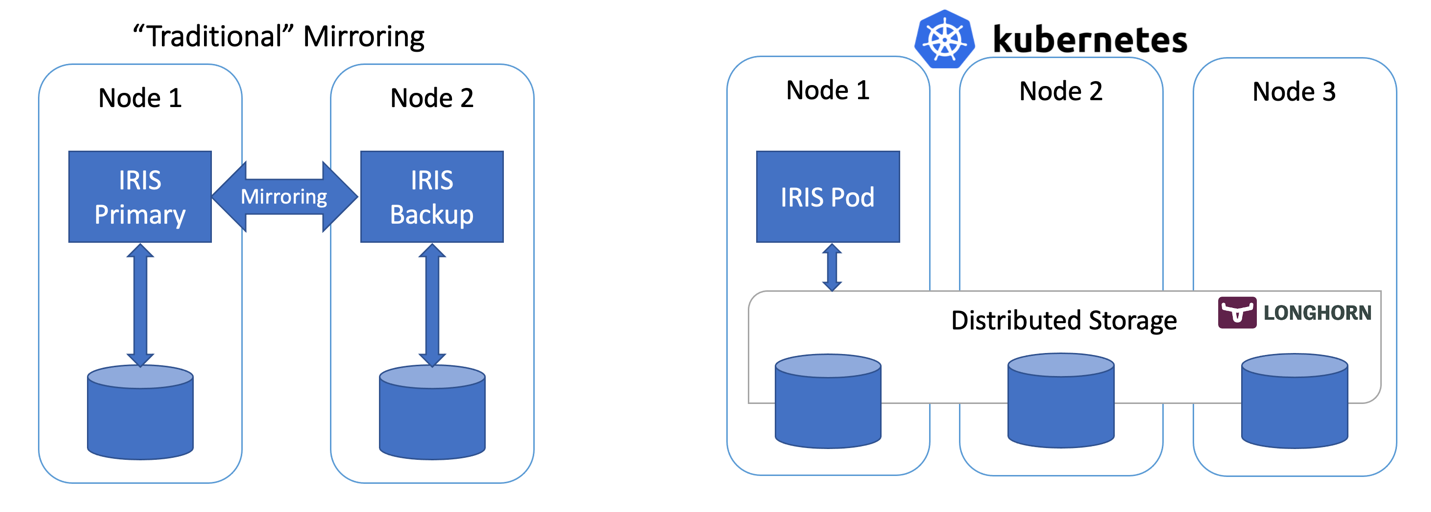
Figure 1 - Traditional Mirroring vs Kubernetes with Distributed StorageAssuming you have a running 3 node cluster and have some familiarity with Kubernetes – go right ahead:
kubectl apply -f https://raw.githubusercontent.com/longhorn/longhorn/master/deploy/longhorn.yaml
kubectl apply -f https://github.com/antonum/ha-iris-k8s/raw/main/tldr.yaml
If you are not sure what the two lines above are about or don’t have the system to execute these on – skip to the “High Availability Requirements” section. We’ll explain things in the details as we go.
The first line installs Longhorn - open-source distributed Kubernetes storage. The second one installs InterSystems IRIS deployment, using Longhorn-based volume for Durable SYS.
Wait for all the pods to come up to the running state. kubectl get pods -A
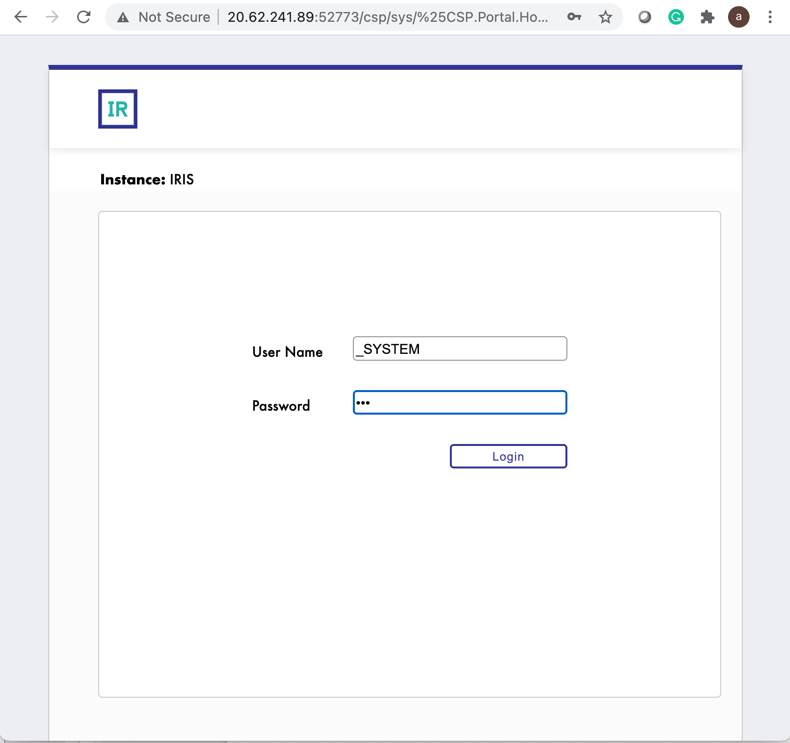
You now should be able to access the IRIS management portal at http://<IRIS Service Public IP>:52773/csp/sys/%25CSP.Portal.Home.zen (default password is 'SYS') and IRIS command line via:
kubectl exec -it iris-podName-xxxx -- iris session iris
Simulate the Failure
Now start messing around. But before you do it, try to add some data into the database and make sure it's there when IRIS is back online.
kubectl exec -it iris-6d8896d584-8lzn5 -- iris session iris
USER>set ^k8stest($i(^k8stest))=$zdt($h)_" running on "_$system.INetInfo.LocalHostName()
USER>zw ^k8stest
^k8stest=1
^k8stest(1)="01/14/2021 14:13:19 running on iris-6d8896d584-8lzn5"
Our "chaos engineering" starts here:
# Stop IRIS - Container will be restarted automatically
kubectl exec -it iris-6d8896d584-8lzn5 -- iris stop iris quietly

# Delete the pod - Pod will be recreated
kubectl delete pod iris-6d8896d584-8lzn5

# "Force drain" the node, serving the iris pod - Pod would be recreated on another node
kubectl drain aks-agentpool-29845772-vmss000001 --delete-local-data --ignore-daemonsets --force

# Delete the node - Pod would be recreated on another node
# well... you can't really do it with kubectl. Find that instance or VM and KILL it.
# if you have access to the machine - turn off the power or disconnect the network cable. Seriously!
High Availability Requirements
We are building a system that can tolerate a failure of the following:
- IRIS instance within container/VM. IRIS – level failure.
- Pod/Container failure.
- Temporary unavailability of the individual cluster node. A good example would be the Availability Zone temporary goes off-line.
- Permanent failure of individual cluster node or disk.
Basically, the scenarios we just tried in the “Simulate the failure” section.
If any of these failures occur, the system should get online without any human involvement and without data loss. Technically there are limits on what data persistence guarantees. IRIS itself can provide based on the Journal Cycle and transaction usage within an application: https://docs.intersystems.com/irisforhealthlatest/csp/docbook/Doc.View.cls?KEY=GCDI_journal#GCDI_journal_writecycle In any case, we are talking under two seconds for RPO (Recovery Point Objective).
Other components of the system (Kubernetes API Service, etcd database, LoadBalancer service, DNS and others) are outside of the scope and typically managed by the Managed Kubernetes Service such as Azure AKS or AWS EKS so we assume that they are highly available already.
Another way of looking at it – we are responsible for handling individual compute and storage component failures and assuming that the rest is taken care of by the infrastructure/cloud provider.
Architecture
When it comes to high availability for InterSystems IRIS, the traditional recommendation is to use mirroring. With mirroring you have two always-on IRIS instances synchronously replicating data. Each node maintains a full copy of the database and if the Primary node goes down, users reconnect to the Backup node. Essentially, with the mirroring approach, IRIS is responsible for the redundancy of both compute and storage.
With mirrors deployed in different availability zones, mirroring provides required redundancy for both compute and storage failure and allows for the excellent RTO (Recovery Time Objective or the time it takes for a system to get back online after a failure) of just a few seconds. You can find the deployment template for Mirrored IRIS on AWS Cloud here: https://community.intersystems.com/post/intersystems-iris-deployment%C2%A0guide-aws%C2%A0using-cloudformation-template
The less pretty side of mirroring is the complexity of setting it up, performing backup/restore procedures and the lack of replication for security settings and local non-database files.
Container orchestrators such as Kubernetes (wait, it’s 2021… are there any other left?!) provide compute redundancy via Deployment objects, automatically restarting the failed IRIS Pod/Container in case of failure. That’s why you see only one IRIS node running on the Kubernetes architecture diagram. Instead of keeping a second IRIS node always running we outsource the compute availability to Kubernetes. Kubernetes will make sure that the IRIS pod be recreated in case the original pod fails for whatever reason.
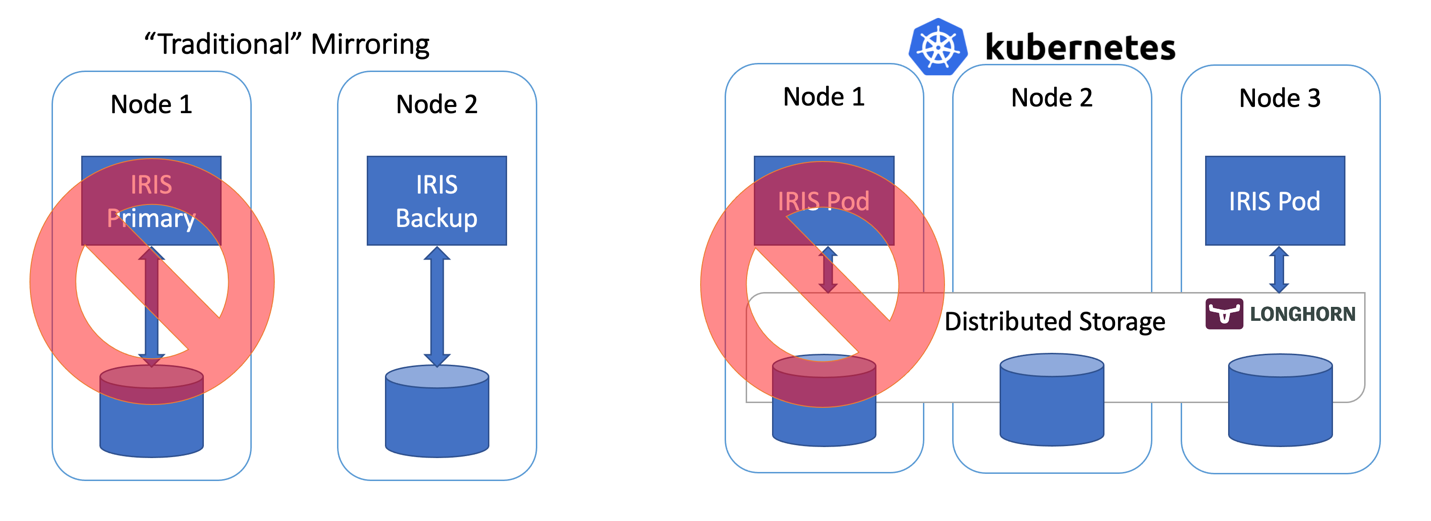
Figure 2 Failover Scenario
So far so good… If IRIS node fails, Kubernetes just creates a new one. Depending on your cluster it takes anywhere between 10 and 90 seconds to get IRIS back online after the compute failure. It is a step down compared with just a couple of seconds for mirroring, but if it’s something you can tolerate in the unlikely event of the outage, the reward is the greatly reduced complexity. No mirroring to configure. No security setting and file replication to worry about.
Frankly, if you login inside the container, running IRIS in Kubernetes, you’ll not even notice that you are running inside the highly available environment. Everything looks and feels just like a single instance IRIS deployment.
Wait, what about storage? We are dealing with a database nevertheless … Whatever failover scenario we can imagine, our system should take care of the data persistence too. Mirroring relies on the compute, local to the IRIS node. If the node dies or just becomes temporarily unavailable – so does the storage for that node. That’s why in mirroring configuration IRIS takes care of replicating databases on the IRIS level.
We need storage that can not only preserve the state of the database upon container restart but also can provide redundancy for the event like node or entire segment of the network (Availability Zone) going down. Just a few years ago there was no easy answer to this. As you can guess from the diagram above – we have such an answer now. It is called distributed container storage.
Distributed storage abstracts underlying host volumes and presents them as one joint storage available to every node of the k8s cluster. We use Longhorn https://longhorn.io in this article; it’s free, open-source and fairly easy to install. But you can also take a look at others, such as OpenEBS, Portworx and StorageOS that would provide the same functionality. Rook Ceph is another CNCF Incubating project to consider. On the high end of the spectrum – there are enterprise-grade storage solutions such as NetApp, PureStorage and others.
Step by step guide
In TL;DR section we just installed the whole thing in one shot. Appendix B would guide you through step- by step installation and validation procedures.
Kubernetes Storage
Let’s step back for a second and talk about containers and storage in general and how IRIS fits into the picture.
By default all data inside the container is ephemeral. When the container dies, data disappears. In Docker, you can use the concept of volumes. Essentially it allows you to expose the directory on the host OS to the container.
docker run --detach
  --publish 52773:52773
  --volume /data/dur:/dur
  --env ISC_DATA_DIRECTORY=/dur/iconfig
  --name iris21 --init intersystems/iris:2020.3.0.221.0
In the example above we are starting the IRIS container and making the host-local ‘/data/dur’ directory accessible to the container at the ‘/dur’ mount point. So, if the container is storing anything inside this directory, it would be preserved and available to use on the next container start.
On the IRIS side of things, we can instruct IRIS to store all the data that needs to survive container restart in the specific directory by specifying ISC_DATA_DIRECTORY. Durable SYS is the name of the IRIS feature you might need to look for in the documentation https://docs.intersystems.com/irisforhealthlatest/csp/docbook/Doc.View.cls?KEY=ADOCK#ADOCK_iris_durable_running
In Kubernetes the syntax is different, but the concepts are the same.
Here is the basic Kubernetes Deployment for IRIS.
apiVersion: apps/v1
kind: Deployment
metadata:
  name: iris
spec:
  selector:
    matchLabels:
      app: iris
  strategy:
    type: Recreate
  replicas: 1
  template:
    metadata:
      labels:
        app: iris
    spec:
      containers:
      - image: store/intersystems/iris-community:2020.4.0.524.0
        name: iris
        env:
        - name: ISC_DATA_DIRECTORY
          value: /external/iris
        ports:
        - containerPort: 52773
          name: smp-http
        volumeMounts:
        - name: iris-external-sys
          mountPath: /external
      volumes:
      - name: iris-external-sys
        persistentVolumeClaim:
          claimName: iris-pvc
In the deployment specification above, ‘volumes’ part lists storage volumes. They can be available outside of the container, via persistentVolumeClaim such as ‘iris-pvc’. volumeMounts expose this volume inside the container. ‘iris-external-sys’ is the identifier that ties volume mount to the specific volume. In reality, we might have multiple volumes and this name is used just to distinguish one from another. You can call it ‘steve’ if you want.
Already familiar environment variable ISC_DATA_DIRECTORY directs IRIS to use a specific mount point to store all the data that needs to survive container restart.
Now let’s take a look at the Persistent Volume Claim iris-pvc.
apiVersion: v1
kind: PersistentVolumeClaim
metadata:
  name: iris-pvc
spec:
  storageClassName: longhorn
  accessModes:
    - ReadWriteOnce
  resources:
    requests:
      storage: 10Gi
Fairly straightforward. Requesting 10 gigabytes, mountable as Read/Write on one node only, using storage class of ‘longhorn’.
That storageClassName: longhorn is actually critical here.
Let’s look at what storage classes are available on my AKS cluster:
kubectl get StorageClass
NAME                             PROVISIONER                     RECLAIMPOLICY   VOLUMEBINDINGMODE   ALLOWVOLUMEEXPANSION   AGE
azurefile                        kubernetes.io/azure-file        Delete          Immediate           true                   10d
azurefile-premium                kubernetes.io/azure-file        Delete          Immediate           true                   10d
default (default)                kubernetes.io/azure-disk        Delete          Immediate           true                   10d
longhorn                         driver.longhorn.io              Delete          Immediate           true                   10d
managed-premium                  kubernetes.io/azure-disk        Delete          Immediate           true                   10d
There are few storage classes from Azure, installed by default and one from Longhorn that we installed as part of the very first command:
kubectl apply -f https://raw.githubusercontent.com/longhorn/longhorn/master/deploy/longhorn.yaml
If you comment out #storageClassName: longhorn in the Persistent Volume Claim definition, it will use storage class, currently marked as “default” which is a regular Azure Disk.
To illustrate why we need Distributed storage let’s repeat the “chaos engineering” experiments we described at the beginning of the article without longhorn storage. The first two scenarios (stop IRIS and delete the Pod) would successfully complete and systems would recover to the operational state. Attempting to either drain or kill the node would bring the system into a failed state.
#forcefully drain the node
kubectl drain aks-agentpool-71521505-vmss000001 --delete-local-data --ignore-daemonsets
kubectl describe pods
...
  Type     Reason            Age                  From               Message
  ----     ------            ----                 ----               -------
  Warning  FailedScheduling  57s (x9 over 2m41s)  default-scheduler  0/3 nodes are available: 1 node(s) were unschedulable, 2 node(s) had volume node affinity conflict.
Essentially, Kubernetes would try to restart the IRIS pod on the cluster, but the node where it was originally started is not available and the other two nodes have “volume node affinity conflict”. With this storage type, the volume is available only on the node it was originally created since it is basically tied to the disk available on the node host.
With longhorn as a storage class, both “force drain” and “node kill” experiments succeed, and the IRIS pod is back into operation shortly. To achieve it Longhorn takes control over the available storage on the 3 nodes of the cluster and replicates the data across all three nodes. Longhorn promptly repairs cluster storage if one of the nodes becomes permanently unavailable. In our “node kill” scenario, the IRIS pod is restarted on another node right away using two remaining volume replicas. Then, AKS provisions a new node to replace the lost one and as soon as it is ready, Longhorn kicks in and rebuilds required data on the new node. Everything is automatic, without your involvement.

Figure 3 Longhorn rebuilding volume replica on the replaced node
More about k8s deployment
Let’s take a look at some other aspects of our deployment:
apiVersion: apps/v1
kind: Deployment
metadata:
  name: iris
spec:
  selector:
    matchLabels:
      app: iris
  strategy:
    type: Recreate
  replicas: 1
  template:
    metadata:
      labels:
        app: iris
    spec:
      containers:
      - image: store/intersystems/iris-community:2020.4.0.524.0
        name: iris
        env:
        - name: ISC_DATA_DIRECTORY
          value: /external/iris
        - name: ISC_CPF_MERGE_FILE
          value: /external/merge/merge.cpf
        ports:
        - containerPort: 52773
          name: smp-http
        volumeMounts:
        - name: iris-external-sys
          mountPath: /external
        - name: cpf-merge
          mountPath: /external/merge
        livenessProbe:
          initialDelaySeconds: 25
          periodSeconds: 10
          exec:
            command:
            - /bin/sh
            - -c
            - "iris qlist iris | grep running"
      volumes:
      - name: iris-external-sys
        persistentVolumeClaim:
          claimName: iris-pvc
      - name: cpf-merge
        configMap:
          name: iris-cpf-merge
strategy: Recreate, replicas: 1 tells Kubernetes that at any given time it should maintain one and exactly one instance of IRIS pod running. This is what takes care of our “delete pod” scenario.
livenessProbe section makes sure that IRIS is always up inside the container and handles “IRIS is down” scenario. initialDelaySeconds allows for some grace period for IRIS to start. You might want to increase it if IRIS is taking a considerable time to start your deployment.
CPF MERGE feature of IRIS allows you to modify the content of the configuration file iris.cpf upon container start. See https://docs.intersystems.com/irisforhealthlatest/csp/docbook/DocBook.UI.Page.cls?KEY=RACS_cpf#RACS_cpf_edit_merge for relevant documentation. In this example I’m using Kubernetes Config Map to manage the content of the merge file: https://github.com/antonum/ha-iris-k8s/blob/main/iris-cpf-merge.yaml Here we adjust global buffers and gmheap values, used by IRIS instance, but everything you can find in iris.cpf file is a fair game. You can even change the default IRIS password using `PasswordHash` field in the CPF Merge file. Read more at: https://docs.intersystems.com/irisforhealthlatest/csp/docbook/Doc.View.cls?KEY=ADOCK#ADOCK_iris_images_password_auth
Besides Persistent Volume Claim https://github.com/antonum/ha-iris-k8s/blob/main/iris-pvc.yaml deployment https://github.com/antonum/ha-iris-k8s/blob/main/iris-deployment.yaml and ConfigMap with CPF Merge content https://github.com/antonum/ha-iris-k8s/blob/main/iris-cpf-merge.yaml our deployment needs a service that exposes IRIS deployment to the public internet: https://github.com/antonum/ha-iris-k8s/blob/main/iris-svc.yaml
kubectl get svc
NAME         TYPE           CLUSTER-IP    EXTERNAL-IP     PORT(S)           AGE
iris-svc     LoadBalancer   10.0.18.169   40.88.123.45   52773:31589/TCP   3d1h
kubernetes   ClusterIP      10.0.0.1      <none>          443/TCP           10d
External IP of the iris-svc can be used to access the IRIS management portal via http://40.88.123.45:52773/csp/sys/%25CSP.Portal.Home.zen. The default password is 'SYS'.
Backup/Restore and Storage Scaling
Longhorn provides web-based UI for configuring and managing volumes.
Identify the pod, running longhorn-ui component and establish port forwarding with kubectl:
kubectl -n longhorn-system get pods
# note the longhorn-ui pod id.
kubectl port-forward longhorn-ui-df95bdf85-gpnjv 9000:8000 -n longhorn-system
Longhorn UI will become available at http://localhost:9000
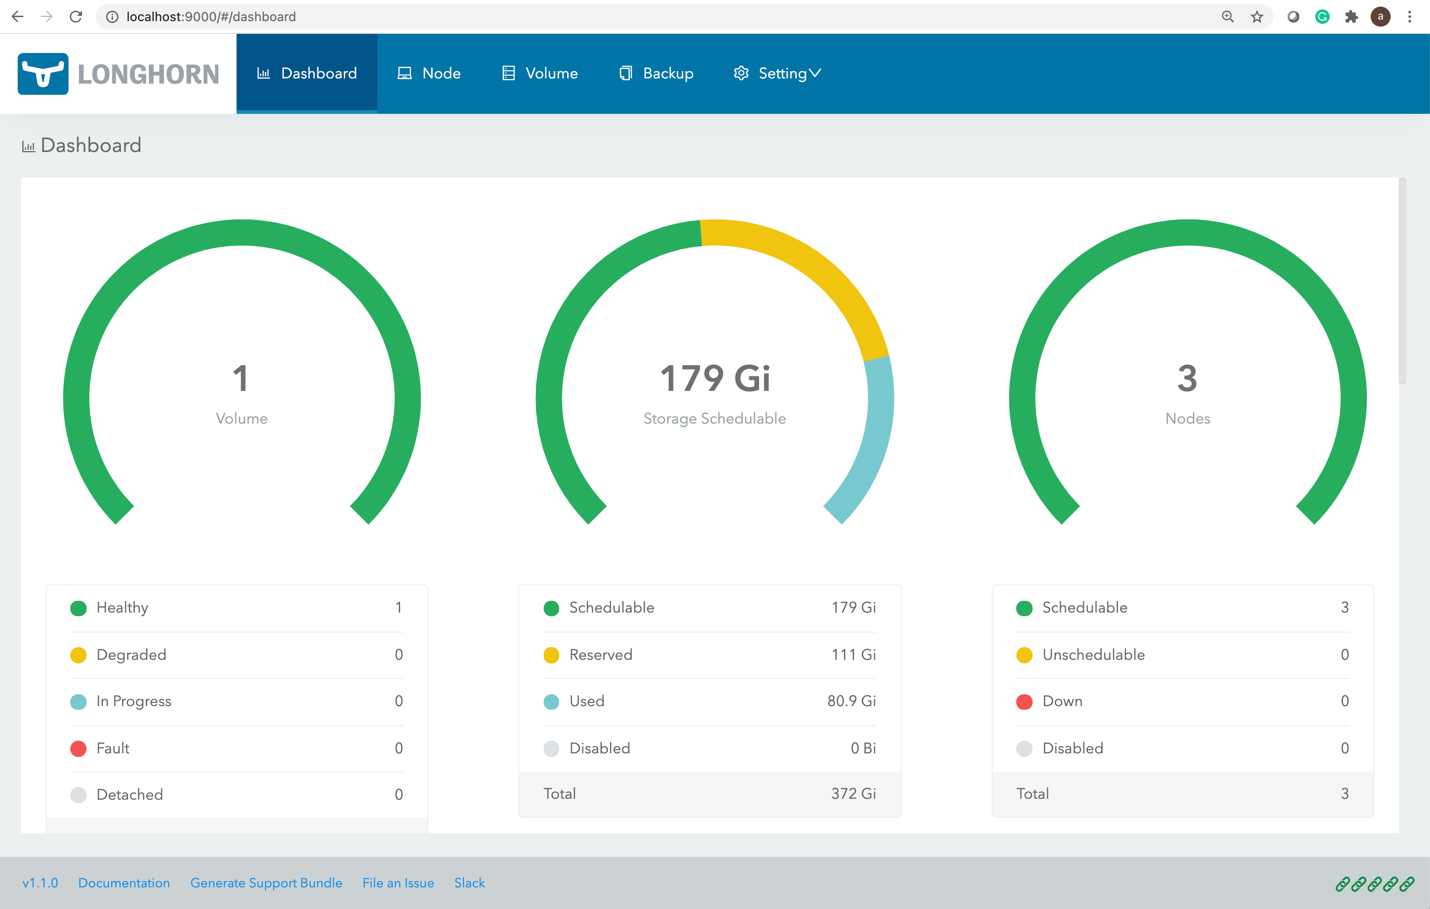
Figure 4 Longhorn UI
Besides high availability, most of the Kubernetes container storage solutions provide convenient options for backup, snapshots and restore. Details are implementation-specific, but the common convention is that backup is associated with the VolumeSnapshot. It is so for Longhorn. Depending on your Kubernetes version and provider you might also need to install volume snapshotter https://github.com/kubernetes-csi/external-snapshotter
`iris-volume-snapshot.yaml` is an example of such a volume snapshot. Before using it, you need to configure backups to either the S3 bucket or NFS volume in Longhorn. https://longhorn.io/docs/1.0.1/snapshots-and-backups/backup-and-restore/set-backup-target/
# Take crash-consistent backup of the iris volume
kubectl apply -f iris-volume-snapshot.yaml
For IRIS it is recommended that you execute External Freeze before taking the backup/snapshot and Thaw after. See details here: https://docs.intersystems.com/irisforhealthlatest/csp/documatic/%25CSP.Documatic.cls?LIBRARY=%25SYS&CLASSNAME=Backup.General#ExternalFreeze
To increase the size of the IRIS volume - adjust storage request in persistent volume claim (file `iris-pvc.yaml`), used by IRIS.
...
  resources:
    requests:
      storage: 10Gi #change this value to required
Then, re-apply the pvc specification. Longhorn cannot actually apply this change while the volume is connected to the running Pod. Temporarily change replicas count to zero in the deployment so volume size can be increased.
High Availability – Overview
At the beginning of the article, we set some criteria for High Availability. Here is how we achieve it with this architecture:
Zombies and other things to consider
If you are familiar with running IRIS in the Docker containers, you might have used the `--init` flag.
docker run --rm -p 52773:52773 --init store/intersystems/iris-community:2020.4.0.524.0
The goal of this flag is to prevent the formation of the "zombie processes". In Kubernetes, you can either use ‘shareProcessNamespace: true’ (security considerations apply) or in your own containers utilize `tini`. Example Dockerfile with tini:
FROM iris-community:2020.4.0.524.0
...
# Add Tini
USER root
ENV TINI_VERSION v0.19.0
ADD https://github.com/krallin/tini/releases/download/${TINI_VERSION}/tini /tini
RUN chmod +x /tini
USER irisowner
ENTRYPOINT ["/tini", "--", "/iris-main"]
Starting 2021, all InterSystems provided container images would include tini by default.
You can further decrease the failover time for “force drain node/kill node” scenarios by adjusting few parameters:
Longhorn Pod Deletion Policy https://longhorn.io/docs/1.1.0/references/settings/#pod-deletion-policy-when-node-is-down and kubernetes taint-based eviction: https://kubernetes.io/docs/concepts/scheduling-eviction/taint-and-toleration/#taint-based-evictions
Disclaimer
As the InterSystems employee, I kinda have to put this in here: Longhorn is used in this article as an example of distributed Kubernetes Block Storage. InterSystems does not validate or issue an official support statement for individual storage solutions or products. You need to test and validate if any specific storage solution fits your needs.
Distributed storage might also have substantially different performance characteristics, comparing to node-local storage. Especially for write operations, where data must be written to multiple locations before it is considered to be in the persisted state. Make sure to test your workloads and understand the specific behaviour and options your CSI driver offers..
Basically, InterSystems does not validate and/or endorse specific storage solutions like Longhorn in the same way as we don’t validate individual HDD brands or server hardware manufacturers. I personally found Longhorn easy to work with and their development team extremely responsive and helpful at the project’s GitHub page. https://github.com/longhorn/longhorn
Conclusion
Kubernetes ecosystem evolved significantly in the past few years and with the use of distributed block storage solutions, you now can build a Highly Available configuration that can sustain IRIS instance, cluster node and even Availability Zone failure.
You can outsource compute and storage high availability to Kubernetes components, resulting in a significantly simpler system to configure and maintain, comparing to the traditional IRIS mirroring. At the same time, this configuration might not provide the same RTO and storage – level performance as mirrored configuration.
In this article, we build a highly available IRIS configuration using Azure AKS as a managed Kubernetes and Longhorn distributed storage system. You can explore multiple alternatives such as AWS EKS, Google Kubernetes Engine for managed K8s, StorageOS, Portworx and OpenEBS as distributed container storage or even enterprise-level storage solutions such as NetApp, PureStorage, Dell EMC and others.
Appendix A. Creating Kubernetes Cluster in the cloud
Managed Kubernetes service from one of the public cloud providers is an easy way to create k8s cluster required for this setup. Azure’s AKS default configuration is ready out of the box to be used for the deployment described in this article.
Create a new AKS cluster with 3 nodes. Leave everything else default.
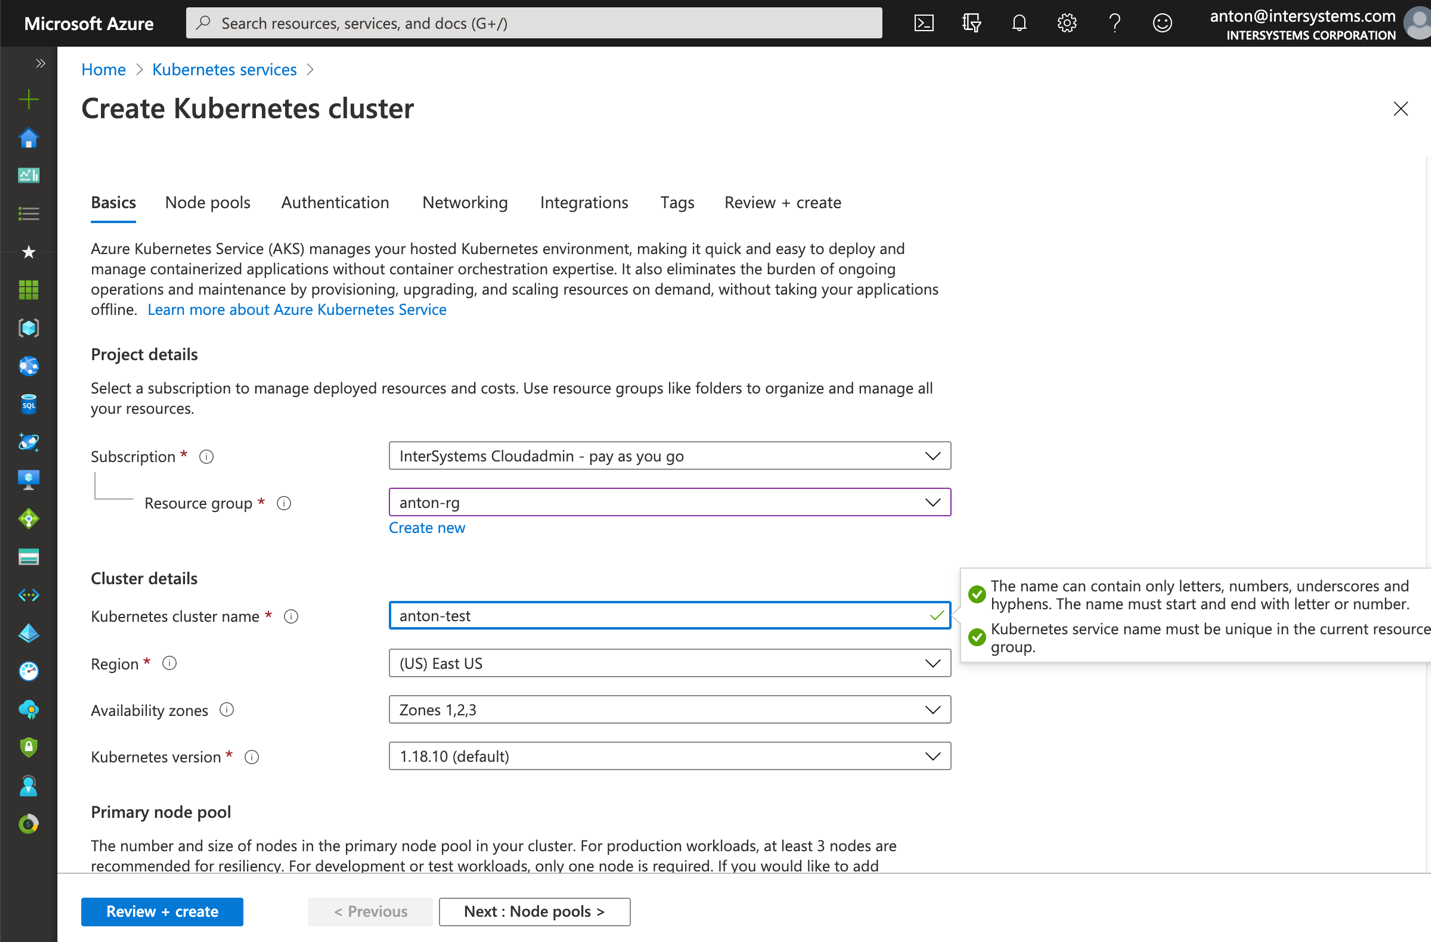
Figure 5 Create AKS cluster
Install kubectl on your computer locally: https://kubernetes.io/docs/tasks/tools/install-kubectl/
Register your AKS cluster with local kubectl
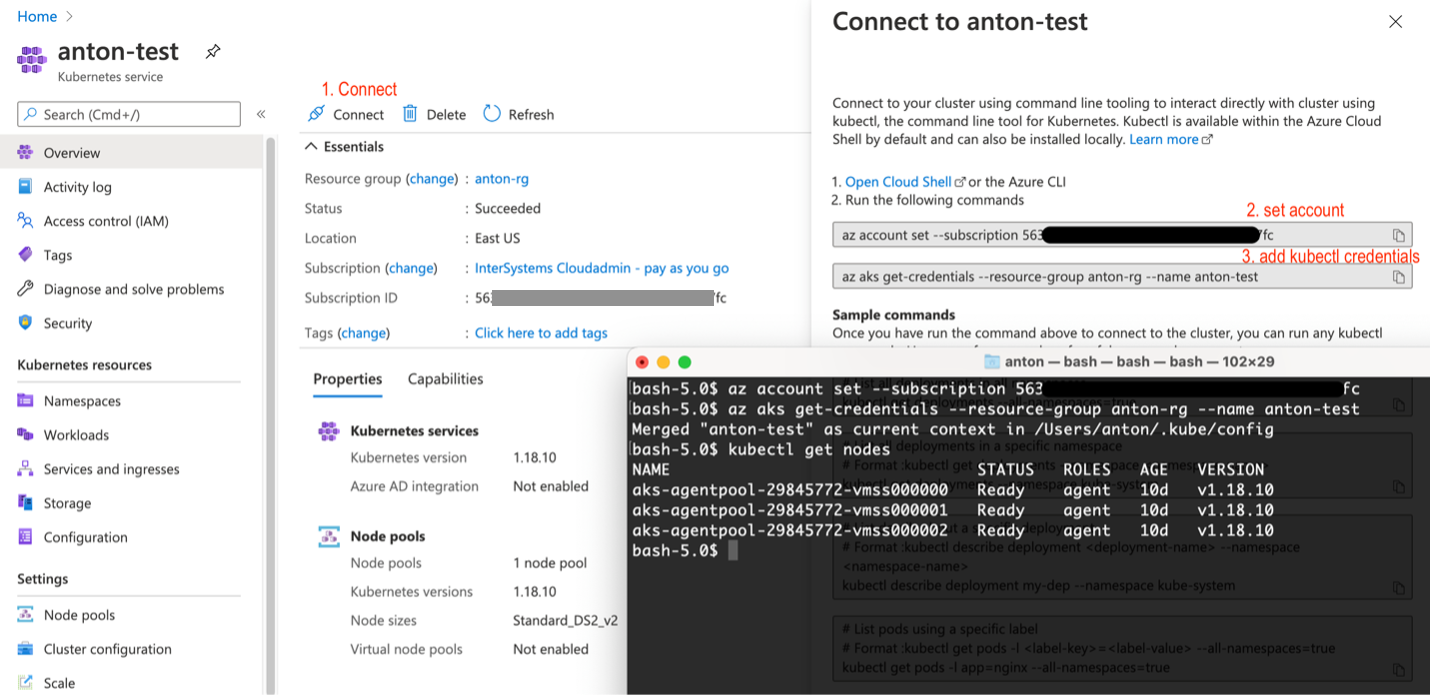
Figure 6 Register AKS cluster with kubectl
After that, you can get right back to the beginning of the article and install longhorn and IRIS deployment.
Installation on AWS EKS is a little bit more complicated. You need to make sure every instance in your node group has open-iscsi installed.
sudo yum install iscsi-initiator-utils -y
Installing Longhorn on GKE requires extra step, described here: https://longhorn.io/docs/1.0.1/advanced-resources/os-distro-specific/csi-on-gke/
Appendix B. Step by step installation
Step 1 – Kubernetes Cluster and kubectl
You need 3 nodes k8s cluster. Appendix A describes how to get one on Azure.
$ kubectl get nodes
NAME                                STATUS   ROLES   AGE   VERSION
aks-agentpool-29845772-vmss000000   Ready    agent   10d   v1.18.10
aks-agentpool-29845772-vmss000001   Ready    agent   10d   v1.18.10
aks-agentpool-29845772-vmss000002   Ready    agent   10d   v1.18.10
Step 2 – Install Longhorn
kubectl apply -f https://raw.githubusercontent.com/longhorn/longhorn/master/deploy/longhorn.yaml
Make sure all the pods in the ‘longhorn-system’ namespace are in the running state. It might take few minutes.
$ kubectl get pods -n longhorn-system
NAME                                       READY   STATUS    RESTARTS   AGE
csi-attacher-74db7cf6d9-jgdxq              1/1     Running   0          10d
csi-attacher-74db7cf6d9-l99fs              1/1     Running   1          11d
...
longhorn-manager-flljf                     1/1     Running   2          11d
longhorn-manager-x76n2                     1/1     Running   1          11d
longhorn-ui-df95bdf85-gpnjv                1/1     Running   0          11d
Refer to the Longhorn installation guide for details and troubleshooting https://longhorn.io/docs/1.1.0/deploy/install/install-with-kubectl
Step 3 – Clone the GitHub repo
$ git clone https://github.com/antonum/ha-iris-k8s.git
$ cd ha-iris-k8s
$ ls
LICENSE                   iris-deployment.yaml      iris-volume-snapshot.yaml
README.md                 iris-pvc.yaml             longhorn-aws-secret.yaml
iris-cpf-merge.yaml       iris-svc.yaml             tldr.yaml
Step 4 – deploy and validate components one by one
tldr.yaml file contains all the components needed for the deployment in one bundle. Here we’ll install them one by one and validate the setup of every one of them individually.
# If you have previously applied tldr.yaml - delete it.
$ kubectl delete -f https://github.com/antonum/ha-iris-k8s/raw/main/tldr.yaml
Create Persistent Volume Claim
$ kubectl apply -f iris-pvc.yaml
persistentvolumeclaim/iris-pvc created
$ kubectl get pvc
NAME STATUS VOLUME CAPACITY ACCESS MODES STORAGECLASS AGE
iris-pvc Bound pvc-fbfaf5cf-7a75-4073-862e-09f8fd190e49 10Gi RWO longhorn 10s
Create Config Map
$ kubectl apply -f iris-cpf-merge.yaml
$ kubectl describe cm iris-cpf-merge
Name: iris-cpf-merge
Namespace: default
Labels: <none>
Annotations: <none>
Data
merge.cpf:
[config]
globals=0,0,800,0,0,0
gmheap=256000
Events: <none>
create iris deployment
$ kubectl apply -f iris-deployment.yaml
deployment.apps/iris created
$ kubectl get pods
NAME READY STATUS RESTARTS AGE
iris-65dcfd9f97-v2rwn 0/1 ContainerCreating 0 11s
note the pod name. You’ll use it to connect to the pod in the next command
$ kubectl exec -it iris-65dcfd9f97-v2rwn -- bash
irisowner@iris-65dcfd9f97-v2rwn:~$ iris session iris
Node: iris-65dcfd9f97-v2rwn, Instance: IRIS
USER>w $zv
IRIS for UNIX (Ubuntu Server LTS for x86-64 Containers) 2020.4 (Build 524U) Thu Oct 22 2020 13:04:25 EDT
h<enter> to exit IRIS shell
exit<enter> to exit pod
access the logs of the IRIS container
$ kubectl logs iris-65dcfd9f97-v2rwn
...
[INFO] ...started InterSystems IRIS instance IRIS
01/18/21-23:09:11:312 (1173) 0 [Utility.Event] Private webserver started on 52773
01/18/21-23:09:11:312 (1173) 0 [Utility.Event] Processing Shadows section (this system as shadow)
01/18/21-23:09:11:321 (1173) 0 [Utility.Event] Processing Monitor section
01/18/21-23:09:11:381 (1323) 0 [Utility.Event] Starting TASKMGR
01/18/21-23:09:11:392 (1324) 0 [Utility.Event] [SYSTEM MONITOR] System Monitor started in %SYS
01/18/21-23:09:11:399 (1173) 0 [Utility.Event] Shard license: 0
01/18/21-23:09:11:778 (1162) 0 [Database.SparseDBExpansion] Expanding capacity of sparse database /external/iris/mgr/iristemp/ by 10 MB.
create iris service
$ kubectl apply -f iris-svc.yaml
service/iris-svc created
$ kubectl get svc
NAME TYPE CLUSTER-IP EXTERNAL-IP PORT(S) AGE
iris-svc LoadBalancer 10.0.214.236 20.62.241.89 52773:30128/TCP 15s
Step 5 – Access management portal
Finally – connect to the management portal of the IRIS, using the external IP of the service: http://20.62.241.89:52773/csp/sys/%25CSP.Portal.Home.zen username _SYSTEM, Password SYS. You’ll be asked to change it on your first login.
.png)
.png)