Article Henry Pereira · Jul 31, 2025 5m read

artisan cover

If you’ve ever watched a true artisan—whether a potter turning mud into a masterpiece or a luthier bringing raw wood to life as a marvelous guitar—you know that magic isn’t in the materials, but in care, craft, and process. I know this firsthand: my handmade electric guitar is a daily inspiration, but I’ll admit—creating something like that is a talent I don’t have.

Yet, in the digital world, I often see people hoping for “magic” from generative AI by typing vague, context-free prompts like “build an app.” The results are usually frustratingly shallow—no artistry, no finesse. Too many expect AI to work miracles with zero context or structure. That frustration is what motivated us to build dc-artisan—a tool for digital prompt artisans. Our goal: to enable anyone to transform rough, wishful prompts into efficient, functional, and context-rich masterpieces.

Like watching a master artisan transform raw materials into art, creating with GenAI is about intent, preparation, and thoughtful crafting. The problem isn’t with AI itself—it’s how we use it. Just as a luthier must carefully select and shape each piece of wood, effective prompt engineering demands clear context, structure, and intention.

We believe the world deserves more than “magical prompts” that lead to disappointment. Powerful generative AI arises from thoughtful human guidance: precise context, real objectives, and deliberate structure. No artisan creates beauty by accident—reliable AI outputs require care and preparation.

dc-artisan approaches prompt engineering as a true craft—systematic, teachable, and testable. It offers a comprehensive toolkit for moving beyond trial, error, and guesswork.

The first thing dc-artisan does is aim to understand your prompt the way a thoughtful collaborator would. When you begin drafting, the tool engages directly with your input:

  • Clarifying questions: dc-artisan analyzes your initial prompt and asks focused questions to uncover your core objective, target audience, expected format, and any missing context. For example:
    • “What kind of output are you expecting—text summary, code, or structured data?”
    • “Who is the target audience?”
    • “What type of input or data will this prompt be used with?”

prompt enhance

These interactions help you clarify not just what you want the prompt to say, but also why.

Once your intent is clear, dc-artisan reviews the structure and offers tailored suggestions—enhancing clarity, improving tone, and filling in missing details critical for context-rich, actionable output.

And the best thing? You use all these features right inside your beloved editor, VS Code! You can insert variables directly in your prompt (like {task} or {audience}) for flexibility and reuse, instantly previewing how final prompts look with different substitutions—so you see exactly how it will work in practice.

But that’s not all. dc-artisan supports prompt tuning for optimal performance. Upload a CSV of test cases to automatically evaluate consistency, output quality, and the impact of your prompt structure across varied inputs. dc-artisan evaluates each response and generates comprehensive reports with quality scores and similarity metrics—so you can measure and optimize your prompts’ effectiveness with confidence.

testing

Prompting Without Context Isn’t Craft — It’s Chaos

Prompt engineering without structure is like carving wood blindfolded. You might produce something, but it likely won’t play a tune.

Many resort to vague or overloaded prompts—short, ambiguous commands or pages of raw content without structure. Either the model has no real idea what you want, or it’s lost in a swamp of noise.

When a prompt’s context becomes too long or cluttered, even advanced LLMs can lose focus. Instead of reasoning or generating new strategies, they often get distracted, repeating earlier content or sticking to familiar patterns from the beginning of your prompt history. Ironically, larger models with bigger context windows (like 32k tokens) are even more susceptible to this. Simply providing more context (more documents, bigger prompts, entire knowledge bases) frequently backfires, resulting in context overload, missed objectives, and confused outputs.

That’s precisely the gap that RAG (Retrieval-Augmented Generation) is designed to fill: not by giving LLMs more information, but by feeding them the most relevant knowledge at the right moment.

How dc-artisan and RAG Pipeline Mode Help

dc-artisan unifies prompt crafting and context management. It doesn’t just help you write better prompts; it ensures your AI receives curated, relevant information, not a tidal wave of trivia.

With RAG Pipeline Mode, you can:

  • 📄 Upload & Chunk Documents: PDF, DOCX, Markdown, TXT—easily embedding into your vector database.
  • 🧬 Inspect Chunks: View each atomic unit of embedded text with precision.
  • 🗑️ Smart Cleanup: Delete unwanted or outdated content directly from the extension, keeping your AI’s knowledge base curated and relevant.

rag

This workflow is inspired by the InterSystems Ideas Portal (see DPI-I-557)

Here’s how you can smoothly integrate a new section about dc-artisan’s backend architecture just before “Closing Thoughts,” highlighting the integration with InterSystems IRIS Interoperability and our custom liteLLM adapter.

What truly sets dc-artisan apart is its robust backend, engineered for both interoperability and flexibility. The extension’s engine runs on InterSystems IRIS Interoperability, utilizing a custom-built liteLLM adapter that we developed.

This architecture means you’re not locked into a single large language model (LLM) provider. Instead, you can seamlessly connect and switch between a wide range of leading LLM platforms—including OpenAI, Gemini, Claude, Azure OpenAI, and others—all managed from a unified, enterprise-grade backend.

Closing Thoughts

More developers are discovering that prompting isn’t about guessing the “magic words.” It’s about thoughtful goals, clear language, and powerful context—writing prompts like engineers, not wizards. Just as luthiers shape wood into instruments with soul, you can shape prompts into reliable, context-enriched AI workflows using tools crafted for your craft.

dc-artisan is more than a tool—it’s a mindset shift from vibe coding toward clarity, precision, and true digital artistry.

🎸 Ready to build prompts with your own hands?
⚙️ Fire up VS Code, install dc-artisan, and start crafting your AI like an artisan—not a magician.

🗳️ And if you like what we’ve built, vote for us in the InterSystems IRIS Dev Tools Contest—your support means a lot!

dc-artisan

2
0 88
Article Henry Pereira · Jun 11, 2025 15m read

Learn how to design scalable, autonomous AI agents that combine reasoning, vector search, and tool integration using LangGraph.

cover

Too Long; Didn't Read

  • AI Agents are proactive systems that combine memory, context, and initiative to automate tasks beyond simple chatbots.
  • LangGraph is a framework that enables us to build complex AI workflows, utilizing nodes (tasks) and edges (connections) with built-in state management.
  • This guide will walk you through building an AI-powered customer support agent that classifies priorities, identifies relevant topics, and determines whether to escalate or auto-reply.

So, What Exactly Are AI Agents?

Let’s face it — “AI agents” can sound like the robots that will take over your boardroom. In reality, they are your proactive sidekicks that can streamline complex workflows and eliminate repetitive tasks. Think of them as the next evolutionary step beyond chatbots: they do not just simply wait for prompts; they initiate actions, coordinate multiple steps, and adapt as they go.

Back in the day, crafting a “smart” system meant juggling separate models for language understanding, code generation, data lookup, you name it, and then duct-taping them together. Half of your time used to vanish in integration hell, whereas the other half you spent debugging the glue.

Agents flip that script. They bundle context, initiative, and adaptability into a single orchestrated flow. It is not just automation; it is intelligence with a mission. And thanks to such frameworks as LangGraph, assembling an agent squad of your own can actually be… dare I say, fun?

image

What Is LangGraph, Exactly?

LangGraph is an innovative framework that revolutionizes the way we build complex applications involving Large Language Models (LLMs).

Imagine that you are conducting an orchestra: every instrument (or “node”) needs to know when to play, how loud, and in what sequence. LangGraph, in this case**,** is your baton, giving you the following:

  • Graph Structure: It employs a graph-like structure with nodes and edges, enabling developers to design flexible, non-linear workflows that accommodate branches and loops. It mirrors complex decision-making processes resembling the way neural pathways might work.
  • State Management: LangGraph offers built-in tools for state persistence and error recovery, simplifying the maintenance of contextual data across various stages within an application. It can effectively switch between short-term and long-term memory, enhancing interaction quality thanks to such tools as Zep.
  • Tool Integration: With LangGraph, LLM agents can easily collaborate with external services or databases to fetch real-world data, improving the functionality and responsiveness of your applications.
  • Human-in-the-Loop: Beyond automation, LangGraph accommodates human interventions in workflows, which are crucial for decision-making processes that require analytical oversight or ethical consideration.

Whether you are building a chatbot with real memory, an interactive story engine, or a team of agents tackling a complex problem, LangGraph turns headache-inducing plumbing into a clean, visual state machine.

Getting Started

To start with LangGraph, you will need a basic setup that typically involves installing such essential libraries as langgraph and langchain-openai. From there, you can define the nodes (tasks) and edges (connections) within the graph, effectively implementing checkpoints for short-term memory and utilizing Zep for more persistent memory needs.

When operating LangGraph, keep in mind the following:

  • Design with Flexibility: Leverage the powerful graph structure to account for potential workflow branches and interactions that are not strictly linear.
  • Interact with Tools Thoughtfully: Enhance but do not replace LLM capabilities with external tools. Provide each tool with comprehensive descriptions to enable precise usage.
  • Employ Rich Memory Solutions: Use memory efficiently, be mindful of the LLM's context window, and consider integrating external solutions for automatic fact management.

Now that we have covered the basics of LangGraph, let's dive into a practical example. To achieve this, we will develop an AI agent specifically designed for customer support.

This agent will receive email requests, analyze the problem description in the email body, and then determine the request's priority and appropriate topic/category/sector.

So buckle up and let's go!

buckle up

To begin, we need to define what a 'Tool' is. You can think of it as a specialized "assistant manager" for your agent, allowing it to interact with external functionalities.

The @tool decorator is essential here. LangChain simplifies custom tool creation, meaning that first, you define a Python function, and then apply the @tool decorator.

tools

Let's illustrate this by creating our first tool. This tool will help the agent classify the priority of an IT support ticket based on its email content:

    from langchain_core.tools import tool
    
    @tool
    def classify_priority(email_body: str) -> str:
        """Classify the priority of an IT support ticket based on email content."""
        prompt = ChatPromptTemplate.from_template(
            """Analyze this IT support email and classify its priority as High, Medium, or Low.
            
            High: System outages, security breaches, critical business functions down
            Medium: Non-critical issues affecting productivity, software problems
            Low: General questions, requests, minor issues
            
            Email: {email}
            
            Respond with only: High, Medium, or Low"""
        )
        chain = prompt | llm
        response = chain.invoke({"email": email_body})
        return response.content.strip()

Excellent! Now we have a prompt that instructs the AI to receive the email body, analyze it, and classify its priority as High, Medium, or Low.

That’s it! You have just composed a tool your agent can call!

Next, let's create a similar tool to identify the main topic (or category) of the support request:


    @tool
    def identify_topic(email_body: str) -> str:
        """Identify the main topic/category of the IT support request."""
        prompt = ChatPromptTemplate.from_template(
            """Analyze this IT support email and identify the main topic category.
            
            Categories: password_reset, vpn, software_request, hardware, email, network, printer, other
            
            Email: {email}
            
            Respond with only the category name (lowercase with underscores)."""
        )
        chain = prompt | llm
        response = chain.invoke({"email": email_body})
        return response.content.strip()

Now we need to create a state, and in LangGraph this little piece is, kind of, a big deal.

Think of it as the central nervous system of your graph. It is how nodes talk to each other, passing notes like overachievers in class.

According to the docs:

“A state is a shared data structure that represents the current snapshot of your application.”

In practice? The state is a structured message that moves between nodes. It carries the output of one step as the input for the next one. Basically, it is the glue that holds your entire workflow together.

Therefore, before constructing the graph, we must first define the structure of our state. In this example, our state will include the following:

  • The user’s request (email body)
  • The assigned priority
  • The identified topic (category)

It is simple and clean, so you can move through the graph like a pro.

    from typing import TypedDict

    # Define the state structure
    class TicketState(TypedDict):
        email_body: str
        priority: str
        topic: str
        
    
    # Initialize state
    initial_state = TicketState(
        email_body=email_body,
        priority="",
        topic=""
    )

Nodes vs. Edges: Key Components of LangGraph

The fundamental building blocks of LangGraph include nodes and edges.

  • Nodes: They are the operational units within the graph, performing the actual work. A node typically consists of Python code that can execute any logic, ranging from computations to interactions with language models (LLMs) or external integrations. Essentially, nodes are like individual functions or agents in traditional programming.
  • Edges: Edges define the flow of execution between nodes, determining what happens next. They act as the connectors that allow the state to transition from one node to another based on predefined conditions. In the context of LangGraph, edges are crucial in orchestrating the sequence and decision flow between nodes.

To grasp the functionality of edges, let’s consider a simple analogy of a messaging application:

  • Nodes are akin to users (or their devices) actively participating in a conversation.
  • Edges symbolize the chat threads or connections between users that facilitate communication.

When a user selects a chat thread to send a message, an edge is effectively created, linking them to another user. Each interaction, be it sending a text, voice, or video message, follows a predefined sequence, comparable to the structured schema of LangGraph’s state. It ensures uniformity and interpretability of data passed along edges.

Unlike the dynamic nature of event-driven applications, LangGraph employs a static schema that remains consistent throughout execution. It simplifies communication among nodes, enabling developers to rely on a stable state format, thereby ensuring seamless edge communication.

Designing a Basic Workflow

Flow engineering in LangGraph can be conceptualized as designing a state machine. In this paradigm, each node represents a distinct state or processing step, while edges define the transitions between those states. This approach is particularly beneficial for developers aiming to strike a balance between deterministic task sequences and the dynamic decision-making capabilities of AI. Let's begin constructing our flow by initializing a StateGraph with the TicketState class we defined earlier.

    from langgraph.graph import StateGraph, START, END
    
    workflow = StateGraph(TicketState)

Node Addition: Nodes are fundamental building blocks, defined to execute such specific tasks as classifying ticket priority or identifying its topic.

Each node function receives the current state, performs its operation, and returns a dictionary to update the state:

   def classify_priority_node(state: TicketState) -> TicketState:
        """Node to classify ticket priority."""
        priority = classify_priority.invoke({"email_body": state["email_body"]})
        return {"priority": priority}

    def identify_topic_node(state: TicketState) -> TicketState:
        """Node to identify ticket topic."""
        topic = identify_topic.invoke({"email_body": state["email_body"]})
        return {"topic": topic}
        
        
    workflow.add_node("classify_priority", classify_priority_node)
    workflow.add_node("identify_topic", identify_topic_node)

The classify_priority_node and identify_topic_node methods will change the TicketState and send the parameter input.

Edge Creation: Define edges to connect nodes:


    workflow.add_edge(START, "classify_priority")
    workflow.add_edge("classify_priority", "identify_topic")
    workflow.add_edge("identify_topic", END)

The classify_priority establishes the start, whereas the identify_topic determines the end of our workflow so far.

Compilation and Execution: Once nodes and edges are configured, compile the workflow and execute it.


    graph = workflow.compile()
    result = graph.invoke(initial_state)

Great! You can also generate a visual representation of our LangGraph flow.

graph.get_graph().draw_mermaid_png(output_file_path="graph.png")

If you were to run the code up to this point, you would observe a graph similar to the one below:

first_graph.png

This illustration visualizes a sequential execution: start, followed by classifying priority, then identifying the topic, and, finally, ending.

One of the most powerful aspects of LangGraph is its flexibility, which allows us to create more complex flows and applications. For instance, we can modify the workflow to add edges from START to both nodes with the following line:

    workflow.add_edge(START, "classify_priority")
    workflow.add_edge(START, "identify_topic")

This change will imply that the agent executes classify_priority and identify_topic simultaneously.

Another highly valuable feature in LangGraph is the ability to use conditional edges. They allow the workflow to branch based on the evaluation of the current state, enabling dynamic routing of tasks.

Let's enhance our workflow. We will create a new tool that analyzes the content, priority, and topic of the request to determine whether it is a high-priority issue requiring escalation (i.e., opening a ticket for a human team). If not, an automated response will be generated for the user.


    @tool
    def make_escalation_decision(email_body: str, priority: str, topic: str) -> str:
        """Decide whether to auto-respond or escalate to IT team."""
        prompt = ChatPromptTemplate.from_template(
            """Based on this IT support ticket, decide whether to:
            - "auto_respond": Send an automated response for simple/common or medium priority issues
            - "escalate": Escalate to the IT team for complex/urgent issues
            
            Email: {email}
            Priority: {priority}
            Topic: {topic}
            
            Consider: High priority items usually require escalation, while complex technical issues necessitate human review.
            
            Respond with only: auto_respond or escalate"""
        )
        chain = prompt | llm
        response = chain.invoke({
            "email": email_body,
            "priority": priority,
            "topic": topic
        })
        return response.content.strip()
        

Furthermore, if the request is determined to be of low or medium priority (leading to an "auto_respond" decision), we will perform a vector search to retrieve historical answers. This information will then be used to generate an appropriate automated response. However, it will require two additional tools:


    @tool
    def retrieve_examples(email_body: str) -> str:
        """Retrieve relevant examples from past responses based on email_body."""
        try:
            examples = iris.cls(__name__).Retrieve(email_body)
            return examples if examples else "No relevant examples found."
        except:
            return "No relevant examples found."

    @tool
    def generate_reply(email_body: str, topic: str, examples: str) -> str:
        """Generate a suggested reply based on the email, topic, and RAG examples."""
        prompt = ChatPromptTemplate.from_template(
            """Generate a professional IT support response based on:
            
            Original Email: {email}
            Topic Category: {topic}
            Example Response: {examples}
            
            Create a helpful, professional response that addresses the user's concern.
            Keep it concise and actionable."""
        )
        chain = prompt | llm
        response = chain.invoke({
            "email": email_body,
            "topic": topic,
            "examples": examples
        })
        return response.content.strip()

Now, let's define the corresponding nodes for those new tools:

    
    def decision_node(state: TicketState) -> TicketState:
        """Node to decide on escalation or auto-response."""
        decision = make_escalation_decision.invoke({
            "email_body": state["email_body"],
            "priority": state["priority"],
            "topic": state["topic"]
        })
        return {"decision": decision}
        
    
    def rag_node(state: TicketState) -> TicketState:
        """Node to retrieve relevant examples using RAG."""
        examples = retrieve_examples.invoke({"email_body": state["email_body"]})
        return {"rag_examples": examples}

    def generate_reply_node(state: TicketState) -> TicketState:
        """Node to generate suggested reply."""
        reply = generate_reply.invoke({
            "email_body": state["email_body"],
            "topic": state["topic"],
            "examples": state["rag_examples"]
        })
        return {"suggested_reply": reply}
        
    
    def execute_action_node(state: TicketState) -> TicketState:
        """Node to execute final action based on decision."""
        if state["decision"] == "escalate":
            action = f"🚨 ESCALATED TO IT TEAM\nPriority: {state['priority']}\nTopic: {state['topic']}\nTicket created in system."
            print(f"[SYSTEM] Escalating ticket to IT team - Priority: {state['priority']}, Topic: {state['topic']}")
        else:
            action = f"✅ AUTO-RESPONSE SENT\nReply: {state['suggested_reply']}\nTicket logged for tracking."
            print(f"[SYSTEM] Auto-response sent to user - Topic: {state['topic']}")
        
        return {"final_action": action}


    workflow.add_node("make_decision", decision_node)
    workflow.add_node("rag", rag_node)
    workflow.add_node("generate_reply", generate_reply_node)
    workflow.add_node("execute_action", execute_action_node)

The conditional edge will then use the output of the make_decision node to direct the flow:

    workflow.add_conditional_edges(
        "make_decision",
        lambda x: x.get("decision"),
        {
            "auto_respond": "rag",
            "escalate": "execute_action"
        }
    )

If the make_escalation_decision tool (via decision_node) results in "auto_respond", the workflow will proceed through the rag node (to retrieve examples), then to generate_reply (to craft the response), and finally to execute_action (to log the auto-response).

Conversely, if the decision is "escalate", the flow will bypass the RAG and take generation steps, moving directly to execute_action to handle the escalation. To complete the graph by adding the remaining standard edges, do the following:

    workflow.add_edge("rag", "generate_reply")
    workflow.add_edge("generate_reply", "execute_action")
    workflow.add_edge("execute_action", END)

Dataset Note: For this project, the dataset we used to power the Retrieval-Augmented Generation (RAG) was sourced from the Customer Support Tickets dataset on Hugging Face. The dataset was filtered to include exclusively the items categorized as 'Technical Support' and restricted to English entries. It ensured that the RAG system retrieved only highly relevant and domain-specific examples for technical support tasks.

At this point, our graph should resemble the one below:

graph.png

When you execute this graph with an email that results in a high priority classification and an "escalate" decision, you will see the following response:

image.png

At the same time, a request that is classified as low priority and results in an "auto_respond" decision will trigger a reply resembling the one below:

image.png

So... Is It All Sunshine?

Not entirely. There a few bumps to watch out for:

  • Data Privacy: Be careful with sensitive info — these agents require guardrails.
  • Compute Costs: Some advanced setups require serious resources.
  • Hallucinations: LLMs can occasionally make things up (still smarter than most interns, though).
  • Non-Determinism: The same input might return different outputs, which is great for creativity, but tricky for strict processes.

However, most of these weak spots can be managed with good planning, the right tools, and — you guessed it — a bit of reflection.

LangGraph turns AI agents from buzzwords into real, working solutions. Whether you want to automate customer support, handle IT tickets, or build autonomous apps, this framework makes it doable and, actually, enjoyable.

Have you got any questions or feedback? Let’s talk. The AI revolution needs builders like you.

4
3 458
Question Henry Pereira · May 30, 2025

Hi all!

I want to create an %Embedding.Config to use with an %Embedding property. I followed the documentation for %Embedding.OpenAI, and it works fine after setting sslConfig, modelName, and apiKey.

However, I need to use AzureOpenAI. While the embedding process is similar to OpenAI's, Azure requires additional connection parameters, like an endpoint. My question is: is it possible to configure these extra parameters with %Embedding.Config, and if so, how?

documentation reference

2
0 67
Article Henry Pereira · May 29, 2025 6m read

image

You know that feeling when you get your blood test results and it all looks like Greek? That's the problem FHIRInsight is here to solve. It started with the idea that medical data shouldn't be scary or confusing – it should be something we can all use. Blood tests are incredibly common for checking our health, but let's be honest, understanding them is tough for most folks, and sometimes even for medical staff who don't specialize in lab work. FHIRInsight wants to make that whole process easier and the information more actionable.

FHIRInsight logo

🤖 Why We Built FHIRInsight

It all started with a simple but powerful question:

“Why is reading a blood test still so hard — even for doctors sometimes?”

If you’ve ever looked at a lab result, you’ve probably seen a wall of numbers, cryptic abbreviations, and a “reference range” that may or may not apply to your age, gender, or condition. It’s a diagnostic tool, sure — but without context, it becomes a guessing game. Even experienced healthcare professionals sometimes need to cross-reference guidelines, research papers, or specialist opinions to make sense of it all.

That’s where FHIRInsight steps in.

We didn’t build it just for patients — we built it for the people on the frontlines of care. For the doctors pulling back-to-back shifts, for the nurses catching subtle patterns in vitals, for every health worker trying to make the right call with limited time and lots of responsibility. Our goal is to make their jobs just a little bit easier — by turning dense, clinical FHIR data into something clear, useful, and grounded in real medical science. Something that speaks human.

FHIRInsight does more than just explain lab values. It also:

  • Provides contextual advice on whether a test result is mild, moderate, or severe
  • Suggests potential causes and differential diagnoses based on clinical signs
  • Recommends next steps — whether that’s follow-up tests, referrals, or urgent care
  • Leverages RAG (Retrieval-Augmented Generation) to pull in relevant scientific articles that support the analysis

Imagine a young doctor reviewing a patient’s anemia panel. Instead of Googling every abnormal value or digging through medical journals, they receive a report that not only summarizes the issue but cites recent studies or WHO guidelines that support the reasoning. That’s the power of combining AI and vector search over curated research.

And what about the patient?

They’re no longer left staring at a wall of numbers, wondering what something like “bilirubin 2.3 mg/dL” is supposed to mean — or whether they should be worried. Instead, they get a simple, thoughtful explanation. One that feels more like a conversation than a clinical report. Something they can actually understand — and bring into the discussion with their doctor, feeling more prepared and less anxious.

Because that’s what FHIRInsight is really about: turning medical complexity into clarity, and helping both healthcare professionals and patients make better, more confident decisions — together.

🔍 Under the Hood

Of course, all that simplicity on the surface is made possible by some powerful tech working quietly in the background.

Here’s what FHIRInsight is built on:

  • FHIR (Fast Healthcare Interoperability Resources) — This is the global standard for health data. It’s how we receive structured information like lab results, patient history, demographics, and encounters. FHIR is the language that medical systems speak — and we translate that language into something people can actually use.
  • Vector Search for RAG (Retrieval-Augmented Generation): FHIRInsight enhances its diagnostic reasoning by indexing scientific PDF papers and trusted URLs into a vector database using InterSystems IRIS native vector search. When a lab result looks ambiguous or nuanced, the system retrieves relevant content to support its recommendations — not from memory, but from real, up-to-date research.
  • Prompt Engineering for Medical Reasoning: We’ve fine-tuned our prompts to guide the LLM toward identifying a wide spectrum of blood-related conditions. Whether it’s iron deficiency anemia, coagulopathies, hormonal imbalances, or autoimmune triggers — the prompt guides the LLM through variations in symptoms, lab patterns, and possible causes.
  • LiteLLM Integration: A custom adapter routes requests to multiple LLM providers (OpenAI, Anthropic, Ollama, etc.) through a unified interface, enabling fallback, streaming, and model switching with ease.

All of this happens in a matter of seconds — turning raw lab values into explainable, actionable medical insight, whether you’re a doctor reviewing 30 patient charts or a patient trying to understand what your numbers mean.

🧩 Creating the LiteLLM Adapter: One Interface to Rule All Models

Behind the scenes, FHIRInsight’s AI-powered reporting is driven by LiteLLM — a brilliant abstraction layer that allows us to call over 100+ LLMs (OpenAI, Claude, Gemini, Ollama, etc.) through a single OpenAI-style interface.

But integrating LiteLLM into InterSystems IRIS required something more permanent and reusable than Python scripts tucked away in a Business Operation. So, we created our own LiteLLM Adapter.

Meet LiteLLMAdapter

This adapter class handles everything you’d expect from a robust LLM integration:

  • Accepts parameters like prompt, model, and temperature
  • Loads your environment variables (e.g., API keys) dynamically

To plug this into our interoperability production, we wrapped it in a dedicated Business Operation:

  • Handles production configuration via standard LLMModel setting
  • Integrates with the FHIRAnalyzer component for real-time report generation
  • Acts as a central “AI bridge” for any future components needing LLM access

Here’s the core flow simplified:

set response = ##class(dc.LLM.LiteLLMAdapter).CallLLM("Tell me about hemoglobin.", "openai/gpt-4o", 0.7)
write response

🧭 Conclusion

When we started building FHIRInsight, our mission was simple: make blood tests easier to understand — for everyone. Not just patients, but doctors, nurses, caregivers... anyone who’s ever stared at a lab result and thought, “Okay, but what does this actually mean?”

We’ve all been there.

By blending the structure of FHIR, the speed of InterSystems IRIS, the intelligence of LLMs, and the depth of real medical research through vector search, we created a tool that turns confusing numbers into meaningful stories. Stories that help people make smarter decisions about their health — and maybe even catch something early that would’ve gone unnoticed.

But FHIRInsight isn’t just about data. It’s about how we feel when we look at data. We want it to feel clear, supportive, and empowering. We want the experience to be... well, kind of like “vibecoding” healthcare — that sweet spot where smart code, good design, and human empathy come together.

We hope you’ll try it, break it, question it — and help us improve it.

Tell us what you’d like to see next. More conditions? More explainability? More personalization?

This is just the beginning — and we’d love for you to help shape what comes next.

2
0 95
Article Henry Pereira · Apr 2, 2025 17m read

Image generated by OpenAI DALL·E

I'm a huge sci-fi fan, but while I'm fully onboard the Star Wars train (apologies to my fellow Trekkies!), but I've always appreciated the classic episodes of Star Trek from my childhood. The diverse crew of the USS Enterprise, each masterminding their unique roles, is a perfect metaphor for understanding AI agents and their power in projects like Facilis. So, let's embark on an intergalactic mission, leveraging AI as our ship's crew and  boldly go where no man has gone before!  This teamwork concept is a wonderful analogy to illustrate how AI agents work and how we use them in our DC-Facilis project. So, let’s dive in and assume the role of a starship captain, leading an AI crew into unexplored territories!

Welcome to CrewAI!

To manage our AI crew, we use a fantastic framework called CrewAI. It's lean, lightning-fast, and operates as a multi-agent Python platform. One of the reasons we love it, besides the fact that it was created by another Brazilian, is its incredible flexibility and role-based design.

from crewai import Agent, Task, Crew

the taken quote

Meet the Planners

In Facilis, our AI agents are divided into two groups. Let's start with the first one I like to call "The Planners."

The Extraction Agent

The main role of Facilis is to take a natural language description of a REST service and auto-magically create all the necessary interoperability. So, our first crew member is the Extraction Agent. This agent is tasked with "extracting" API specifications from a user's prompt description.

Here's what the Extraction Agent looks out for:

  • Host (required)
  • Endpoint (required)
  • Params (optional)
  • Port (if available)
  • JSON model (for POST/PUT/PATCH/DELETE)
  • Authentication (if applicable)
    def create_extraction_agent(self) -> Agent:
        return Agent(
            role='API Specification Extractor',
            goal='Extract API specifications from natural language descriptions',
            backstory=dedent("""
                You are specialized in interpreting natural language descriptions
                and extracting structured API specifications.
            """),
            allow_delegation=True,
            llm=self.llm
        )

    def extract_api_specs(self, descriptions: List[str]) -> Task:
        return Task(
            description=dedent(f"""
                Extract API specifications from the following descriptions:
                {json.dumps(descriptions, indent=2)}
                
                For each description, extract:
                - host (required)
                - endpoint (required)
                - HTTP_Method (required)
                - params (optional)
                - port (if available)
                - json_model (for POST/PUT/PATCH/DELETE)
                - authentication (if applicable)
                
                Mark any missing required fields as 'missing'.
                Return results in JSON format as an array of specifications.
            """),
            expected_output="""A JSON array containing extracted API specifications with all required and optional fields""",
            agent=self.extraction_agent
        )

The Validation Agent

Next up, the Validation Agent! Their mission is to ensure that the API specifications gathered by the Extraction Agent are correct and consistent. They check:

  1. Valid host format
  2. Endpoint starting with '/'
  3. Valid HTTP methods (GET, POST, PUT, DELETE, PATCH)
  4. Valid port number (if provided)
  5. JSON model presence for applicable methods.

    def create_validation_agent(self) -> Agent:
        return Agent(
            role='API Validator',
            goal='Validate API specifications for correctness and consistency',
            backstory=dedent("""
                You are an expert in API validation, ensuring all specifications
                meet the required standards and format.
            """),
            allow_delegation=False,
            llm=self.llm
        )

 def validate_api_spec(self, extracted_data: Dict) -> Task:
        return Task(
            description=dedent(f"""
                Validate the following API specification:
                {json.dumps(extracted_data, indent=2)}
                
                Check for:
                1. Valid host format
                2. Endpoint starts with '/'
                3. Valid HTTP method (GET, POST, PUT, DELETE, PATCH)
                4. Valid port number (if provided)
                5. JSON model presence for POST/PUT/PATCH/DELETE methods
                
                Return validation results in JSON format.
            """),
            expected_output="""A JSON object containing validation results with any errors or confirmation of validity""",
            agent=self.validation_agent
        )

The Interaction Agent

Moving on, we meet the Interaction Agent, our User Interaction Specialist. Their role is to obtain any missing API specification fields that were marked by the Extraction Agent and validate them based on the Validation Agent's findings. They interact directly with users to fill any gaps.

The Production Agent

We need two crucial pieces of information to create the necessary interoperability: namespace and production name. The Production Agent engages with users to gather this information, much like the Interaction Agent.

The Documentation Transformation Agent

Once the specifications are ready, it's time to convert them into OpenAPI documentation. The Documentation Transformation Agent, an OpenAPI specialist, takes care of this.

    def create_transformation_agent(self) -> Agent:
        return Agent(
            role='OpenAPI Transformation Specialist',
            goal='Convert API specifications into OpenAPI documentation',
            backstory=dedent("""
                You are an expert in OpenAPI specifications and documentation.
                Your role is to transform validated API details into accurate
                and comprehensive OpenAPI 3.0 documentation.
            """),
            allow_delegation=False,
            llm=self.llm
        )

    def transform_to_openapi(self, validated_endpoints: List[Dict], production_info: Dict) -> Task:
        return Task(
            description=dedent(f"""
                Transform the following validated API specifications into OpenAPI 3.0 documentation:
                
                Production Information:
                {json.dumps(production_info, indent=2)}
                
                Validated Endpoints:
                {json.dumps(validated_endpoints, indent=2)}
                
                Requirements:
                1. Generate complete OpenAPI 3.0 specification
                2. Include proper request/response schemas
                3. Document all parameters and request bodies
                4. Include authentication if specified
                5. Ensure proper path formatting
                
                Return the OpenAPI specification in both JSON and YAML formats.
            """),
            expected_output="""A JSON object containing the complete OpenAPI 3.0 specification with all endpoints and schemas""",
            agent=self.transformation_agent
        )

The Review Agent

After transformation, the OpenAPI documentation undergoes a meticulous review to ensure compliance and quality. The Review Agent follows this checklist:

  1. OpenAPI 3.0 Compliance
  • Correct version specification
  • Required root elements
  • Schema structure validation
  1. Completeness
  • All endpoints documented
  • Fully specified parameters
  • Defined request/response schemas
  • Properly configured security schemes
  1. Quality Checks
  • Consistent naming conventions
  • Clear descriptions
  • Proper use of data types
  • Meaningful response codes
  1. Best Practices
  • Proper tag usage
  • Consistent parameter naming
  • Appropriate security definitions

Finally, if everything looks good, the Review Agent reports a healthy JSON object with the following structure:

{
 "is_valid": boolean,
 "approved_spec": object (the reviewed and possibly corrected OpenAPI spec),
 "issues": [array of strings describing any issues found],
 "recommendations": [array of improvement suggestions]
}

    def create_reviewer_agent(self) -> Agent:
        return Agent(
            role='OpenAPI Documentation Reviewer',
            goal='Ensure OpenAPI documentation compliance and quality',
            backstory=dedent("""
                You are the final authority on OpenAPI documentation quality and compliance.
                With extensive experience in OpenAPI 3.0 specifications, you meticulously
                review documentation for accuracy, completeness, and adherence to standards.
            """),
            allow_delegation=True,
            llm=self.llm
        )


    def review_openapi_spec(self, openapi_spec: Dict) -> Task:
        return Task(
            description=dedent(f"""
                Review the following OpenAPI specification for compliance and quality:
                
                {json.dumps(openapi_spec, indent=2)}
                
                Review Checklist:
                1. OpenAPI 3.0 Compliance
                - Verify correct version specification
                - Check required root elements
                - Validate schema structure
                
                2. Completeness
                - All endpoints properly documented
                - Parameters fully specified
                - Request/response schemas defined
                - Security schemes properly configured
                
                3. Quality Checks
                - Consistent naming conventions
                - Clear descriptions
                - Proper use of data types
                - Meaningful response codes
                
                4. Best Practices
                - Proper tag usage
                - Consistent parameter naming
                - Appropriate security definitions
                
                You must return a JSON object with the following structure:
                {{
                    "is_valid": boolean,
                    "approved_spec": object (the reviewed and possibly corrected OpenAPI spec),
                    "issues": [array of strings describing any issues found],
                    "recommendations": [array of improvement suggestions]
                }}
            """),
            expected_output="""A JSON object containing: is_valid (boolean), approved_spec (object), issues (array), and recommendations (array)""",
            agent=self.reviewer_agent
        )

The Iris Agent

The last agent in the planner group is the Iris Agent, who sends the finalized OpenAPI documentation to Iris.


    def create_iris_i14y_agent(self) -> Agent:
        return Agent(
            role='Iris I14y Integration Specialist',
            goal='Integrate API specifications with Iris I14y service',
            backstory=dedent("""
                You are responsible for ensuring smooth integration between the API
                documentation system and the Iris I14y service. You handle the
                communication with Iris, validate responses, and ensure successful
                integration of API specifications.
            """),
            allow_delegation=False,
            llm=self.llm
        )

    def send_to_iris(self, openapi_spec: Dict, production_info: Dict, review_result: Dict) -> Task:
        return Task(
            description=dedent(f"""
                Send the approved OpenAPI specification to Iris I14y service:

                Production Information:
                - Name: {production_info['production_name']}
                - Namespace: {production_info['namespace']}
                - Is New: {production_info.get('create_new', False)}

                Review Status:
                - Approved: {review_result['is_valid']}
                
                Return the integration result in JSON format.
            """),
            expected_output="""A JSON object containing the integration result with Iris I14y service, including success status and response details""",
            agent=self.iris_i14y_agent
        )

class IrisI14yService:
    def __init__(self):
        self.logger = logging.getLogger('facilis.IrisI14yService')
        self.base_url = os.getenv("FACILIS_URL", "http://dc-facilis-iris-1:52773") 
        self.headers = {
            "Content-Type": "application/json"
        }
        self.timeout = int(os.getenv("IRIS_TIMEOUT", "504"))  # in milliseconds
        self.max_retries = int(os.getenv("IRIS_MAX_RETRIES", "3"))
        self.logger.info("IrisI14yService initialized")

    async def send_to_iris_async(self, payload: Dict) -> Dict:
        """
        Send payload to Iris generate endpoint asynchronously
        """
        self.logger.info("Sending payload to Iris generate endpoint")
        if isinstance(payload, str):
            try:
                json.loads(payload)  
            except json.JSONDecodeError:
                raise ValueError("Invalid JSON string provided")
        
        retry_count = 0
        last_error = None

        # Create timeout for aiohttp
        timeout = aiohttp.ClientTimeout(total=self.timeout / 1000)  # Convert ms to seconds

        while retry_count < self.max_retries:
            try:
                self.logger.info(f"Attempt {retry_count + 1}/{self.max_retries}: Sending request to {self.base_url}/facilis/api/generate")
                
                async with aiohttp.ClientSession(timeout=timeout) as session:
                    async with session.post(
                        f"{self.base_url}/facilis/api/generate",
                        json=payload,
                        headers=self.headers
                    ) as response:
                        if response.status == 200:
                            return await response.json()
                        response.raise_for_status()

            except asyncio.TimeoutError as e:
                retry_count += 1
                last_error = e
                error_msg = f"Timeout occurred (attempt {retry_count}/{self.max_retries})"
                self.logger.warning(error_msg)
                
                if retry_count < self.max_retries:
                    wait_time = 2 ** (retry_count - 1)
                    self.logger.info(f"Waiting {wait_time} seconds before retry...")
                    await asyncio.sleep(wait_time)
                continue

            except aiohttp.ClientError as e:
                error_msg = f"Failed to send to Iris: {str(e)}"
                self.logger.error(error_msg)
                raise IrisIntegrationError(error_msg)

        error_msg = f"Failed to send to Iris after {self.max_retries} attempts due to timeout"
        self.logger.error(error_msg)
        raise IrisIntegrationError(error_msg, last_error)

Meet the Generators

Our second set of agents are - the Generators. They are here to transform the OpenAPI specifications into InterSystems IRIS interoperability. There are eight of them in this group.

The first one is the Analyzer Agent. He's like the planner, mapping out the route. Its job is to delve into the OpenAPI specs and figure out what IRIS Interoperability components are needed.


    def create_analyzer_agent():
        return Agent(
            role="OpenAPI Specification Analyzer",
            goal="Thoroughly analyze OpenAPI specifications and plan IRIS Interoperability components",
            backstory="""You are an expert in both OpenAPI specifications and InterSystems IRIS Interoperability. 
            Your job is to analyze OpenAPI documents and create a detailed plan for how they should be 
            implemented as IRIS Interoperability components.""",
            verbose=False,
            allow_delegation=False,
            tools=[analyze_openapi_tool],
            llm=get_facilis_llm()
        )

   analysis_task = Task(
        description="""Analyze the OpenAPI specification and plan the necessary IRIS Interoperability components. 
        Include a list of all components that should be in the Production class.""",
        agent=analyzer,
        expected_output="A detailed analysis of OpenAPI spec and plan for IRIS components, including Production components list",
        input={
            "openapi_spec": openApiSpec,
            "production_name": "${production_name}" 
        }
    )

Next up, the Business Services (BS) and Business Operations (BO) Agents take over. They generate the Business Services and Business Operations based on the OpenAPI endpoints. They use a handy tool called MessageClassTool to generate the perfect message classes, ensuring the communication.


    def create_bs_generator_agent():
        return Agent(
            role="IRIS Production and Business Service Generator",
            goal="Generate properly formatted IRIS Production and Business Service classes from OpenAPI specifications",
            backstory="""You are an experienced InterSystems IRIS developer specializing in Interoperability Productions.
            Your expertise is in creating Business Services and Productions that can receive and process incoming requests based on
            API specifications.""",
            verbose=False,
            allow_delegation=True,
            tools=[generate_production_class_tool, generate_business_service_tool],
            llm=get_facilis_llm()
        )

    def create_bo_generator_agent():
        return Agent(
            role="IRIS Business Operation Generator",
            goal="Generate properly formatted IRIS Business Operation classes from OpenAPI specifications",
            backstory="""You are an experienced InterSystems IRIS developer specializing in Interoperability Productions.
            Your expertise is in creating Business Operations that can send requests to external systems
            based on API specifications.""",
            verbose=False,
            allow_delegation=True,
            tools=[generate_business_operation_tool, generate_message_class_tool],
            llm=get_facilis_llm()
        )

    bs_generation_task = Task(
        description="Generate Business Service classes based on the OpenAPI endpoints",
        agent=bs_generator,
        expected_output="IRIS Business Service class definitions",
        context=[analysis_task]
    )

    bo_generation_task = Task(
        description="Generate Business Operation classes based on the OpenAPI endpoints",
        agent=bo_generator,
        expected_output="IRIS Business Operation class definitions",
        context=[analysis_task]
    )

    class GenerateMessageClassTool(BaseTool):
        name: str = "generate_message_class"
        description: str = "Generate an IRIS Message class"
        input_schema: Type[BaseModel] = GenerateMessageClassToolInput

        def _run(self, message_name: str, schema_info: Union[str, Dict[str, Any]]) -> str:
            writer = IRISClassWriter()
            try:
                if isinstance(schema_info, str):
                    try:
                        schema_dict = json.loads(schema_info)
                    except json.JSONDecodeError:
                        return "Error: Invalid JSON format for schema info"
                else:
                    schema_dict = schema_info

                class_content = writer.write_message_class(message_name, schema_dict)
                # Store the generated class
                writer.generated_classes[f"MSG.{message_name}"] = class_content
                return class_content
            except Exception as e:
                return f"Error generating message class: {str(e)}"

Once BS and BO have done their thing, it's time for the Production Agent to shine! This agent pulls everything together to create a cohesive production environment.

After everything is set up, next in line is the Validation Agent. This one makes comes in for a final checkup, making sure each Iris class is ok.

Then we have the Export Agent and the Collection Agent. The Export Agent generates the .cls files while the Collection Agent gathers all the file names. Everything gets passed along to the importer, which compiles everything into InterSystems Iris.


    def create_exporter_agent():
        return Agent(
            role="IRIS Class Exporter",
            goal="Export and validate IRIS class definitions to proper .cls files",
            backstory="""You are an InterSystems IRIS deployment specialist. Your job is to ensure 
            that generated IRIS class definitions are properly exported as valid .cls files that 
            can be directly imported into an IRIS environment.""",
            verbose=False,
            allow_delegation=False,
            tools=[export_iris_classes_tool, validate_iris_classes_tool],
            llm=get_facilis_llm()
        )
        
    def create_collector_agent():
        return Agent(
            role="IRIS Class Collector",
            goal="Collect all generated IRIS class files into a JSON collection",
            backstory="""You are a file system specialist responsible for gathering and 
            organizing generated IRIS class files into a structured collection.""",
            verbose=False,
            allow_delegation=False,
            tools=[CollectGeneratedFilesTool()],
            llm=get_facilis_llm()
        )

    export_task = Task(
        description="Export all generated IRIS classes as valid .cls files",
        agent=exporter,
        expected_output="Valid IRIS .cls files saved to output directory",
        context=[bs_generation_task, bo_generation_task],
        input={
            "output_dir": "/home/irisowner/dev/output/iris_classes"  # Optional
        }
    )

    collection_task = Task(
        description="Collect all generated IRIS class files into a JSON collection",
        agent=collector,
        expected_output="JSON collection of all generated .cls files",
        context=[export_task, validate_task],
        input={
            "directory": "./output/iris_classes"
        }
    )

Limitations and Challenges

Our project started as an exciting experiment, where my fellow musketeers and I aimed to create a fully automated tool using agents. It was a wild ride! Our main focus was on REST API integrations. It's always a joy to get a task with an OpenAPI specification to integrate; however, legacy systems can be a whole different story. We thought automating these tasks could be incredibly useful. But every adventure has its twists: One of the biggest challenges was instructing the AI to convert OpenAPI to Iris Interoperability. We started with openAI GPT3.5-turbo model, on initial tests proved difficult with debugging and preventing breaks. Switching to Anthropic Claude 3.7 Sonnet showed better results for the Generator group but not so much for the Planners... This led us to split our environment configurations, using different LLM providers for flexibility. We used GPT3.5-turbo for planning and Claude sonnet for generation, great combo! This combination worked well but we did encounter issues with hallucinations. Moving to GT4o improved results, yet we still faced hallucinations creating Iris classes and sometimes unnecessary OpenAPI specifications like the renowned Pet Store OpenAPI example. we had a blast learning along the way, and I'm super excited about the amazing future in this field with countless possibilities!

0
1 131
Article Henry Pereira · Sep 29, 2024 3m read

sql-embedding cover

InterSystems IRIS 2024 recently introduced the vector types. This addition empowers developers to work with vector search, enabling efficient similarity searches, clustering, and a range of other applications. In this article, we will delve into the intricacies of vector types, explore their applications, and provide practical examples to guide your implementation.

At its essence, a vector type is a structured collection of numerical values arranged in a predefined order. These values serve to represent different attributes, features, or characteristics of an object.

SQL-Embedding: A Versatile Tool

To streamline the creation and utilization of embeddings for vector searches within SQL queries, we introduces SQL-Embedding tool. This feature enables to leverage a diverse range of embedding models directly within their SQL databases, tailored to their specific requirements.

Practical Example: Similarity Search

Let's consider a scenario where we aim to determine the similarity between two texts using the fastembed model and SQL-Embedding. The following SQL query showcases how this can be accomplished:

SELECT
 VECTOR_DOT_PRODUCT(
 embFastEmbedModel1,
 dc.embedding('my text', 'fastembed/BAAI/bge-small-en-v1.5')
 ) AS "Similarity between 'my text' and itself",
 VECTOR_DOT_PRODUCT(
 embFastEmbedModel1,
 dc.embedding('lorem ipsum', 'fastembed/BAAI/bge-small-en-v1.5')
 ) AS "Similarity between 'my text' and 'lorem ipsum'"
FROM testvector;

Caching

One of the significant benefits of using SQL-Embedding in InterSystems IRIS is its ability to cache repeated embedding requests. This caching mechanism significantly improves performance by reducing the computational overhead associated with generating embeddings for identical or similar inputs.

How Caching Works

When you execute a SQL-Embedding query, InterSystems IRIS checks if the embedding for the given input has already been cached. If it exists, the cached embedding is retrieved and used directly, eliminating the need to regenerate it. This is particularly advantageous in scenarios where the same embeddings are frequently requested, such as in recommendation systems or search applications.

Caching Benefits

  • Reduced Latency: By avoiding redundant embedding calculations, caching can significantly reduce query response times.
  • Improved Scalability: Caching can handle increased workloads more efficiently, as it reduces the strain on the underlying embedding models.
  • Optimized Resource Utilization: Caching helps conserve computational resources by avoiding unnecessary calculations.

In conclusion, the introduction of vector types in InterSystems IRIS presents a robust tool for working with numerical object representations. By harnessing similarity searches, SQL-Embedding, and various applications, developers can unlock new possibilities and enhance their data-driven solutions.

If you found our app interesting and contributed some insight, please vote for sql-embeddings and help us on this journey!

2
2 279
Article Henry Pereira · Aug 1, 2024 4m read

Frontend development can be a daunting, even nightmarish, task for backend-focused developers. Early in my career, the lines between frontend and backend were blurred, and everyone was expected to handle both. CSS, in particular, was a constant struggle; it felt like an impossible mission.

Although I enjoy frontend work, CSS remains a complex challenge for me, especially since I learned it through trial and error. The meme of Peter Griffin struggling to open blinds perfectly captures my experience of learning CSS. Peter Griffin CSS

But today, everything changes. Tools like Streamlit have revolutionized the game for developers like me, who prefer the comfort of a terminal's black screen. Gone are the days of wrestling with lines of code that look like cryptic messages from aliens (looking at you, CSS!). As Doctor Károly Zsolnai-Fehér from Two Minute Papers always says, "What a time to be alive!" With Streamlit, you can build an entire web application using just Python code. Want to see it in action? Buckle up, because I'm about to share my attempt at creating the frontend for SQLZilla using this awesome tool.

To install it, simply open your terminal and cast this spell:

pip install streamlit

(Or you can add it to your requirements.txt file.)

Create a file, app.py and add this code snippet to display an "SQLZilla" title:

import streamlit as st

st.title("SQLZilla")

Run the Show!

Open your terminal again and type this command to activate your creation:

streamlit run app.py

Voila! Your Streamlit app should appear in your web browser, proudly displaying the title "SQLZilla."

Add an image using image method, to centralize it I just create 3 columns and add on center (shame on me)

   st.title("SQLZilla")

   left_co, cent_co, last_co = st.columns(3)
   with cent_co:
       st.image("small_logo.png", use_column_width=True)

To manage configurations and query results, you can use session state. Here's how you can save configuration values and store query results:

if 'hostname' not in st.session_state:
    st.session_state.hostname = 'sqlzilla-iris-1'
if 'user' not in st.session_state:
    st.session_state.user = '_system'
if 'pwd' not in st.session_state:
    st.session_state.pwd = 'SYS'
# Add other session states as needed

To connect SQLZilla to an InterSystems IRIS database, you can use SQLAlchemy. First, install SQLAlchemy with:

pip install sqlalchemy

Then, set up the connection in your app.py file:

from sqlalchemy import create_engine
import pandas as pd

# Replace with your own connection details
engine = create_engine(f"iris://{user}:{password}@{host}:{port}/{namespace}")

def run_query(query):
    with engine.connect() as connection:
        result = pd.read_sql(query, connection)
        return result

Once you've connected to the database, you can use Pandas and Streamlit to display the results of your queries. Here's an example of how to display a DataFrame in your Streamlit app:

if 'query' in st.session_state:
    query = st.session_state.query
    df = run_query(query)
    st.dataframe(df)

To make your app more interactive, you can use st.rerun() to refresh the app whenever the query changes:

if 'query' in st.session_state and st.button('Run Query'):
    df = run_query(st.session_state.query)
    st.dataframe(df)
    st.rerun()

You can find various Streamlit components to use. In SQLZilla, I added an ACE code editor version called streamlit-code-editor:

from code_editor import code_editor

editor_dict = code_editor(st.session_state.code_text, lang="sql", height=[10, 100], shortcuts="vscode")

if len(editor_dict['text']) != 0:
    st.session_state.code_text = editor_dict['text']

Since the SQLZilla assistant is written in Python, I just called the class:

from sqlzilla import SQLZilla

def assistant_interaction(sqlzilla, prompt):
    response = sqlzilla.prompt(prompt)
    st.session_state.chat_history.append({"role": "user", "content": prompt})
    st.session_state.chat_history.append({"role": "assistant", "content": response})

    if "SELECT" in response.upper():
        st.session_state.query = response

    return response

Congratulations! You’ve built your own SQLZilla. Continue exploring Streamlit and enhance your app with more features. And if you like SQLZilla, vote for this incredible assistant that converts text into queries!

3
2 577
Article Henry Pereira · May 18, 2024 5m read


Current triage systems often rely on the experience of admitting physicians. This can lead to delays in care for some patients, especially when faced with inexperienced residents or non-critical symptoms. Additionally, it can result in unnecessary hospital admissions, straining resources and increasing healthcare costs.

We focused our project on pregnant women and conducted a survey with friends of ours who work at a large hospital in São Paulo, Brazil, specifically in the area of monitoring and caring for pregnant women.

0
0 216
Article Henry Pereira · Jan 16, 2023 14m read

cover

In this article, I will show you how one can easily create and read Microsoft Word documents using InterSystems IRIS with the leverage power of embedded Python.

Setup

First things first, let’s install the Python module called python-docx. There are a lot of modules to write MS Word files in Python. However, this one is the easiest one to use.

Just execute the following command on the terminal:

!pip3 install python-docx

If you are working with Docker, like I do, just add the following line to a Dockerfile

ENV PIP_TARGET=${ISC_PACKAGE_INSTALLDIR}/mgr/python RUN pip3 install python-docx

Let’s Get Started!

Now that you have installed the module, let’s create a very simple document. It will be a skeleton for a more complex document afterward. To create an empty file, we use the following code:

ClassMethod CreateDocument(path as %String) [ Language = python ]
{

from docx import Document

document = Document()

document.save(path + "document.docx")

}

If you execute it, you’ll see that it will create an empty document.

Quick note:

Since python-docx creates .docx files, you don’t have to use MS Word. Both Google Docs and LibreOffice are free alternatives that support .docx files, and they are just as good as the MS Office suite.

After creating an empty document, let’s add headings and subheadings to its structure our document. To do that we will use the add_heading() method.

hard

The add_heading() method accepts two arguments: the first one is the text, and the second one determines the style by level. There are 10 levels: 0 is the biggest one, while 9 is the smallest.

ClassMethod CreateDocument(path as %String) [ Language = python ]
{

from docx import Document

document = Document()
document.add_heading('The Lord of the Donuts', 0)
document.add_heading('best donut from middle earth', 2)
document.save(path + "document.docx")

}

The document.docx until now should look like this:

step1

Adding Images

To add an image to a word document we will use add_picture() method.

The path to the image is passed as the first parameter.

ClassMethod Create(path As %String) [ Language = python ]
{

from docx import Document

document = Document()

document.add_heading('The Lord of the Donuts', 0)

document.add_heading('best donut from middle earth', 2)

document.add_picture(path + "donut.png")

document.save(path + "document.docx")

}

Also, you can specify the width and height of the image. To resize the image, you might have to recalculate the values using dots-per-inch(dpi) format. However, python-docx has an auxiliary class called docx.shared that helps you to convert inches, centimeters, and millimeters.

document.add_picture(path + "donut.png", width=docx.shared.Inches(5), height=docx.shared.Inches(7))

add img

Writing Paragraphs

To begin writing paragraphs, you can use the add_paragraph() method, as we did with headings.

ClassMethod Create(path As %String) [ Language = python ]
{
    from docx import Document

    document = Document()
    document.add_heading('The Lord of the Donuts', 0)
    document.add_heading('best donut from middle earth', 2)
    document.add_picture('/irisrun/repo/assets/donut.png')

    document.add_paragraph('One donut to rule them all \nOne donut to find them \nOne donut to bring them all \nAnd in the darkness bind them')

    document.save(path + "document.docx")

}

Great, but how do we change the font size, style, and color?

I’m glad you asked. We are going to need to add a run.

Run in Word is a sequence of characters, where all of them share the same character formatting.

So, let’s add our paragraph object to a variable, and we add a run to that variable using add_run().

The first parameter is the text, and the second parameter is the style.

You can use such styles as bold, italic, subscript, underline, strike, double_strike, emboss, etc.

Let’s break our paragraph into parts and apply a bold font to all words “One”, whereas for “find them” we will choose italics.

ClassMethod Create(path As %String) [ Language = python ]
{
    from docx import Document

    document = Document()
    document.add_heading('The Lord of the Donuts', 0)
    document.add_heading('best donut from middle earth', 2)
    document.add_picture(path + 'donut.png')

    paragraph = document.add_paragraph('One donut to rule them all, \n')
    paragraph.add_run('One').bold = True
    paragraph.add_run(' donut to ')
    paragraph.add_run('find them,').italic = True
    paragraph.add_run(' One').bold = True
    paragraph.add_run(' donut to bring them all, \nAnd with sugar bind them\n')

    document.save(path + "document.docx")
}

Great! As you can see Runs are small blocks to stylize. To change the font, you just need to modify the font.name property from the run.

ClassMethod Create(path As %String) [ Language = python ]
{
    from docx import Document

    document = Document()
    document.add_heading('The Lord of the Donuts', 0)
    document.add_heading('best donut from middle earth', 2)
    document.add_picture(path + 'donut.png')

    paragraph = document.add_paragraph('One donut to rule them all, \n')
    paragraph.add_run('One').bold = True
    paragraph.add_run(' donut to ')
    paragraph.add_run('find them,').italic = True
    paragraph.add_run(' One').bold = True
    paragraph.add_run(' donut to bring them all, \nAnd with sugar bind them\n')

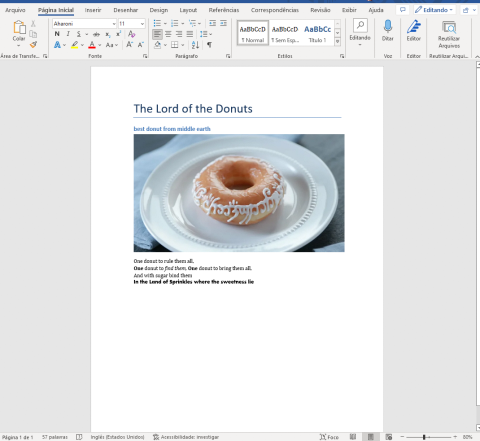
    run = paragraph.add_run('In the Land of Sprinkles where the sweetness lie')
    run.font.name = 'Aharoni'

    document.add_heading('How to order', 2)
    document.add_paragraph('Start with a Coating,', style='List Number')
    document.add_paragraph('Pick a Topping,', style='List Number')
    document.add_paragraph('Choose a Drizzle', style='List Number')

    document.save(path + "document.docx")
}

font

As you can see, the last line of the paragraph is written in a different font. Great, but there is a better way to improve the paragraph. All you need is to create a custom font style. To specify the style type, we need to import the WD_STYLE_TYPE enum from python-docx. Also, remember to import “Pt” class from shared to use it for the font size. After that, you should call the add_style and give a name to this new style. When adding the run to the paragraph, include the custom style name as the second parameter.

ClassMethod Create(path As %String) [ Language = python ]
{
    from docx import Document
    from docx.enum.style import WD_STYLE_TYPE
    from docx.shared import Pt
    from docx.enum.text import WD_ALIGN_PARAGRAPH

    document = Document()
    document.add_heading('The Lord of the Donuts', 0)
    document.add_heading('best donut from middle earth', 2)
    document.add_picture(path + 'donut.png')

    paragraph = document.add_paragraph('One donut to rule them all, \n')
    paragraph.add_run('One').bold = True
    paragraph.add_run(' donut to ')
    paragraph.add_run('find them,').italic = True
    paragraph.add_run(' One').bold = True
    paragraph.add_run(' donut to bring them all, \nAnd with sugar bind them\n')

    font_styles = document.styles
    font_charstyle = font_styles.add_style('customStyle', WD_STYLE_TYPE.CHARACTER)
    font_object = font_charstyle.font
    font_object.size = Pt(15)
    font_object.name = 'Book Antiqua'
    run = paragraph.add_run('In the Land of Sprinkles where the sweetness lie','customStyle')

    document.save(path + "document.docx")
}

At this point the document should look like this: image

Creating Lists

If you want to create an ordered list, just add multiple paragraphs and select the style for the List Number as we did before.

		font_styles = document.styles
    font_charstyle = font_styles.add_style('customStyle', WD_STYLE_TYPE.CHARACTER)
    font_object = font_charstyle.font
    font_object.size = Pt(15)
    font_object.name = 'Book Antiqua'
    run = paragraph.add_run('In the Land of Sprinkles where the sweetness lie','customStyle')

    document.add_heading('How to order', 2)
    document.add_paragraph('Start with a Coating,', style='List Number')
    document.add_paragraph('Pick a Topping,', style='List Number')
    document.add_paragraph('Choose a Drizzle', style='List Number')

    document.save(path + "document.docx")

It’s the same thing as Unordered Lists, but the style must use here will be List Bullet

		font_styles = document.styles
    font_charstyle = font_styles.add_style('customStyle', WD_STYLE_TYPE.CHARACTER)
    font_object = font_charstyle.font
    font_object.size = Pt(15)
    font_object.name = 'Book Antiqua'
    run = paragraph.add_run('In the Land of Sprinkles where the sweetness lie','customStyle')

    document.add_heading('How to order', 2)
    document.add_paragraph('Start with a Coating,', style='List Number')
    document.add_paragraph('Powndered Sugar', style='List Bullet')
    document.add_paragraph('Glazed', style='List Bullet')
    document.add_paragraph('Chocolate Icing', style='List Bullet')

    document.add_paragraph('Pick a Topping,', style='List Number')
    document.add_paragraph('Sprinkles Rainbow', style='List Bullet')
    document.add_paragraph('Chopped Peanuts', style='List Bullet')

    document.add_paragraph('Choose a Drizzle', style='List Number')
    document.add_paragraph('Hot fudge', style='List Bullet')
    document.add_paragraph('Marshmalow', style='List Bullet')
    document.add_paragraph('Salted Caramel', style='List Bullet')

    document.save(path + "document.docx")

Before moving on, we will require a fast refactoring of the code to make it look a little bit more "pythonish".

		font_styles = document.styles
    font_charstyle = font_styles.add_style('customStyle', WD_STYLE_TYPE.CHARACTER)
    font_object = font_charstyle.font
    font_object.size = Pt(15)
    run = paragraph.add_run('In the Land of Sprinkles where the sweetness lie','customStyle')
    run.font.name = 'Book Antiqua'

    steps = dict(coating = ['Powndered Sugar', 'Glazed', 'Chocolate Icing'],
        topping = ['Sprinkles Rainbow','Chopped Peanuts'],
        drizzle = ['Hot fudge', 'Marshmalow', 'Salted Caramel']
    )

    document.add_heading('How to order', 2)
    document.add_paragraph('Start with a Coating,', style='List Number')
    for coat in steps['coating']:
        document.add_paragraph(coat, style='List Bullet')

    document.add_paragraph('Pick a Topping,', style='List Number')
    for top in steps['topping']:
        document.add_paragraph(top, style='List Bullet')

    document.add_paragraph('Choose a Drizzle', style='List Number')
    for drizzle in steps['drizzle']:
        document.add_paragraph(drizzle, style='List Bullet')

    document.save(path + "document.docx")

With this latest modification, we can now see how the document has changed so far.

lists

Working with tables

Working with tables is a little bit different than everything else we have done until now. Before we start working on tables, let’s get the data.

Just import IRIS and pandas to the method and execute a simple SELECT.

from docx import Document
from docx.enum.style import WD_STYLE_TYPE
from docx.shared import Pt
import iris
import pandas as pd
#
#
#
rs = iris.sql.exec('SELECT id, img, name, "desc" FROM dc_docx_sample.Donuts')

Now we need to add a table to the document by calling a method add_table() and defining how many columns we will require with the cols parameter and adding only one row for the header.

You can define a style for the table by setting style property. For this example, let’s add a grid with the ‘Table Grid’ style.

		table = document.add_table(rows=1, cols=4)
    table.style = "Table Grid"

The table object has an array of rows with a sequence of table cells in each row. For each cell, we can merge them with other cells or add paragraphs with runs as mentioned before. We can also add another table (subtable), or simply add text. Let’s populate the header row:

		table = document.add_table(rows=1, cols=4)
    table.style = "Table Grid"
    heading_row = table.rows[0].cells
    heading_row[0].text = 'ID'
    heading_row[1].text = 'Image'
    heading_row[2].text = 'Product'
    heading_row[3].text = 'Description'

Finally, using a “for loop”, populate each row with the data that we get. The trick is to add a paragraph and add_picture for the img property on the Donuts example class.

		rs = iris.sql.exec('SELECT id, img, name, "desc" FROM dc_docx_sample.Donuts')
    df = rs.dataframe()
    for idx in df.index:
        row_cells = table.add_row().cells
        row_cells[0].text = str(df['id'][idx])
        image_cell = row_cells[1].add_paragraph('')
        image_cell.add_run().add_picture(path + 'img/' + df['img'][idx])
        row_cells[2].text = str(df['name'][idx])
        row_cells[3].text = str(df['desc'][idx])

You can now output the document with the following table:

table

Look's very good!

Reading MS Word Documents

Last but not least, it’s time to read some MS Word files!

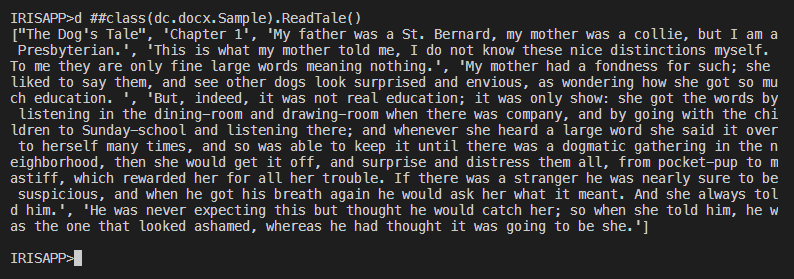
In the assets folder on the repository, you can find three docx files. The first one, called dogs_tale.docx, is just a part of chapter one of a short story, written by Mark Twain.

dogs tale

In the same way, we instantiate the object in the document when creating it. We are going to do it now. The only difference will be the file path and name on the constructor argument.

The paragraphs property is an array of paragraphs in the file in the document order.

Let’s fetch all the paragraphs from the dogs_tale.docx and then display the total number of paragraphs:

ClassMethod DogsTale(path As %String) [ Language = python ]
{
    from docx import Document
    doc = Document(path + "dogs_tale.docx")

    print(len(doc.paragraphs))
}

Nice!

As we have seen before, a Paragraph has a collection of runs. So, let’s dissect the third paragraph of this file:

ClassMethod DogsTale(path As %String) [ Language = python ]
{
    from docx import Document
    doc = Document(path + "dogs_tale.docx")

    print(len(doc.paragraphs))

    p = doc.paragraphs[2]
    for run in p.runs:
        aux = ''
        if (run.bold): aux = '// has Bold style'
        if (run.italic): aux = '// has Italic style'
        print(run.text, aux + '\n')
}

Note that we can get direct access to the third paragraph by index (remember that Python array of elements starts at 0)

Finally, we can get the complete text of the document and print it as an array:

ClassMethod DogsTale(path As %String) [ Language = python ]
{
    from docx import Document
    doc = Document(path + "dogs_tale.docx")

    print(len(doc.paragraphs))

    p = doc.paragraphs[2]
    for run in p.runs:
        aux = ''
        if (run.bold): aux = '// has Bold style'
        if (run.italic): aux = '// has Italic style'
        print(run.text, aux + '\n')

    fulltext = []
    for p in doc.paragraphs:
        fulltext.append(p.text)
    print(fulltext)
}

arr

The last thing we can do to spice it up a little bit is to read the table on order.docx

order


ClassMethod Read(path As %String) [ Language = python ]
{
    from docx import Document
    doc = Document(path + "order.docx")

    fulltext = []
    for p in doc.paragraphs:
        fulltext.append(p.text)
    print(fulltext)

    tables = doc.tables
    data = {}
    cols = {}
    for table in tables:
        key = None
        for i, row in enumerate(table.rows):
            for col, cell in enumerate(row.cells):
                text = cell.text
                if i == 0:
                    cols[col] = text
                    data[text] = []
                    continue
                data[cols[col]].append(text)
    print(data)
}

Let’s make a template

It would be a fun exercise to practice everything we have learned so far by making a template. A template is a document that contains a "boilerplate" text that does not change. The input parameter for the information you want to replace will be in the following format: {{input_parameter}}

In the assets folder on the repository, you can find the third file called template.docx

template

As we did before, let's instantiate the document by passing the file with the path in the constructor argument.

Then, let's define the dictionary, where we will select the parameter names and values.

ClassMethod Template(path As %String) [ Language = python ]
{
    from docx import Document 


    dict = {"company_name": "Mordor co",
        "name": "Saruman the White",
        "employee_name": "Radagast the Brown",
        "employee_job_title": "magician",
        "job_title": "wizard",
        "quality": "wise",
        "recipient_name": "Gandalf the Gray"
        }
    regex1 = re.compile(r"\{\{(.*?)\}\}") 
    doc = Document(path + "template.docx")
}

Now create a Python function to search a pattern into paragraphs and runs to replace it with the dictionary when found.

ClassMethod Template(path As %String) [ Language = python ]
{
    import re 
    from docx import Document 


    def docx_replace_regex(doc_obj, regex, dict): 
        for p in doc_obj.paragraphs: 
            for r in p.runs:
                arr = regex.findall(r.text)
                for word in arr:
                    r.text = r.text.replace('{{'+word+'}}', dict[word])

    dict = {"company_name": "Mordor co",
        "name": "Saruman the White",
        "employee_name": "Radagast the Brown",
        "employee_job_title": "magician",
        "job_title": "wizard",
        "quality": "wise",
        "recipient_name": "Gandalf the Gray"
        }
    regex1 = re.compile(r"\{\{(.*?)\}\}") 
    doc = Document(path + "template.docx")
    docx_replace_regex(doc, regex1, dict) 
    doc.save(path + 'result1.docx')
}

Let me add a quick explanation to those who are new to Python. This little 'r' before the quote means "raw string literal", in which a backslash, for example, means "just a backslash". You don’t need any escape sequences to represent a new line, tabs, etc.

template finished

Conclusion

The article covers the process of writing MS Word files, adding a paragraph, runs, headers, and images to MS Word documents. Finally, how to read paragraphs and runs has been explained too.

If you want to go deep, I strongly recommend taking a look at the official documentation of python-docx

Please do reach out to me with all the suggestions, comments, and feedback you may have, I'll be glad to answer you.

Github link to this code

Thanks for reading.

7
7 1271
Article Henry Pereira · Apr 6, 2022 7m read

so... where's my money?

All of us know that money is important. We constantly need to monitor all expenses to avoid looking back to the bank statement and thinking: “So, where’s my money?”

To evade financial stress, we must keep an eye on the inflow and outflow of money into our accounts.It is also important to tack when and how we spend and earn. Manually recording all transactions in order to understand where our money goes requires an effort. It demands consistency, and it is boring. Today there is a bunch of mobile or SaaS options that help you manage your finances.

I believe that there’s a good chance you are doing this already. Yet, how about developing an expense tracker application that will keep an eye on our expenses whereas we will just need to feed it with the information?

In this article, we will build an expense tracker app using embedded Python with Scikit-learn for machine learning to help you categorise all transactions.

We're going to call this project "soWhereIsMyMoney". If you started reading this article imagining that I would complain about something, sorry if that sounds like clickbait.

https://media2.giphy.com/media/doy2r0cVrjuFAmjNAJ/giphy.gif?cid=ecf05e47kteltd6y3iw7i4h34dh0ov82mcpih6alc8srzkb8&rid=giphy.gif&ct=g

Buckle up everyone, and let's go!

For this project, I used the InterSystems-iris-dev-template, it is a batteries-included configuration for docker and IRIS.

The next step is to add the python libraries that we need to Dockerfile.

ENV PIP_TARGET=${ISC_PACKAGE_INSTALLDIR}/mgr/python

RUN pip3 install numpy \
        pandas \
        scikit-learn

The flow of money between accounts is represented by transactions grouped by categories.

Now, we are going to create two persistent classes with a one-to-many relationship: Category and Transaction.

Class dc.soWhereIsMyMoney.Category Extends %Persistent
{
Index IdxName On Name [ Unique ];
Property Name As %String [ Required ];
Property Type As %String(DISPLAYLIST = ",Income,Expense", VALUELIST = ",I,E") [ InitialExpression = "E", Required ];

Relationship Transactions As dc.soWhereIsMyMoney.Transaction [ Cardinality = many, Inverse = Category ];
}

Categories are composed of two types, where one is the Income and the other one is the Expense.

Class dc.soWhereIsMyMoney.Transaction Extends %Persistent
{
Index IdxCategory On Category;
Property Description As %String [ Required ];
Property CreatedAt As %DateTime;
Property UpdatedAt As %DateTime;
Property Amount As %Numeric [ Required ];

Relationship Category As dc.soWhereIsMyMoney.Category [ Cardinality = one, Inverse = Transactions ];
}

The category will help you keep in touch with spending. There are a million categories to consider. Everything should be accounted for, from large expenses like your mortgage and car payment to smaller ones like your Netflix subscription. Some users might choose to group “Lunch”, “Eating out” and “Takeaway” into one single “Food” category. Other ones might split them between “Eating out” and “Groceries.”

It’s time to define the categories into which all the transactions should fall. To keep this sample simple, I chose to use only 8 categories:

  • Income
  • Eating Out
  • Personal Care
  • Fuel
  • Sport
  • Utilities
  • Entertainment
  • Groceries

Our goal is to give you a description. We want to assign it to one of these categories. It can be done using the power of Machine Learning.

The extensive prevalence of text classification articles and tutorials on the Internet is related to binary text classification like sentiment analysis. The challenge is that we have to deal with a multiclass text classification problem. To solve that, we can employ some different machine learning models like Multinominal Naive Bayes, Random Forest, Logistic Regression, Linear Support Vector Machine, etc. For our case, Linear Support Vector Machine will fit perfectly.

If you want a simple explanation about Support Vector Machine, I strongly recommend watching SVM in 2 minutes video.

Science

Ok, it has been a bit too fast till now. It certainly would be good to step back for a moment and give you a more detailed explanation of the text representation. Classifiers can not directly process the text documents in their original form. First, it is necessary to preprocess the text converting it to a more numerical representation.

As I said before, we will use Scikit-learn. Scikit-learn is a Python library that contains such tools as regression, clustering, dimensionality reductions, and classification for statistical modelling and machine learning.

So, will transfer all records from "Transaction" into a pandas Dataframe.

import iris
rs = iris.sql.exec('SELECT Category->ID as category_id, Category->Name as category, Description as description FROM dc_soWhereIsMyMoney."Transaction" ')
df = rs.dataframe()

Noice, it's very simple to do.

from sklearn.model_selection import train_test_split
  X_train, _, y_train, _ = train_test_split(df['description'], df['category'], random_state = 0)

We have just create a train-test split (part of the data set is left out from the training to see how the model performs on data it hasn’t seen). The x_train defines the part of the data that help us make the predictions. It is the input (the transaction descriptions). The y_train defines the expected categories for those inputs.

from sklearn.feature_extraction.text import CountVectorizer
count_vect = CountVectorizer(min_df=5, encoding='utf8', ngram_range=(1, 2), stop_words='english')
  X_train_counts = count_vect.fit_transform(X_train)

CountVectorizer will transform a collection of descriptions into a matrix of token counts. min_df is the minimum frequency rate a word must have in the input data in order to be kept, ngram_range is set to (1, 2) to indicate that we want to consider both unigrams and bigrams. To reduce the number of noisy features stop_words is set to "English" to remove all common pronouns and articles ("a", "the", ...).

from sklearn.feature_extraction.text import TfidfTransformer
tfidf_transformer = TfidfTransformer(norm='l2',sublinear_tf=True)
  X_train_tfidf = tfidf_transformer.fit_transform(X_train_counts)

Then we will transform these word counts into frequencies. For each term in our dataset, we will calculate a measure called "Term Frequency, Inverse Document Frequency", abbreviated to tf-idf. To ensure all our feature vectors have a Euclidian norm of 1, the norm is set to l2 and sublinear_df is set to True to be able to use a logarithmic form for frequency.

After all data transformations we have made, now we have all the descriptions and categories. Thus, it is time to fit the model to train the classifiers.

from sklearn.svm import LinearSVC
model = LinearSVC()
model.fit(X_train_tfidf, y_train)

In the source code, which can be found on Github, I left a fake dataset that I used to train and test the project.

sample base

simple test

This is a full description of the method to suggest a category:

Class dc.soWhereIsMyMoney.nlp.Category
{

ClassMethod Suggestion(description As %String) [ Language = python ]
{
  import iris
  from sklearn.model_selection import train_test_split
  from sklearn.feature_extraction.text import CountVectorizer
  from sklearn.feature_extraction.text import TfidfTransformer
  from sklearn.svm import LinearSVC

  X_train, _, y_train, _ = train_test_split(df['description'], df['category'], random_state = 0)
  count_vect = CountVectorizer(min_df=5, encoding='utf8', ngram_range=(1, 2), stop_words='english')
  X_train_counts = count_vect.fit_transform(X_train)
  tfidf_transformer = TfidfTransformer(norm='l2',sublinear_tf=True)
  X_train_tfidf = tfidf_transformer.fit_transform(X_train_counts)
  model = LinearSVC()
  model.fit(X_train_tfidf, y_train)

  return model.predict(count_vect.transform([description]))[0]
}

}

For the Transaction class, we need to add a method of allocating all input data into the right category.


ClassMethod Log(amount As %Numeric, description As %String, category As %String = "") As %Status
	{
	 Set tSC = $$$OK
	 Set transaction = ..%New()
	 Set transaction.Amount = amount
	 Set transaction.Description = description
	 Set:(category="") category = ##class(dc.soWhereIsMyMoney.nlp.Category).Suggestion(description)
	 Try {
	 $$$ThrowOnError(##class(dc.soWhereIsMyMoney.Category).FindOrCreateByName(category, .Category))
	 Set transaction.Category = Category
	 $$$ThrowOnError(transaction.%Save())
	 } Catch ex {
	 Set tSC=ex.AsStatus()
	 }
	 Quit tSC
	}

That was it! Next time we can dive deeper and get acquainted with all possibilities the power of ePython could offer us.

Please do reach out to me with all the suggestions, comments, and feedback you may have.

Github link to this code

Thanks for reading.

0
0 1931
Article Henry Pereira · Dec 1, 2021 5m read

freepik- freepik.com First of all, what is data anonymization?

According to Wikipedia:

Data anonymization is a type of information sanitization whose intent is privacy protection. It is the process of removing personally identifiable information from data sets, so that the people whom the data describe remain anonymous.

In other words, the data anonymization is a process that retains the data but keeps the source anonymous. Depending on the adopted anonymization technique the data is redacted, masked or substituted.

And that is the purpose of iris-Disguise, to provide a set of anonymization tools.

You can use in two different ways, by method execution or specify your anonymization strategy inside the persistent class definition itself.

The current version of iris-Disguise offers 6 strategies to anonymize data:

  • Destruction
  • Scramble
  • Shuffling
  • Partial Masking
  • Randomization
  • Faking

Let me explain each strategy, I will show a method execution with an example and as mentioned, I'll also show how to apply inside the persistent class definition. To use iris-Disguise in this way you need to "wear a disguise glasses". In the persistent class, you can extent the dc.Disguise.Glasses class and change any property with the data type with the strategy of your choice. After that, at any moment, just call the DisguiseProcess method on the class. All the values will be replaced using the strategy of the data type.

So buckle up and let's go.

Destruction

This strategy will replace a entire column with a word ('CONFIDENTIAL' is the default).

Do ##class(dc.Disguise.Strategy).Destruction("classname", "propertyname", "Word to replace")

The third parameter is optional. If not provided, the word 'CONFIDENTIAL' will be used.

Class packageSample.FictionalCharacter Extends (%Persistent, dc.Disguise.Glasses)
{
Property Name As dc.Disguise.DataTypes.String(FieldStrategy = "DESTRUCTION");
}
Do ##class(packageSample.FictionalCharacter).DisguiseProcess()

1

Scramble

This strategy will scrambling all characters in a property.

Do ##class(dc.Disguise.Strategy).Scramble("classname", "propertyname")

Class packageSample.FictionalCharacter Extends (%Persistent, dc.Disguise.Glasses)
{
Property Name As dc.Disguise.DataTypes.String(FieldStrategy = "SCRAMBLE");
}
Do ##class(packageSample.FictionalCharacter).DisguiseProcess()

scramble

Shuffling

Shuffling will rearrange all values in a given property. Is not a masking strategy because it works "verticaly". This strategy is useful for relatinship because referential integrity will be kept. Until this version, this method only works on one-to-many relationships.

Do ##class(dc.Disguise.Strategy).Shuffling("classname", "propertyname")

Class packageSample.FictionalCharacter Extends (%Persistent, dc.Disguise.Glasses)
{
Property Name As %String;
Property Weapon As dc.Disguise.DataTypes.String(FieldStrategy = "SHUFFLING");
}
Do ##class(packageSample.FictionalCharacter).DisguiseProcess()

shuffling

Partial Masking

This strategy will obfuscate the part of data, a credit card number for example, can be replaced by 456X XXXX XXXX X783

Do ##class(dc.Disguise.Strategy).PartialMasking("classname", "propertyname", prefixLength, suffixLength, "mask")

PrefixLength, suffixLength and mask are optional. If not provided, the default values will be used.

Class packageSample.FictionalCharacter Extends (%Persistent, dc.Disguise.Glasses)
{
Property Name As %String;
Property SSN As dc.Disguise.DataTypes.PartialMaskString(prefixLength = 2, suffixLength = 2);
Property Weapon As %String;
}
Do ##class(packageSample.FictionalCharacter).DisguiseProcess()

partialmsk

Randomization

This strategy will generate purely random data. There are three types of randomization: integer, numeric and date.

Do ##class(dc.Disguise.Strategy).Randomization("classname", "propertyname", "type", from, to)

type: "integer", "numeric" or "date". "integer" is the default.

from and to are optional. Is to define the range of randomization. For integer type the default range is 1 to 100. For numeric type the default range is 1.00 to 100.00.

Class packageSample.FictionalCharacter Extends (%Persistent, dc.Disguise.Glasses)
{
Property Name As %String;
Property Age As dc.Disguise.DataTypes.RandomInteger(MINVAL = 10, MAXVAL = 25);
Property SSN As %String;
Property Weapon As %String;
}
Do ##class(packageSample.FictionalCharacter).DisguiseProcess()

rand

Fake Data

The idea of Faking is to replace data with random but plausible values. iris-Disguise provides a small set of methods to generate fake data.

Do ##class(dc.Disguise.Strategy).Fake("classname", "propertyname", "type")

type: "firstname", "lastname", "fullname", "company", "country", "city" and "email"

Class packageSample.FictionalCharacter Extends (%Persistent, dc.Disguise.Glasses)
{
Property Name As dc.Disguise.DataTypes.FakeString(FieldStrategy = "FIRSTNAME");
Property Age As %Integer;
Property SSN As %String;
Property Weapon As %String;
}
Do ##class(packageSample.FictionalCharacter).DisguiseProcess()

fake

### I want to hear from you!

Feedback and ideas are welcome!

Let me know what you think of this tool, how it fits your needs and what features are missing.

And I want to say a very special thanks to @Henrique Dias, @Oliver Wilms, @Robert Cemper, @Yuri Marx and @Evgeny Shvarov that commented, reviewed, suggested and made rich discussions which inspired me to create and improve the iris-Disguise.

12
3 1503
Article Henry Pereira · Sep 10, 2021 3m read

https://media3.giphy.com/media/L0qTl8hl84EDly62J1/giphy.gif?cid=ecf05e47wl2uvkvz3dxsp1axa4gf5tsk7s7nqytg7vwadj38&rid=giphy.gif&ct=g

I really love documentaries! Last weekend I was watching a Netflix documentary called This is Pop, because it was Analytics Contest time and I thought: Why not creating a pop song analytics with InterSystems Iris?

The first challenge was the database. I found on Data World project a CSV file with the Billboard hot 100 songs from 2000 to 2018, created by "Michael Tauberg" @typhon, that fits perfectly.

I was talking to @Henrique Dias and he gave me the idea of using Microsoft Power BI for good looking report with charts.

Which genres were most popular between 2000 and 2018?

Which artists had more songs on Billboard?

Which year had more dance songs?

So let's analyze the data set, with a help of csvgen imported the CSV file.

The data set contains:

Title — Title of the song

Artist — Name of the Artist

Energy — The energy of the Song — higher the value, more energetic

Danceability — higher the value, easier it is to dance to the song

Loudness..dB.. — higher the value, louder the song.

Liveness — higher the value, more likely the song is a live recording.

Valence. — higher the value, more positive mood for the song.

Duration_ms. — The duration of the song in miliseconds.

Acousticness.. higher the value, more acoustic the song

Speechiness. — higher the value, more spoken word the song contains

Lyrics — Song lyric.

Genre — Musical Genre of Song.

On the CSV file the Genre is an array like this [u'dance pop', u'hip pop', u'pop', u'pop rap', u'rap']

My idea was to create a table for Genre and another table to solve the N:N relationship. A simple script on data populates this tables.

After that, just connect the Power BI on InterSystems Iris (here a step-by-step how to do that).

Next step: cool infographics.

https://github.com/henryhamon/pop-song-analytics/blob/master/assets/pop_songs_analytics_1.png?raw=true

A bar chart to show the count of artists and a line chart for the average duration by year.

A pie chart with the most common genres, for my surprise, contemporary country was the most popular genre.

Has pop music gotten louder over the years? To answer that I use a Scatter plot with the average loudness by songs.

The Pop Songs become less or more danceable?

On the second page a bar chart shows how danceability changed by the years and a relation between energy versus acousticness.

https://github.com/henryhamon/pop-song-analytics/blob/master/assets/pop_songs_analytics_2.png?raw=true

If you liked the idea, please consider voting for the pop-songs-analytics

https://openexchange.intersystems.com/contest/current

Special thanks to @Henrique Dias for the nice chat and support.

7
0 482
Article Henry Pereira · Aug 2, 2021 8m read

https://media.giphy.com/media/Nxu57gIbNuYOQ/giphy.gif

Easy, easy, I'm not promoting a war against the machines in the best sci-fi way to avoid world domination of Ultron or Skynet. Not yet, not yet 🤔

I invite you to challenge the machines through the creation of a very simple game using ObjectScript with embedded Python.

I have to say that I got super excited with the feature of Embedded Python on InterSystems IRIS, it's incredible the bunch of possibilities that opens to create fantastic apps.

Let's build a tic tac toe, the rules are quite simple and I believe that everyone knows how to play.

That's what saved me of the tedium in my childhood during long car trips with family before chidren have cellphones or tablets, nothing like challenge my siblings to play some matches on the blurry glass.

So buckle up and let's go!

Rules

As said, the rules are quite simple:

  • only 2 players for set
  • it's played in turns in a grid of 3x3
  • the human player will always be the letter X and the computer the letter O
  • the players will only be able to put the letters in the empty spaces
  • the first to complete a sequence of 3 equal letters on the horizontal, or on vertical or on diagonal, is the winner
  • when the 9 spaces are occupied that will be draw and the end of the match

https://media4.giphy.com/media/3oriNKQe0D6uQVjcIM/giphy.gif?cid=790b761123702fb0ddd8e14b01746685cc0059bac0bc66e9&rid=giphy.gif&ct=g

All the mechanism and the rules we will write on ObjectScript, the mechanism of the computer player will be written in Python.

Let's get the hands dirty

We will control the board in a global, in wich each row will be in a node and each column in a piece.

Our first method is to initiate the board, to make it easy I will initiate the global already with the nodes(rows A, B and C) and with the 3 pieces:

/// Iniciate a New Game
ClassMethod NewGame() As %Status
{
  Set sc = $$$OK
  Kill ^TicTacToe
  Set ^TicTacToe("A") = "^^"
  Set ^TicTacToe("B") = "^^"
  Set ^TicTacToe("C") = "^^"
  Return sc
}

at this moment we will create a method to add the letters in the empty spaces, for this each player will give the location of the space on the board.

Each row a letter and each column a number, to put the X in the middle, for example, we pass B2 and the letter X to the method.

ClassMethod MakeMove(move As %String, player As %String) As %Boolean
{
  Set $Piece(^TicTacToe($Extract(move,1,1)),"^",$Extract(move,2,2)) = player
}

Let's validate if the coordination is valid, the most simple way I see is using a regular expression:

ClassMethod CheckMoveIsValid(move As %String) As %Boolean
{
  Set regex = ##class(%Regex.Matcher).%New("(A|B|C){1}[0-9]{1}")
  Set regex.Text = $ZCONVERT(move,"U")
  Return regex.Locate()
}

we need to garantee that the selected space is empty

ClassMethod IsSpaceFree(move As %String) As %Boolean
{
  Quit ($Piece(^TicTacToe($Extract(move,1,1)),"^",$Extract(move,2,2)) = "")
}

Nooice!

Now let's check if any player won the set or if the game is already finished, for this let's create the method CheckGameResult.

First we check if there was any winner completing by the horizontal, we will use a list with the rows and a simple $Find solves

    Set lines = $ListBuild("A","B","C")
    // Check Horizontal
    For i = 1:1:3 {
      Set line = ^TicTacToe($List(lines, i))
      If (($Find(line,"X^X^X")>0)||($Find(line,"O^O^O")>0)) {
        Return $Piece(^TicTacToe($List(lines, i)),"^", 1)_" won"
      }
    }

With another For we check the vertical

For j = 1:1:3 {
      If (($Piece(^TicTacToe($List(lines, 1)),"^",j)'="") &&
        ($Piece(^TicTacToe($List(lines, 1)),"^",j)=$Piece(^TicTacToe($List(lines, 2)),"^",j)) &&
        ($Piece(^TicTacToe($List(lines, 2)),"^",j)=$Piece(^TicTacToe($List(lines, 3)),"^",j))) {
        Return $Piece(^TicTacToe($List(lines, 1)),"^",j)_" won"
      }
    }

to check the diagonal:

    If (($Piece(^TicTacToe($List(lines, 2)),"^",2)'="") &&
      (
        (($Piece(^TicTacToe($List(lines, 1)),"^",1)=$Piece(^TicTacToe($List(lines, 2)),"^",2)) &&
          ($Piece(^TicTacToe($List(lines, 2)),"^",2)=$Piece(^TicTacToe($List(lines, 3)),"^",3)))||
        (($Piece(^TicTacToe($List(lines, 1)),"^",3)=$Piece(^TicTacToe($List(lines, 2)),"^",2)) &&
        ($Piece(^TicTacToe($List(lines, 2)),"^",2)=$Piece(^TicTacToe($List(lines, 3)),"^",1)))
      )) {
      Return ..WhoWon($Piece(^TicTacToe($List(lines, 2)),"^",2))
    }

at last, we check if there was a draw

    Set gameStatus = ""
    For i = 1:1:3 {
      For j = 1:1:3 {
        Set:($Piece(^TicTacToe($List(lines, i)),"^",j)="") gameStatus = "Not Done"
      }
    }
    Set:(gameStatus = "") gameStatus = "Draw"

Great!

It's time to build the machine

Let's create our opponent, we need to create an algorithm able to calculate all the available movements and use a metric to know wich is the best movement.

The ideal is to use an algorithm of decision called MiniMax (Wikipedia: MiniMax)

https://media3.giphy.com/media/WhTC5v5qQP4yAUvGKz/giphy.gif?cid=ecf05e47cx92yiew8vsig62tjq738xf7hfde0a2ygyfdl0xt&rid=giphy.gif&ct=g

The MiniMax algorithm is a decision rule used in games theory, decision theory and artificial intelligence.

Basicaly, we need to know how to play assuming wich will be the possible movements of the opponent and catch the best scene possible.

In details, we take the actual scene and recursively check the result of the movement of each player, in case the computer wins the match we score with +1, in case it looses we then score with -1 and 0 if draw.

If it is not the end of the game, we open another tree with the current game state. After that, we find the move with the maximum value to the computer and the minimum to the opponent.

See the diagram below, there are 3 available movements: B2, C1 and C3.

Choosing C1 or C3, the opponent has a chance to win in the next turn, but if choosing B2 dosen't matter the movement the opponent chooses, the machine wins the match.

minimaxp

It's like have the time stone in our hands and try to find the best timeline.

https://pa1.narvii.com/7398/463c11d54d8203aac94cda3c906c40efccf5fd77r1-460-184_hq.gif

Converting to python

ClassMethod ComputerMove() As %String [ Language = python ]
{
  import iris
  from math import inf as infinity
  computerLetter = "O"
  playerLetter = "X"

  def isBoardFull(board):
    for i in range(0, 8):
      if isSpaceFree(board, i):
        return False
    return True

  def makeMove(board, letter, move):
    board[move] = letter

  def isWinner(brd, let):
    # check horizontals
    if ((brd[0] == brd[1] == brd[2] == let) or \
      (brd[3] == brd[4] == brd[5] == let) or \
      (brd[6] == brd[7] == brd[8] == let)):
        return True
    # check verticals
    if ((brd[0] == brd[3] == brd[6] == let) or \
        (brd[1] == brd[4] == brd[7] == let) or \
        (brd[2] == brd[5] == brd[8] == let)):
        return True
    # check diagonals
    if ((brd[0] == brd[4] == brd[8] == let) or \
        (brd[2] == brd[4] == brd[6] == let)):
        return True
    return False

  def isSpaceFree(board, move):
    #Retorna true se o espaco solicitado esta livre no quadro
    if(board[move] == ''):
      return True
    else:
      return False

  def copyGameState(board):
    dupeBoard = []
    for i in board:
      dupeBoard.append(i)
    return dupeBoard

  def getBestMove(state, player):
    done = "Done" if isBoardFull(state) else ""
    if done == "Done" and isWinner(state, computerLetter): # If Computer won
      return 1
    elif done == "Done" and isWinner(state, playerLetter): # If Human won
      return -1
    elif done == "Done":    # Draw condition
      return 0

    # Minimax Algorithm
    moves = []
    empty_cells = []
    for i in range(0,9):
      if state[i] == '':
        empty_cells.append(i)

    for empty_cell in empty_cells:
      move = {}
      move['index'] = empty_cell
      new_state = copyGameState(state)
      makeMove(new_state, player, empty_cell)

      if player == computerLetter:
          result = getBestMove(new_state, playerLetter)
          move['score'] = result
      else:
          result = getBestMove(new_state, computerLetter)
          move['score'] = result

      moves.append(move)

    # Find best move
    best_move = None
    if player == computerLetter:
        best = -infinity
        for move in moves:
            if move['score'] > best:
                best = move['score']
                best_move = move['index']
    else:
        best = infinity
        for move in moves:
            if move['score'] < best:
                best = move['score']
                best_move = move['index']

    return best_move

  lines = ['A', 'B', 'C']
  game = []
  current_game_state = iris.gref("^TicTacToe")

  for line in lines:
    for cell in current_game_state[line].split("^"):
      game.append(cell)

  cellNumber = getBestMove(game, computerLetter)
  next_move = lines[int(cellNumber/3)]+ str(int(cellNumber%3)+1)
  return next_move
}

First I convert the global in a simple array, ignoring columns and rows, leting flat to facilitate.

At each analised move we call the method copyGameState that, as the name says, copys the state of the game in that moment, where we apply the MiniMax.

The method getBestMove that will be called recursevely until ends the game finding a winner or draw.

First the empty spaces are mapped and we verify the result of each move, changing between the players.

The results are stored in move['score'] to, after we check all the possibilities, find the best move.

I hope you have had fun, it is possible to improve the intelligence using algorithms like Alpha-Beta Pruning(Wikipedia: AlphaBeta Pruning) or neural network, just take care not to give life to Skynet.

https://media4.giphy.com/media/mBpthYTk5rfbZvdtIy/giphy.gif?cid=790b761181bf3c36d85a50b84ced8ac3c6c937987b7b0516&rid=giphy.gif&ct=g

Feel free to leave any comments or questions.

That's all folks

Complete source code: InterSystems Iris version 2021.1.0PYTHON

8
5 1555
Question Henry Pereira · Mar 12, 2021

Hi community,

I need to write an SQL query with hierarchical order, I have a table with a column referencing itself, similar as the sample bellow:

ID
DATE
MESSAGE
LOGIN
PARENT_ID
1
27/01/21
Bacon ipsum dolor amet pork shoulder ribs
User 1
 
2
27/01/21
Gouda croque monsieur emmental.
User 2
1
3
27/01/21
Manchego fromage frais airedale
User 3
2

Oracle database has Hierarchical Query, to do something like that:

SELECT id, MESSAGE, parent_id
   FROM messages
   CONNECT BY PRIOR id = parent_id;
4
0 318
Question Henry Pereira · May 20, 2020

Hi community,

I need to write an SQL query  to fetch a random record from a table, that table has millions of data.

In postgresql, for example, there is a RANDOM() function to do something like that:

SELECT column FROM table
ORDER BY RANDOM()
LIMIT 1

Is it possible to do something like that in Caché?

Thanks in advance

8
0 910
Announcement Henry Pereira · Mar 27, 2020

SQLBuilder is a flexible and powerful SQL query string builder for InterSystems IRIS,

With SQLBuilder you have nice and clean object oriented methods, instead of having to use concatenation and substituition to generate dynamic queries.

A Dynamic SQL without SQLBuilder

A Dynamic SQL with SQLBuilder

If you like it, don't forget to vote in the IRIS Programming Contest

18
5 757
Article Henry Pereira · Sep 16, 2019 6m read

In an ever-changing world, companies must innovate to stay competitive. This ensures that they’ll make decisions with agility and safety, aiming for future results with greater accuracy.
Business Intelligence (BI) tools help companies make intelligent decisions instead of relying on trial and error. These intelligent decisions can make the difference between success and failure in the marketplace.
Microsoft Power BI is one of the industry’s leading business intelligence tools. With just a few clicks, Power BI makes it easy for managers and analysts to explore a company’s data. This is important because when data is easy to access and visualize, it’s much more like it’ll be used to make business decisions. 


8
2 3050
Article Henry Pereira · Apr 11, 2019 10m read


Hello everyone,

I was first introduced to TDD almost 9 year ago, and I immediately fell in love with it. 
Nowadays it's become very popular but, unfortunately, I see that many companies don't use it. Moreover, many developers don't even know what it is exactly or how to use it, mainly beginners.

Overview

My goal with this article is to show how to use TDD with %UnitTest. I will show my workflow and explain how to use cosFaker, one of my first projects, which I created using Caché and recently uploaded to OpenExchange.

So buckle up and let's go.

What is TDD?

7
10 1647
Article Henry Pereira · May 16, 2017 3m read

Hi Community,
This post is to introduce one of my first project in COS, I created when started to learn the language and until today I'm keeping improve it.

The CosFaker(here on Github) is a pure COS library for generating fake data.

cosFaker vs Populate Utils

So why use cosFaker if caché has the populate data utility?

Ok the populate utility has great things, like the SSN Generator for example, but what to do when you have a field with a long description of a product? How to check if that table will list the emails or if that calculated property will count the days of the last user interaction.

8
2 1121