#Python

0 Followers · 456 Posts

Python is an interpreted high-level programming language for general-purpose programming. Created by Guido van Rossum and first released in 1991, Python has a design philosophy that emphasizes code readability, notably using significant whitespace

Official site.

InterSystems Python Binding Documentation.

Article Alex Woodhead · Jun 15, 2023 6m read

Demonstration example for the current Grand Prix contest for use of a more complex Parameter template to test the AI.

Interview Questions

There is documentation. A recruitment consultant wants to quickly challenge candidates with some relevant technical questions to a role.

Can they automate making a list of questions and answers from the available documentation?

Interview Answers and Learning

One of the most effective ways to cement new facts into accessible long term memory is with phased recall.

0
0 1498
Article Lucas Enard · Aug 2, 2022 8m read

On this GitHub you can find all the information on how to use a HuggingFace machine learning / AI model on the IRIS Framework using python.

1. iris-huggingface

Usage of Machine Learning models in IRIS using Python; For text-to-text, text-to-image or image-to-image models.

Here, models as example :

2. Installation

2.1. Starting the Production

While in the iris-local-ml folder, open a terminal and enter :

docker-compose up

The very first time, it may take a few minutes to build the image correctly and install all the needed modules for Python.

2.2. Access the Production

Following this link, access the production : Access the Production

2.3. Closing the Production

docker-compose down

How it works

For now, some models may not work with this implementation since everything is automatically done, which means, no matter what model you input, we will try to make it work through transformerspipeline library.

Pipeline is a powerful tool by the HuggingFace team that will scan the folder in which we downloaded the model, then understand what library it should use between PyTorch, Keras, Tensorflow or JAX to then load that model using AutoModel.
From here, by inputting the task, the pipeline knows what to do with the model, tokenizer or even feature-extractor in this folder, and manage your input automatically, tokenize it, process it, pass it into the model, then give back the output in a decoded form usable directly by us.

3. HuggingFace API

You must first start the demo, using the green Start button or Stop and Start it again to apply your config changes.

Then, by clicking on the operation Python.HFOperation of your choice, and selecting in the right tab action, you can test the demo.

In this test window, select :

Type of request : Grongier.PEX.Message

For the classname you must enter :

msg.HFRequest

And for the json, here is an example of a call to GPT2 :

{
    "api_url":"https://api-inference.huggingface.co/models/gpt2",
    "payload":"Can you please let us know more details about your ",
    "api_key":"----------------------"
}

Now you can click on Visual Trace to see in details what happened and see the logs.

NOTE that you must have an API key from HuggingFace before using this Operation ( the api-keys are free, you just need to register to HF )

NOTE that you can change the url to try any other models from HuggingFace, you may need to change the payload.

See as example:
sending hf reqhf reqhf resp

4. Use any model from the web

In the section we will teach you how to use almost any model from the internet, HuggingFace or not.

4.1. FIRST CASE : YOU HAVE YOUR OWN MODEL

In this case, you must copy paste your model, with the config, the tokenizer.json etc inside a folder inside the model folder.
Path : src/model/yourmodelname/

From here you must go to the parameters of the Python.MLOperation.
Click on the Python.MLOperation then go to settings in the right tab, then in the Python part, then in the %settings part. Here, you can enter or modify any parameters ( don't forget to press apply once your are done ).
Here's the default configuration for this case :
%settings

name=yourmodelname
task=text-generation

NOTE that any settings that are not name or model_url will go into the PIPELINE settings.

Now you can double-click on the operation Python.MLOperation and start it. You must see in the Log part the starting of your model.

From here, we create a PIPELINE using transformers that uses your config file find in the folder as seen before.

To call that pipeline, click on the operation Python.MLOperation , and select in the right tab action, you can test the demo.

In this test window, select :

Type of request : Grongier.PEX.Message

For the classname you must enter :

msg.MLRequest

And for the json, you must enter every arguments needed by your model.
Here is an example of a call to GPT2 :

{
    "text_inputs":"Unfortunately, the outcome",
    "max_length":100,
    "num_return_sequences":3
}

Click Invoke Testing Service and wait for the model to operate.

See for example:
sending ml req

Now you can click on Visual Trace to see in details what happened and see the logs.

See for example :
ml req

ml resp

4.2. SECOND CASE : YOU WANT TO DOWNLOAD A MODEL FROM HUGGINGFACE

In this case, you must find the URL of the model on HuggingFace;

4.2.1. Settings

From here you must go to the parameters of the Python.MLOperation.
Click on the Python.MLOperation then go to settings in the right tab, then in the Python part, then in the %settings part. Here, you can enter or modify any parameters ( don't forget to press apply once your are done ).
Here's some example configuration for some models we found on HuggingFace :

%settings for gpt2

model_url=https://huggingface.co/gpt2
name=gpt2
task=text-generation

%settings for camembert-ner

name=camembert-ner
model_url=https://huggingface.co/Jean-Baptiste/camembert-ner
task=ner
aggregation_strategy=simple

%settings for bert-base-uncased

name=bert-base-uncased
model_url=https://huggingface.co/bert-base-uncased
task=fill-mask

%settings for detr-resnet-50

name=detr-resnet-50
model_url=https://huggingface.co/facebook/detr-resnet-50
task=object-detection

%settings for detr-resnet-50-protnic

name=detr-resnet-50-panoptic
model_url=https://huggingface.co/facebook/detr-resnet-50-panoptic
task=image-segmentation

NOTE that any settings that are not name or model_url will go into the PIPELINE settings, so in our second example, the camembert-ner pipeline requirers an aggregation_strategy and a task that are specified here while the gpt2 requirers only a task.

See as example:
settings ml ope2

Now you can double-click on the operation Python.MLOperation and start it.
You must see in the Log part the starting of your model and the downloading.
NOTE You can refresh those logs every x seconds to see the advancement with the downloads. dl in real time

From here, we create a PIPELINE using transformers that uses your config file find in the folder as seen before.

4.2.2. Testing

To call that pipeline, click on the operation Python.MLOperation , and select in the right tab action, you can test the demo.

In this test window, select :

Type of request : Grongier.PEX.Message

For the classname you must enter :

msg.MLRequest

And for the json, you must enter every arguments needed by your model.
Here is an example of a call to GPT2 ( Python.MLOperation ):

{
    "text_inputs":"George Washington lived",
    "max_length":30,
    "num_return_sequences":3
}

Here is an example of a call to Camembert-ner ( Python.MLOperation2 ) :

{
    "inputs":"George Washington lived in washington"
}

Here is an example of a call to bert-base-uncased ( Python.MLOperation3 ) :

{
    "inputs":"George Washington lived in [MASK]."
}

Here is an example of a call to detr-resnet-50 using an online url ( Python.MLOperationDETRRESNET ) :

{
    "url":"http://images.cocodataset.org/val2017/000000039769.jpg"
}

Here is an example of a call to detr-resnet-50-panoptic using the url as a path( Python.MLOperationDetrPanoptic ) :

{
    "url":"/irisdev/app/misc/000000039769.jpg"
}

Click Invoke Testing Service and wait for the model to operate.
Now you can click on Visual Trace to see in details what happened and see the logs.

NOTE that once the model was downloaded once, the production won't download it again but get the cached files found at src/model/TheModelName/.
If some files are missing, the Production will download them again.

See as example:
sending ml reqml reqml resp

See as example:
sending ml reqml resp

5. TroubleShooting

If you have issues, reading is the first advice we can give you, most errors are easily understood just by reading the logs as almost all errors will be captured by a try / catch and logged.

If you need to install a new module, or Python dependence, open a terminal inside the container and enter for example : "pip install new-module"
To open a terminal there are many ways,

  • If you use the InterSystems plugins, you can click in the below bar in VSCode, the one looking like docker:iris:52795[IRISAPP] and select Open Shell in Docker.
  • In any local terminal enter : docker-compose exec -it iris bash
  • From Docker-Desktop find the IRIS container and click on Open in terminal

Some models may require some changes for the pipeline or the settings for example, it is your task to add in the settings and in the request the right information.

6. Conclusion

From here you should be able to use any model that you need or own on IRIS.
NOTE that you can create a Python.MLOperation for each of your model and have them on at the same time.

5
1 832
Article Evgeny Shvarov · May 16, 2023 1m read

Hi folks!

Just want to introduce you a new util to import CSV into IRIS - csvgenpy!

Install

USER>zpm "install csvgenpy"

Use:

do ##class(shvarov.csvgenpy.csv).Generate("file or url","table","schema")

Example:

USER>do ##class(shvarov.csvgenpy.csv).Generate("https://raw.githubusercontent.com/datasciencedojo/datasets/master/titanic.csv","titanic","data")

This will create table and class data.titanic in IRIS and will load the data.  you can proof it with:

0
1 305
Article Dmitry Maslennikov · Feb 6, 2023 4m read

Let me introduce my new project, which is irissqlcli, REPL (Read-Eval-Print Loop)  for InterSystems IRIS SQL 

  • Syntax Highlighting
  • Suggestions (tables, functions)
  • 20+ output formats
  • stdin support
  • Output to files 

Install it with pip

pipinstallirissqlcli

Or run with docker

dockerrun-itcaretdev/irissqlcliirissqlcliiris://_SYSTEM:SYS@host.docker.internal:1972/USER

Connect to IRIS

$ irissqlcli iris://_SYSTEM@localhost:1972/USER -W
Password for _SYSTEM:
Server:  InterSystems IRIS Version 2022.3.0.606 xDBC Protocol Version 65
Version: 0.1.0
[SQL]_SYSTEM@localhost:USER> select $ZVERSION
+---------------------------------------------------------------------------------------------------------+
| Expression_1                                                                                            |
+---------------------------------------------------------------------------------------------------------+
| IRIS for UNIX (Ubuntu Server LTS for ARM64 Containers) 2022.3 (Build 606U) Mon Jan 30202309:05:12 EST |
+---------------------------------------------------------------------------------------------------------+
1 row in set
Time: 0.063s
[SQL]_SYSTEM@localhost:USER> help
+----------+-------------------+------------------------------------------------------------+
| Command  | Shortcut          | Description                                                |
+----------+-------------------+------------------------------------------------------------+
| .exit    | \q                | Exit.                                                      |
| .mode    | \T                | Change the table format used to output results.            |
| .once    | \o [-o] filename  | Append next result to an output file (overwrite using -o). |
| .schemas | \ds               | List schemas.                                              |
| .tables  | \dt [schema]      | List tables.                                               |
| \e       | \e                | Edit command with editor (uses $EDITOR).                   |
| help     | \?                | Show this help.                                            |
| nopager  | \n                | Disable pager, print to stdout.                            |
| notee    | notee             | Stop writing results to an output file.                    |
| pager    | \P [command]      | Set PAGER. Print the query results via PAGER.              |
| prompt   | \R                | Change prompt format.                                      |
| quit     | \q                | Quit.                                                      |
| tee      | tee [-o] filename | Append all results to an output file (overwrite using -o). |
+----------+-------------------+------------------------------------------------------------+
Time: 0.012s
[SQL]_SYSTEM@localhost:USER>
20
2 895
Article Dmitry Maslennikov · Apr 19, 2023 2m read

Apache Superset is a modern data exploration and data visualization platform. Superset can replace or augment proprietary business intelligence tools for many teams. Superset integrates well with a variety of data sources.

And now it is possible to use with InterSystems IRIS as well.

An online demo is available and it uses IRIS Cloud SQL as a data source.

4
0 997
Article Seisuke Nakahashi · Apr 27, 2023 2m read

Let's say you have Python including variable-length arguments methods. How can you call it from ObjectScript? 

deftest1(*args):return sum(args)
  
deftest2(**kwargs):
  a1 = kwargs.get("a1",None)
  a2 = kwargs.get("a2",None)
  return a1+a2

You can call this "a.py" from ObjectScript as below.  For **kwargs argument, create Dynamic Object in ObjectScript and put it into methods with <variablename>... (3 dots) format. 

set a=##class(%SYS.Python).Import("a")
    write a.test1(1,2,3)   ;; 6set req={}
    set req.a1=10set req.a2=20write a.test2(req...)   ;; 30
0
1 320
Article Maria Nesterenko · Apr 20, 2023 5m read

Many factors affect a person's quality of life, and one of the most important is sleep. The quality of our sleep determines our ability to function during the day and affects our mental and physical health. Good quality sleep is critical to our overall health and well-being. Therefore, by analyzing indicators preceding sleep, we can determine the quality of our sleep. This is precisely the functionality of the Sheep's Galaxy application.

Sheep's Galaxy is a sample application that works with InterSystems' IntegratedML and IRIS Cloud SQL technologies and provides the user with a tool to analyze and improve sleep quality. The analysis of sleep takes into account factors such as noise levels, room lighting, sleep duration, caffeine consumption, and more, allowing the user to reconsider their sleep-related habits and create optimal conditions for sleep in the future.

Presentation video:

https://www.youtube.com/watch?v=eZ9Wak831x4&ab_channel=MariaGladkova

The app is based on the following technologies:

Frontend part:

To build this app we used Angular framework. It helped us to create a simple single page application. We used Angular v15, and all Angular components were implemented as standalones to streamline the authoring experience. We didn’t use Angular modules and it's a good practice to scale an app in the future if it need. We also used Smart Component Architecture – all components in our frontend application are divided into "smart" and "dumb" components. This concepts helps us to separate the business logic code and presentation code between these components. All business logic and requests to server are kept in the isolated services. To process our backend data we use RxJS - a library for composing asynchronous and event-based programs by using observable sequences. To style our app we used Angular Material - it is a User Interface component library which developers can use in their Angular projects to speed up development of elegant and consistent user interfaces. This library offers a lot of reusable and beautiful UI components - we added some of them like Cards, Inputs, Data Tables, Datepickers, and much more. Below we present an overview of typical user workflow. First, user goes through either the registration process, if using it for the first time, or through authorization screen.

image

Using the app, the user enters information about sleep, such as activity level during the day, number of cups of coffee, sleeping comfort, stress level and amount of positive emotions, as well as room light and bedtime.

image

After each data entry, the user will receive a notification of sleep quality. This data is then analyzed using machine learning algorithms to provide users with insights into their sleep patterns.

image

Backend part:

Fastapi is a python framework based on two technologies: Pydantic and Starlette. It has the following features:

  • Is based on open standards: OpenAPI, JSON schema, OAuth2;
  • Automatic API documentation in swagger;
  • Dependencies implementation;
  • Uses features of modern python: type annotation, asyncio;
  • Supports synchronous and asynchronous code;

The project structure consists of routers with endpoints, models for each entity and processing services.

Each endpoint appears in the atomic documentation at /docs and endpoint fields have a relationship to the data models in the database.

image

Pydantic models automatically validate incoming and outgoing data.

image

The process of working with user data is built on the protocol, which allows you to work with data in a secure way.

image

The process of interaction with the database is implemented through IRIS SQL connection using the DB API.

image

IRIS Cloud SQL with IntegratedML:

First, you need to login to InterSystems Cloud Services Portal. Here you need to create a new IRIS Cloud SQL deployment. Be sure to include IntegratedML when you create a new deployment. When it's ready, you can obtain connection parameters to use in docker-compose.yml:

image

By opening 'IntegratedML Tools' menu you have access to create, train, validate your model, and have the ability to generate predictions on a selected field in your model table.

image

In our app, we predict sleep quality based on user data. To do this, we fill in the fields in the Prediction section as follows:

image

In the generated query, the prediction field contains a prediction of the quality of sleep, the probability_quality field contains the probability that the dream will be "qualitative".

Links:

To learn more about our project or use it as a template for your future work: https://openexchange.intersystems.com/package/Sheep%E2%80%99s-Galaxy

Thanks:

Our team would like to thank InterSystems and Banksia Global for an opportunity to work with cutting-edge technology on important issues.

Developers of project:

5
0 355
Article Oliver Wilms · Apr 21, 2023 2m read

We have a rule to disable a user account if they have not logged in for a certain number of days. IRIS Audit database logs many events such as login failures for example. It can be configured to log successful logins as well. We have IRIS clusters with many IRIS instances. I like to run queries against audit data from ALL IRIS instances and identify user accounts which have not logged into ANY IRIS instance.

1
0 214
Article Oliver Wilms · Apr 21, 2023 1m read

Within IRIS I defined a task to export audit data every day.

I provide some sample files in my GitHub repo.

I wrote ObjectScript code to import all files into otw.audit.consolidator class.

I want to use Python SQLAlchemy, pandas and sqlalchemy-iris (created by Dmitry Maslenikov) to copy consolidated audit data from my consolidator class in my IRIS container to my InterSystems Cloud SQL deployment.

I updated my Dockerfile to pip3 install sqlalchemy-iris and pandas (dataframes).

docker-compose build –no-cache in my personal AWS took 700 seconds.

1
0 218
Article Muhammad Waseem · Apr 17, 2023 4m read

Hi Community,
In this article, I will introduce my application iris-mlm-explainer

This web application connects to InterSystems Cloud SQL to create, train, validate, and predict ML models, make Predictions and display a dashboard of all the trained models with an explanation of the workings of a fitted machine learning model. The dashboard provides interactive plots on model performance, feature importances, feature contributions to individual predictions, partial dependence plots, SHAP (interaction) values, visualization of individual decision trees, etc.

Prerequisites

6
1 431
Article Alex Woodhead · Apr 16, 2023 4m read

Overview

Cross-Skilling from IRIS objectScript to Python it becomes clear there are some fascinating differences in syntax.

One of these areas was how Python returns Tuples from a method with automatic unpacking.

Effectively this presents as a method that returns multiple values. What an awesome invention :)

out1, out2 = some_function(in1, in2)

ObjectScript has an alternative approach with ByRef and Output parameters.

Do ##class(some_class).SomeMethod(.inAndOut1, in2, .out2)

Where:

  • inAndOut1 is ByRef
  • out2 is Output

The leading dot (".") in front of the variable name passes ByRef and for Output.

0
0 563
Article Guillaume Rongier · Mar 29, 2023 1m read

Quick Tips: Total Productive Maintenance

Named parameters can be achieved with SQLAlchemy :  

from sqlalchemy import create_engine, text,types,engine

_engine = create_engine('iris+emb:///')

with _engine.connect() as conn:
    rs = conn.execute(text("select :some_private_name"), {"some_private_name": 1})
    print(rs.all())

or with native api

from sqlalchemy import create_engine, text,types,engine

# set URL for SQLAlchemy
url = engine.url.URL.create('iris', username='SuperUser', password='SYS', host='localhost', port=33782, database='FHIRSERVER')

_engine = create_engine(url)

with _engine.connect() as conn:
    rs = conn.execute(text("select :some_private_name"), {"some_private_name": 1})
    print(rs.all())

requirements.txt

sqlalchemy==1.4.22
sqlalchemy-iris==0.5.0
irissqlcli

It's working today, on IRIS 2021.2+

0
0 552
Article Guillaume Rongier · Nov 30, 2022 2m read

If you are using Python, you can use the built-in venv module to create a virtual environment. This module is the recommended way to create and manage virtual environments.

A virtual environment is a tool that helps to keep dependencies required by different projects separate by creating isolated python virtual environments for them. It solves the “Project X depends on version 1.x but, Project Y needs 4.x” dilemma, and keeps your global site-packages directory clean and manageable.

So if like me you work a lot with Python, you can use the venv module to create a virtual environment for your project. This will allow you to install packages without affecting the global Python installation.

You will find here two neat alias to create and activate a virtual environment.

Python aliases

alias venv="python3 -m venv .venv; source .venv/bin/activate"
alias irisvenv="python3 -m venv .venv; source .venv/bin/activate; pip install https://github.com/grongierisc/iris-embedded-python-wrapper/releases/download/v0.0.3/iris-0.0.3-py3-none-any.whl"

Let dive into the details of each alias.

Python venv

The first alias is a simple one. It will create a virtual environment in the current directory and activate it.

python3 -m venv .venv

Create an environment named .venv in the current directory.

source .venv/bin/activate

Activate the environment.

InterSystems IRIS venv

The second alias is the same as the first one exept that it will install the InterSystems IRIS Python wrapper in the virtual environment.

python3 -m venv .venv

Create an environment named .venv in the current directory.

source .venv/bin/activate

Activate the environment.

pip install https://github.com/grongierisc/iris-embedded-python-wrapper/releases/download/v0.0.3/iris-0.0.3-py3-none-any.whl

Install the InterSystems IRIS Python wrapper.

This module is a wrapper around the InterSystems IRIS Embedded Python API. It allows you to connect to an InterSystems IRIS instance and execute SQL queries.

⚠️ To make it work you need to to have an environment variable named IRISINSTALLDIR pointing to the InterSystems IRIS installation directory. ⚠️

export IRISINSTALLDIR=/opt/iris
export LD_LIBRARY_PATH=$IRISINSTALLDIR/bin:$LD_LIBRARY_PATH
# for MacOS
export DYLD_LIBRARY_PATH=$IRISINSTALLDIR/bin:$DYLD_LIBRARY_PATH

Conclusion

I hope you will find this post useful. If you have any questions or comments, please feel free to leave a comment below.

3
2 1985
Article Harry Tong · Feb 21, 2023 2m read

InterSystems IRIS 2022.2 has Native SDK for Python (https://docs.intersystems.com/iris20222/csp/docbook/Doc.View.cls?KEY=PA…).

We know how to traverse a global data structure using IRIS Object Script $Order function.

SET key=""FOR  {
     SET key=$ORDER(^myglobal(key)) 
     QUIT:key=""WRITE !,^myglobal(key)
   }

How to do the same from Python using IRIS Native SDK for Python? Here is a code example:

2
0 516
Question Elijah Cotterrell · Mar 6, 2023

I'm curious about how embedded Python is handled by %CSP classes, particularly in the case of defining REST endpoints on IRIS.
Here is a simple dispatch class for the endpoint /api/pythonapp on my local IRIS instance (2022.3):

Class Python.App.Dispatch Extends%CSP.REST
{

XData UrlMap [ XMLNamespace = "https://www.intersystems.com/urlmap" ]
{
<Routes>
    <Route Url="/test" Method="GET" Call="Hello" />
</Routes>
}

ClassMethod Hello() As%Status [ Language = python ]
{
    import iris

    print('Hello World!')
    return True
}

}
4
0 297
Question Dean Rochester · Feb 21, 2023

In article

https://community.intersystems.com/print/518106

Traceback (most recent call last):
  File "c:\Users\rochesterd\PythonScripts\fhir_stuff\fhir-client-python-main\fhir-client-python-main\src\client.py", line 57, in <module>
    patient0 = Patient.parse_obj(patients_resources.search(
AttributeError: 'NoneType' object has no attribute 'serialize'

8
0 322
Article Muhammad Waseem · Feb 10, 2023 5m read

Hi Community,

This article is a continuation of my article about  Getting to know Python Flask Web Framework   

In this article, we will cover the basics of topics listed below:

1. Routing in Flask Framework
2. Folder structure for a Flask app (Static and Template)
3. Getting and displaying data in the Flask application from IRIS.

So, let's begin.

0
0 1842
Article Ricardo Paiva · Feb 9, 2023 3m read

Schematron is a rule-based validation language for making assertions about the presence or absence of certain patterns in XML documents. A schematron refers to a collection of one or more rules containing tests. Schematrons are written in a form of XML, making them relatively easy for everyone, even non-programmers, to inspect, understand, and write

0
0 1427
Question Dmitry Maslennikov · Feb 6, 2023

So, I know that I can return a SQL Error message from my SQL Procedure written in ObjectScript, with code like this

$ cat <<EOF | irissqlcli iris://_SYSTEM:SYS@localhost:1972/USER
CREATEorREPLACEPROCEDUREtest()
LANGUAGE OBJECTSCRIPT
{
 SET %sqlcontext.%SQLCODE = 400SET %sqlcontext.%ROWCOUNT = -1SET %sqlcontext.%Message = "test error message"
};

CALLtest();

EOF
[SQLCODE: <-400>:<Fatal error occurred>]
[Location: <SPFunction>]
[%msg: <test error message>]

But I did not find how to do it with Python. I can't find %sqlcontext variable available there

1
0 235
Article Guillaume Rongier · Dec 14, 2021 10m read

Iris-python-template

Template project with various Python code to be used with InterSystems IRIS Community Edition with container.

Featuring :

  • Notebooks
    • Embedded Python Kernel
    • ObjectScript Kernel
    • Vanilla Python Kernel
  • Embedded Python
    • Code example
    • Flask demo
  • IRIS Python Native APIs
    • Code example

Diagram

2. Table of Contents

3. Installation

3.1. Docker

The repo is dockerised so you can clone/git pull the repo into any local directory

git clone https://github.com/grongierisc/iris-python-template.git

Open the terminal in this directory and run:

docker-compose up -d

and open then http://localhost:8888/tree for Notebooks

Or, open the cloned folder in VSCode, start docker-compose and open the URL via VSCode menu: VsCodeNotebooks

4. How to start coding

4.1. Prerequisites

Make sure you have git and Docker desktop installed.

This repository is ready to code in VSCode with ObjectScript plugin. Install VSCode, Docker and ObjectScript plugin and open the folder in VSCode.

4.1.1. Start coding in ObjectScript

Open /src/ObjectScript/Embedded/Python.cls class and try to make changes - it will be compiled in running IRIS docker container.

4.1.2. Start coding with Embedded Python

The easiest way is to run VsCode in the container.

To attach to a Docker container, either select Remote-Containers: Attach to Running Container... from the Command Palette (kbstyle(F1)) or use the Remote Explorer in the Activity Bar and from the Containers view, select the Attach to Container inline action on the container you want to connect to.

Containers Explorer screenshot

Then configure your python interpreter to /usr/irissys/bin/irispython

PythonInterpreter

4.1.3. Start coding with Notebooks

Open this url : http://localhost:8888/tree

Then you have access to three different notebooks with three different kernels.

  • Embedded Python kernel
  • ObjectScript kernel
  • Vanilla python3 kernel
Notebooks

5. What's inside the repository

5.1. Dockerfile

A dockerfile which install some python dependancies (pip, venv) and sudo in the container for conviencies. Then it create the dev directory and copy in it this git repository.

It starts IRIS and imports Titanics csv files, then it activates %Service_CallIn for Python Shell. Use the related docker-compose.yml to easily setup additional parametes like port number and where you map keys and host folders.

This dockerfile ends with the installation of requirements for python modules.

The last part is about installing jupyter notebook and it's kernels.

Use .env/ file to adjust the dockerfile being used in docker-compose.

5.2. .vscode/settings.json

Settings file to let you immedietly code in VSCode with VSCode ObjectScript plugin

5.3. .vscode/launch.json

Config file if you want to debug with VSCode ObjectScript

Read about all the files in this article

5.4. .vscode/extensions.json

Recommendation file to add extensions if you want to run with VSCode in the container.

More information here

Archiecture

This is very useful to work with embedded python.

5.5. src folder

This folder is devied in two parts, one for ObjectScript example and one for Python code.

5.5.1. src/ObjectScript

Different piece of code that shows how to use python in IRIS.

5.5.1.1. src/ObjectScript/Embedded/Python.cls

All comments are in french to let you impove your French skills too.

/// Embedded python example
Class ObjectScript.Embbeded.Python Extends %SwizzleObject
{

/// HelloWorld with a parameter
ClassMethod HelloWorld(name As %String = "toto") As %Boolean [ Language = python ]
{
    print("Hello",name)
    return True
}

/// Description
Method compare(modèle, chaine) As %Status [ Language = python ]
{
    import re

    # compare la chaîne [chaîne] au modèle [modèle]
    # affichage résultats
    print(f"\nRésultats({chaine},{modèle})")
    match = re.match(modèle, chaine)
    if match:
        print(match.groups())
    else:
        print(f"La chaîne [{chaine}] ne correspond pas au modèle [{modèle}]")
}

/// Description
Method compareObjectScript(modèle, chaine) As %Status
{
    w !,"Résultats("_chaine_","_modèle_")",!
    set matcher=##class(%Regex.Matcher).%New(modèle)                             
    set matcher.Text=chaine
    if matcher.Locate() {
        write matcher.GroupGet(1)
    }
    else {
        w "La chaîne ["_chaine_"] ne correspond pas au modèle ["_modèle_"]"
    }
}

/// Description
Method DemoPyhtonToPython() As %Status [ Language = python ]
{
    # expression régulières en python
    # récupérer les différents champs d'une chaîne
    # le modèle : une suite de chiffres entourée de caractères quelconques
    # on ne veut récupérer que la suite de chiffres
    modèle = r"^.*?(\d+).*?$"

    # on confronte la chaîne au modèle
    self.compare(modèle, "xyz1234abcd")
    self.compare(modèle, "12 34")
    self.compare(modèle, "abcd")
}

Method DemoPyhtonToObjectScript() As %Status [ Language = python ]
{
    # expression régulières en python
    # récupérer les différents champs d'une chaîne
    # le modèle : une suite de chiffres entourée de caractères quelconques
    # on ne veut récupérer que la suite de chiffres
    modèle = r"^.*?(\d+).*?$"

    # on confronte la chaîne au modèle
    self.compareObjectScript(modèle, "xyz1234abcd")
    self.compareObjectScript(modèle, "12 34")
    self.compareObjectScript(modèle, "abcd")
}

/// Description
Method DemoObjectScriptToPython() As %Status
{
    // le modèle - une date au format jj/mm/aa
    set modèle = "^\s*(\d\d)\/(\d\d)\/(\d\d)\s*$"
    do ..compare(modèle, "10/05/97")
    do ..compare(modèle, " 04/04/01 ")
    do ..compare(modèle, "5/1/01")
}

}
  • HelloWorld
    • Simple function to say Hello in python
    • It uses the OjectScript wrapper with the tag [ Language = python ]
  • compare
    • An python function that compare a string with a regx, if their is a match then print it, if not print that no match has been found
  • compareObjectScript
    • Same function as the python one but in ObjectScript
  • DemoPyhtonToPython
    • Show how to use a python function with python code wrapped in ObjectScript
set demo = ##class(ObjectScript.Embbeded.Python).%New()

zw demo.DemoPyhtonToPython()
  • DemoPyhtonToObjectScript
    • An python function who show how to call an ObjecScript function
  • DemoObjectScriptToPython
    • An ObjectScript function who show how to call an python function

5.5.1.2. src/ObjectScript/Gateway/Python.cls

An ObjectScript class who show how to call an external phyton code with the gateway functionnality.

In this example python code is not executed in the same process of IRIS.

/// Description
Class Gateway.Python
{

/// Demo of a python gateway to execute python code outside of an iris process.
ClassMethod Demo() As %Status
{
    Set sc = $$$OK

    set pyGate = $system.external.getPythonGateway()

    d pyGate.addToPath("/irisdev/app/src/Python/gateway/Address.py")

    set objectBase = ##class(%Net.Remote.Object).%New(pyGate,"Address")

    set street = objectBase.street
    
    zw street
    
    Return sc
}

}

5.5.2. src/Python

Different piece of python code that shows how to use embedded python in IRIS.

5.5.2.1. src/Python/embedded/demo.cls

All comments are in french to let you impove your French skills too.

import iris

person = iris.cls('Titanic.Table.Passenger')._OpenId(1)

print(person.__dict__)

First import iris module that enable embedded python capabilities. Open an persistent class with cls function from iris module. Note that all % function are replaced with _.

To run this example you have to use iris python shell :

/usr/irissys/bin/irispython /opt/irisapp/src/Python/embedded/demo.py

5.5.2.2. src/Python/native/demo.cls

Show how to use native api in python code.

import irisnative

# create database connection and IRIS instance
connection = irisnative.createConnection("localhost", 1972, "USER", "superuser", "SYS", sharedmemory = False)
myIris = irisnative.createIris(connection)

# classMethod
passenger = myIris.classMethodObject("Titanic.Table.Passenger","%OpenId",1)
print(passenger.get("name"))

# global
myIris.set("hello","myGlobal")
print(myIris.get("myGlobal"))

To import irisnative, you have to install the native api wheels in your python env.

pip3 install /usr/irissys/dev/python/intersystems_irispython-3.2.0-py3-none-any.whl

Then you can run this python code

/usr/bin/python3 /opt/irisapp/src/Python/native/demo.py

Note that in this case a connection is made to iris database, this mean, this code is executed in a different thread than the IRIS one.

5.5.2.3. src/Python/flask

A full demo of the combiantion between embedded python and the micro framework flask. You can test this end point :

GET http://localhost:4040/api/passengers?currPage=1&pageSize=1
5.5.2.3.1. How it works

In order to use embedded Python, we use irispython as a python interepreter, and do:

import iris

Right at the beginning of the file.

We will then be able to run methods such as:

flaskExample

As you can see, in order to GET a passenger with an ID, we just execute a query and use its result set.

We can also directly use the IRIS objects:

flaskObjectExample

Here, we use an SQL query to get all the IDs in the table, and we then retreive each passenger from the table with the %OpenId() method from the Titanic.Table.Passenger class (note that since % is an illegal character in Python, we use _ instead).

Thanks to Flask, we implement all of our routes and methods that way.

5.5.2.3.2. Launching the flask server

To launch the server, we use gunicorn with irispython.

In the docker-compose file, we add the following line:

iris:
  command: -a "sh /opt/irisapp/server_start.sh"

That will launch, after the container is started (thanks to the -a flag), the following script:

#!/bin/bash

cd ${SRC_PATH}/src/Python/flask

${PYTHON_PATH} -m gunicorn --bind "0.0.0.0:8080" wsgi:app &

exit 1

With the environment variables defined in the Dockerfile as follows:

ENV PYTHON_PATH=/usr/irissys/bin/irispython
ENV SRC_PATH=/opt/irisapp/

5.5.3. src/Notebooks

Three notebooks with three different kernels :

  • One Python3 kernel to run native APIs
  • One Embedded Python kernel
  • One ObjectScript kernel

Notebooks can be access here http://localhost:8888/tree

Notebooks

5.5.3.1. src/Notebooks/HelloWorldEmbedded.ipynb

This notebook uses IRIS embedded python kernel.

It shows example to open and save persistent classes and how to run sql queries.

5.5.3.2. src/Notebooks/IrisNative.ipynb

This notebook uses vanilla python kernel.

It shows example run iris native apis.

5.5.3.3. src/Notebooks/ObjectScript.ipynb

This notebook uses ObjectScript kernel.

It shows example to run ObjectSCript code and how to use embedded pythoon in ObjectScript.

4
4 1476
Article Yuri Marx · Jul 20, 2022 6m read

Python has become the most used programming language in the world (source: https://www.tiobe.com/tiobe-index/) and SQL continues to lead the way as a database language. Wouldn't it be great for Python and SQL to work together to deliver new functionality that SQL alone cannot? After all, Python has more than 380,000 published libraries (source: https://pypi.org/) with very interesting capabilities to extend your SQL queries within Python. This article details how to create new SQL Stored Procedures in InterSystems IRIS Database using Embedded Python.

Python libraries used as samples

3
0 1280
Question Jonathan Earnest · Jan 13, 2023

I'm trying to get started with IRIS for Health but every time I got to a step that asks me to install a .whl-package I cant continue. I'm getting an error that the file does not exist.

Here is the complete error message:

PS C:\Users\x\GIT\quickstarts-multimodel-python> pip install nativeAPI_wheel\irisnative-1.0.0-cp39-cp39m-win_amd64.whl    
WARNING: Requirement 'nativeAPI_wheel\\irisnative-1.0.0-cp39-cp39m-win_amd64.whl' looks like a filename, but the file does not exist
ERROR: irisnative-1.0.0-cp39-cp39m-win_amd64.whl is not a supported wheel on this platform.

Am I doing something wrong?

6
0 1101
Article Guillaume Rongier · Dec 6, 2022 3m read

OCR DEMO

This is a demo of the OCR functionality of the pero-ocr library.

It used in the iris application server in python.

Demo

This is an example of input data :

input

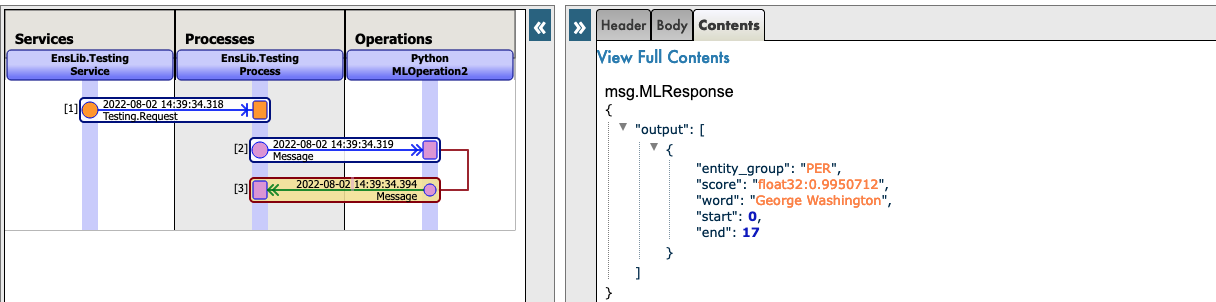
This is the result of the OCR :

In this example you have the following information:

  • The text is in the TextEquiv tag
  • The confidence is in the conf attribute of the TextEquiv tag
  • The coordinates of the text are in the Coords tag
<PcGts xmlns="http://schema.primaresearch.org/PAGE/gts/pagecontent/2019-07-15" xmlns:xsi="http://www.w3.org/2001/XMLSchema-instance" xsi:schemaLocation="http://schema.primaresearch.org/PAGE/gts/pagecontent/2019-07-15/pagecontent.xsd">
  <Metadata>
    <Creator>Pero OCR</Creator>
    <Created>2022-12-13T08:47:12.207893+00:00</Created>
    <LastChange>2022-12-13T08:47:12.207893+00:00</LastChange>
  </Metadata>
  <Page imageFilename="/irisdev/app/misc/in/United_States_Declaration_of_Independence.jpg" imageWidth="3923" imageHeight="4656">
    <TextRegion id="r004">
      <Coords points="977,121 932,121 932,283 1189,277 1178,114 977,121"/>
      <TextLine id="r004-l002" index="0" custom="heights_v2:[123.7,39.0]">
        <Coords points="932,121 932,283 1189,277 1178,114 1130,118 1100,117 1048,121 1019,121 977,121 932,121"/>
        <Baseline points="932,244 977,244 1019,244 1058,244 1100,241 1138,241 1186,238"/>
        <TextEquiv conf="1.000">
          <Unicode>IN</Unicode>
        </TextEquiv>
      </TextLine>
    </TextRegion>
    <TextRegion id="r008">
      <Coords points="1461,107 1241,107 1241,287 2116,290 2549,281 2986,287 3211,277 3203,98 2978,107 2552,101 2114,111 1461,107"/>
      <TextLine id="r008-l001" index="0" custom="heights_v2:[133.8,45.8]">
        <Coords points="1241,107 1241,287 1464,287 1681,284 1896,287 2116,290 2549,281 2986,287 3211,277 3203,98 2978,107 2552,101 2327,107 2114,111 1461,107 1241,107"/>
        <Baseline points="1241,241 1463,241 1682,238 1897,241 2116,244 2331,241 2550,235 2765,238 2984,241 3209,231"/>
        <TextEquiv conf="0.910">
          <Unicode>CONGRESS, JULY 4, 1776.</Unicode>
        </TextEquiv>
      </TextLine>
    </TextRegion>
    <TextRegion id="r001">
      <Coords points="591,452 208,455 209,611 1723,602 2100,608 2855,595 3617,598 3618,442 2855,439 2098,452 1725,446 591,452"/>
      <TextLine id="r001-l003" index="0" custom="heights_v2:[113.8,42.1]">
        <Coords points="208,455 209,611 592,608 968,605 1218,605 1723,602 2100,608 2855,595 3231,595 3617,598 3618,442 2855,439 2477,446 2098,452 1725,446 1346,449 1159,449 591,452 208,455"/>
        <Baseline points="209,569 592,566 968,563 1347,563 1723,559 2100,566 2479,559 2855,553 3231,553 3617,556"/>
        <TextEquiv conf="0.289">
          <Unicode>Dhe unaniwons Declaratton of te Heten maiss States of TNmerica</Unicode>
        </TextEquiv>
      </TextLine>
    </TextRegion>
    <TextRegion id="r000">
      <Coords points="161,3474 161,3539 423,3539 633,3536 958,3468 1354,3472 1764,3581 1944,3571 2246,3730 2653,3718 2718,3633 2855,3608 3238,3557 3514,3554 3739,3462 3762,3397 3761,3333 3735,3139 3743,2696 3730,2177 3735,1920 3723,1727 3736,1341 3717,1014 3724,943 3719,818 3697,693 1012,712 795,776 421,776 183,786 173,848 168,1032 173,2392 160,2713 161,3474"/>
      <TextLine id="r000-l004" index="0" custom="heights_v2:[40.2,18.4]">
        <Coords points="2796,699 2501,703 2205,706 1909,709 1611,709 1460,709 1012,712 1013,771 1315,768 1611,768 1910,768 2206,764 2502,761 2800,758 3096,758 3392,755 3698,752 3697,693 3392,696 3096,699 2802,699 2796,699"/>
        <Baseline points="1013,752 1315,749 1611,749 1910,749 2206,746 2501,743 2800,739 3096,739 3392,736 3697,733"/>
        <TextEquiv conf="0.281">
          <Unicode>hen n lí loune z human venl, i kemu nematy k mpeopě toíohohhehttcal bandí uhích have connechdí tem vith ancthet, andíl</Unicode>
        </TextEquiv>
      </TextLine>
      <TextLine id="r000-l005" index="1" custom="heights_v2:[40.4,19.2]">
        <Coords points="421,776 421,836 794,836 1157,839 1521,839 1884,836 2244,833 2608,829 2971,826 3335,823 3704,813 3703,754 3333,763 2970,767 2607,770 2244,773 1884,776 1520,779 1157,779 795,776 421,776"/>
        <Baseline points="421,817 794,817 1157,820 1521,820 1884,817 2244,813 2608,810 2971,807 3334,804 3704,794"/>
        <TextEquiv conf="0.211">
          <Unicode>o hi ſhwes f he eail, fie rehatal andequal flohon &amp; ufch lhe laav  . kalut and   Aloil ped entilt ttem, a dant rafech to the ofunin o manknd tequies fhat thep</Unicode>
        </TextEquiv>
      </TextLine>
     <!-- Truncated for readme-->
      <TextLine id="r019-l105" index="9" custom="heights_v2:[47.5,21.7]">
        <Coords points="3209,4269 3214,4336 3257,4333 3296,4333 3332,4333 3373,4337 3411,4337 3452,4336 3488,4333 3527,4333 3575,4333 3575,4264 3527,4264 3488,4264 3446,4267 3411,4267 3373,4267 3338,4264 3296,4264 3257,4264 3209,4267 3209,4269"/>
        <Baseline points="3212,4315 3257,4312 3296,4312 3334,4312 3373,4315 3411,4315 3450,4315 3488,4312 3527,4312 3575,4312"/>
        <TextEquiv conf="0.283">
          <Unicode>imuiaa</Unicode>
        </TextEquiv>
      </TextLine>
      <TextLine id="r019-l108" index="10" custom="heights_v2:[40.9,20.2]">
        <Coords points="3198,4406 3251,4409 3294,4409 3339,4412 3394,4415 3398,4354 3343,4351 3298,4348 3251,4348 3202,4345 3198,4406"/>
        <Baseline points="3199,4386 3251,4389 3296,4389 3341,4392 3395,4395"/>
        <TextEquiv conf="0.370">
          <Unicode>Qlver</Unicode>
        </TextEquiv>
      </TextLine>
      <TextLine id="r019-l114" index="11" custom="heights_v2:[39.2,19.1]">
        <Coords points="3181,4469 3225,4466 3263,4466 3305,4466 3327,4466 3352,4465 3386,4462 3424,4462 3472,4462 3472,4404 3424,4404 3386,4404 3341,4407 3305,4407 3263,4407 3225,4407 3177,4411 3181,4469"/>
        <Baseline points="3180,4450 3225,4447 3263,4447 3305,4447 3344,4447 3386,4443 3424,4443 3472,4443"/>
        <TextEquiv conf="0.312">
          <Unicode>Vbalřew/</Unicode>
        </TextEquiv>
      </TextLine>
    </TextRegion>
    <TextRegion id="r020">
      <Coords points="3685,4399 3607,4399 3607,4465 3685,4465 3685,4399"/>
      <TextLine id="r020-l112" index="0" custom="heights_v2:[44.3,21.4]">
        <Coords points="3607,4399 3607,4465 3685,4465 3685,4399 3607,4399"/>
        <Baseline points="3607,4443 3685,4443"/>
        <TextEquiv conf="0.486">
          <Unicode>17.</Unicode>
        </TextEquiv>
      </TextLine>
    </TextRegion>
  </Page>
</PcGts>

Installation

git clone <this repo>

/!\ This demo requires the models to be installed /!\

To install the model download the model from the realase page and extract it in the misc/pero-ocr-fix-computation-on-cpu of the project.

https://github.com/grongierisc/iris-pero-ocr/releases/download/v1.0.0/OCR_350000.pt.cpu

https://github.com/grongierisc/iris-pero-ocr/releases/download/v1.0.0/ParseNet_296000.pt.cpu

/!\ Both models are required /!\

Then docker-compose up

docker-compose up

Usage

Put any sample image in the samples folder and copy them in misc/in folder and they will be processed by the OCR.

The results will be in the misc/out folder.

You will find the xml files with the results and the images with the detected text.

You can monitor the progress in the logs here http

login with _SYSTEM and SYS

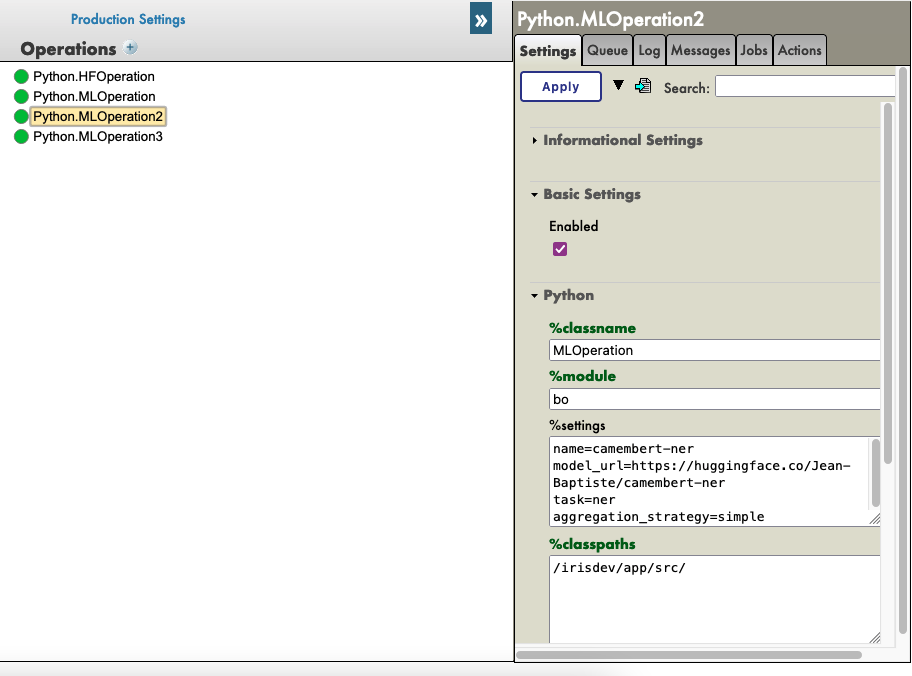
How it works in IRIS

The OCR is an Business Service that parse all the files in the misc/in folder and put the results in a message queue.

The message queue is consumed by a Business Operation that put the results in the misc/out folder.

Code is in the src/python/pero-ocr folder.

6
2 566
Article Guillaume Rongier · Dec 1, 2022 2m read

ipython-iris-magic

%%iris magic for IPython, can run ObjectScript command in Notebooks

It can be run in any Notebook and does not require any special setup on IRIS or the Notebook.

Demo

Native Api

image

Embedded Python

image

As you can see, the first line load the magic, the second line connect to the server, the third line run the ObjectScript command.

All of this demo is in the example/Notebooks/Demo-Iris-Magic.ipynb

To run the demo run the following command in the root of the project:

docker-compose up

Then go to this url: http://127.0.0.1:8888/notebooks/Demo-Iris-Magic.ipynb

Load the magic

%load_ext iris_magic

Connect to the server

%%iris iris://superuser:SYS@localhost:1972/USER

Run the ObjectScript command

%%iris
Set x = 1
Write x

You can also use the magic to run SQL query.

Load the magic

%load_ext sql

/!\ You need to install the sql extension first.

The sql extension is not part of the standard IPython installation. You can install it with the following command:

pip install ipython-sql

Connect to the server

%sql iris://superuser:SYS@localhost:1972/USER

Run the SQL query

%sql SELECT 1

Installation

In order to use this magic, you need to install the ipython-iris-magic package.

pip install ipython-iris-magic

All the dependencies will be installed automatically.

Usage

%load_ext iris_magic
%%iris iris://superuser:SYS@localhost:1972/USER 
set test = "toto"
zw test

Output:

test="toto"
1
0 646
Question Dmitry Maslennikov · Nov 13, 2022

I have table

CREATETABLE nodes (
        nameVARCHAR(50) NOTNULL, 
        parentVARCHAR(50), 
        PRIMARY KEY (name), 
        FOREIGN KEY(parent) REFERENCES nodes (name) ONUPDATEcascade
);

I put some data

INSERTINTO nodes (name, parent) VALUES ('n1', NULL);
INSERTINTO nodes (name, parent) VALUES ('n11', 'n1');
INSERTINTO nodes (name, parent) VALUES ('n12', 'n1');
INSERTINTO nodes (name, parent) VALUES ('n13', 'n1');

Let's delete all

DELETEFROM nodes;

Nope, no way.

SQL Error [124] [S1000]: [SQLCODE: <-124>:<FOREIGN KEY constraint failed referential check upon DELETE of row in referenced table>]
[Location: <ServerLoop>]
[%msg: <At least 1 Row exists in table 'SQLUser.nodes' which references key 'NODESPKey2' - Foreign Key Constraint 'NODESFKey3', Field(s) 'parent' failed on referential action of NO ACTION>]
7
0 614