#Beginner

0 Followers · 499 Posts

Beginner tag unites articles and questions for those who are getting started with InterSystems Data Platform

InterSystems staff + admins Hide everywhere
Hidden post for admin
Article Dmitrii Kuznetsov · Feb 15, 2021 17m read

A concurrent session in IRIS:
SQL, Objects, REST, and GraphQL
 

Kazimir Malevich, "Athletes" (1932)
 

"But of course you don't understand! How can a person who has always traveled in a horse-drawn carriage understand the feelings and impressions of the express traveler or the pilot in the air?"

Kazimir Malevich (1916)

Introduction

We’ve already addressed the topic of why object/type representation is superior to SQL for implementing subject area models. And those conclusions and facts are as true now as they have ever been. So why should we take a step back and discuss technologies that drag abstractions back to the global level, where they had been in the pre-object and pre-type era? Why should we encourage the use of spaghetti code, which results in bugs that are hard to track down, and which relies only on virtuoso developer skills? 

There are several arguments in favor of transmitting data via SQL/REST/GraphQL-based APIs as opposed to representing them as types/objects:

2
4 1162
Question Sehinde Raji · May 21, 2021

Hey I am very new to Intersystems Objectscript and I am trying to find a way of extract 4 digit numbers from a stream.

I have a stream full of results 

2334

3434

5543

4334

And I am trying to remove each 4 digit grouping from the stream.

I have tried the following for loop 

for i=1:1:$length(result) {

set curr = $extract(result, i)

write !, curr

set count(curr) = $get(count(curr)) + 1

}

Unfortunately the loop extracts one digit.

Does anyone have any suggestions on how to solve this ?

6
0 502
Article Mihoko Iijima · Mar 5, 2021 3m read

This article is a continuation of this post.

The purpose of this article is to explain how the Interoperability menu works for system integration.

image

The left side of the figure is the window for accepting information sent from external systems.

There are various ways to receive information, such as monitoring the specified directory at regular intervals to read files, periodically querying the database, waiting for input, or directly calling and having it passed from applications in other systems.

In the system integration mechanism created in the IRIS Interoperability menu, the received information is stored in an object called a message. The message is sent to the component responsible for the subsequent processing.

A message can be created using all the received information or only a part of it.

Suppose you want to send the information contained in the message to an external system. In that case, you need to send the message to the component responsible for requesting the external network to process it (the right side of the figure). The component that receives the message will request the external system to process it.

Besides, suppose a message requires human review, data conversion, or data appending. In that case, the message is sent to the component in the middle of the diagram (BPM), which is responsible for coordinating the processing flow.

Messages are used to send and receive data between each component. When a message is sent or received, the message is automatically stored in the database.

Since messages are stored in the database, it is possible to check the difference before and after the data conversion. Check the message that was the source of a problem during an operation or start over (resend) from the middle of the process. Verify the status using messages at each stage of development, testing, and operation.

A simple picture of system integration would be divided into three components (business services, business processes, and business operations), as shown in the figure below.

There is also a definition called "production" that stores information about the components to be used (e.g., connection information).

image

The role of each component is as follows:

Business Services
Responsible for receiving information from external sources, creating messages, and sending messages to other components.

Business Processes
This role is activated when a message is received and is responsible for coordinating the process (calling components in the defined order, waiting for responses, waiting for human review results, etc.).

Business Operations This function is activated when a message is received and has a role in requesting the external system to process the message.

Messages are used to send and receive data between components.

Components other than business services initiate processing when they receive a message.

The question is, what is the purpose of creating and using this message?

Messages are created by retrieving the information you want to relay to the external system from entered data into the business service.

Since not all external systems connected to IRIS use the same type of data format for transmission, and the content to be relayed varies, the production can freely define message classes according to the information.

There are two types of messages: request (= request message) and response (= response message). The message that triggers the component's activation is called request (= request message), and the message that the component responds to after processing is called response (= response message).

These messages will be designed while considering the process of relaying them.

In the following articles, we will use a study case to outline the creation of productions, messages, and components.

1
0 1160
Article Mihoko Iijima · Mar 5, 2021 6m read

This article is a continuation of this post.

In the previous article, how the Interoperability menu works for system integration was explained.

In this article, I would like to explain how to develop a system integration using the Interoperability menu.

To begin with, what kind of process do you want to create? While thinking about this, make the following content.

  • Production
  • Message
  • Components
    • Business Services
    • Business Processes
    • Business Operations

Production is a definition used to specify the components required for system integration and to store the component settings, which are configured using the Management Portal (internally stored as a class definition for Production).

For example, suppose you are creating a business service that processes files placed in a specified directory at regular intervals. In that case, it is necessary to set up exactly which directories to monitor and which files to process. A Production is prepared to store these settings.

The settings depend on the adapter used by the component that sends and receives data.

Adapters are classes to simplify the connection to external systems, some are protocol-specific such as Mail/File/SOAP/FTP/HTTP/SQL/TCP, and some are standards specific HL7.

Please refer to the documentation (protocol-specific adapters and adapters related to EDI documentation for more information on adapters.

Since we will define the necessary components for the Production, "Start Production" will start the system integration, and "Stop Production" will stop the system integration.

The development required to complete the Production is the creation of the components necessary for system integration, specifically the following contents:

  • Message
  • Components (Business Services, Business Processes, Business Operations)
  • Data conversion, etc.

The content above will be explained slowly in the articles coming after this one.

First of all, let's start Production using the sample Production and check the message process by processing data while checking the settings.

Sample can be downloaded from https://github.com/Intersystems-jp/selflearning-interoperability.

To use a Container, download the sample code using the git clone, navigate the clone's directory, and run docker-compose up -d It's that easy!

See here for the procedure (it will take some time to create a container).

If you do not use containers, create a new namespace after downloading the sample, and import all class definition files (extension .cls) under the src folder into the created namespace. For more information on the process of creating a namespace, please refer to the video after 07:03 of this article.

Please refer to the README for more details on the sample code.

When you are ready, access the management portal (change the web server's port number to match your environment).

http://localhost:52773/csp/sys/UtilHome.csp

Go to the Management Portal > Interoperability > Configuration > Production.

If you are using a method other than containers, connect to the namespace where you imported the source code, access [Configuration] > [Production], click the [Open] button, select [Start] > [Production], and then click the [Start] button.

※ If you are using something other than a container, you will need to make some initial settings. Please set up the contents described below before trying the following contents.

image

The production page will be displayed as [Component Name] for each of the "Service", "Process", and "Operation" components.

Click on the component name to change the contents of the "Settings" tab on the right side of the screen.

For example, when you click on Start.GetKionOperation (single click), the display is as follows.

image

This component has the [HTTP Server] and [URL] settings for connecting to the Web API. There is a [appid] field at the bottom of the settings where you can enter the API key that you get it. There is a [lang] field near [appid] and is set "ja" ("ja" = Japanese). [lang] set language of response from OpenWeather. For English, set "en". When you finish to set these settings , click the "Apply" button.

image

If you are using a container, the setup is complete. For more information, please click here.


If you are experimenting with something other than containers

Please make the following two settings in advance:

1) Configure the SSL client.

Since the Web API to be connected to will be communicated using HTTPS, configure the SSL client on the IRIS side in advance.

To match the settings of the sample production, we will use the name [openweather]. The settings in the Production are as follows:

image

Click the Management Portal > [System Administration] > [Security] > [SSL/TLS Configuration] > [Create New Configuration] button, enter "openweather" in the "Configuration Name" field, and then click in the "Save" button to finish.

image

2) Create a base URL for REST

In the sample production, we have configured it so that the information can be entered via REST, and the base URL for REST needs to be configured on the IRIS side.

In the sample, we set /start as the base URL. Since the Start.REST class exists in the namespace where the sample was imported, we will specify this class as the dispatch class and add %All as the application role to omit authentication at the time of access.

Management Portal > System Administration > Security > Applications > Web Application Path > Click the "Create new web application" button.

In the Name field, specify /start; in the Namespace field, specify the namespace from which the sample was imported; in the Dispatch Class field, specify Start.REST; in the Allowed Authentication Method field, select "Unauthenticated", and save the file.

After saving, add the %All role to the application role on the "Application Roles" tab.

image

image


Try to send data

Once you are all set up, try to use a business service to send information via REST and let it run.

http://localhost:52773/start/weather/Takoyaki/Osaka

The above example is a URL that supposes that someone has purchased "Takoyaki" in Osaka City.

The screen after execution is as follows.

image

Check the messages that have been sent to the Production.

In the Management Portal > Interoperability > Configuration > Production, click on the service below:

Select the "Messages" tab on the right side of the screen and click on any number below to the header field column. If you do not see it, reload your browser.

image

Using the Visual Trace page, you can see the information of messages sent and received between components. You can see that the weather information is retrieved from the Web API and sent back in the light blue frame.

In this way, you can use tracing to see what data was being sent and received at that time and in what order.

Throughout this article, we have confirmed that Production has defined the necessary components and their settings for system integration by referring to the sample code settings.

We also confirmed that we could refer to the messages flowing through the Production in chronological order by using the Visual Trace page.

In the next articles, we will discuss the concept behind creating the "message" shown in this trace and how actually to define it.

0
0 737
Article Mihoko Iijima · Mar 5, 2021 4m read

This article is a follow-up to this post.

In the previous article, [What is a Production?], we checked the production contents. We ran the sample code and checked the flowing messages' contents into the production on the Visual Trace page.

This article will review the concept and the definition of the messages used to send and receive data between components from the required development content for system integration.

Before creating a message, let's review the case study.

A company operates a shopping site and is changing the order of displaying product information to match the seasons.
However, some items sell well regardless of the season, while others sell at unexpected times, which does not match the current display rule of changing the order.
Therefore, we looked into the possibility of changing the order of display to match the day's temperature instead of the season. It became necessary to survey the temperature of the purchased products at that time.
Since an external Web API is available for checking weather information, we plan to collect the weather information at the time of purchase and register it in the later review database.

From this case, you can see the following:

Information to be received from the outside is "purchased product name and name of the city."
The information to be sent from IRIS to an external system to request processing is the "name of the city." The result of this process will be "weather information" for the city used as an input.

image

From this case study, we will implement the components needed for system integration. But before that, to run the components, you need to send and receive messages, which are relay data, and to use the messages, you need to define the message class.

A message class is designed to consider what information (i.e., messages) should be sent and received to make the component to run.

In this process, we need the following two types of information:

A) The name of the city to send to an external Web API to obtain weather information.

B) weather information and purchased product name for recording in the DB.

The name of the city in A) and the purchased product name in B) can be included in the input information to IRIS.

The weather information in B) can be retrieved from the response information of an external Web API.

Here is a diagram that considers what information would be needed to send and receive each component from the available data.

The first line of the yellow balloons describes the message class name, and the second line onwards states what to set for the property.

image

In the sample code, we have the following three types of messages:

Start.Request(Request message)
It is used to send the name of the purchased product and the city to acquire the weather information.

Start.Response(Response message)
They are used to return the results of operations (weather information) to obtain weather information.

Start.InsertRequest(Request message)
It is used to send the weather information and the name of the purchased products for DB registration.

The messages are specified in a superclass, Request message, and Response message are derived from Ens.Request and Ens.Response, respectively.

The following is an example of the definition of the Request message Start.Request.

Below is an example of the definition of the Response message.

The Request message, Start.InsertRequest to be sent with the DB registration request is as follows:

(We plan to set the WeatherInfo property to the information in Start.Response, which will be returned after the weather information is obtained.)

If you want to create it in Studio, you can also use the Message Creation Wizard.

Reference) Steps to create a response class in Studio

The key point so far

A message class is designed with the idea of "what information (i.e., messages) should be sent and received" to make the component RUN.

Once the message class (which is the information to drive each component) is implemented, the next step is to create a class for the component.

0
0 628
Article Mihoko Iijima · Mar 5, 2021 10m read

This article is a continuation of this post.

In the previous article, we reviewed how to create and define messages used to send and receive data between components.

In this article, I will explain how to create a business operation from the component creation methods.

We will quickly check the code by referring to the sample.。

image

Component NameRole
Start.FileBSA business service that uses file inbound adapter to read files placed in a specified directory at regular intervals.
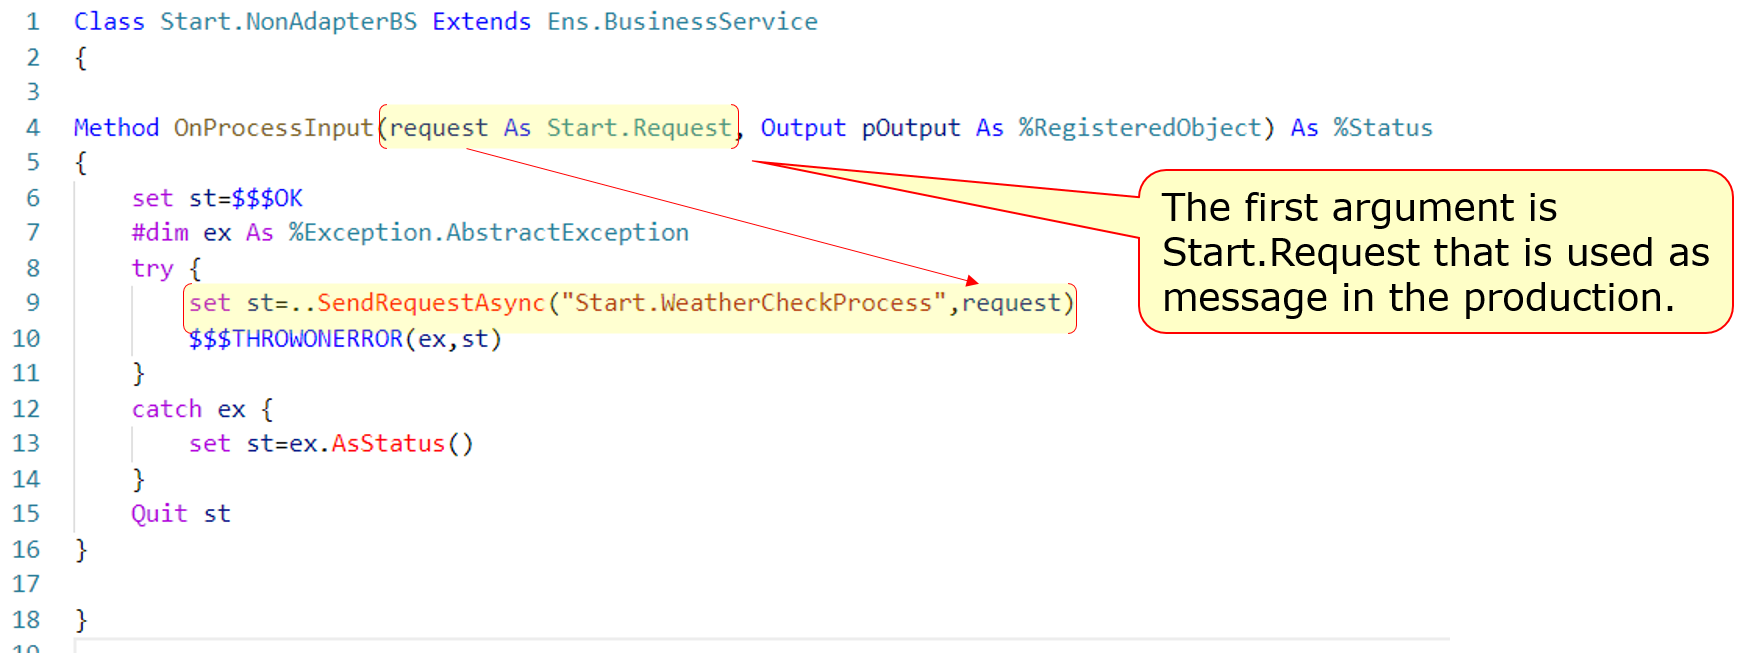
Start.NonAdapterBSBusiness services that allow applications and users to input information directly without using an adapter.
Start.WS.WebServiceBSBusiness services that allow people to enter information using web services.
Start.WeatherCheckProcessA business process that controls the procedure for acquiring weather information and then registering it in a database.
Start.GetKionOperationBusiness operation to pass the city name to the web service that provides weather information and sent back.
Start.SQLInsertOperationBusiness operations using SQL outbound adapters to request registration of weather and purchase information into the database.
Start.InsertOperationBusiness operations that perform updates to tables in InterSystems IRIS without the use of adapters.

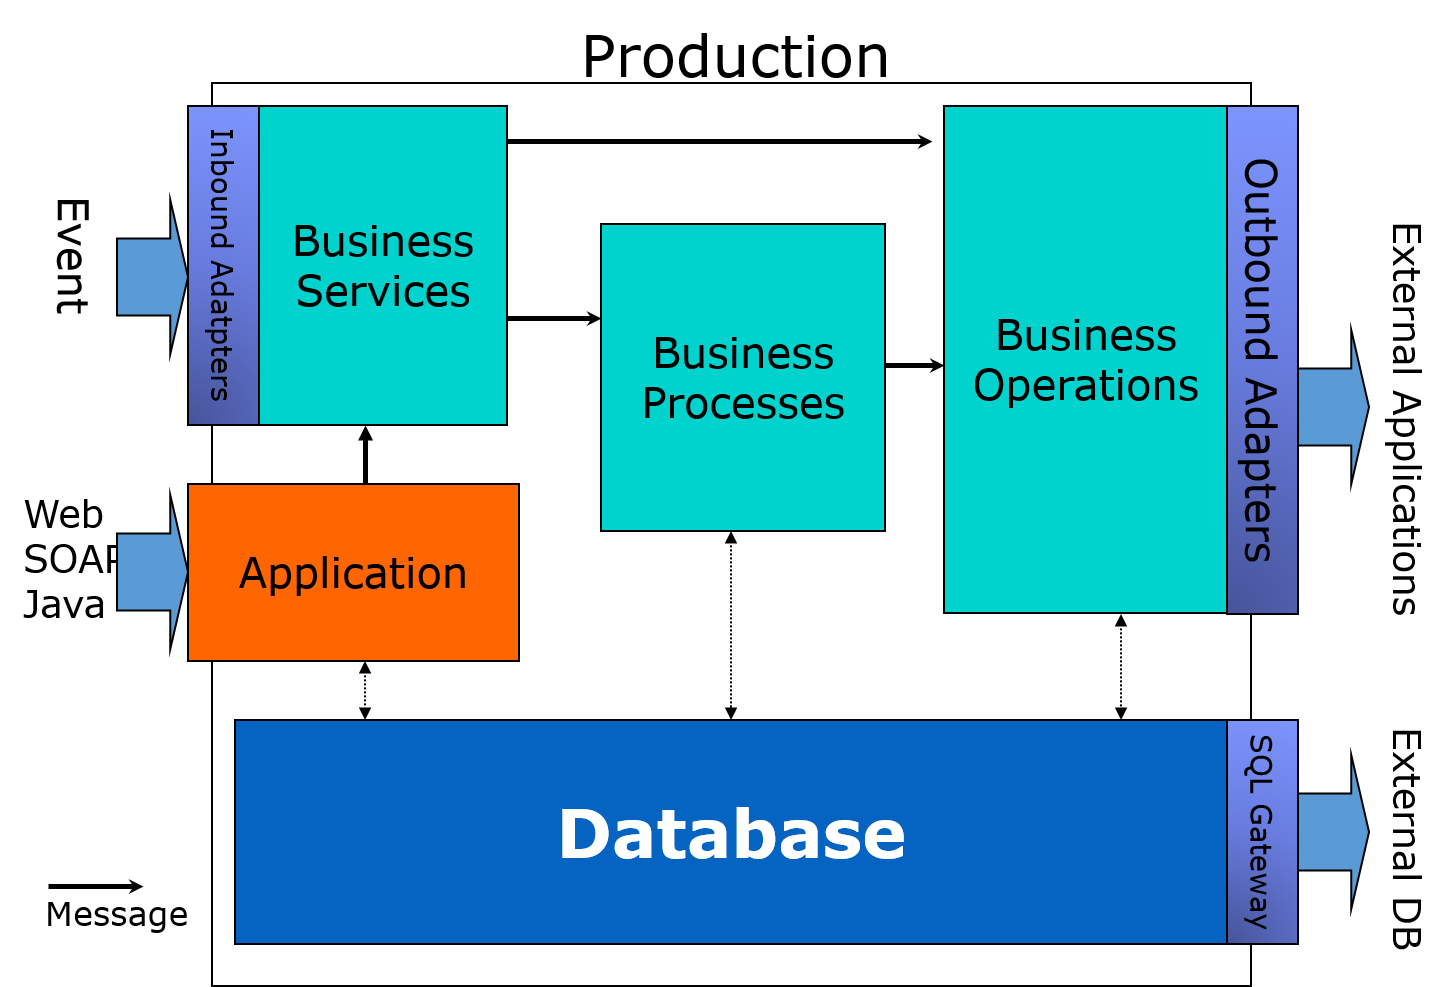
Note: BS stands for Business Services, BP for Business Processes, and BO for Business Operations.

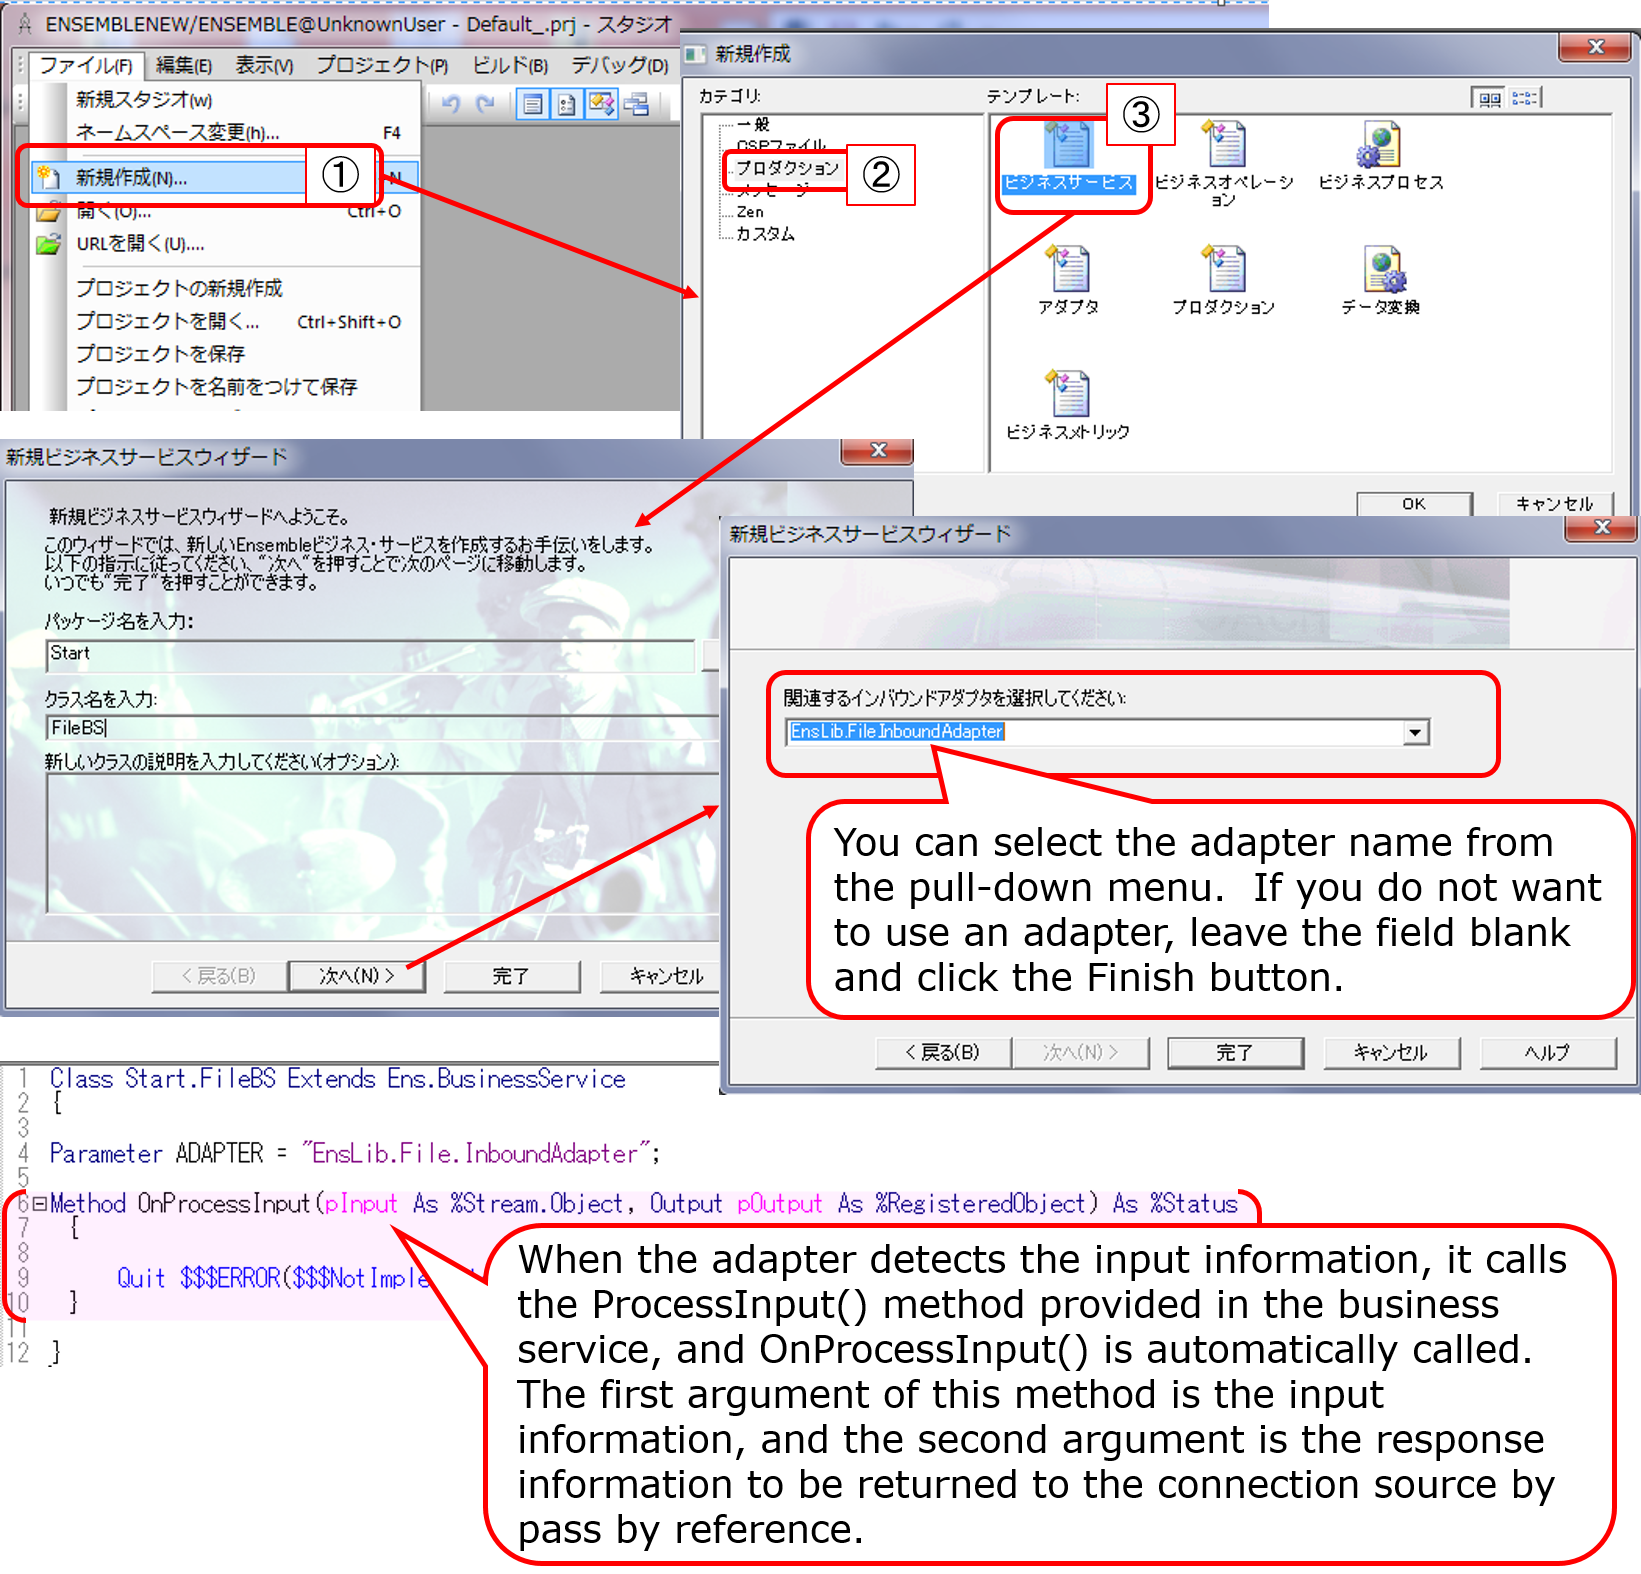
You need to write ObjectScript in Business Services and Business Operations and can be created in VSCode or Studio. Business Processes can also be made in the Management Portal (see this article for more information on using VSCode).

There is no particular order of creation, but the external site to be connected to is a public site and can be used immediately in this sample. In this case, it is convenient to start with the business operation to make testing easier.

After creating the components, there are test page in the production for business processes and business operations. However, testing is disabled by default in the production definition to avoid random testing in the production environment.

For details on how to allow "Testing Enables" in Production, use the following settings (the sample Production has been set to "Testing Enabled" in advance):

image

1) Business Operations

In the sample, two types of business operations are provided.

One operation is to pass the city’s name to an external Web API via REST and request the acquisition of weather information. The other operation is to give the weather information and the name of the purchased product to the InterSystems IRIS database and ask for the update process.

1)-1 REST Business Operations

Let’s start by creating an operation that calls an external Web API via REST.

This operation starts the GetKion() method when a Start.Request message is entered, queries an external site, and returns the weather information in a Start.Response message.

See here for code details.

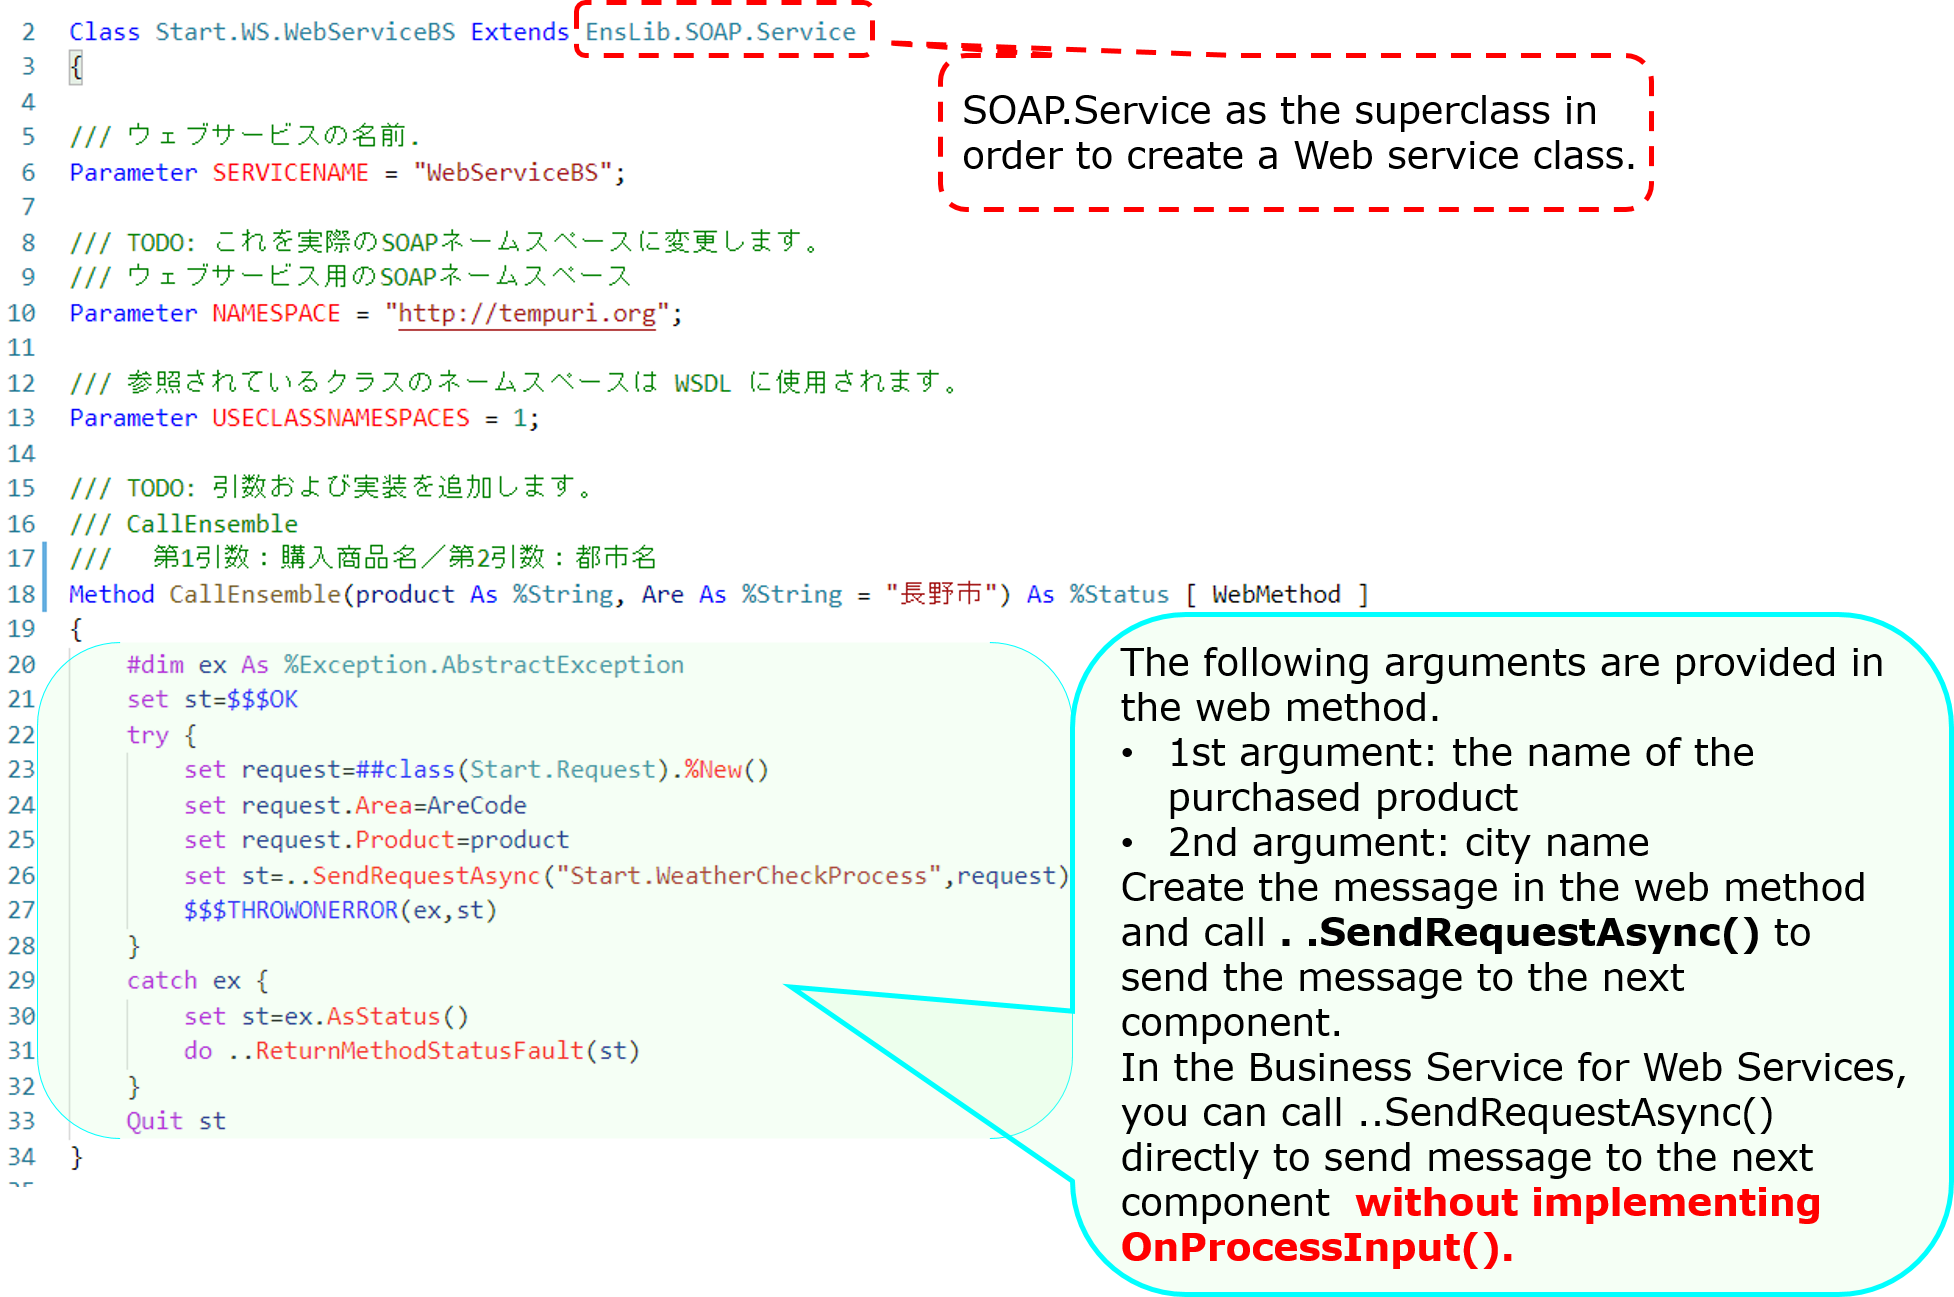
To create a business operation for REST, inherit from EnsLib.REST.Operation .

Class Start.GetKionOperation Extends EnsLib.REST.Operation

Inheritance of this class provides the following methods in IRIS that match the HTTP methods. Please refer to the documentation for details.

  • GetURL()— used for HTTP GET operations.
  • PostURL()— used in HTTP POST operations.
  • PutURL()— used in a HTTP PUT operations.
  • DeleteURL()— used in a HTTP DELETE operations.

For REST, use the adapter EnsLib.HTTP.OutboundAdapter. Set the adapter name to the ADAPTER parameter and the Adapter property, as shown in the example.

The INVOCATION parameter configures the Queue.

Parameter ADAPTER = "EnsLib.HTTP.OutboundAdapter";

Property Adapter As EnsLib.HTTP.OutboundAdapter;

Parameter INVOCATION = "Queue";

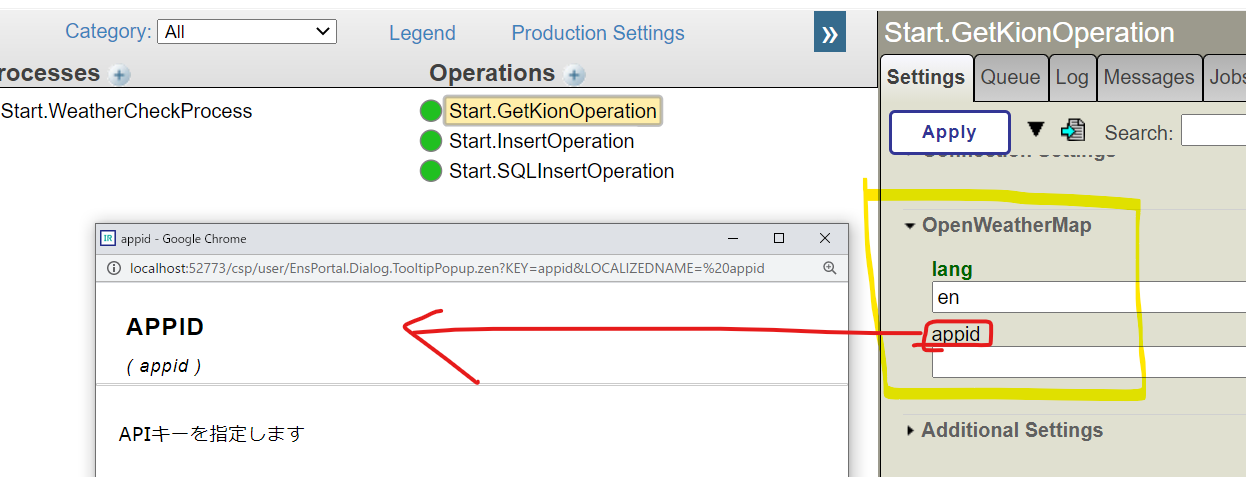
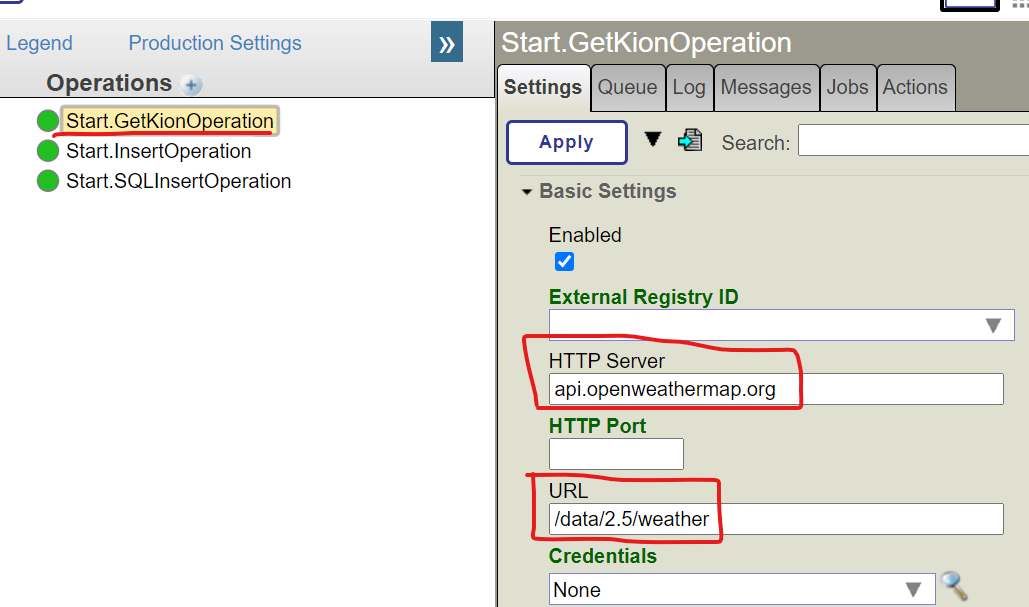
It is necessary to specify the OpenWeather API key to be obtained at runtime. There is a way to display settings that vary depending on the environment in the production settings.

The procedure is as follows:

  1. Define the properties
  2. Specify the name of the property you created in the SETTINGS parameter (if there are multiple properties, separate them with commas). Optionally, you can also specify a category (use “property name: category name”).

An example code is shown below.

/// APIキーを指定します
Property appid As %String;
/// specify lang option for OpenWeather API (default = ja = japanese)
Property lang As %String [ InitialExpression = "ja" ];

Parameter SETTINGS = "lang:OpenWeatherMap,appid:OpenWeatherMap";

The Production Settings page displays the following. The description in the line immediately before the property definition is also displayed in the production settings page, as shown in the figure.

image

Then, we will review the message map, which is an essential setting for business operations.

The above definition is defined so that the GetKion() method will work when the Start.Request message is sent.

In the GetKion() method, the city name can be obtained from the request message’s Area property passed as input information.

By setting the city name as a parameter of the URL published by the external Web API and calling it, you can obtain weather information.

The HTTP server and URL settings are configured in the Production page of the Management Portal. To obtain the settings, use the Adapter property provided by the HTTP outbound adapter.

Example) to specify a URL, use ..Adapter.URL

Use the GetURL() method provided by Business Operations for REST to call an external site. The first parameter is the URL to be executed (i.e., the URL specified in the required parameters such as city name). The second parameter is the HTTP response with parameters passed by reference.

Since the weather information is stored in JSON format in the HTTP response, the operation is complete when the data is registered in the response message (=pResponse).

image

The response message class’s name is specified in the second parameter of the created method by passing reference.

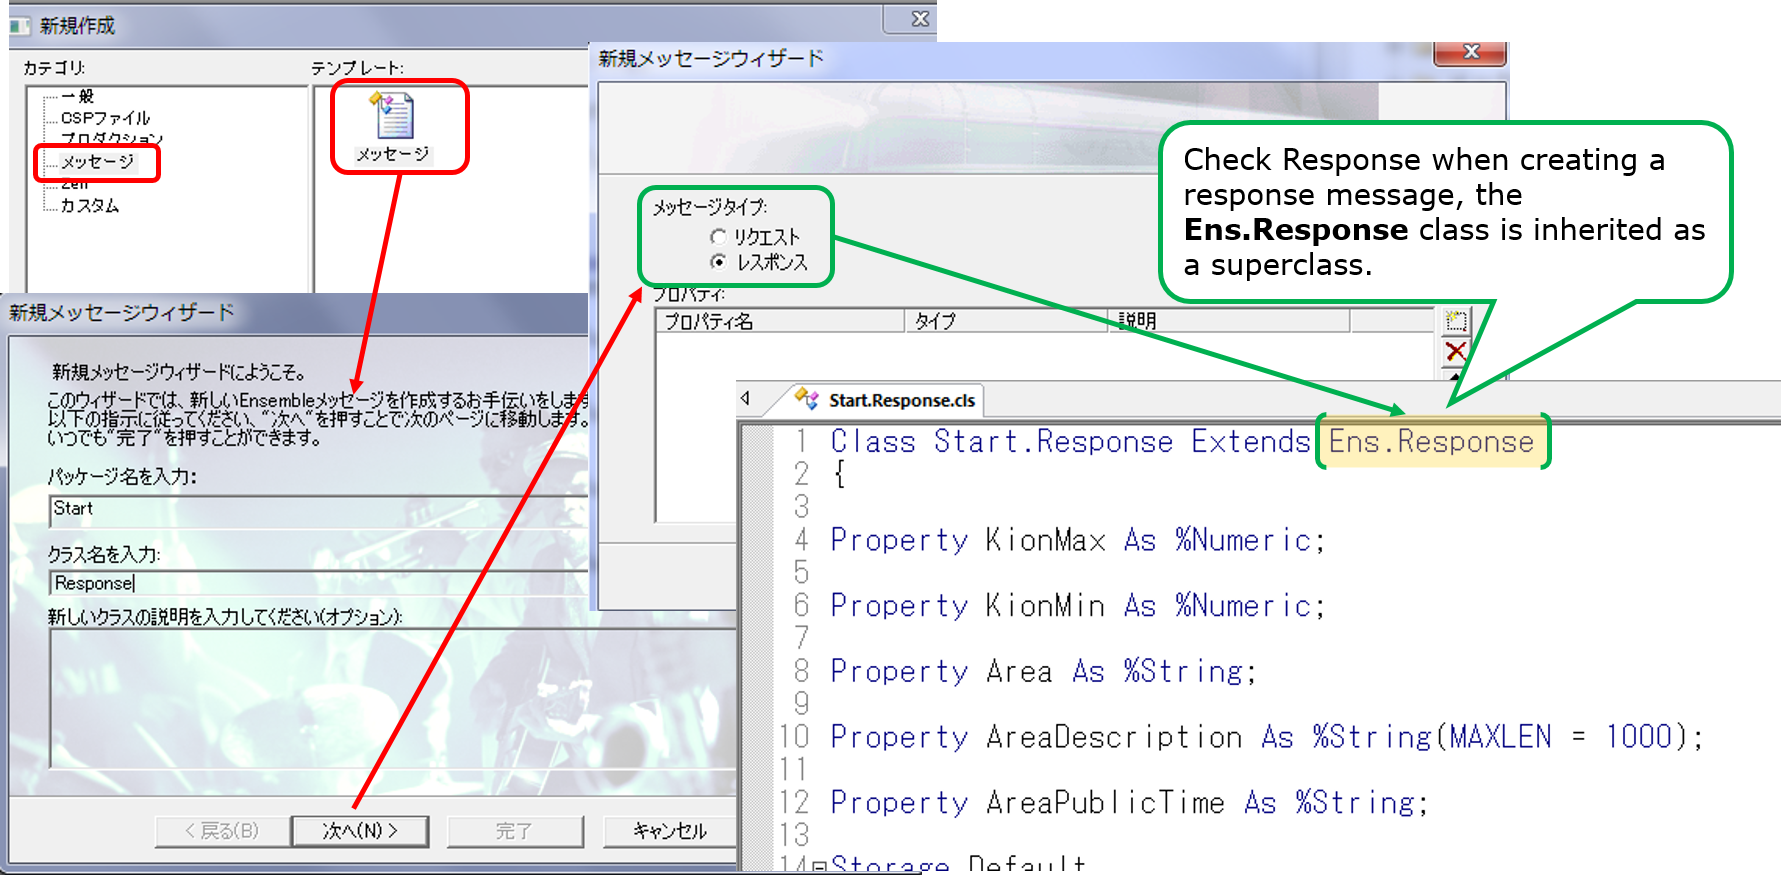
Method GetKion(pRequest As Start.Request, Output pResponse As Start.Response) As %Status

To return a response message to the caller, create an instance of the response message, store it in the second parameter variable (pResponse), and set the necessary information in the properties.

set pResponse.AreaDescription=weatherinfo.weather.%Get(0).description
set pResponse.KionMax=weatherinfo.main."temp_max"
set pResponse.KionMin=weatherinfo.main."temp_min"
set pResponse.Area=weatherinfo.name
// this code is fit to Japan time because weatherinfo.dt is UTC
set unixEpochFormat=weatherinfo.dt+32400
set dt=$system.SQL.Functions.DATEADD("s",unixEpochFormat,"1970-01-01 00:00:00")
set pResponse.AreaPublicTime=dt

Since HTTP responses from external sites are returned in JSON format, the stream that could be obtained from the HTTP response is used to convert it into a dynamic object that is convenient for JSON operations within IRIS.

set weatherinfo={}.%FromJSON(tHttpResponse.Data)

An example of a returned JSON string is shown below:

{
    "coord": {
        "lon": 135.5022,
        "lat": 34.6937
    },
    "weather": [
        {
            "id": 803,
            "main": "Clouds",
            "description": "broken clouds",
            "icon": "04d"
        }
    ],
    "base": "stations",
    "main": {
        "temp": 11.38,
        "feels_like": 8.33,
        "temp_min": 11,
        "temp_max": 12.22,
        "pressure": 1007,
        "humidity": 62
    },
    "visibility": 10000,
    "wind": {
        "speed": 2.57,
        "deg": 220
    },
    "clouds": {
        "all": 75
    },
    "dt": 1611820991,
    "sys": {
        "type": 1,
        "id": 8032,
        "country": "JP",
        "sunrise": 1611784750,
        "sunset": 1611822143
    },
    "timezone": 32400,
    "id": 1853909,
    "name": "Osaka",
    "cod": 200
}

The maximum temperature, minimum temperature, and weather can be obtained as follows:

set pResponse.AreaDescription=weatherinfo.weather.%Get(0).description
set pResponse.KionMax=weatherinfo.main."temp_max"
set pResponse.KionMin=weatherinfo.main."temp_min"

If you would like to learn more about JSON manipulation in IRIS, please refer to this article and documentation.

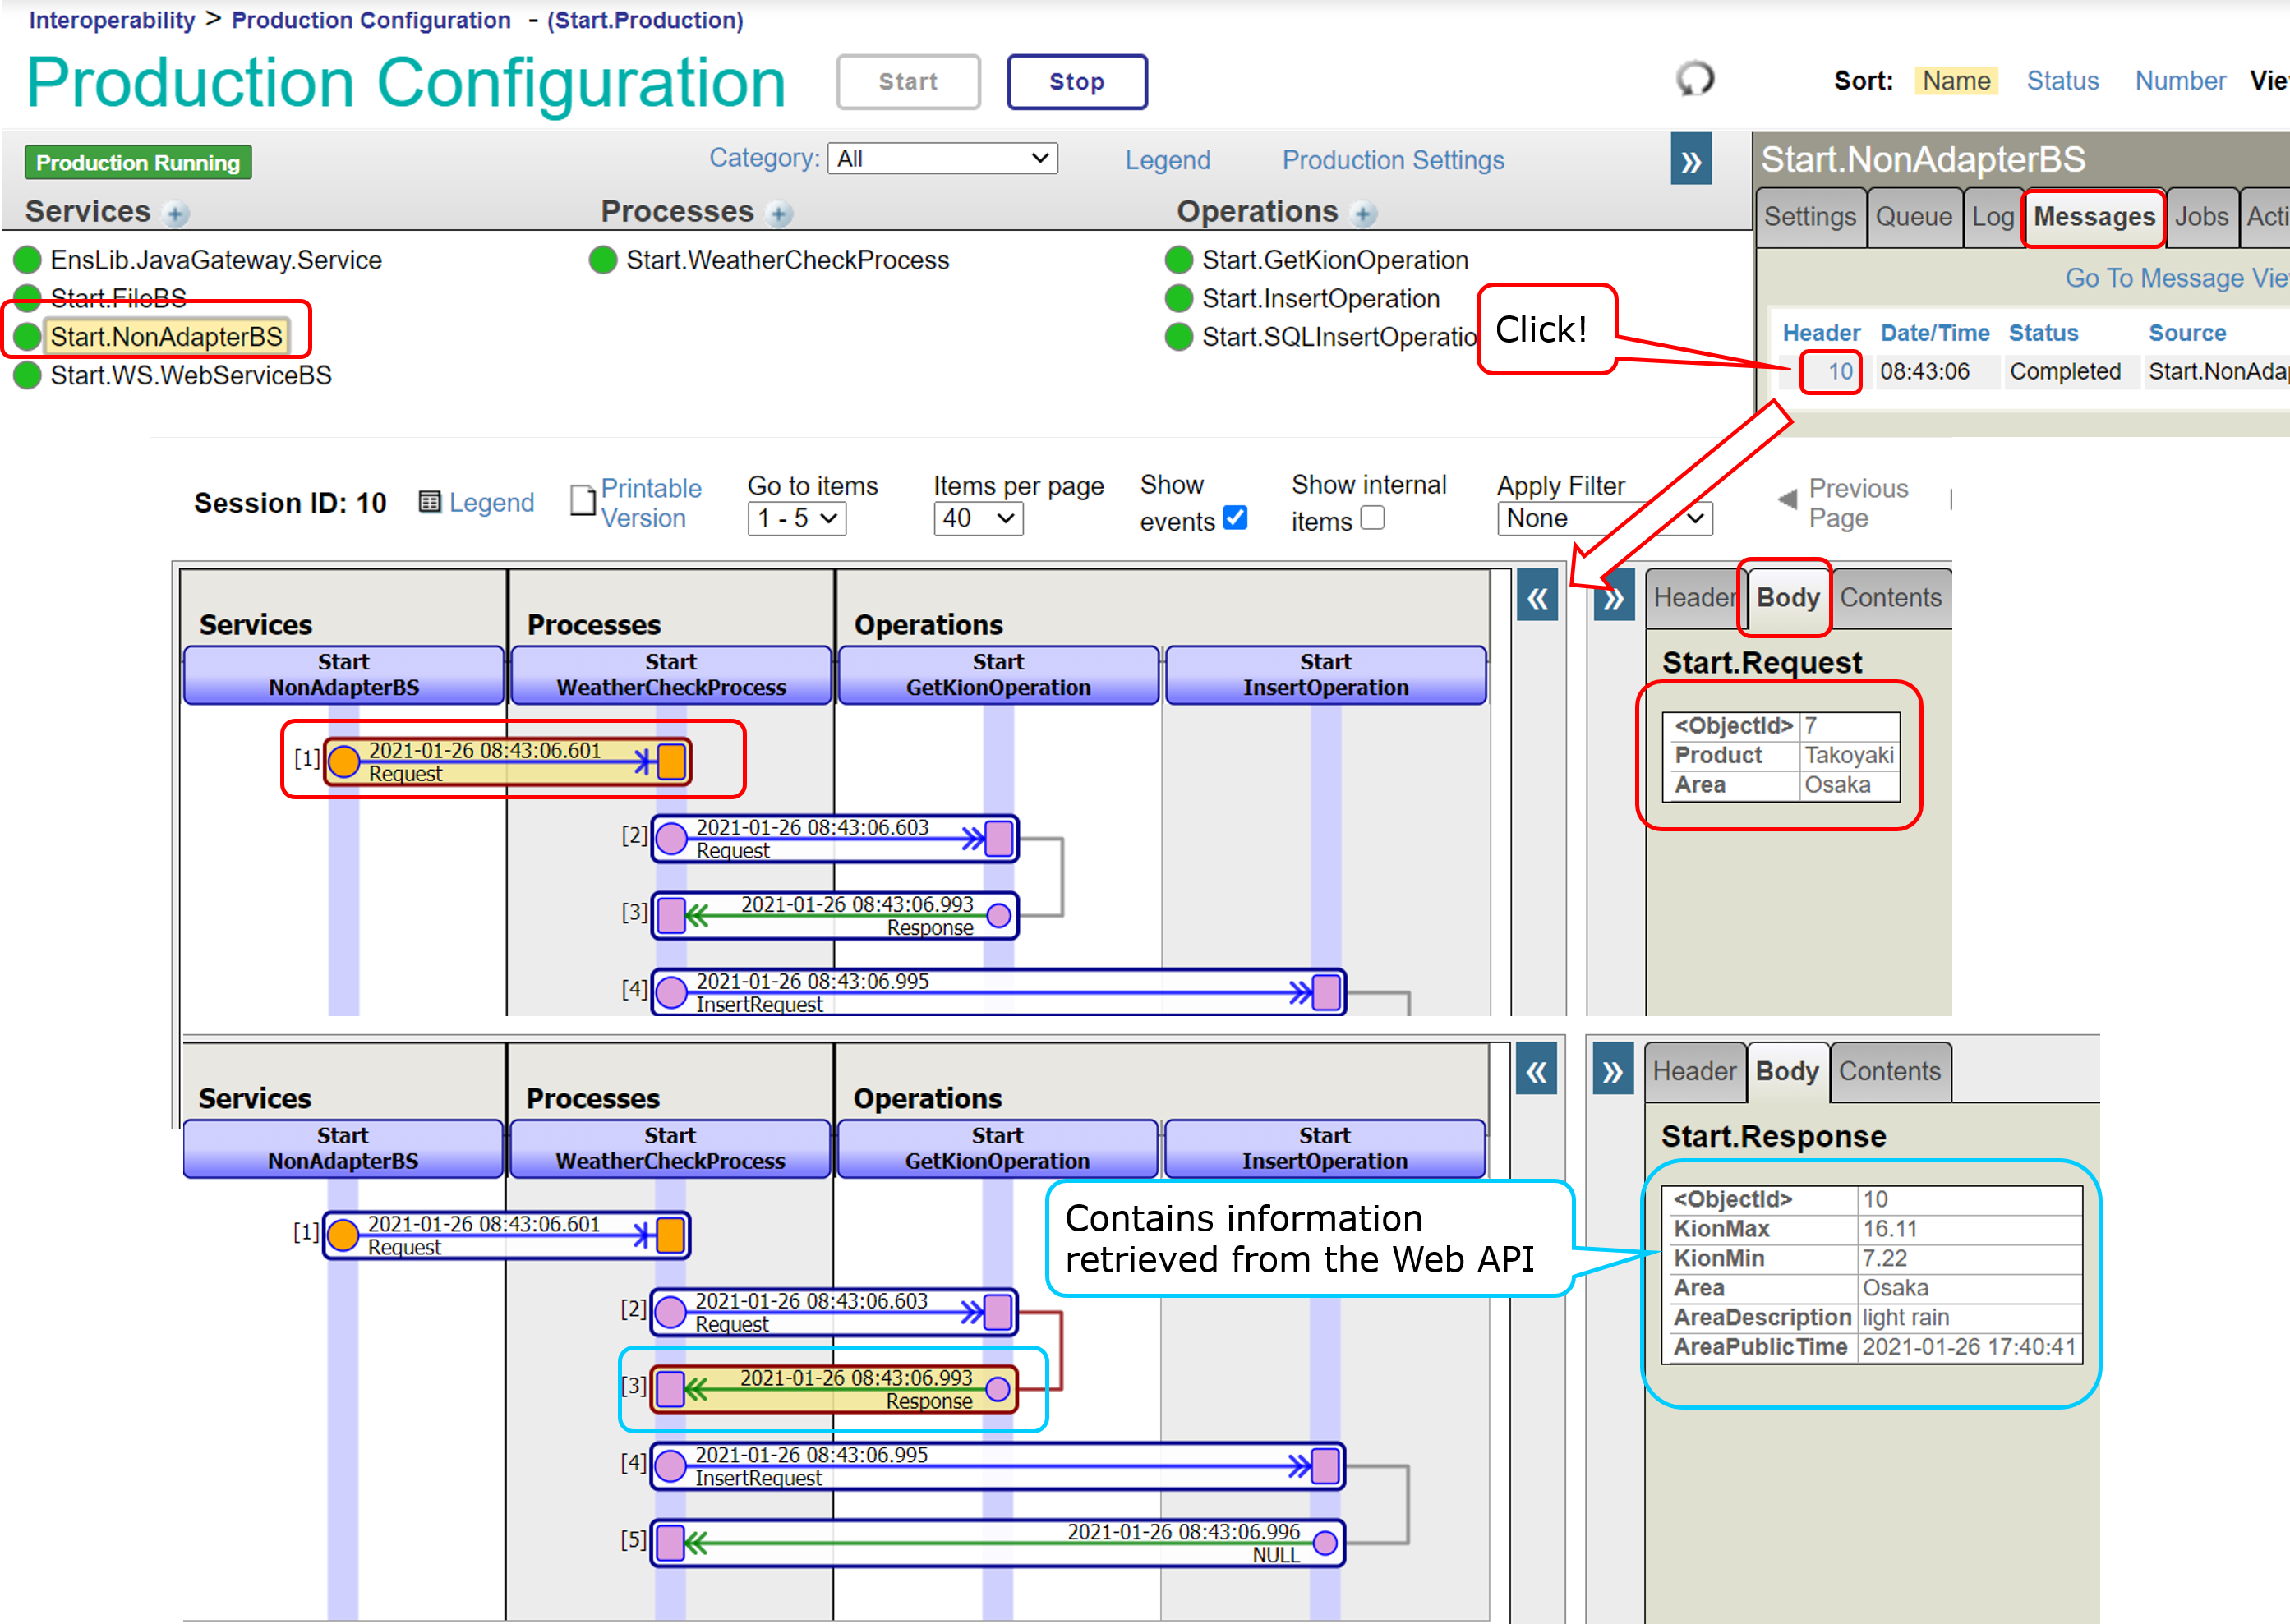
Now, let’s use the production testing tool to see if we can get the weather information properly.

Open the Production page (Management Portal> Interoperability> Configuration> Production), click Start.GetKionOperation, and then click the "Test" button on the "Action" tab.

Specify a city name (Naha, Sapporo, Nagano, Shinjuku, etc.) for Area, and click the “Run Test Service” button.

You can see the test results below, with the maximum and minimum temperatures and the weather listed.

image

Continue to learn how to use the Trace page.

image

Selecting a horizontal rectangle such as image in the left screen causes the information, in the right screen, to change.

Messages sent and received during the system integration process are automatically saved in the database. Using the message Visual Trace page, you can see in detail what messages were passed to which components in chronological order and whether there was a response or not.

Besides, if an error occurs,

“An error occurred while sending/receiving/receiving □ message to the component from ○ to △.”

a red mark will appear where the error occurred so that you can see it. Of course, in addition to tracing, we also have an event log page. (Management Portal > [Interoperability] > [View] > [Event Log])

Moving on, let’s check out the operation to request an update to the database.

1)-2 Business operations that request updates to the database

The sample provides two types of operations: Start.SQLInsertOperation and Start.InsertOperation.

Each of them is an operation to request a database update, but Start.SQLInsertOperation uses the SQL outbound adapter, while Start.InsertOperation has no adapter.

The difference between the two is,

operation using the SQL outbound adapter is assumed to be accessed via ODBC/JDBC connections so that the database connection destination can be switched in the production settings.

For operations that do not use adapters, it is assumed that the DB update target is a database within the range of visibility from the production configuration and that no connection destination switching occurs.

The IRIS database can be used to store arbitrary data during system integration. However, suppose the system configuration changes for some reason a few years later, and the need to connect to a database on a different server arises. In that case, the operation without the adapter cannot be continued.

On the other hand, operations using the SQL outbound adapter can be operated if there are no changes processing the content of the destination specification (if there is no problem with the SQL statement to be executed, it can be connected to databases of different products).

During system integration, there may be cases where connection information changes due to external system reasons. Therefore it is vital to have a design that can flexibly respond to changes. For this reason, it is recommended to create components that support external connections in a loosely coupled manner.

However, suppose there is no change in the configuration in the future. In that case, you can access the database in IRIS without using the ODBC/JDBC connection, so you can choose to use the adapter or not, depending on your usage.

Let’s take a look at the Start.SQLInsertOperation code that uses the adapter.

The adapter used in the sample is an SQL outbound adapter, which allows you to request the database to execute SQL statements. Different adapters provide different methods. Please refer to the documentation for details on the methods provided by the adapters.

image

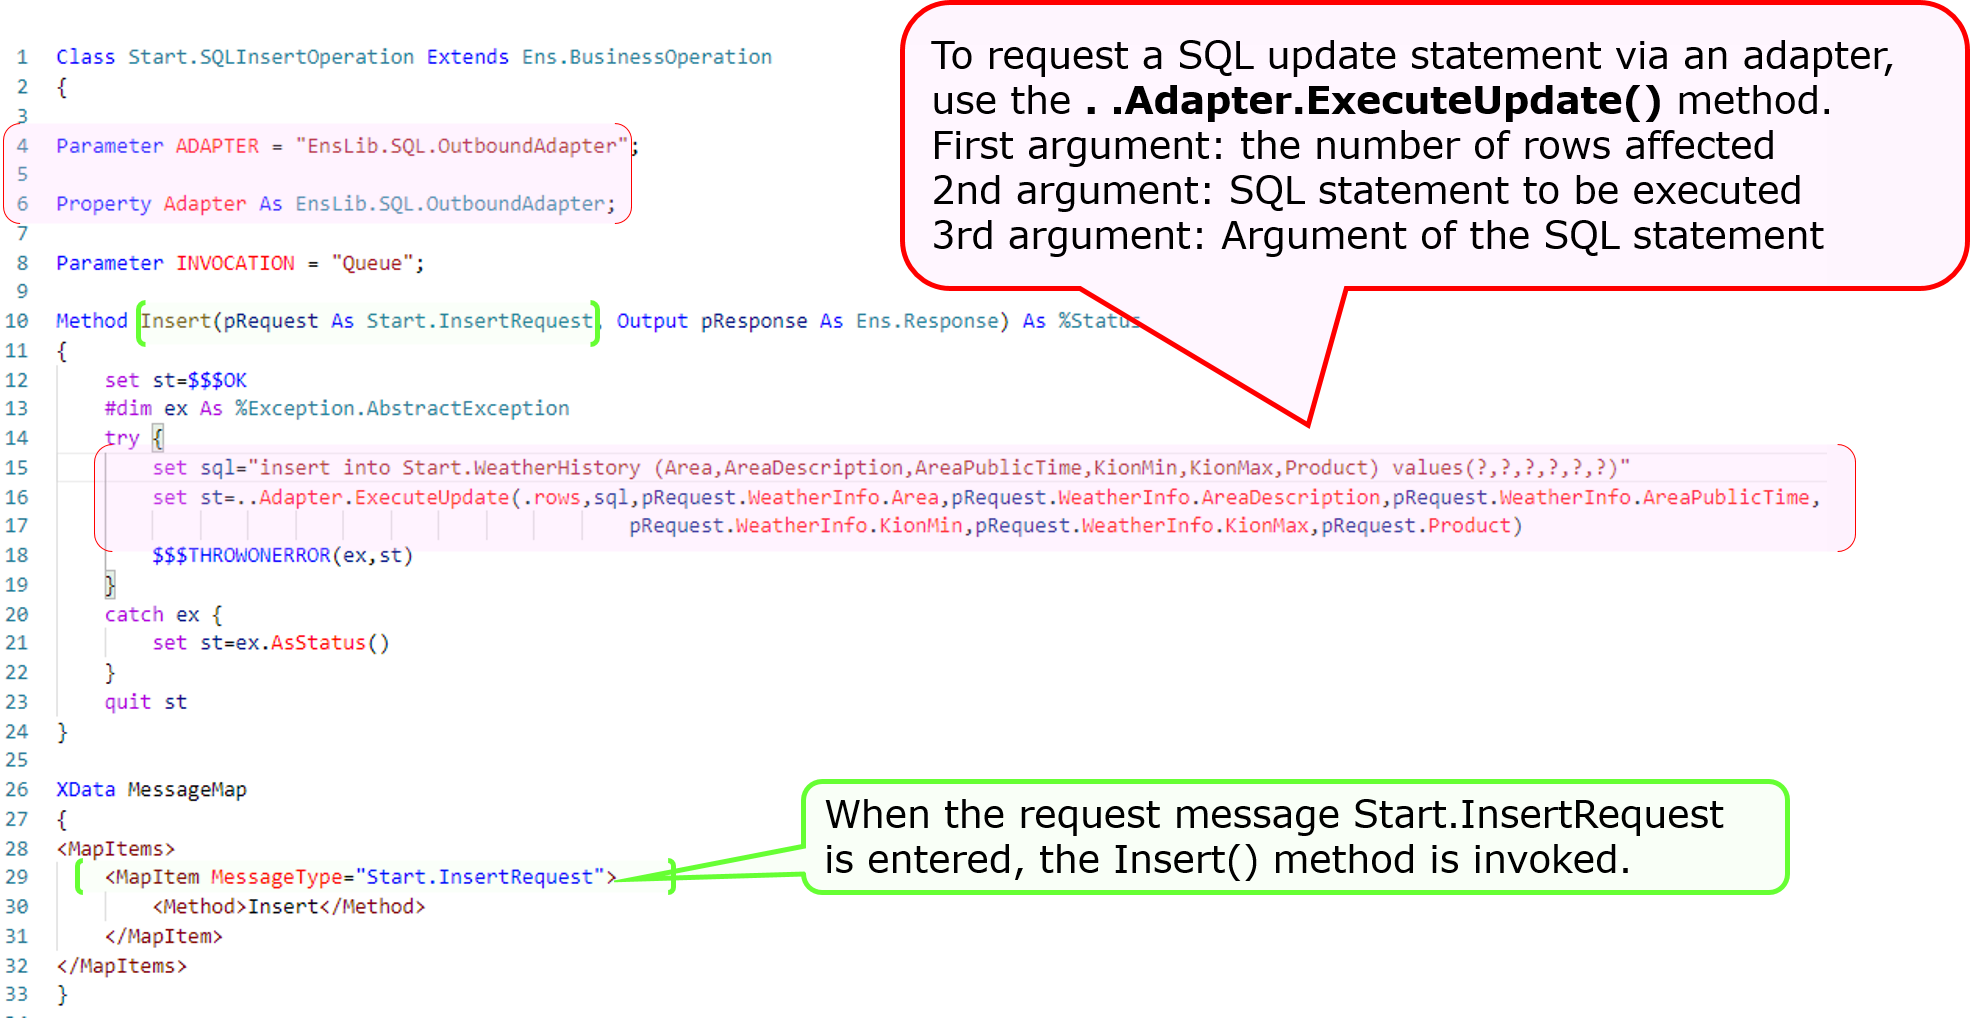
Then review the code for Start.InsertOperation, without using the adapter.

Whether you use an adapter or not, the message map and method definitions for the operation are required. If you do not use an adapter, you do not need to define the “Paramter” and “Property” for the adapter.

Business operations without adapters: In Start.InsertOperation, SQL is executed using ObjectScript (the comment statement is the update process in object operations).

The implementation is satisfactory if the database to be updated is not detached from IRIS.

We found out that operations using adapters provide a reliable method to request processing from the destination. We also confirmed that it is possible to create operations without using adapters and freely write code for them.

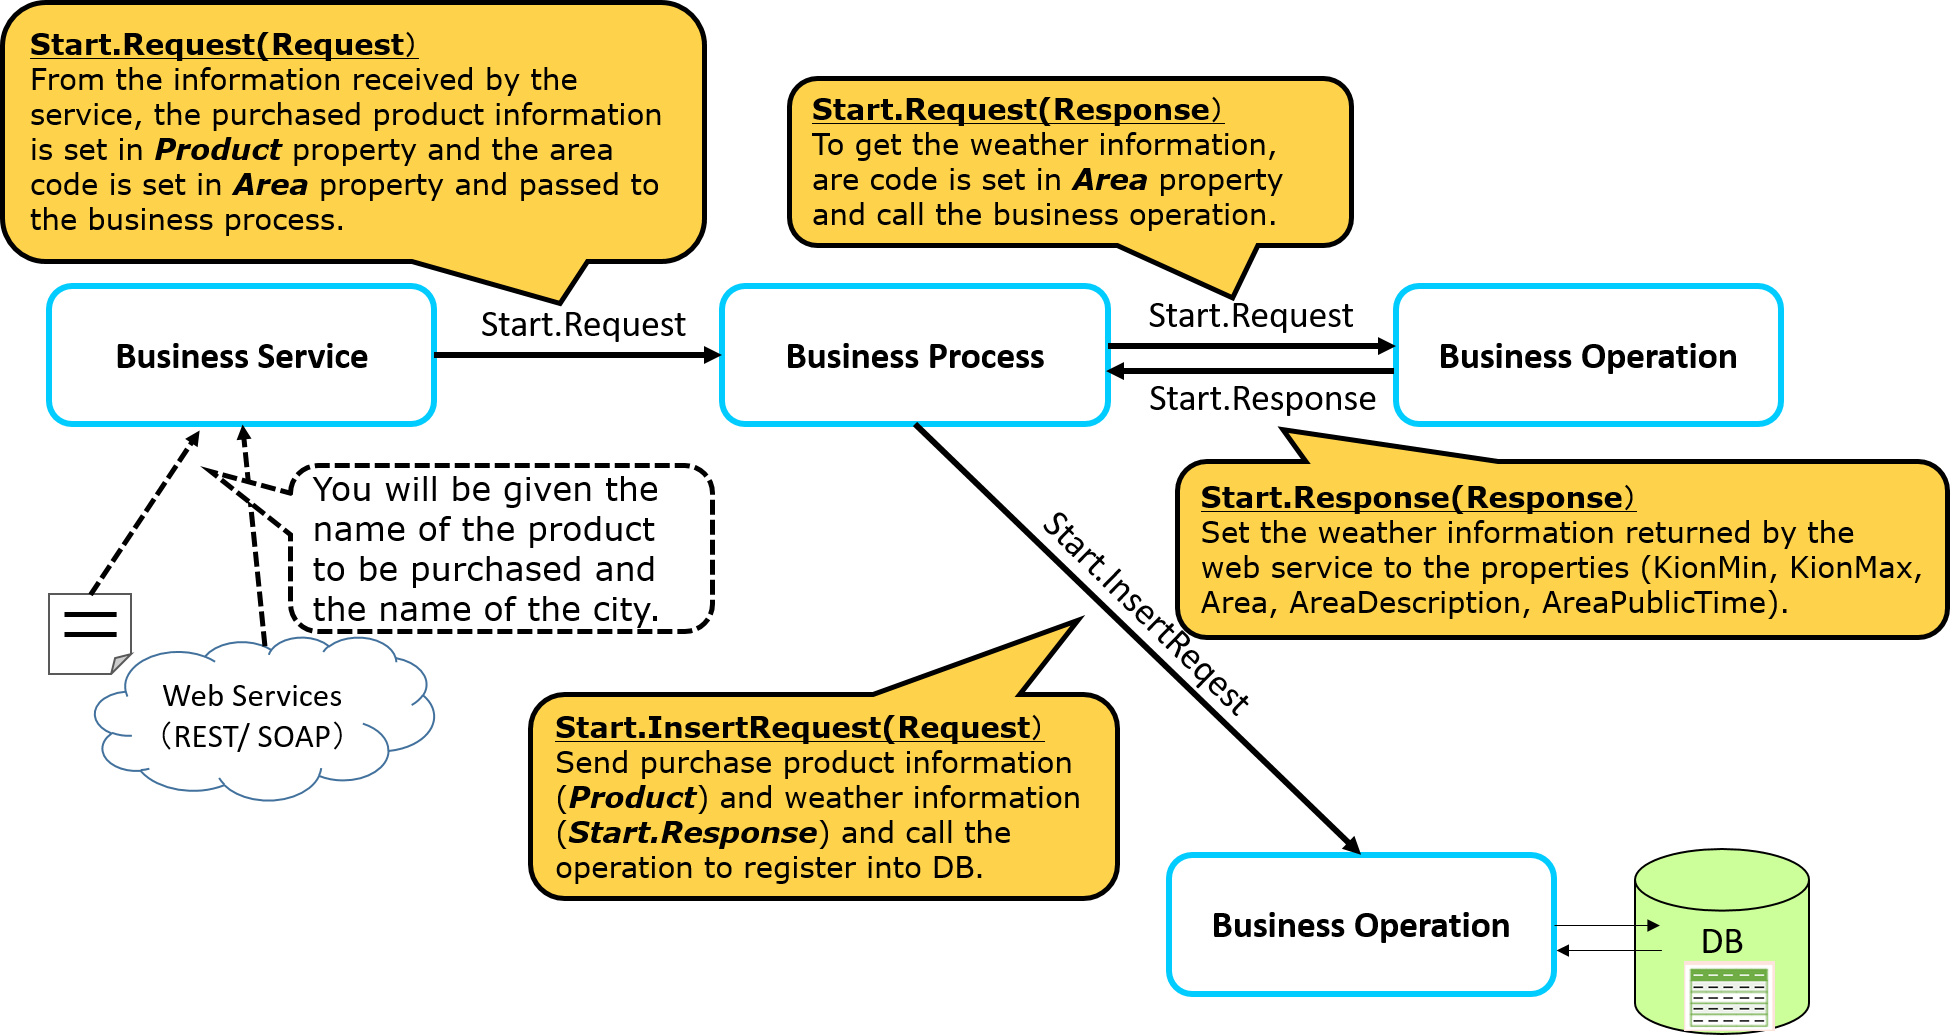
Next, I would like to explain how to create a business process that calls the operations for getting weather information and updating the database in the correct order.

0
0 1025
Article Mihoko Iijima · Mar 5, 2021 7m read

This article is a continuation of this post.

In the previous article, we discussed business operations' creation from the components required for system integration.

In this article, you will learn how to create a business process that calls the two business operations you have defined in the sequence order.

The business process acts as the coordinator (command center) of the process.

The processing adjustments you may want to implement in the sample include the following:

Step 1: Provide the city name to an external Web API and request weather information.
Step 2: Register the result of the query (weather information) from Step 1 and the name of the purchased product received at the start of the production.

In the sample business process, we will wait for the answer to step 1 and adjust step 2 to operate.

In the process of waiting for a response (i.e., synchronization), for instance, what happens if step 1) doesn't respond for a few days?

If new messages are delivered to the business process while waiting for a response for a few days, the messages will not be dismissed since they are stored in a queue. However, the business process will not process new messages, and there will be a delay in the operation.

Note: Business processes and business operations have cues.

Therefore, in production, when there is a synchronous call, there are two ways for the business process to move: A) to synchronize perfectly, and B) to save the state of the business process itself in the database and hand over the execution environment so that other processes can run while waiting for a response.

A) How to synchronize perfectly:

While a synchronous call is being made, the business process's processing is ongoing, and waiting for the next message to be processed until all processing is completed.
➡This function is used when the order of processing needs to be guaranteed in the first-in-first-out method.

B) The method of saving the state of the business process itself in the database and hand over the execution environment so that other processes can run while waiting for a response is

When a synchronous call is made, the process saves its state in the database. When a response message is received, and it is time to process the message, it opens the database and executes the next process.
(IRIS will manage the storage and re-opening of business processes in the database).
➡ Used when it is acceptable to switch the processing order of messages (i.e., when it is allowed to process more and more different messages received while waiting for a response).

In the sample, B) is used.

There are two types of editors for creating business processes: a Business Process Editor that allows you to place processing boxes (activities) and implement them while defining their execution, and a method for creating them using ObjectScript in Studio or VSCode.

If you use the Business Process Editor, you will use the call activity to invoke the component, but this activity is implemented in the B) way. Of course, you can also implement theA) method in the Business Process Editor, except that you will not use the call activity in that case (you will use the code activity).

In this section, I will explain how to create it.

If you use the Business Process Editor, you write them in the Management Portal.

You can also open the business process from the production configuration page. The figure below shows the procedure.

image

Icons like in this editor are called activities, and those marked with are activities that can invoke other components.

This symbol indicates that a response message will be returned (i.e., a synchronous call will be made). The activity defaults to the asynchronous call setting, which can be changed as needed.

Now let's look at business processes, which are components that are invoked upon receiving a request message, as well as business operations.

In the sample, the request message: It is set to start when it receives a Start.Request and does not return a response message.

image

In the business process, messages appear in various situations.

Request messages that are sent to business processes.

Request message (+ response message) to be sent when calling another component using the activity.

In the Business Process Editor, the names of the objects that store messages are clearly separated to be able to see which message was sent from which destination.

image

  • request(basic requirements)

The message that triggered the start of the business process, in our example, is Start.Request (the message to be specified in the Request settings on the Context tab in the Business Process Editor)

  • response(basic response)

Response message to return to the caller of the business process (not used in the sample) (message to be specified in the settings of the response in the context tab in the Business Process Editor)

  • callrequest(request message)

Request message to be sent when calling the component determined by the activity.

  • callresponse(response message)

Response message returned from the component specified by the activity.

callrequest and callresponse are objects that will be deleted when the call processing of the activity is completed. All other objects will not disappear until the business process is finished.

Now comes the problem when callresponse disappears.

That's because, as you can see in this sample, When calling a component, if you want to use the response result of a previously called component, the response message will be lost, and the information that was to be used in the next component will be erased.

It is a problem 😓

What should we do?・・・・・

In such a case, you can use the context object.

The context object, like request/response, is an object that survives until the end of the business process.

Moreover, since context is a generic object, it can be defined in the process editor.

In addition to the context, the response object can also be used if it has a property that matches the inherited data's saving.

Now, let's go over the steps again.

image

Response message in the light blue balloon: Start.Response is an object that will be deleted when the process is finished.

Since we want to use the response message (Start.Response) that contains the weather information as the message to be sent to the next [Business Operation for DB Update], we have to implement the context object in a way that all the property values of the response message (Start.Response) can be assigned to it.

Then what is the setting for the context property?

The properties are defined in "Context Properties" in the Context tab of the Business Process Editor.

In this case, we would like to save all the properties of the response message (Start.Response) to the context object. Therefore, the property type specification is set to Start.Response.

image

Following that, check the settings in the activity.

image

The request and response messages have a button called ○○ Builder.

Clicking on this button will launch a line-drawing editor that allows you to specify what you want to register in the properties of each message.

image

After this, the business operation for requesting a database update (Start.SQLInsertOperation or Start.InsertOperation) is called in the same way with the activity, and you are all set.

(For more information, see Configuring for Business Processes).

Once you have completed the verification, you can test it. The testing method is the same as the one used for testing business operations (see this article).

The trace after the test is as follows:

image

Since the business process is the coordinator, we could see that it invoked the defined components sequentially, keeping the synchronous execution.

Note 1: The sample only deals with the call activity, but various other activities such as data transformation.

Note 2: Business processes created by ObjectScript alone, other than the Business Process Editor, inherit from the Ens.BusinessProcess class. If it is created in the Business Process Editor, it inherits from the Ens.BusinessProcessBPL class.

The business process is the coordinator of the system integration process.
The Business Process Editor provides the following types of variables for messages (request/response/callrequest/callreponse/context).
A business process created with the Business Process Editor can work in a way that does not delay other messages, even if there is synchronization in the component's calling.

In the next section, we will finally show you how to develop the last component: business services.

0
0 575
Article Mihoko Iijima · Mar 5, 2021 9m read

This article is a continuation of this post.

In the previous article, we discussed the development of business processes, which are part of the components required for system integration and serve as a production coordinator.

This article will discuss creating a business service, which is the information input window for production.

And finally, the last component of “Let's Use Interoperability!”

The business service provides a window of input for information sent from outside IRIS, with or without using the adapter for external I/F.

There are three types of business services in the sample (links in parentheses are links to the sample code):

  1. Business services for files using inbound adaptersStart.FileBS
  2. Business services for Web services using the SOAP inbound adapterStart.WS.WebServiceBS
  3. Business service called by stored procedure or REST without using an adapterStart.NonAdapterBS

Different connection methods used for inputting information will only increase the number of business services; however, the processing done within a business service is

Create a request message to be sent
using externally inputted information and
simply call the business component

It's effortless.

Now, let's outline how to create components that use file-inbound adapters.

Business services are written in scripts, which can be created in VSCode or Studio (see this article on using VSCode).

1. Business services for files using inbound adapters(Start.FileBS

If you create a class in VSCode, you should create a class that inherits from Ens.BusinessService. As for adapters, you can use the ADAPTER parameter as ADAPTER class name (e.g., specify a file-inbound adapter class).
If you do not use the adapter, no configuration is required.

Class Start.FileBS Extends Ens.BusinessService
{
Parameter ADAPTER = "EnsLib.File.InboundAdapter";

In the file-inbound adapter, you can specify the directory to be monitored in Settings→File Path for the production's business service.

image

If the file located in the "File Path" matches the information specified in the "File Spec," it opens the file as a stream object. It defines it as the first variable when calling the business service ProcessInput().

When ProcessInput() is started, OnProcessInput() is automatically called. OnProcessInput() is passed directly to OnProcessInput() with the parameters passed to ProcessInput().

image

In OnProcessInput() the initial statement gets the information from the file stream object, which is passed as the first parameter, then creates a message to be given to the next component, writes the process of calling the next component, and completes the basic logic.


【Memo】
For Studio, launch the Business Services Wizard in the New Creation menu, select the adapter and press the Finish button.


The OnProcessInput() method definition is as follows:

Method OnProcessInput(pInput As %Stream.Object, Output pOutput As %RegisteredObject) As %Status

pInput is provided with an instance of the %Stream.FileCharacter class for text files or the %Stream.FileBinary class for binary files.

In the sample, a file in text format will be inputted, and we have written it to accept multi-line requests and one request per line.

AtEnd property is set to 1 when EndOfFile is deteced. You can use this property to stop loop.

In a loop, we read the lines using the ReadLine() method, which enables us to obtain information about the contents of the file one line at a time (see the documentation for file adapter details).

Compose the message, retrieving information line by line. Then, we execute the ..SendRequestAsync() method, which calls the other components.

When executing the method, the first parameter should be the name of the component you want to call as a string, and the second parameter should be the request message you have created.

Note that the ..SendRequestAsync() is an asynchronous call and does not wait for a response.

Memo:There is also SendRequestSync() for synchronous calls.。

The sample code is as follows:

image

Reference:explanation of the usage of the $piece() function in the above example text

$piece(“string”, ”delimiter mark”, ”position number”)

The function to set/get a string with a delimiter, in the sample, to get the first and second value of comma-separated data, is written with the following syntax:

set request.Product=$piece(record,",",1)
set request.Area=$piece(record,",",2)

Now, let's check the function of Start.FileBS as it appeared in the above description.

In the sample production, the "File Path" was set to /irisdev/src, and the "File Spec" was set to check.txt. Either prepare the same directory or change it to a different directory and register the sample data in the check.txt file using the following format: purchased product name, name of the city.

※If you are using the sample container, please rename [Test-check.txt] in the src directory under the directory created by the git clone.

image

image

2. Business services for Web services using the SOAP inbound adapter (Start.WS.WebServiceBS

Next, we will outline the creation of business services for Web services.

The Business Service Class for Web Services acts as a Web Service Provider = Web Service Server.

In the sample, we have two parameters in the Web service method for this sample production to have information sent from the Web service client. The web method uses the data entered in the parameters to create a message class and call other components.

image

When you define a Web service class, a test screen is created. However, it is not shown by default.

Log in to IRIS (or start a terminal), go to the namespace where the production is located and do the following:

For your reference:Access to the Catalog and Test Pages

Here is a sample code configuration in the setting where the container was started with docker-compose up -d (run in the %SYS namespace)

set $namespace="%SYS"
set ^SYS("Security","CSP","AllowClass","/csp/user/","%SOAP.WebServiceInfo")=1
set ^SYS("Security","CSP","AllowClass","/csp/user/","%SOAP.WebServiceInvoke")=1


【Attention】Please note that the sentence is case-sensitive and should be written with care. Also, depending on the namespace in which the product is used, the specified script changes. The example sentence is written on the assumption that the sample is imported into the USER namespace.
If you import the sample code into the ABC namespace, the fourth subscript should be "/csp/abc/."

Once the configuration is complete, go to the following URL:

http://localhost:52773/csp/user/Start.WS.WebServiceBS.cls

image

If you want to provide the WSDL to your Web services client, specify WSDL=1 at the end of the following URL

http://localhost:52773/csp/user/Start.WS.WebServiceBS.cls?WSDL

3. Business services called by stored procedures or REST without using adapters(Start.NonAdapterBS

Next, we will introduce the Business Service without adapters (Start.NonAdapterBS).

image

For business services that use adapters, the adapter calls the business service's ProcessInput() method to detect the information.

If you don't use adapters, you can still call the ProcessInput() method, but this method is not public. Therefore, if you implement a business service that does not use adapters, you will need to consider ProcessInput().

The sample utilizes the following two methods:

Now, here's an example of a stored procedure.

image

After adding a business service (Start.NonAdapterBS) that does not use adapters to the production (state added in the sample), run the following stored procedure

call Start.Utils_CallProduction('piroshki','Russia')

image

A resulting trace of the running result is as follows:

image

Next, here is an example of creating a dispatch class for REST:

image

The XML described in the XData Url Map defines which methods are called in response to the URL at the time of the REST call.
The example describes a definition that calls the WeatherCheck() method when the URL of the /weather/first parameter (purchased product name)/ second parameter (name of the city) are provided in the GET request.

<Route Url="/weather/:product/:arecode" Method="GET" Call="WeatherCheck"/>

Then, define the base URL for the above URL in the Management Portal's Web Application Path Settings screen, and it is complete.

See this article for more details on the configuration.

Once it is ready, try to run the information using a business service that allows you to send the REST information.

Example)http://localhost:52773/start/weather/Takoyaki/Osaka

image

image

If you do not use an adapter, as ProcessInput() cannot be called directly from outside, we have created an object for the business service in the logic executed through REST or stored procedures (using the CreateBusinessService() method of the Ens.Director class) and called ProcessInput()

If you use an adapter, the adapter detects the input and stores the information in a unique object and passes it to the business service. In contrast, if you don't use an adapter, the rest is pretty much the same, only the difference is in the above-mentioned part of the process.

The business service is simply designed to use the information entered outside IRIS to create request messages and call business components.

Throughout the sample production, we were able to see the following:

Different components play different roles in making a production run (business services, business processes, business operations).

To transmit information between components, use the message.

Messages are stored in the database unless deleted and thus can be traced at any time.

Some adapters simplify the process of around the connection.

These are the basic operations on how to use Interoperability in IRIS.

There are also record maps (see: FAQ TOPIC) and data conversion tools that are useful for input and output of CSV files and other format-specific files.

As well as this series, there is also an article on simple IoT applications developed with InterSystems IRIS using Interoperability. Please check it out.

Besides, IRIS for Health also supports FHIR and HL7 (including SS-MIX2) transmissions.

I would be pleased to explain it in another post. If you have something of interest to share, please leave a comment!

Finally, training courses are also available to learn how to use Interoperability.

If you'd like to take the time to try it out with an instructor, please consider joining one of our training courses!

0
0 751
Question Sreeram Makam · Oct 8, 2019

Hi All, I am a Data Architect and am trying a method of deploying alter statements onto Cache DB.

My Data Modeling tool generates alters as this.. So question is if the Cache has a way to rename table? If so what is it?

ALTER TABLE <SchemaName>.GROUP_TYPE_NODES RENAME TO GROUP_TYPE_10082019140110000
;

This is giving error.

SQL Error [25] [37000]: [SQLCODE: <-25>:<Input encountered after end of query>]
[Location: <Prepare>]
[%msg: < Input (IDENTIFIER) encountered after end of query^ALTER TABLE xxx.GROUP_TYPE_NODES RENAME>]
 

4
0 824
Article Alex Kogan · Nov 15, 2020 11m read

Hello all,

               I would like to share the Foreign Key setup I recently used for my project and found it is very useful.  When asking around, I realized that there are some developers out there, who would like more information on explicit foreign key setup, so I would like to briefly discuss explicit foreign key setup and give a quick sample on how to set it up

3
1 817
Discussion Dmitry Maslennikov · Nov 9, 2020

Let's imagine you have to implement a method with a definition

/// Set value to %session.Data
ClassMethod setValue(params...) As %Status
{
}

How it should work

do ..setValue("key1", "val")

is equal to

set %session.Data("key1") = "val"

and 

do ..setValue("key1", "key2", "key3", "key4", "val")

is equal to 

set %session.Data("key1", "key2", "key3", "key4") = "val"

so, quite simple, any amount of arguments, while the latest one is a value, and any previous is an index, should accept at least 2 arguments.

How would you implement this method?

15
0 330
Question Fanny Van · May 16, 2018

Hey everyone, 

Here's my issue, I would like to develop a web application which use and send datas to TrakCare app, but I really don't know how to communicate with TrakCare's datas. 

With a little research, I think I could use "RESTForms" or "EnsembleWorkFlow" but I don't really get how...
Can somebody help me and tell me the way forward ?

3
0 634
Question Luiz Henrique Carvalho Martarelli · Jul 24, 2020

Hello people!

I am Brazilian and I am starting to work with the latest version of CACHE, and I would like to know where I can see an example of a TRIGGER, I would like to validate the fields before writing the actual data in the database.

in advance, thank you very much! and sorry for any mistake in concordance in english

7
0 724
Question Eduard Lebedyuk · Jul 6, 2018

Let's say I have this simple script  file try.script

write 1
write 0

I can execute it in a terminal (csession) by calling:

csession cache < try.script

And I get the following output:

%SYS>
1
%SYS>
0

However I want to use a try catch block in my script:

try {
write 1/0
catch {}
halt

But as script is executed line by line, it's interpreted like this:

%SYS>
TRY {
      ^
<SYNTAX>
%SYS>

WRITE 1/0
^
<DIVIDE>
%SYS>

CATCH {}
^
<SYNTAX>
%SYS>

I know that I can write it all in 1 line, but I'd rather not do that. Is there a way to feed multiline statement into Cache?

8
0 1331
Article Sergey Mikhailenko · Jun 2, 2020 8m read

When you first start working with InterSystems IRIS, it’s a common practice to install a system with only a minimum level of security. You have to enter passwords fewer times and this makes it easier to work with development services and web applications when you're first getting acquainted. And, sometimes, minimal security is more convenient for deploying a developed project or solution. And yet there comes a moment when you need to move your project out of development, into an Internet environment that’s very likely hostile, and it needs to be tested with the maximum security settings (that is, completely locked down) before being deployed to production. And that’s what we’ll discuss in this article. For more complete coverage of DBMS security issues in InterSystems Caché, Ensemble, and IRIS, you may want to read my other article, Recommendations on installing the InterSystems Caché DBMS for a production environment. The security system in InterSystems IRIS is based on the concept of applying different security settings for different categories: users, roles, services, resources, privileges, and applications. Users can be assigned roles. Users and roles can have privileges on resources — databases, services, and applications — with varying read, write, and use rights. Users and roles can also have SQL privileges on the SQL tables located in databases.

How Security Levels Differ

When installing InterSystems IRIS, you can choose the security level: Minimal, Normal, or Locked Down. The levels differ in the degree of user engagement, the available roles and services, and in the configuration of authentication methods for services and applications. For more information, read the Preparing for InterSystems Security section of the Preparing to Install InterSystems IRIS guide.
In the documentation you’ll find the tables shown below, which show the security settings for each level. You can change the settings in the system management portal interface.

Initial User Security Settings

Security SettingMinimalNormalLocked Down
Password Pattern3.32ANP3.32ANP8.32ANP
Inactive Limit090 days90 days
Enable _SYSTEM UserYesYesNo
Roles assigned to UnknownUser%AllNoneNone

Initial Service Properties

Service PropertyMinimalNormalLocked Down
Use Permission is PublicYesYesNo
Requires AuthenticationNoYesYes
Enabled ServicesMostSomeFewest

Initial Enabled Settings for Services

ServiceMinimalNormalLocked Down
%Service_BindingsEnabledEnabledDisabled
*%Service_CSPEnabledEnabledEnabled
%Service_CacheDirectEnabledDisabledDisabled
%Service_CallInEnabledDisabledDisabled
%Service_ComPortDisabledDisabledDisabled
%Service_ConsoleEnabledEnabledEnabled
%Service_ECPDisabledDisabledDisabled
%Service_MSMActivateDisabledDisabledDisabled
%Service_MonitorDisabledDisabledDisabled
%Service_ShadowDisabledDisabledDisabled
%Service_TelnetDisabledDisabledDisabled
%Service_TerminalEnabledEnabledEnabled
%Service_WebLinkDisabledDisabledDisabled

*For InterSystems IRIS, %Service_CSP applies %Service_WebGateway. The services used are slightly different for different operating systems.

How You Can Improve Security

For each enabled service, you need to choose the appropriate authentication methods: unauthenticated, password, Kerberos, or delegated. You also need to disable web applications that aren’t used in the system. And for web applications that are enabled, you need to select the correct authentication method: authenticated, password, Kerberos, delegated, login, or cookie. Of course, the administrator chooses the security settings for each project and solution so the project can function according to the customer's requirements. And this is always a balance between keeping the system convenient enough that users can actually get their work done, while also secure enough to keep intruders at bay. As you know, the most secure system is a disabled system. If you encounter a need to manually increase the security level of your system more than once, this is a sure sign you need to write a software module to solve these problems. In fact, InterSystems Open Exchange has a lockdown program that can help you improve security. You’ll find the source code for the program in the repository on the InterSystems isc-apptools-lockdown page. Here’s what the LockDown program does.

First, it changes passwords for preinstalled users:

  • Admin,
  • CSPSystem,
  • IAM,
  • SuperUser,
  • UnknownUser,
  • _Ensemble,
  • _SYSTEM.

Second, it disables all services except:

  • %%service_web gateway
  • %service_console
  • %service_login
  • %service_terminal

Next, it sets password protection for all web applications, including:

  • /csp/ensdemo
  • /csp/samples
  • /csp/user
  • /isc/studio/usertemplates
  • /csp/docbook
  • /csp/documatic
  • /isc/studio/rules
  • /isc/studio/templates

Finally, it sets system-wide security parameters including:

  • Password complexity "8.32 ANP"
  • Limit on user inactivity of 90 days
  • Audit and all security-relevant events You can install the LockDown program on your system by downloading LockDown.cls from GitHub. Then, in terminal mode, enter the following:
USER>zn “%SYS”
%SYS>do $system.OBJ.Load("/home/irisusr/LockDown.cls","ck")

Or you can install it using the ZPM batch manager from the public register with the following commands:

USER>zn “%SYS”
%SYS> zpm “install isc-apptools-lockdown”

Performing a Lockdown

Before executing a lockdown, it’s strongly recommended that you perform a backup. The LockDown program must be executed from the %SYS area. If you don't want to change the password for all preinstalled users, leave the first parameter empty. If you want to keep the ability to edit programs and classes using IRIS Studio, Atelier, or VSCode, don’t disable the %Service_Bindings service. To ensure this works, the bindings argument must be set to 1. Here’s an example: do ##class(App.Security.LockDown).Apply("New Password 123",.msg,1) This module also contains a function that’s useful if the system password is compromised and you need a replacement for all preinstalled accounts without performing a lockdown. You can run it as follows: do ##class(App.Security.LockDown).Change Password("New Password 123", "Admin,CSPSystem,IAM,SuperUser,Unknown User, _Ensemble,_SYSTEM") Most likely, after performing the lockdown, your application or project will stop working. To fix it, you’ll need to restore some security settings to their original state. This can be done either via the management portal interface (security section) or programmatically.

Changing Your Security Settings After Lockdown

After lockdown, if your web applications used authentication methods other than passwords, you’ll need to enable them. I suggest running the software module zpm-registry-test-deployment, which has an example of using LockDown for the ZPM-registry project. The code that follows is applied at the end of the installation. The project was installed on IRIS with a minimal level of security. Here’s what the code had to do:

  • Change passwords for all preinstalled users.
  • Disable all services not used by this project.
  • Enable password protection for all applications on the system, except web applications /registry (which allows unauthorized users to get a list of packages in the registry).
  • Create a new user with privileges to publish new packages in the registry. This user must have write rights to the project tables in the IRISAPP database.

Create a new user:

set tSC= ##class(App.Security.LockDown).CreateUser(pUsername, "%DB_"_Namespace, pPassword, "ZMP registry user",Namespace)
If $$$ISERR(tSC) quit tSC
write !,"Create user "_pUsername

Add privileges for a new and unauthorized user:

set tSC=##class(App.Security.LockDown).addSQLPrivilege(Namespace, "1,ZPM.Package", "s", "UnknownUser")
set tSC=##class(App.Security.LockDown).addSQLPrivilege(Namespace, "1,ZPM.Package", "s", pUsername)
set tSC=##class(App.Security.LockDown).addSQLPrivilege(Namespace, "1,ZPM.Package_dependencies", "s", pUsername)
set tSC=##class(App.Security.LockDown).addSQLPrivilege(Namespace, "1,ZPM_Analytics.Event", "s", pUsername)
set tSC=##class(App.Security.LockDown).addSQLPrivilege(Namespace, "9,ZPM.Package_Extent", "e", pUsername)
set tSC=##class(App.Security.LockDown).addSQLPrivilege(Namespace, "9,ZPM_Analytics.Event_Extent", "e", pUsername)
If $$$ISERR(tSC) quit tSC
write  !,"Add privileges "

Run the LockDown program:

set tSC= ##class(App.Security.LockDown).Apply(NewPassSys)
If $$$ISERR(tSC) quit tSC

Change the settings for the web app so that an unknown user can log in:
set prop("AutheEnabled")=96
set tSC=##class(Security.Applications).Modify("/registry",.prop)
If $$$ISERR(tSC) quit tSC
write !,"Modify /registry "

Change the settings for the %service_terminal service, changing the authorization method to Operating System, Password:
set name="%service_terminal"
set prop("Enabled")=1
set prop("AutheEnabled")=48 ; Operating System,Password
set tSC=##class(Security.Services).Modify(name,.prop)
If $$$ISERR(tSC) quit tSC
write !,"Modify service terminal"

Wrapping Up

In this article, I discussed why you might want to increase the security level of your system and how you’d do this programmatically, and I showed an example using the InterSystems LockDown program. We used a method in which we first closed down everything in the system (that is, we set the maximum security level). We then moderated the security by opening the services and applications necessary for the project to function, but only those. I'm sure there are other ways and best practices, and I’d love to hear about them as part of the discussion of this article by the community.

2
3 1139
Article Renato Banzai · Jun 1, 2020 4m read

Making a Chart using Intersystems IRIS + Python

How to use the IRIS Native API in Python to access globals and plot some charts.

Why Python?

With a large adoption and use in the world, Python have a great community and a lot of accelerators | libraries to deploy any kind of application. If you are curious (https://www.python.org/about/apps/)

Why COVID-19 Data

As the pandemy evolves in the world a lot of information are being spreaded so I decided to create an application to audit those information. Unfortunately each country has a different test policy so I decided to use the death data to avoid the cases subnotifications.

Chart options:

  • Linear: Using linear y axis
  • Log: Using a logathmic y axis as the infection grows exponentially
  • Days after the first death: Align all 1st deaths country in the same time series
  • Real Timeline: With the real date of each report
  • Rate: Consider the population of the country
  • Total Deaths: Consider just the number of deaths

The Chart Application

picture

Demo - Try it yourself

I have deployed the application as a demo here: (http://iris-python-suite.eastus.cloudapp.azure.com/covid19-chart)

Take a look the code

Clone my repository to see all the code implementation.

git clone https://github.com/renatobanzai/iris-python-covid19.git

What did I use in Python

In this application environment I use Python 3.7 with these modules.

  • PyYAML==5.3.1
  • dash==1.12.0
  • plotly==4.7.1
  • irisnative-1.0.0-cp34-abi3-linux_x86_64.whl

Project Structure

This project has a simple structure to be easy to understand. On the main folder we have 3 most important subfolders:

  • ./app: with all the application code and installing configuration.
  • ./iris: with the InterSystems IRIS dockerfile preparing to serve the application.
  • ./data: with the files from Johns Hopkins University to ingest and a YAML to change configuration outside the container environment by a volume

Application Structure

Now inside the ./app directory we can see some files:

  • __main__.py : with the implementation of the web application
  • iriscovid19.py : a class performing all data interaction

Database Structure

This application uses Intersystems IRIS as a repository, the globals used are:

-^config : with some config data -^raw.covid19 : where the raw data (Source of Data) are ingested -^countrydetails : to get the population of each country -^end.date.deaths : to serve the chart requisitions and here is the goal, Its fast! -^end.timeless.deaths : to server another kind of chart requisition

What the python code does?

The python get the csv files from ../data folder and ingest into the globals ^raw.covid19, ^countrydetails. After this perform a data prep using the globals and generating a ready to use data to plot the charts. After this a web app goes up to you interact with the graph as you desire.

How to perform joins between globals?

The paradigm in this case is quite different from the SQL Patterns. To perform joins, I ingested the data in a format that can be used as a index to merge the globals. e.g:

#{country_index} is only an example

^raw.covid19("countries","{country_index}","deaths")
^countrydetails("{country_index}","population")

If for some reason you need to use the population of a country its prepared to get with one .get() method.

Running the application by yourself

Prerequisites

  • git
  • docker and docker-compose
  • acess to a terminal in your environment

Steps

With docker-compose you can easily up one environment with all the pieces and configurations go to the iris-python-covid19 folder and type this:

$ docker compose up

Estimated time to up containers

1st time running will depend of your internet link to download the images and dependencies. If it last more than 15 minutes probably something goes wrong feel free to communicate here. After the 1st time running the next ones will perform better and take less then 2 minutes.

If is everything ok

After a while you can open your browser and go to the address:

http://localhost:8050

Main Menu

The project has a main menu that points you to the functionalities:

  • COVID-19 Chart Example "/covid19-chart": A interactive chart using globals + Python
  • Global CRUD Example "/config-CRUD": A demonstration of a Globals CRUD
  • Reset Data (Dont Panic!) "/reset-data": If you want to re-perform the start-up applications process

You should look at IRIS Admin Portal

I'm using for now the USER namespace

http://localhost:9092
user: _SYSTEM
pass: theansweris42

Demo

I deployed this application on (http://iris-python-suite.eastus.cloudapp.azure.com/covid19-chart)http://iris-python-suite.eastus.cloudapp.azure.com/covid19-chart

If this article help you or you like the content vote:

This application is at the current contest on open exchange, you can vote in my application iris-python-suite here(https://openexchange.intersystems.com/contest/current)

1
0 500
Article Eduard Lebedyuk · Jul 16, 2019 4m read

When I describe InterSystems IRIS to more technically-minded people, I always start with how it is a multimodel DBMS at its core.

In my opinion that is its main advantage (on the DBMS side). And the data is stored only once. You just choose the access API you want to use.

  • You want some sort of summary for your data? Use SQL!
  • Do you want to work extensively with one record? Use objects!
  • Want to access or set one value and you know the key? Use globals!

On first blush it's a nice story - short and concise and it gets the message across, but when people really start working with InterSystems IRIS the questions start. How are classes and tables and globals related? What are they to each other? How's the data really stored?

In this article I would try to answer these questions and explain what's really going on.

Part one. Model bias.

People working with data are often biased towards the model they work with.

Developers think in objects. For them databases and tables are boxes you interact with via CRUD (Create-Read-Update-Delete, preferably over ORM) but the underlying conceptual model is objects (of course it's mainly true for developers in object-oriented languages - so most of us).

On the other hand, as a consequence of spending so much time in relational DBMSes, DBAs often think of data as tables. Objects are just wrappers over rows in this case.

And with InterSystems IRIS, a persistent class is also a table, which stores data in global, so some clarification is required.

Part two. An example.

Let's say you created class Point:

Class try.Point Extends %Persistent [DDLAllowed]
{
    Property X;
    Property Y;
}

You can also create the same class with DDL/SQL:

CREATE Table try.Point (
    X VARCHAR(50),
    Y VARCHAR(50))

After compilation, our new class would have auto-generated a storage structure which maps data that is natively stored in globals to columns (or properties if you're an object-oriented thinker):

Storage Default
{
<Data name="PointDefaultData">
    <Value name="1">
        <Value>%%CLASSNAME</Value>
    </Value>
    <Value name="2">
        <Value>X</Value>
    </Value>
    <Value name="3">
        <Value>Y</Value>
    </Value>
</Data>
<DataLocation>^try.PointD</DataLocation>
<DefaultData>PointDefaultData</DefaultData>
<IdLocation>^try.PointD</IdLocation>
<IndexLocation>^try.PointI</IndexLocation>
<StreamLocation>^try.PointS</StreamLocation>
<Type>%Library.CacheStorage</Type>
}

What is going on here?

From the bottom-up (bold words are important, ignore the rest):

  • Type: generated storage type, in our case the default storage for persistent objects
  • StreamLocation - global where we store streams
  • IndexLocation - global for indices
  • IdLocation - global where we store ID autoincremental counter
  • DefaultData - storage XML element which maps global value to columns/properties
  • DataLocation - global in which to store data

Now our "DefaultData" is PointDefaultData so let's look closer at its structure. Essentially it says that global node has this structure:

  • 1 - %%CLASSNAME
  • 2 - X
  • 3 - Y

So we might expect our global to look like this:

^try.PointD(id) = %%CLASSNAME, X, Y

But if we output our global it would be empty because we didn't add any data:

zw ^try.PointD

Let's add one object:

set p = ##class(try.Point).%New()
set p.X = 1
set p.Y = 2
write p.%Save()

And here's our global

zw ^try.PointD
^try.PointD=1
^try.PointD(1)=$lb("",1,2)

As you see our expected structure %%CLASSNAME, X, Y is set with $lb("",1,2) which corresponds to X and Y properties of our object (%%CLASSNAME is system property, ignore it).

We can also add a row via SQL:

INSERT INTO try.Point (X, Y) VALUES (3,4)

Now our global looks like this:

zw ^try.PointD
^try.PointD=2
^try.PointD(1)=$lb("",1,2)
^try.PointD(2)=$lb("",3,4)

So the data we add via objects or SQL are stored in globals according to storage definitions (side note: you can manually modify the storage definition by replacing X and Y in PointDefaultData - check what happens to the new data!).

Now, what happens when we want to execute a SQL query?

SELECT * FROM try.Point

It is translated into ObjectScript code that iterates over the ^try.PointD global and populates columns based on the storage definition - the PointDefaultData part of it precisely.

Now for modifications. Let's delete all the data from the table:

DELETE FROM try.Point

And let's see our global at this point:

zw ^try.PointD
^try.PointD=2

Note that only ID counter is left, so new object/row would have an ID=3. Also our class and table continue to exist.

But what happens when we run:

DROP TABLE try.Point

It would destroy the table, the class, and delete the global.

zw ^try.PointD

If you followed this example, I hope you now have a better understanding of how globals, classes and tables integrate and complement each other. Using the right API for the job at hand results in faster, more agile, less buggy development.

1
5 1626
Question Michael Davidovich · Apr 1, 2019

Currently, when we want to write data to a file that will be viewed in Excel, we parse the data in tab deliminated format to the file and name it with .xls at the end.  That is sent to end users via email.  They get a warning that the data is not formatted properly (it's not really an Excel file after all) but it does display somewhat correctly as the tabs are understood (this does not work if we deliminated with commas however).

28
3 4153
Question Scott Roth · Jan 23, 2020

Ok so I am way outside of my comfort zone, and had to build an application using CSP to give users the ability to access SQL configuration tables. These SQL Configuration tables will affect the data that is sent to the downstream system. 

I saw in the examples where we were able to import GIF's/IMAGES into the CSP folders to use as a reference in our CSP pages. My question is how do you do that? If I try to import through studio, it tells me the file is invalid.

Just trying to make it a little more user friendly then blocks on a page.

We are currently using Health Share 2018.1.3

Thanks

Scott

1
0 1033
Question Ilmija Asani · Jan 16, 2020

Hello community,

I'm new to Objectscript and Intersystems development. I've read documentation and some examples and succeded to import my Java class  file into HealthShare using the Java Gateway Service. To import my class i tryed both methods (Wizard, or scripting) with success.

Everything works great, i see my imported class inside the namespace, and i can call the methods.

6
0 600
Question Eduard Lebedyuk · Jan 15, 2020

How do I rename class programmatically?

This discussion touches on data move which, is not a concern in my case (BPL renames).

I also don't care about external references.

The best I got is:

  1. Get class text as string
  2. Replace class name in this string
  3. Save new string as new class
  4. Open new class as object
  5. Delete storage
  6. Compile class

Are there any better alternatives?

Also found this discussion.

5
1 606
Article Eduard Lebedyuk · Jan 13, 2020 1m read

While and for are pretty similar, but sometimes you need to do a not recommended thing - change cycle boundaries.

In this situation while and for are different. For calculates boundaries once per run and while calculates boundaries on every iteration.

Consider this code sample:

set x = 5
for i=1:1:x {
     write "i: ", i,", x: ", x,!
     set x = x+1
}

You'll get this output:

i: 1, x: 5
i: 2, x: 6
i: 3, x: 7
i: 4, x: 8
i: 5, x: 9

Compare to while cycle:

set i = 1
set x = 5
while (i<=x) {
    write "i: ", i,", x: ", x,!
    set x = x+1
    set i = i+1
}

The output is infinite:

7
0 491
Article Patrick Jamieson · Apr 22, 2019 8m read

Launching IRIS Using Docker

This brief document will walk through the steps to launch IRIS community edition using Docker on the MAC. For those new to Docker, the first two pages explain how to install Docker, and run some basic commands that will be needed to get the IRIS community edition running. Experienced Docker users can skip directly to page three.

3
4 2486
Discussion Evgeny Shvarov · Aug 31, 2019

Hi Developers!

Often we need to use relatively small arrays with constants, static arrays in algorithms, etc where we need to do something with each element of an array. There are several ways to deal with it in ObjectSctipt. 

Previously I used to use globals, locals, PPG for this but not so long time ago figured out that %List is a way too handy.

Indeed, suppose we have an array of months and need to set up and use it in our code.

15
1 690
Question Jess Farmer · Mar 6, 2019

I am under the impression that inside HealthShare you can Services, Processes, and Operations. The service takes incoming data, the processes can process that data, and then the operations can send that data out.

I am curious if anyone has any experience, guides, or advice on how I can send data to a service using a Java application. I intend for the data to be in XML format. I am also curious if I succeed at picking up the data in the service, how I send the data back to the Java application using an Operation.

As of now I am attempting to get this to work on a local environment.

2
0 382
Article Eduard Lebedyuk · Dec 9, 2019 1m read

If you work with anything other than English, you would earlier or later encounter the characters from the title or just plain ??????????.

Encodings are usually known, but sometimes you just get gibberish and need to make sense of it.

In this cases $zcvt is your friend, the three argument form specifically.

But there are a lot of options. So here's an utility script to check how the text would look like in different encodings:

4
0 447