Is Terminal access to the InterSystems IRIS Experience sandbox available?
Cache for Windows (x86-64) 2015.1 (Build 429U) Fri Feb 13 2015 14:37:23 EST [HealthShare Modules:Core:12.07.3703 + Linkage Engine:13.04.3703]
Use case: Search an LDAP database from Caché over TLS using Mutual Authentication.
Extract from the %SYS.LDAP documentation:
Is there a Studio Inspector equivalent in Atelier?
A quick start guide to connect Ensemble to RabbitMQ using the RabbitMQ Java Client, a Java proxy class and the Ensemble Java Gateway.
Word and PDF documentation, source code and utilities available at https://github.com/toncat/ensemble2rabbitmq.
#Software Versions Server
- Windows Server 2012 R2 x64
- Erlang OTP 19.1
- RabbitMQ Server 3.6.5
- RabbitMQ Java Client 3.6.5
Client
- Windows Server 2012 R2 x64
- Java JDK SE 8u111
- RabbitMQ Java Client 3.6.5
- Ensemble 2016.2.0.736.0
#RabbitMQ
##Install Server http://www.rabbitmq.com/install-windows.html
Download and run the Erlang Windows Binary File
Download and install the RabbitMQ Server
Open port 5672 on server firewall
5672 is the default non-SSL port the RabbitMQ server listens for AMQP connections.
If not already configured during the RabbitMQ Server installation then open the Windows Firewall with Advanced Security management console:
Control Panel > Administrative Tools > Windows Firewall with Advanced SecurityAdd a new Port Inbound Rule:
- Protocol = TCP
- Port = 5672
And any other ports required for this installation.
##Install Client Install client on both the server hosting the RabbitMQ Server and a machine acting as a remote client.
Download and install the Java JDK
Set and check JAVA_HOME
System > Advanced system settings > Environment Variables…
JAVA_HOME = C:\Program Files\Java\jdk1.8.0_111
C:\>echo %JAVA_HOME%
C:\Program Files\Java\jdk1.8.0_111
Add the JDK bin folder to the system PATH
System > Advanced system settings > Environment Variables…
Path = %SystemRoot%;...;C:\Program Files\Java\jdk1.8.0_111\bin
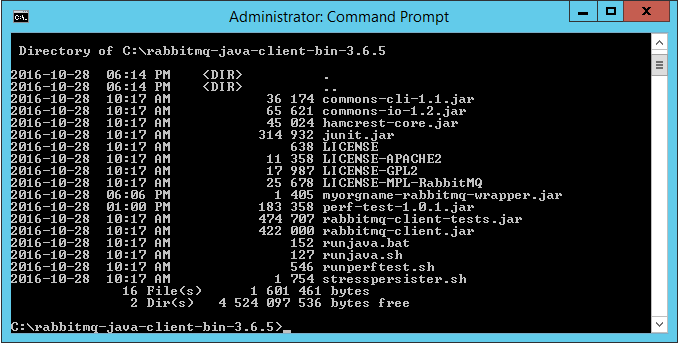
Download, unzip and copy the RabbitMQ Java Client files to a folder
C:\rabbitmq-java-client-bin-3.6.5\commons-cli-1.1.jar
C:\rabbitmq-java-client-bin-3.6.5\commons-io-1.2.jar
C:\rabbitmq-java-client-bin-3.6.5\junit.jar
…
C:\rabbitmq-java-client-bin-3.6.5\stresspersister.sh
##RPC local quick test Local to RabbitMQ Server to facilitate confidence testing.
Defaults
- host name = ”amqp://localhost”
- user name = ”guest”
- Password = ”guest”
- port number = 5672
- Vhost = “/”
Download RabbitMQ Performance Testing Tool jar filehttp://central.maven.org/maven2/com/rabbitmq/perf-test/1.0.1/perf-test-1.0.1.jar
Copy the jar file to the RabbitMQ Java Client folder
C:\rabbitmq-java-client-bin-3.6.5\perf-test-1.0.1.jar
More details available at:
https://www.rabbitmq.com/java-tools.html
https://github.com/rabbitmq/rabbitmq-perf-test
Run HelloServer example
Open a command prompt, navigate to the RabbitMQ Java client folder and execute
RabbitMQ Java client path>runjava com.rabbitmq.examples.HelloServer
Example
Windows
C:\rabbitmq-java-client-bin-3.6.5>runjava com.rabbitmq.examples.HelloServer

Unix
sh runjava.sh com.rabbitmq.examples.HelloServer
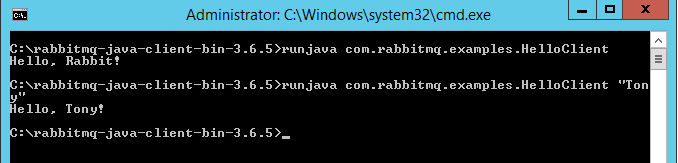
Run HelloClient example
Open a separate command prompt, navigate to the Java client folder and execute
RabbitMQ Java client path>runjava com.rabbitmq.examples.HelloClient
Example
Windows
C:\rabbitmq-java-client-bin-3.6.5>runjava com.rabbitmq.examples.HelloClient
C:\rabbitmq-java-client-bin-3.6.5>runjava com.rabbitmq.examples.HelloClient "Tony"

Unix
$ sh runjava.sh com.rabbitmq.examples.HelloClient
Hello, Rabbit!
$ sh runjava.sh com.rabbitmq.examples.HelloClient "Tony"
Hello, Tony!
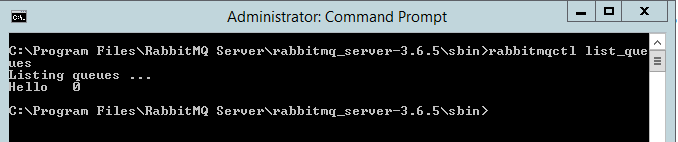
Monitor queues
Open a separate command prompt, navigate to the sbin folder in the RabbitMQ server folder and execute
RabbitMQ Server path>\sbin\rabbitmqctl list_queues
Example
Windows
C:\Program Files\RabbitMQ Server\rabbitmq_server-3.6.5\sbin>rabbitmqctl list_queues
Unix
$ ./rabbitmqctl list_queues
Listing queues ...
Hello	0
##RPC remote quick test Remote to RabbitMQ server to facilitate confidence testing across network.
Defaults
- user name = “guest”
- Password = “guest”
- port number = 5672
- Vhost = “/”
"guest" user can only connect via localhost:
https://www.rabbitmq.com/access-control.html
Run HelloServer example On the remote machine; open a command prompt, navigate to the RabbitMQ Java client folder and execute
RabbitMQ Java client path>runjava com.rabbitmq.examples.HelloServer “host”
Example
Windows
C:\rabbitmq-java-client-bin-3.6.5>runjava com.rabbitmq.examples.HelloServer "amqp://WIN-UK0KESAK7LB"
Unix
$ sh runjava.sh com.rabbitmq.examples.HelloServer
Run HelloClient example On the remote machine; open a separate command prompt, navigate to the Java client folder and execute
Java client path>runjava com.rabbitmq.examples.HelloClient “message” “host”
Example
Windows
C:\rabbitmq-java-client-bin-3.6.5>runjava com.rabbitmq.examples.HelloClient "Tony" "amqp://WIN-UK0KESAK7LB"
Unix
$ sh runjava.sh com.rabbitmq.examples.HelloClient "Tony" "amqp://WIN-UK0KESAK7LB"
Hello, Tony!
Monitor queues
On the RabbitMQ Server server; open a separate command prompt, navigate to the sbin folder in the RabbitMQ server folder and execute
RabbitMQ Server path>\sbin\rabbitmqctl list_queues
Example
Windows
C:\Program Files\RabbitMQ Server\rabbitmq_server-3.6.5\sbin>rabbitmqctl list_queues
Unix
$ ./rabbitmqctl list_queues
Listing queues ...
Hello	0
#Ensemble Object Gateway
##Create Java Object Gateway definition
Navigate to the Object Gateways page in the Management Portal
System > Configuration > Connectivity > Object Gateways
and select Create New Gateway.

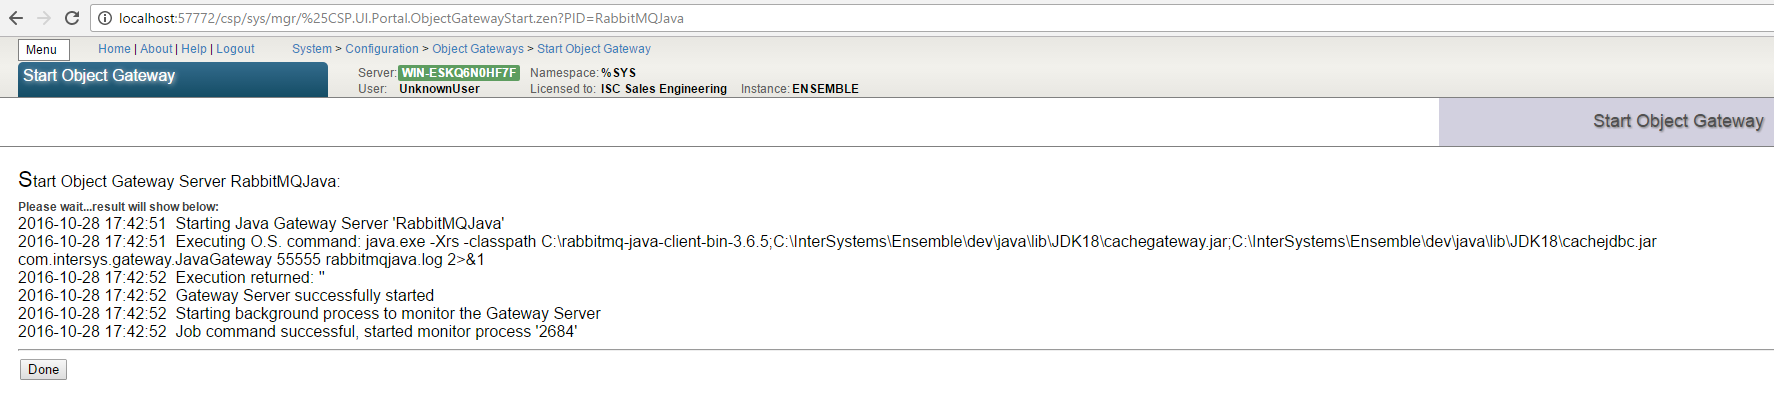
Start instance of gateway
You can start the Java Gateway server in one of the following ways
- Manually, by selecting the Start link of a previously configured gateway (see below)
- Manually, by calling the business service StartGateway method
- Manually, by entering a command at the Terminal command prompt
- Automatically, by adding a Java Gateway business service to the production
- The Java Gateway server starts when the production starts
#Proxy class
The object gateway provides a proxy class mechanism to execute, in this example, Java code, from within Ensemble.
##RabbitMQ Java wrapper class
It is usually not practical to import a complete library, so the recommendation is to create a wrapper class that provides a simplified, subset of the required functionality.
Create a Java source file
<root folder>\com\myorgname\rabbitmq\Wrapper.java
package com.myorgname.rabbitmq;

import com.rabbitmq.client.ConnectionFactory;
import com.rabbitmq.client.Connection;
import com.rabbitmq.client.Channel;
import com.rabbitmq.client.QueueingConsumer;

public class Wrapper {

  public void sendMsg(String hostName, String queueName, byte[] msg) throws Exception {
	   ConnectionFactory factory = new ConnectionFactory();
	   factory.setHost(hostName);
	   Connection connection = factory.newConnection();
	   Channel channel = connection.createChannel();
	   channel.queueDeclare(queueName, false, false, false, null);

		  channel.basicPublish("", queueName, null, msg);

		  channel.close();
		  connection.close();

  }

	public int readMsg(String hostName, String queueName, byte[] msg) throws Exception {
		ConnectionFactory factory = new ConnectionFactory();
		factory.setHost(hostName);
		Connection connection = factory.newConnection();
		Channel channel = connection.createChannel();
		channel.queueDeclare(queueName, false, false, false, null);
		QueueingConsumer consumer = new QueueingConsumer(channel);
		channel.basicConsume(queueName, true, consumer);

		QueueingConsumer.Delivery delivery = consumer.nextDelivery();
		int len = delivery.getBody().length;
		System.arraycopy(delivery.getBody(),0,msg,0,len);

		channel.close();
		connection.close();

		return len;

	}

}
Compile the wrapper class
Compile the class using for example
javac -verbose -cp C:\rabbitmq-java-client-bin-3.6.5\rabbitmq-client.jar com\myorgname\rabbitmq\Wrapper.java
Example output
C:\rabbitmq-java-proxy-3.6.5>javac -verbose -cp C:\rabbitmq-java-client-bin-3.6.
5\rabbitmq-client.jar com\myorgname\rabbitmq\Wrapper.java
[parsing started RegularFileObject[com\myorgname\rabbitmq\Wrapper.java]]
[parsing completed 30ms]
[search path for source files: C:\rabbitmq-java-client-bin-3.6.5\rabbitmq-client
.jar]
…
[loading ZipFileIndexFileObject[C:\rabbitmq-java-client-bin-3.6.5\rabbitmq-clien
t.jar(com/rabbitmq/client/AMQP$BasicProperties.class)]]
[wrote RegularFileObject[com\myorgname\rabbitmq\Wrapper.class]]
[total 631ms]
Package the class/es in a jar file
Create a jar using for example
jar cvf myorgname-rabbitmq-wrapper.jar com\myorgname\rabbitmq\Wrapper.class
Example output
C:\rabbitmq-java-proxy-3.6.5>jar cvf myorgname-rabbitmq-wrapper.jar com\myorgnam
e\rabbitmq\Wrapper.class
added manifest
adding: com/myorgname/rabbitmq/Wrapper.class(in = 1938) (out= 899)(deflated 53%)
Copy the jar file to the RabbitMQ Java Client install folder
##Ensemble proxy class ###Import the Java wrapper into Ensemble
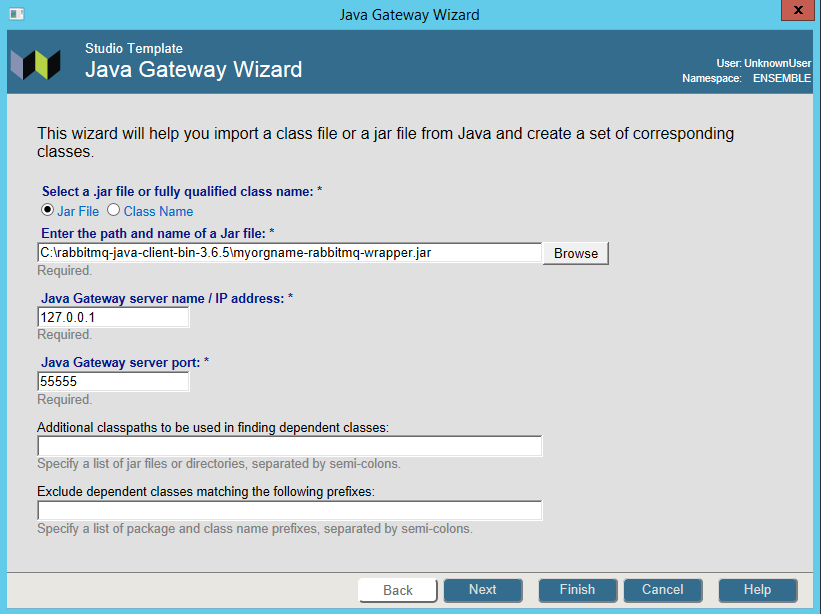
Open the Java Gateway Wizard in Studio
Tools > Add-Ins > Java Gateway Wizard
- Select Jar File and enter the path and name of the wrapper jar file
- Specify the Java Gateway server name or IP address and its port number
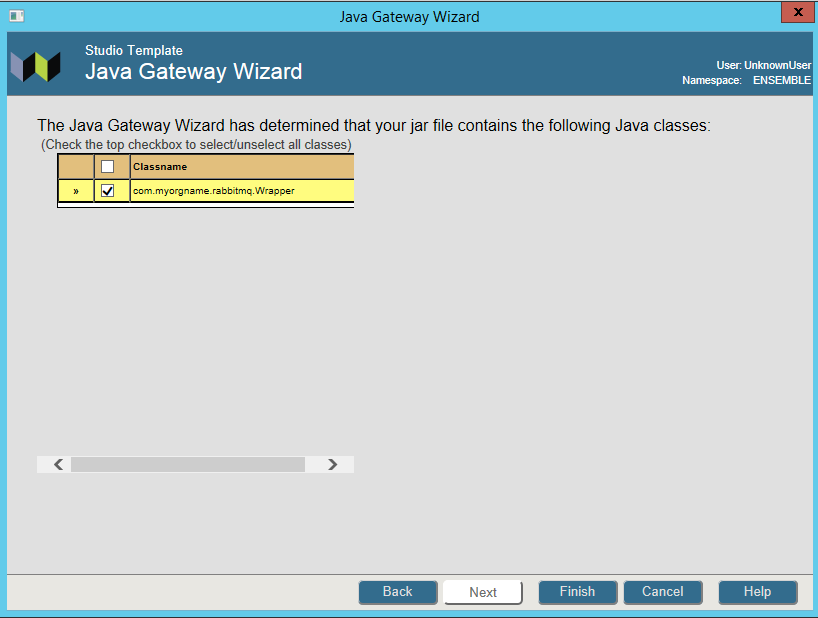
- Select Next
- Select the Wrapper class
- Select Finish
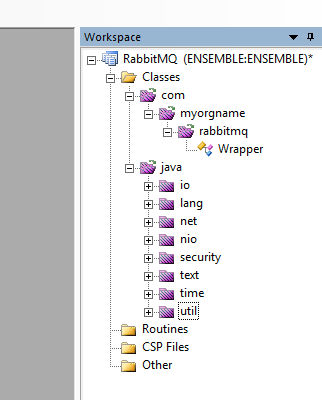
Example result of an import
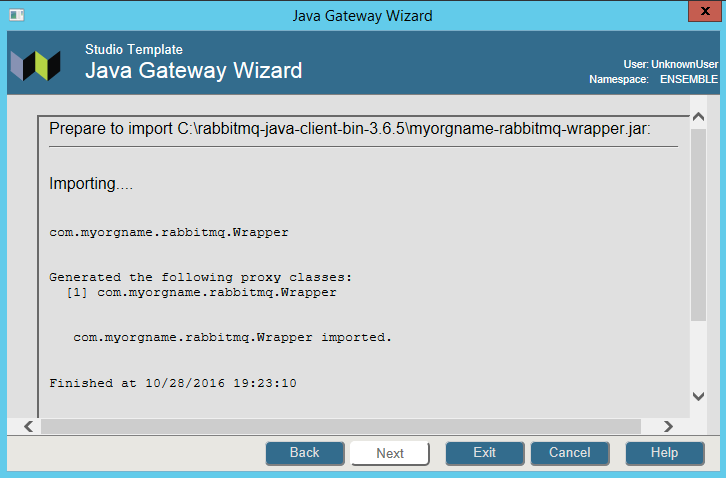
Note the proxy classes imported
 ###Use the proxy classes in your application
####Create a utility class to test connectivity to the RabbitMQ server
###Use the proxy classes in your application
####Create a utility class to test connectivity to the RabbitMQ server
Class RabbitMQ.Java.HelloWorld Extends %RegisteredObject
{

Parameter CLASSPATH = "C:\rabbitmq-java-client-bin-3.6.5\myorgname-rabbitmq-wrapper.jar";

Parameter HOST = "localhost";

Parameter QUEUE = "hello";

/// s sc=##class(RabbitMQ.Java.HelloWorld).SendMsg()
ClassMethod SendMsg(pMsg = "Hello from Ensemble!") As %Status
{
	#dim tGateway as %Net.Remote.Gateway
	#dim tException as %Exception.AbstractException

	Set tSC=$$$OK
	Try	{
		Set tGateway=..Connect()
		Set tRabbitMQWrapper=##class(com.myorgname.rabbitmq.Wrapper).%New(tGateway)
		Set tByteStream=##class(%Library.GlobalBinaryStream).%New()
		Set tSC = tByteStream.Write(pMsg)
		Do tRabbitMQWrapper.sendMsg(..#HOST,..#QUEUE, tByteStream)
		Write !,"Sent message via "_tByteStream.Read()

		Set tSC=tGateway.%Disconnect()

	} Catch tException {
		Set tSC = tException.AsStatus()
	}

	Quit tSC
}

/// s sc=##class(RabbitMQ.Java.HelloWorld).ReadMsg()
ClassMethod ReadMsg(pMsgLen = 32000) As %Status
{
	#dim tGateway as %Net.Remote.Gateway
	#dim tException as %Exception.AbstractException

	Set tSC=$$$OK
	Try	{
		Set tGateway=..Connect()
		Set tRabbitMQWrapper=##class(com.myorgname.rabbitmq.Wrapper).%New(tGateway)

		Set tReadStream=##class(%GlobalBinaryStream).%New()
		// we need to 'reserve' a number of bytes since we are passing the stream
		// by reference (Java's equivalent is byte[] ba = new byte[max];)
		For i=1:1:pMsgLen Do tReadStream.Write("0")

		Set tBytesRead=tRabbitMQWrapper.readMsg(..#HOST,..#QUEUE, .tReadStream)
		Write tReadStream.Read(tBytesRead),!
		Write "Bytes Read: ",tBytesRead,!

		Set tSC=tGateway.%Disconnect()

	} Catch tException {
		Set tSC = tException.AsStatus()
	}

	Quit tSC
}

ClassMethod Connect(pPort As %Integer = 55555, pHost As %String = "127.0.0.1") As %Net.Remote.Gateway
{
	// connect to current namespace, use 2 second timeout
	Set tSC=$$$OK,tNamespace=$zu(5),tTimeout=2
	Set tClassPath=##class(%ListOfDataTypes).%New()
	Do tClassPath.Insert(..#CLASSPATH)

	// get a connection handle and connect
	Set tGateway=##class(%Net.Remote.Gateway).%New()
	Set tSC=tGateway.%Connect(pHost,pPort,tNamespace,tTimeout,tClassPath)
	If tSC'=$$$OK {
		Write $system.OBJ.DisplayError(tSC)
		Set tGateway=""
	}
	Quit tGateway
}
####Test the utility class

#The End
A question from Benjamin Linden:
We are looking to upgrade the hardware for our server.
Do we need to buy a new Caché license? Or can we keep using the one we have?
You may experience errors executing Java programs that rely on the JAVA_HOME environment.
For example when Create PDF from this pivot in DeepSee or in this case, outputting a Zen Report as PDF.
You can verify the PDF generation configuration by clicking on the Verify Now button on the Management Portal System > Configuration > Zen Report Settings page:

Outputting a Zen Report as PDF causes an error, for example ZENApp.MyReport.cls in the SAMPLES namespace:
Using the URI Query Parameter $LOG=1:
